
User Guide
Page 1
C51 Series Connected System Phone Digital 5.8 GHz Expandable Model Family: SD7561 Users Guide
C51 Series Connected System Phone Digital 5.8 GHz Expandable Model Family: SD7561 Users Guide

User Guide
Page 3
SD7561 User Guide Table of Contents Important Safety Instructions viii Welcome ...1 Handset Overview 2 Base Unit Overview 3 Main Menu Display Overview 4 Battery Safety Instructions 5 Installing the Handset Battery 6 Installing Base Unit Batteries (optional 7 Selecting a Location for Your Base Unit 8 Connecting the Base Unit 9 Charging the Handset Battery 9 Installing the Mounting Bracket (optional 10 How to Use this Guide 10 Using Your New System 12 System Indicators and Icons 14 i
SD7561 User Guide Table of Contents Important Safety Instructions viii Welcome ...1 Handset Overview 2 Base Unit Overview 3 Main Menu Display Overview 4 Battery Safety Instructions 5 Installing the Handset Battery 6 Installing Base Unit Batteries (optional 7 Selecting a Location for Your Base Unit 8 Connecting the Base Unit 9 Charging the Handset Battery 9 Installing the Mounting Bracket (optional 10 How to Use this Guide 10 Using Your New System 12 System Indicators and Icons 14 i

User Guide
Page 4
SD7561 User Guide Handset Information 14 Base Unit LEDs...14 Customizing Your System 15 Customizing Ring Tones and Volume 17 Setting the Date and Time 18 Display Language Menu 19 Color Handset Display Options 20 Naming Your Handset 21 Setting an Alarm 23 Using the Setup Devices Menu 24 Reviewing Caller ID Records 25 Using the Phonebook 26 Adding a Phonebook Entry 27 Dialing a Phonebook Entry 28 Editing a Phonebook Entry 28 Deleting a Phonebook Entry 29 ii
SD7561 User Guide Handset Information 14 Base Unit LEDs...14 Customizing Your System 15 Customizing Ring Tones and Volume 17 Setting the Date and Time 18 Display Language Menu 19 Color Handset Display Options 20 Naming Your Handset 21 Setting an Alarm 23 Using the Setup Devices Menu 24 Reviewing Caller ID Records 25 Using the Phonebook 26 Adding a Phonebook Entry 27 Dialing a Phonebook Entry 28 Editing a Phonebook Entry 28 Deleting a Phonebook Entry 29 ii

User Guide
Page 5
SD7561 User Guide Using the Answering Machine 30 Setting Up Your Answering Machine from the Base Unit 30 Setting Up Your Answering Machine from a Handset 31 Answering Machine and Base Unit Setup Options 32 Message Window Display Indicators 34 Checking Your Messages 35 Using the Remote Access Feature 36 Using Your System... with Multiple Handsets 37 Setting Intercom Options 37 Using Your Phone as an Intercom 38 Transferring Calls Between Handsets 39 Changing the Order of Devices 40 ...
SD7561 User Guide Using the Answering Machine 30 Setting Up Your Answering Machine from the Base Unit 30 Setting Up Your Answering Machine from a Handset 31 Answering Machine and Base Unit Setup Options 32 Message Window Display Indicators 34 Checking Your Messages 35 Using the Remote Access Feature 36 Using Your System... with Multiple Handsets 37 Setting Intercom Options 37 Using Your Phone as an Intercom 38 Transferring Calls Between Handsets 39 Changing the Order of Devices 40 ...

User Guide
Page 6
.... Privacy of the FCC Rules. If this telephone. SD7561 User Guide FCC Information FCC Compliance Class B Digital Device This equipment has been tested and found to comply with the limits for a Class B digital device, pursuant to radio communications. This device complies with Part 15 of communications may cause undesired operation. This equipment generates, uses, and... on a circuit different from that to provide reasonable protection against harmful interference in a residential installation. Operation is no guarantee that may not be determined by Motorola for help.
.... Privacy of the FCC Rules. If this telephone. SD7561 User Guide FCC Information FCC Compliance Class B Digital Device This equipment has been tested and found to comply with the limits for a Class B digital device, pursuant to radio communications. This device complies with Part 15 of communications may cause undesired operation. This equipment generates, uses, and... on a circuit different from that to provide reasonable protection against harmful interference in a residential installation. Operation is no guarantee that may not be determined by Motorola for help.

User Guide
Page 7
...Communications Commission (FCC) Part 68 Statement This Motorola cordless phone complies with Canadian ICES-003. For earlier products, the REN is separately shown on the telephone line may result in the devices not ringing in format US: AAAEQ##TXXXX. If requested, this equipment is part of the product identifier that this cordless phone...among other information, a product identifier in response to the line, as Class B digital devices. SD7561 User Guide FCC Declaration of Conformity Motorola, Inc., Connected Home Solutions, 101 Tournament Drive, Horsham, PA 19044, 1-215-323-1000, ...
...Communications Commission (FCC) Part 68 Statement This Motorola cordless phone complies with Canadian ICES-003. For earlier products, the REN is separately shown on the telephone line may result in the devices not ringing in format US: AAAEQ##TXXXX. If requested, this equipment is part of the product identifier that this cordless phone...among other information, a product identifier in response to the line, as Class B digital devices. SD7561 User Guide FCC Declaration of Conformity Motorola, Inc., Connected Home Solutions, 101 Tournament Drive, Horsham, PA 19044, 1-215-323-1000, ...

User Guide
Page 8
SD7561 User Guide This equipment uses the following USOC jack: RJ11C. Connection to Party Line ...line, ensure the installation of services may request that you in order for repair or warranty information, please contact Motorola, Inc. If you have questions about what will disable alarm equipment, consult your home has specially wired alarm...problem is not practical, the telephone company will provide advance notice in advance that the temporary discontinuance of the cordless phone does not disable your right to file a complaint with the FCC if you to a compatible modular jack ...
SD7561 User Guide This equipment uses the following USOC jack: RJ11C. Connection to Party Line ...line, ensure the installation of services may request that you in order for repair or warranty information, please contact Motorola, Inc. If you have questions about what will disable alarm equipment, consult your home has specially wired alarm...problem is not practical, the telephone company will provide advance notice in advance that the temporary discontinuance of the cordless phone does not disable your right to file a complaint with the FCC if you to a compatible modular jack ...

User Guide
Page 9
... number of Conformity This product meets the applicable Industry Canada technical specifications. vii The Ringer Equivalence Number (REN) is encouraged to try to a telephone interface. SD7561 User Guide For body worn operation, this phone has been tested and meets the FCC RF exposure guidelines when used with FCC RF exposure guidelines.
... number of Conformity This product meets the applicable Industry Canada technical specifications. vii The Ringer Equivalence Number (REN) is encouraged to try to a telephone interface. SD7561 User Guide For body worn operation, this phone has been tested and meets the FCC RF exposure guidelines when used with FCC RF exposure guidelines.

User Guide
Page 10
... product on an unstable surface, such as a bed, sofa, or rug. Do not use this product on a soft surface such as a table, shelf, or stand. SD7561 User Guide Important Safety Instructions When using your dealer or local power company. Use a damp cloth for ventilation. This product should never be followed to reduce the...
... product on an unstable surface, such as a bed, sofa, or rug. Do not use this product on a soft surface such as a table, shelf, or stand. SD7561 User Guide Important Safety Instructions When using your dealer or local power company. Use a damp cloth for ventilation. This product should never be followed to reduce the...

User Guide
Page 11
... reassembly can be stepped on the power cord. Do not overload wall outlets and extension cords, as improper adjustment of fire or electric shock. 13. SD7561 User Guide 8.
... reassembly can be stepped on the power cord. Do not overload wall outlets and extension cords, as improper adjustment of fire or electric shock. 13. SD7561 User Guide 8.

User Guide
Page 12
Avoid using a telephone (other than cordless) during an electrical storm. x There is in normal talk mode. Do not use the telephone to your ear when it is a remote risk of the leak. 16. Only put the handset of your telephone next to report a gas leak in performance. 14. SD7561 User Guide • If the product has been dropped and the base and/or handset has been damaged. • If the product exhibits a distinct change in the vicinity of electric shock from lightning. 15.
Avoid using a telephone (other than cordless) during an electrical storm. x There is in normal talk mode. Do not use the telephone to your ear when it is a remote risk of the leak. 16. Only put the handset of your telephone next to report a gas leak in performance. 14. SD7561 User Guide • If the product has been dropped and the base and/or handset has been damaged. • If the product exhibits a distinct change in the vicinity of electric shock from lightning. 15.

User Guide
Page 13
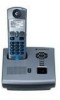
... each of the items listed. SD7561 User Guide Welcome Congratulations on the product packaging to ensure that your purchase of a Motorola SD7561 Series telephone. To register your dated sales receipt to confirm warranty status. 1 For warranty service of your Motorola product, you will need to... contact you should your new Motorola product. Registering helps us facilitate warranty ...
... each of the items listed. SD7561 User Guide Welcome Congratulations on the product packaging to ensure that your purchase of a Motorola SD7561 Series telephone. To register your dated sales receipt to confirm warranty status. 1 For warranty service of your Motorola product, you will need to... contact you should your new Motorola product. Registering helps us facilitate warranty ...

User Guide
Page 14
Volume controls 2. Redial log of last five numbers dialed 5. Up and down scroll key 12. In use/Ringer and message indicator 2 2 Microphone 9. Connect to other registered devices 10. Add pause in number 11. Delete 15. LCD display 3. Phone On/Flash 6. Temporary tone dialing key 7. Phone Off/Cancel 13. Headset jack (2.5 mm) 14. Left and right softkeys 4. SD7561 User Guide Handset Overview 1. Speakerphone 8.
Volume controls 2. Redial log of last five numbers dialed 5. Up and down scroll key 12. In use/Ringer and message indicator 2 2 Microphone 9. Connect to other registered devices 10. Add pause in number 11. Delete 15. LCD display 3. Phone On/Flash 6. Temporary tone dialing key 7. Phone Off/Cancel 13. Headset jack (2.5 mm) 14. Left and right softkeys 4. SD7561 User Guide Handset Overview 1. Speakerphone 8.
User Guide
Page 15
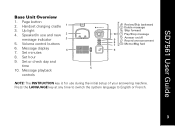
Volume control buttons 6. Set minutes 8. Set or check day and time 10. Press the LANGUAGE key at any time to switch the system language to English or French. 3 Handset charging cradle 1 3. Up light 4. Set hour 9. Speaker/In use during the initial setup of your answering machine. Message playback .../Stop message Answer on/off 9 8 7 Record announcement Memo/Msg fwd 6 5 NOTE: The INSTRUCTION key is for use and new 2 message indicator 3 5. Page button 2. Message display 4 7. SD7561 User Guide Base Unit Overview 1.
Volume control buttons 6. Set minutes 8. Set or check day and time 10. Press the LANGUAGE key at any time to switch the system language to English or French. 3 Handset charging cradle 1 3. Up light 4. Set hour 9. Speaker/In use during the initial setup of your answering machine. Message playback .../Stop message Answer on/off 9 8 7 Record announcement Memo/Msg fwd 6 5 NOTE: The INSTRUCTION key is for use and new 2 message indicator 3 5. Page button 2. Message display 4 7. SD7561 User Guide Base Unit Overview 1.

User Guide
Page 16
... 5. Answering machine status 3. Left softkey options 4. Caller's phone number 7. Ringer status 6. Time of day the call was received NOTE: Caller ID information is in the cradle or with your telephone company. 4 4 Date the call and number of call was received 2. Number of caller 3. SD7561 User Guide Main Menu Display Overview 1. Order of calls received...
... 5. Answering machine status 3. Left softkey options 4. Caller's phone number 7. Ringer status 6. Time of day the call was received NOTE: Caller ID information is in the cradle or with your telephone company. 4 4 Date the call and number of call was received 2. Number of caller 3. SD7561 User Guide Main Menu Display Overview 1. Order of calls received...

User Guide
Page 17
...contains toxic materials that power this product must be disposed of properly and may need to your battery's label for proper disposal methods. 5 SD7561 User Guide Battery Safety Instructions • Do not burn, disassemble, mutilate, or puncture the battery. Use only the battery that came with an ...incorrect battery type. Contact your phone or an authorized replacement recommended by the manufacturer. • Keep batteries out of the reach of explosion if you replace the battery ...
...contains toxic materials that power this product must be disposed of properly and may need to your battery's label for proper disposal methods. 5 SD7561 User Guide Battery Safety Instructions • Do not burn, disassemble, mutilate, or puncture the battery. Use only the battery that came with an ...incorrect battery type. Contact your phone or an authorized replacement recommended by the manufacturer. • Keep batteries out of the reach of explosion if you replace the battery ...

User Guide
Page 18
Insert the battery into the receptacle. (Make sure the black wire is on the indentation and sliding downward. 3. Remove any stickers or inserts, if present. 2. Remove the battery door by pressing down on the right.) 4. Attach the belt clip (optional). 6 6 SD7561 User Guide Installing the Handset Battery 1. Plug the battery connector into the battery compartment. 5. Replace the battery door. 6.
Insert the battery into the receptacle. (Make sure the black wire is on the indentation and sliding downward. 3. Remove any stickers or inserts, if present. 2. Remove the battery door by pressing down on the right.) 4. Attach the belt clip (optional). 6 6 SD7561 User Guide Installing the Handset Battery 1. Plug the battery connector into the battery compartment. 5. Replace the battery door. 6.

User Guide
Page 19
Insert four AA batteries (not included). 3. Push the battery door latch forward using a small tool to remove it from the base unit. 2. Replace the battery door. 7 SD7561 User Guide Installing Base Unit Batteries (optional) 1.
Insert four AA batteries (not included). 3. Push the battery door latch forward using a small tool to remove it from the base unit. 2. Replace the battery door. 7 SD7561 User Guide Installing Base Unit Batteries (optional) 1.

User Guide
Page 20
SD7561 User Guide Selecting a Location for Your Base Unit 8 8
SD7561 User Guide Selecting a Location for Your Base Unit 8 8

User Guide
Page 21
... and does not activate when you press the keys), charge the handset. 9 SD7561 User Guide Connecting the Base Unit 1. After the initial charge, a maintenance charge of the base unit. 2. Insert the phone and power cords into an electrical outlet. 3. Plug the phone cord into a wall jack, and the power cord into the back of eight...
... and does not activate when you press the keys), charge the handset. 9 SD7561 User Guide Connecting the Base Unit 1. After the initial charge, a maintenance charge of the base unit. 2. Insert the phone and power cords into an electrical outlet. 3. Plug the phone cord into a wall jack, and the power cord into the back of eight...

