
User Guide
Page 3
SD7561 User Guide Table of Contents Important Safety Instructions viii Welcome ...1 Handset Overview 2 Base Unit Overview 3 Main Menu Display Overview 4 Battery Safety Instructions 5 Installing the Handset Battery 6 Installing Base Unit Batteries (optional 7 Selecting a Location for Your Base Unit 8 Connecting the Base Unit 9 Charging the Handset Battery 9 Installing the Mounting Bracket (optional 10 How to Use this Guide 10 Using Your New System 12 System Indicators and Icons 14 i
SD7561 User Guide Table of Contents Important Safety Instructions viii Welcome ...1 Handset Overview 2 Base Unit Overview 3 Main Menu Display Overview 4 Battery Safety Instructions 5 Installing the Handset Battery 6 Installing Base Unit Batteries (optional 7 Selecting a Location for Your Base Unit 8 Connecting the Base Unit 9 Charging the Handset Battery 9 Installing the Mounting Bracket (optional 10 How to Use this Guide 10 Using Your New System 12 System Indicators and Icons 14 i

User Guide
Page 4
SD7561 User Guide Handset Information 14 Base Unit LEDs...14 Customizing Your System 15 Customizing Ring Tones and Volume 17 Setting the Date and Time 18 Display Language Menu 19 Color Handset Display Options 20 Naming Your Handset 21 Setting an Alarm 23 Using the Setup Devices Menu 24 Reviewing Caller ID Records 25 Using the Phonebook 26 Adding a Phonebook Entry 27 Dialing a Phonebook Entry 28 Editing a Phonebook Entry 28 Deleting a Phonebook Entry 29 ii
SD7561 User Guide Handset Information 14 Base Unit LEDs...14 Customizing Your System 15 Customizing Ring Tones and Volume 17 Setting the Date and Time 18 Display Language Menu 19 Color Handset Display Options 20 Naming Your Handset 21 Setting an Alarm 23 Using the Setup Devices Menu 24 Reviewing Caller ID Records 25 Using the Phonebook 26 Adding a Phonebook Entry 27 Dialing a Phonebook Entry 28 Editing a Phonebook Entry 28 Deleting a Phonebook Entry 29 ii

User Guide
Page 5
SD7561 User Guide Using the Answering Machine 30 Setting Up Your Answering Machine from the Base Unit 30 Setting Up Your Answering Machine from a Handset 31 Answering Machine and Base Unit Setup Options 32 Message Window Display Indicators 34 Checking Your Messages 35 Using the Remote Access Feature 36 Using Your System... with Multiple Handsets 37 Setting Intercom Options 37 Using Your Phone as an Intercom 38 Transferring Calls Between Handsets 39 Changing the Order of Devices 40 Changing Default Phone Line Settings 41 Registering a New Handset 41 Troubleshooting...
SD7561 User Guide Using the Answering Machine 30 Setting Up Your Answering Machine from the Base Unit 30 Setting Up Your Answering Machine from a Handset 31 Answering Machine and Base Unit Setup Options 32 Message Window Display Indicators 34 Checking Your Messages 35 Using the Remote Access Feature 36 Using Your System... with Multiple Handsets 37 Setting Intercom Options 37 Using Your Phone as an Intercom 38 Transferring Calls Between Handsets 39 Changing the Order of Devices 40 Changing Default Phone Line Settings 41 Registering a New Handset 41 Troubleshooting...

User Guide
Page 10
... a bed, sofa, or rug. Use a damp cloth for ventilation. This product should never be followed to reduce the risk of the base unit and handset are provided for cleaning. 4. If you are not sure of the type of power supply in the back or bottom of fire, electric shock, and... injury: 1. Do not place this product on the marking label. SD7561 User Guide Important Safety Instructions When using your dealer or local power company. Do not use this product from overheating, these openings must not be...
... a bed, sofa, or rug. Use a damp cloth for ventilation. This product should never be followed to reduce the risk of the base unit and handset are provided for cleaning. 4. If you are not sure of the type of power supply in the back or bottom of fire, electric shock, and... injury: 1. Do not place this product on the marking label. SD7561 User Guide Important Safety Instructions When using your dealer or local power company. Do not use this product from overheating, these openings must not be...

User Guide
Page 11
... by an authorized technician to restore the product to dangerous voltages or other controls may result in the risk of the base or handset other than specified access doors may touch dangerous voltage points or short out parts that are covered by the operating instructions, as this...overload wall outlets and extension cords, as improper adjustment of fire or electric shock. 10. Incorrect reassembly can be stepped on the power cord. SD7561 User Guide 8. Do not install this product through slots in a risk of other risks. Never spill liquid of electric shock, do not ...
... by an authorized technician to restore the product to dangerous voltages or other controls may result in the risk of the base or handset other than specified access doors may touch dangerous voltage points or short out parts that are covered by the operating instructions, as this...overload wall outlets and extension cords, as improper adjustment of fire or electric shock. 10. Incorrect reassembly can be stepped on the power cord. SD7561 User Guide 8. Do not install this product through slots in a risk of other risks. Never spill liquid of electric shock, do not ...

User Guide
Page 12
Avoid using a telephone (other than cordless) during an electrical storm. There is in the vicinity of electric shock from lightning. 15. Do not use the telephone to your ear when it is a remote risk of the leak. 16. x Only put the handset of your telephone next to report a gas leak in normal talk mode. SD7561 User Guide • If the product has been dropped and the base and/or handset has been damaged. • If the product exhibits a distinct change in performance. 14.
Avoid using a telephone (other than cordless) during an electrical storm. There is in the vicinity of electric shock from lightning. 15. Do not use the telephone to your ear when it is a remote risk of the leak. 16. x Only put the handset of your telephone next to report a gas leak in normal talk mode. SD7561 User Guide • If the product has been dropped and the base and/or handset has been damaged. • If the product exhibits a distinct change in performance. 14.

User Guide
Page 14
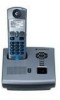
Left and right softkeys 4. Temporary tone dialing key 7. Microphone 9. Add pause in number 11. Volume controls 2. Phone Off/Cancel 13. Connect to other registered devices 10. SD7561 User Guide Handset Overview 1. Delete 15. Up and down scroll key 12. LCD display 3. Headset jack (2.5 mm) 14. Phone On/Flash 6. Speakerphone 8. In use/Ringer and message indicator 2 2 Redial log of last five numbers dialed 5.
Left and right softkeys 4. Temporary tone dialing key 7. Microphone 9. Add pause in number 11. Volume controls 2. Phone Off/Cancel 13. Connect to other registered devices 10. SD7561 User Guide Handset Overview 1. Delete 15. Up and down scroll key 12. LCD display 3. Headset jack (2.5 mm) 14. Phone On/Flash 6. Speakerphone 8. In use/Ringer and message indicator 2 2 Redial log of last five numbers dialed 5.
User Guide
Page 15
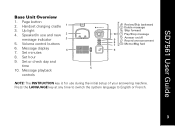
SD7561 User Guide Base Unit Overview 1. Message display 4 7. Speaker/In use during the initial setup of your answering machine. Set or check day and time 10. ...: The INSTRUCTION key is for use and new 2 message indicator 3 5. Up light 4. Volume control buttons 6. Press the LANGUAGE key at any time to switch the system language to English or French. 3 Handset charging cradle 1 3. Set minutes 8.
SD7561 User Guide Base Unit Overview 1. Message display 4 7. Speaker/In use during the initial setup of your answering machine. Set or check day and time 10. ...: The INSTRUCTION key is for use and new 2 message indicator 3 5. Up light 4. Volume control buttons 6. Press the LANGUAGE key at any time to switch the system language to English or French. 3 Handset charging cradle 1 3. Set minutes 8.

User Guide
Page 16
Ringer status 6. Battery charging icon (appears only when the handset is supplied only if you subscribe to the service with LOW BATTERY message) Caller ID Display Overview 1. Left softkey option 4. Caller's phone number 7. Number of caller 3. Answering machine status 3. Date... the call was received NOTE: Caller ID information is in the cradle or with your telephone company. 4 4 Right softkey options 5. Time of calls received 6. Name of messages waiting 7. SD7561 User Guide...
Ringer status 6. Battery charging icon (appears only when the handset is supplied only if you subscribe to the service with LOW BATTERY message) Caller ID Display Overview 1. Left softkey option 4. Caller's phone number 7. Number of caller 3. Answering machine status 3. Date... the call was received NOTE: Caller ID information is in the cradle or with your telephone company. 4 4 Right softkey options 5. Time of calls received 6. Name of messages waiting 7. SD7561 User Guide...

User Guide
Page 18
Attach the belt clip (optional). 6 6 Insert the battery into the receptacle. (Make sure the black wire is on the indentation and sliding downward. 3. Plug the battery connector into the battery compartment. 5. Remove the battery door by pressing down on the right.) 4. Remove any stickers or inserts, if present. 2. Replace the battery door. 6. SD7561 User Guide Installing the Handset Battery 1.
Attach the belt clip (optional). 6 6 Insert the battery into the receptacle. (Make sure the black wire is on the indentation and sliding downward. 3. Plug the battery connector into the battery compartment. 5. Remove the battery door by pressing down on the right.) 4. Remove any stickers or inserts, if present. 2. Replace the battery door. 6. SD7561 User Guide Installing the Handset Battery 1.

User Guide
Page 21
SD7561 User Guide Connecting the Base Unit 1. Charging the Handset Battery The initial battery charge time is blank and does not activate when you press the keys), charge the handset. 9 Be sure to place the handset in its base when not in use to a telephone wall jack (see Installing the ...Mounting Bracket). NOTE: If your handset displays a LOW BATTERY message, or the handset seems completely inactive (the LCD is 10-12 hours. Place the base on a sturdy surface, or mount it to insure maximum daily performance. Plug the phone cord into a wall jack, and the power...
SD7561 User Guide Connecting the Base Unit 1. Charging the Handset Battery The initial battery charge time is blank and does not activate when you press the keys), charge the handset. 9 Be sure to place the handset in its base when not in use to a telephone wall jack (see Installing the ...Mounting Bracket). NOTE: If your handset displays a LOW BATTERY message, or the handset seems completely inactive (the LCD is 10-12 hours. Place the base on a sturdy surface, or mount it to insure maximum daily performance. Plug the phone cord into a wall jack, and the power...

User Guide
Page 23
... connecting to (CONNECT TO) different devices. • FEATURES/OPTIONS are located above the corresponding softkeys (Using Your ON OFF Right soft key New System for additional information). 11 SD7561 User Guide How to Use this guide, use of two fonts to distinguish between FUNCTIONS and FEATURES/OPTIONS. • FUNCTION keys are found...
... connecting to (CONNECT TO) different devices. • FEATURES/OPTIONS are located above the corresponding softkeys (Using Your ON OFF Right soft key New System for additional information). 11 SD7561 User Guide How to Use this guide, use of two fonts to distinguish between FUNCTIONS and FEATURES/OPTIONS. • FUNCTION keys are found...

User Guide
Page 25
...keys to turn the ringer volume to a comfortable level. To end the page, press the EXIT softkey, or press the PAGE button again. 13 SD7561 User Guide Spkrphone Connect to Volume controls Page Use to initiate an intercom call). To make or answer a call hands-free. Press to connect to... any device registered to and select a device. To locate a handset, press the PAGE button. Scroll to your base unit. When you are not on the displays. Registered devices beep and Paging from base appears on...
...keys to turn the ringer volume to a comfortable level. To end the page, press the EXIT softkey, or press the PAGE button again. 13 SD7561 User Guide Spkrphone Connect to Volume controls Page Use to initiate an intercom call). To make or answer a call hands-free. Press to connect to... any device registered to and select a device. To locate a handset, press the PAGE button. Scroll to your base unit. When you are not on the displays. Registered devices beep and Paging from base appears on...

User Guide
Page 26
Handset Information Indicator Description Call muted The microphone is muted The ringer is off E The battery is charging v The speakerphone is in use Base Unit LEDs LED in use up light/page Description On when a handset is charging in the cradle. On when the handset is off-hook. SD7561 User Guide System Indicators and Icons When using your system you may see one or more of the following messages, icons, and LEDs. Flashes when paging a handset. 14 14
Handset Information Indicator Description Call muted The microphone is muted The ringer is off E The battery is charging v The speakerphone is in use Base Unit LEDs LED in use up light/page Description On when a handset is charging in the cradle. On when the handset is off-hook. SD7561 User Guide System Indicators and Icons When using your system you may see one or more of the following messages, icons, and LEDs. Flashes when paging a handset. 14 14

User Guide
Page 32
...the scroll keys to ringer options, you have a color handset, in the background of time before your handset screen. You can modify your display's wallpaper and color pallets from the Display Setup menu. SD7561 User Guide Color Handset Display Options If you can download additional images from www....openLCR.com. The handset display backlight remains on during daytime hours, or is always on when the handset is charging. 20 20 Sets the amount ...
...the scroll keys to ringer options, you have a color handset, in the background of time before your handset screen. You can modify your display's wallpaper and color pallets from the Display Setup menu. SD7561 User Guide Color Handset Display Options If you can download additional images from www....openLCR.com. The handset display backlight remains on during daytime hours, or is always on when the handset is charging. 20 20 Sets the amount ...

User Guide
Page 33
SD7561 User Guide Naming Your Handset Each registered handset has a default name (e.g., Handset-A-01; To name your handset to the base unit and remains part of your changes. 5. Use... to enter the new name. Press the MENU softkey. 2. You can rename your handset: 1. Press the DONE softkey when you have finished making all of the name). the number represents the order... in which the handset was registered to make it easily distinguishable from other registered handsets. Scroll to erase the current name. See the key chart on the next...
SD7561 User Guide Naming Your Handset Each registered handset has a default name (e.g., Handset-A-01; To name your handset to the base unit and remains part of your changes. 5. Use... to enter the new name. Press the MENU softkey. 2. You can rename your handset: 1. Press the DONE softkey when you have finished making all of the name). the number represents the order... in which the handset was registered to make it easily distinguishable from other registered handsets. Scroll to erase the current name. See the key chart on the next...

User Guide
Page 38
numbers can be up to 11 characters long; A letter "P" appears in the number on the display. 26 26 Stored names can be up to 24 digits. SD7561 User Guide Using the Phonebook Each handset has a private phonebook that can store up to wait for instance, if you try to add an entry. • While entering numbers, press the #/PAUSE key twice to add a two-second pause (for an outside line). NOTES: • If the phonebook is full, the handset will display PHONEBK FULL when you need to 50 names with numbers.
numbers can be up to 11 characters long; A letter "P" appears in the number on the display. 26 26 Stored names can be up to 24 digits. SD7561 User Guide Using the Phonebook Each handset has a private phonebook that can store up to wait for instance, if you try to add an entry. • While entering numbers, press the #/PAUSE key twice to add a two-second pause (for an outside line). NOTES: • If the phonebook is full, the handset will display PHONEBK FULL when you need to 50 names with numbers.

User Guide
Page 39
Press the CHANGE softkey or use the scroll key to hear samples of your changes. 27 SD7561 User Guide Adding a Phonebook Entry Each registered handset can press the corresponding softkey, or press down on the scroll key. 5. Select the Ringer option to choose a ring tone that ...plays when you can store up to the next option (e.g., Name, Number, or Ringer), you receive a call from this phone number. 6. NOTE: To...
Press the CHANGE softkey or use the scroll key to hear samples of your changes. 27 SD7561 User Guide Adding a Phonebook Entry Each registered handset can press the corresponding softkey, or press down on the scroll key. 5. Select the Ringer option to choose a ring tone that ...plays when you can store up to the next option (e.g., Name, Number, or Ringer), you receive a call from this phone number. 6. NOTE: To...
User Guide
Page 42
...to set time. • Press minute key to set exact minute. • Press and hold announcement key to receive setup instructions. 2. SD7561 User Guide Using the Answering Machine Your telephone's integrated answering machine uses audible prompts to help you decide not to record an announcement, the... prerecorded announcement (Please leave your answering machine from any registered handset. NOTE: If you set day. • Press the Day/Time key to check day and time. Press the INSTRUCTIONS button. You...
...to set time. • Press minute key to set exact minute. • Press and hold announcement key to receive setup instructions. 2. SD7561 User Guide Using the Answering Machine Your telephone's integrated answering machine uses audible prompts to help you decide not to record an announcement, the... prerecorded announcement (Please leave your answering machine from any registered handset. NOTE: If you set day. • Press the Day/Time key to check day and time. Press the INSTRUCTIONS button. You...

User Guide
Page 43
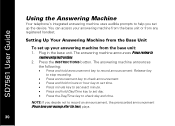
Press the EXIT softkey after you wish to customize. 4. To set up additional devices: 1. Scroll to the device you have completed all changes. 31 Scroll to and select Setup devices. 3. Press the MENU softkey. 2. SD7561 User Guide Setting Up Your Answering Machine from a Handset The Setup devices menu allows you to set up your answering machine, change your base unit's settings, and customize any additional devices (e.g., cell docks, cameras, handsets) you add to your system. Press the SETUP softkey. 5.
Press the EXIT softkey after you wish to customize. 4. To set up additional devices: 1. Scroll to the device you have completed all changes. 31 Scroll to and select Setup devices. 3. Press the MENU softkey. 2. SD7561 User Guide Setting Up Your Answering Machine from a Handset The Setup devices menu allows you to set up your answering machine, change your base unit's settings, and customize any additional devices (e.g., cell docks, cameras, handsets) you add to your system. Press the SETUP softkey. 5.

