
User Guide
Page 6
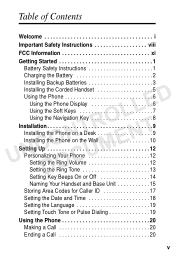
... Safety Instructions viii FCC Information xi Getting Started 1 Battery Safety Instructions 1 Charging the Battery 2 Installing Backup Batteries 3 Installing the Corded Handset 5 Using the Phone 6 LLED Using the Phone Display 6 Using the Soft Keys 7 Using the Navigation Key 8 NTRO Installation 9 UNCO ENT Installing the Phone on a Desk 9 Installing the Phone on the Wall 10 CUM Setting Up 12...
... Safety Instructions viii FCC Information xi Getting Started 1 Battery Safety Instructions 1 Charging the Battery 2 Installing Backup Batteries 3 Installing the Corded Handset 5 Using the Phone 6 LLED Using the Phone Display 6 Using the Soft Keys 7 Using the Navigation Key 8 NTRO Installation 9 UNCO ENT Installing the Phone on a Desk 9 Installing the Phone on the Wall 10 CUM Setting Up 12...

User Guide
Page 17
... storing over 30 days. • Do not dispose of children. Refer to make or answer calls, you can use your phone or an authorized replacement recommended by the manufacturer. Use only the battery that could result in injury. • Caution: There is a risk of properly and may need . Getting Started Before you...
... storing over 30 days. • Do not dispose of children. Refer to make or answer calls, you can use your phone or an authorized replacement recommended by the manufacturer. Use only the battery that could result in injury. • Caution: There is a risk of properly and may need . Getting Started Before you...

User Guide
Page 18
UNCDOONCTURMOELNLTED 2 Getting Started Charging the Battery 1 Remove any stickers if present. 2 Remove the battery door. 3 Insert the battery into the battery compartment. 4 Plug the battery connector into the receptacle in the battery compartment and replace the battery door.
UNCDOONCTURMOELNLTED 2 Getting Started Charging the Battery 1 Remove any stickers if present. 2 Remove the battery door. 3 Insert the battery into the battery compartment. 4 Plug the battery connector into the receptacle in the battery compartment and replace the battery door.

User Guide
Page 19
...5 jkl 6 mno 7 pqrs 8 tuv 9 wxyz ton e 0 oper # pau se h an ds fr ee r ed ial in t er co m 5.8 GHz DIGITAL NTROLLED Charge LED UNCO ENT 6 Rest the handset in , the phone DO must be installed into an outlet. Note: The corded handset will work during power outages with or without the... backup batteries. 3 Getting Started CUM 7 For the initial charge, charge the battery for at least 10 seconds for at least 16 hours. Note: Every time a battery is plugged in the base so the charging LED lights.
...5 jkl 6 mno 7 pqrs 8 tuv 9 wxyz ton e 0 oper # pau se h an ds fr ee r ed ial in t er co m 5.8 GHz DIGITAL NTROLLED Charge LED UNCO ENT 6 Rest the handset in , the phone DO must be installed into an outlet. Note: The corded handset will work during power outages with or without the... backup batteries. 3 Getting Started CUM 7 For the initial charge, charge the battery for at least 10 seconds for at least 16 hours. Note: Every time a battery is plugged in the base so the charging LED lights.

User Guide
Page 20
NTRO Press down until the cover clicks into the slots on the compartment. 1 With the back of the base facing you, press the cover latch to show status DOCUM of the cover into place. UNCO ENT The base display has a battery meter to remove the battery compartment cover. 2 Insert four AA alkaline batteries as directed on the base unit. LLED 3 Replace the compartment cover by inserting the tabs of the backup batteries. 4 Getting Started
NTRO Press down until the cover clicks into the slots on the compartment. 1 With the back of the base facing you, press the cover latch to show status DOCUM of the cover into place. UNCO ENT The base display has a battery meter to remove the battery compartment cover. 2 Insert four AA alkaline batteries as directed on the base unit. LLED 3 Replace the compartment cover by inserting the tabs of the backup batteries. 4 Getting Started

User Guide
Page 25
Installing the Phone on a desktop or mount it to install the phone. OONCTURMOELNLTED 9 This section provides the step-bystep instructions you will need to a wall. Installation Installation You can install your MD790 series phone on a Desk Once the battery is fully charged, plug the phone cord into the back of the phone and then into the phone jack UonNthewCaDll.
Installing the Phone on a desktop or mount it to install the phone. OONCTURMOELNLTED 9 This section provides the step-bystep instructions you will need to a wall. Installation Installation You can install your MD790 series phone on a Desk Once the battery is fully charged, plug the phone cord into the back of the phone and then into the phone jack UonNthewCaDll.

User Guide
Page 67
Batteries. Only batteries whose fully charged capacity falls below 80% of tampering; (c) mismatched board serial numbers; Abuse & Misuse. Use of Motorola, are excluded from coverage. Defects or damages resulting from coverage. Communication Services. or (d) nonconforming or non-Motorola housings, or parts, are excluded from service, testing, adjustment, RCUM installation, maintenance, alteration, or modification in any...
Batteries. Only batteries whose fully charged capacity falls below 80% of tampering; (c) mismatched board serial numbers; Abuse & Misuse. Use of Motorola, are excluded from coverage. Defects or damages resulting from coverage. Communication Services. or (d) nonconforming or non-Motorola housings, or parts, are excluded from service, testing, adjustment, RCUM installation, maintenance, alteration, or modification in any...


