User Guide
Page 3
MD7260 User Guide Table of Contents FCC Information...v Important Safety Instructions ...ix Welcome ...1 Handset Overview ...2 Base Unit Overview ...3 Charger Overview ...3 Getting Started...4 Battery Safety Instructions...4 Installing the Battery ...5 Charging the Handset Battery 6 Installing the Base Unit...7 Basic Operations...9 Handset Indicators ...9 Base Unit LEDs...9 Making a Call...10 Answering Calls ...10 i
MD7260 User Guide Table of Contents FCC Information...v Important Safety Instructions ...ix Welcome ...1 Handset Overview ...2 Base Unit Overview ...3 Charger Overview ...3 Getting Started...4 Battery Safety Instructions...4 Installing the Battery ...5 Charging the Handset Battery 6 Installing the Base Unit...7 Basic Operations...9 Handset Indicators ...9 Base Unit LEDs...9 Making a Call...10 Answering Calls ...10 i

User Guide
Page 4
MD7260 User Guide Ending a Call ...10 Speakerphone Operation ...10 Adjust Handset Volume ...11 Redial Function ...11 Mute Function...11 Setting the Date and Time 12 Locate a Misplaced Handset 12 Display Language...13 Customizing Your Handset...14 Ringer Volume ...14 Ringer Tone...14 Setting the Intercom Tone 15 Naming Your Handset...15 Key Tone...15 Setting the Auto Answer Feature 16 Customizing Your Base Unit ...17 Dialing Method...17 ii
MD7260 User Guide Ending a Call ...10 Speakerphone Operation ...10 Adjust Handset Volume ...11 Redial Function ...11 Mute Function...11 Setting the Date and Time 12 Locate a Misplaced Handset 12 Display Language...13 Customizing Your Handset...14 Ringer Volume ...14 Ringer Tone...14 Setting the Intercom Tone 15 Naming Your Handset...15 Key Tone...15 Setting the Auto Answer Feature 16 Customizing Your Base Unit ...17 Dialing Method...17 ii

User Guide
Page 5
MD7260 User Guide Deregister Handset...17 Phonebook Operations ...18 Storing a New Entry...18 Reviewing/Dialing from the Phonebook 20 Editing a Phonebook Entry 20 Delete a Single Phonebook Entry 21 Caller ID/Call Waiting Caller ID 21 Reviewing Caller ID Records 22 Storing a Caller ID Entry in the Phonebook 23 Dialing from the Caller ID Log 24 Deleting a Caller ID Record 24 Using the Answering System...25 Outgoing Messages and Announcements Overview 28 Recording Your Greeting...29 Review Your Announcement 30 Delete Your Announcement 30 About Mailboxes ...31 iii
MD7260 User Guide Deregister Handset...17 Phonebook Operations ...18 Storing a New Entry...18 Reviewing/Dialing from the Phonebook 20 Editing a Phonebook Entry 20 Delete a Single Phonebook Entry 21 Caller ID/Call Waiting Caller ID 21 Reviewing Caller ID Records 22 Storing a Caller ID Entry in the Phonebook 23 Dialing from the Caller ID Log 24 Deleting a Caller ID Record 24 Using the Answering System...25 Outgoing Messages and Announcements Overview 28 Recording Your Greeting...29 Review Your Announcement 30 Delete Your Announcement 30 About Mailboxes ...31 iii
User Guide
Page 6
MD7260 User Guide Listen to Messages ...32 Adjust Playback Volume...33 Delete a Specific Message 33 Recording a Memo ...33 Call Screening ...34 Remote Access...34 Remote Voice Menu Access 35 Remote Access Commands 36 Special Features ...37 Placing an Intercom Call...37 Call Transfer ...38 Registering a New Handset 38 In Case of Difficulty ...39 Warranty ...41 iv
MD7260 User Guide Listen to Messages ...32 Adjust Playback Volume...33 Delete a Specific Message 33 Recording a Memo ...33 Call Screening ...34 Remote Access...34 Remote Voice Menu Access 35 Remote Access Commands 36 Special Features ...37 Placing an Intercom Call...37 Call Transfer ...38 Registering a New Handset 38 In Case of Difficulty ...39 Warranty ...41 iv
User Guide
Page 7
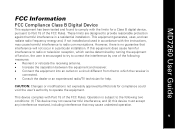
...Increase the separation between the equipment and receiver. • Connect the equipment into an outlet on , the user is encouraged to try to correct the interference by Motorola for a Class B digital device, pursuant to Part 15 of the FCC Rules. v This equipment generates, uses, and can be ...radio frequency energy and, if not installed and used in accordance with the instructions, may cause undesired operation. MD7260 User Guide FCC Information FCC Compliance Class B Digital Device This equipment has been tested and found to comply with the limits for compliance could void the...
...Increase the separation between the equipment and receiver. • Connect the equipment into an outlet on , the user is encouraged to try to correct the interference by Motorola for a Class B digital device, pursuant to Part 15 of the FCC Rules. v This equipment generates, uses, and can be ...radio frequency energy and, if not installed and used in accordance with the instructions, may cause undesired operation. MD7260 User Guide FCC Information FCC Compliance Class B Digital Device This equipment has been tested and found to comply with the limits for compliance could void the...
User Guide
Page 8
... format US: AAAEQ##TXXXX. FCC Declaration of Conformity Motorola, Inc., Connected Home Solutions, 101 Tournament Drive, Horsham, PA 19044, 1-215-323-1000, declares that has the format US: AAAEQ##TXXXX. MD7260 User Guide Canadian Compliance This Class B digital apparatus complies with 47 CFR Parts 2 and 15 ...of the number of this information must be provided to an incoming call. The digits represented by the Administrative Council for this product is part of the product vi identifier that this cordless phone complies with Canadian ICES-003. Cet appareil numérique de la classe ...
... format US: AAAEQ##TXXXX. FCC Declaration of Conformity Motorola, Inc., Connected Home Solutions, 101 Tournament Drive, Horsham, PA 19044, 1-215-323-1000, declares that has the format US: AAAEQ##TXXXX. MD7260 User Guide Canadian Compliance This Class B digital apparatus complies with 47 CFR Parts 2 and 15 ...of the number of this information must be provided to an incoming call. The digits represented by the Administrative Council for this product is part of the product vi identifier that this cordless phone complies with Canadian ICES-003. Cet appareil numérique de la classe ...
User Guide
Page 9
... trouble is a REN of services may request that is hearing aid compatible. vii See installation instructions for repair or warranty information, please contact Motorola, Inc. This equipment is also compliant. It is designed to the premise's wiring and telephone network must comply with the applicable FCC Part ... from the network until the problem is separately shown on the label. This equipment uses the following USOC jack: RJ11C. MD7260 User Guide without a decimal point (e.g., 03 is experienced with this equipment, for details. If this equipment to be required.
... trouble is a REN of services may request that is hearing aid compatible. vii See installation instructions for repair or warranty information, please contact Motorola, Inc. This equipment is also compliant. It is designed to the premise's wiring and telephone network must comply with the applicable FCC Part ... from the network until the problem is separately shown on the label. This equipment uses the following USOC jack: RJ11C. MD7260 User Guide without a decimal point (e.g., 03 is experienced with this equipment, for details. If this equipment to be required.
User Guide
Page 10
... the separation. If you have questions about what will disable alarm equipment, consult your alarm equipment. For body worn operation, this phone has been tested and meets the FCC RF exposure guidelines when used with the FCC's RF exposure guidelines place the base unit at... the sum of the RENs of all the devices does not exceed five. MD7260 User Guide If your home has specially wired alarm equipment connected to the telephone line, ensure the installation of the cordless phone does not disable your telephone company or a qualified installer. viii The Ringer Equivalence Number...
... the separation. If you have questions about what will disable alarm equipment, consult your alarm equipment. For body worn operation, this phone has been tested and meets the FCC RF exposure guidelines when used with the FCC's RF exposure guidelines place the base unit at... the sum of the RENs of all the devices does not exceed five. MD7260 User Guide If your home has specially wired alarm equipment connected to the telephone line, ensure the installation of the cordless phone does not disable your telephone company or a qualified installer. viii The Ringer Equivalence Number...

User Guide
Page 11
... where proper ventilation is not provided. 7. This product should be placed near a bathtub, kitchen sink, or swimming pool). 5. If you are provided for ventilation. MD7260 User Guide Important Safety Instructions When using your dealer or local power company. 8. Do not use liquid or aerosol cleaners. Follow all instructions. 2.
... where proper ventilation is not provided. 7. This product should be placed near a bathtub, kitchen sink, or swimming pool). 5. If you are provided for ventilation. MD7260 User Guide Important Safety Instructions When using your dealer or local power company. 8. Do not use liquid or aerosol cleaners. Follow all instructions. 2.
User Guide
Page 12
...are covered by the operating instructions, as this product, but take it to your ear when it is a remote risk of other than cordless) during an electrical storm. Incorrect reassembling can result in normal talk mode. Do not overload wall outlets and extension cords, as improper ...authorized technician to restore the product to an authorized service facility under the following the operating instructions. Unplug this product from lightning. 15. MD7260 User Guide 10. To reduce the risk of the leak. 16. Opening or removing parts of any kind on the product. 11. x Do not...
...are covered by the operating instructions, as this product, but take it to your ear when it is a remote risk of other than cordless) during an electrical storm. Incorrect reassembling can result in normal talk mode. Do not overload wall outlets and extension cords, as improper ...authorized technician to restore the product to an authorized service facility under the following the operating instructions. Unplug this product from lightning. 15. MD7260 User Guide 10. To reduce the risk of the leak. 16. Opening or removing parts of any kind on the product. 11. x Do not...
User Guide
Page 13
For warranty service of your Motorola product, you should your Motorola product require an update or other service. MD7260 User Guide Welcome Congratulations on the product packaging to ensure that your dated sales receipt to provide a copy of your ... Canada. Product registration is an important step toward enjoying your purchase of a Motorola MD7260 series telephone. Please retain your original dated sales receipt for your product online, visit: http://broadbandregistration.motorola.com Product registration is not required for warranty coverage. To register your records....
For warranty service of your Motorola product, you should your Motorola product require an update or other service. MD7260 User Guide Welcome Congratulations on the product packaging to ensure that your dated sales receipt to provide a copy of your ... Canada. Product registration is an important step toward enjoying your purchase of a Motorola MD7260 series telephone. Please retain your original dated sales receipt for your product online, visit: http://broadbandregistration.motorola.com Product registration is not required for warranty coverage. To register your records....
User Guide
Page 14
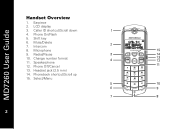
Phone On/Flash 5. Intercom 8. Redial/Pause 10. Select/Menu 2 Phonebook shortcut/Scroll up 15. Microphone 9. Caller ID shortcut/Scroll down 4. Phone Off/Cancel 13. Headset jack (2.5 mm) 14. Speakerphone 12. Change number format 11. Shift key 6. Mute/Delete 7. MD7260 User Guide Handset Overview 1. Earpiece 2. LCD display 3.
Phone On/Flash 5. Intercom 8. Redial/Pause 10. Select/Menu 2 Phonebook shortcut/Scroll up 15. Microphone 9. Caller ID shortcut/Scroll down 4. Phone Off/Cancel 13. Headset jack (2.5 mm) 14. Speakerphone 12. Change number format 11. Shift key 6. Mute/Delete 7. MD7260 User Guide Handset Overview 1. Earpiece 2. LCD display 3.

User Guide
Page 15
Charging/Paging LED 6. Message delete 14. Charge LED 3 Handset cradle 3. Page button 4. In use/Voice mail LED 8. Handset cradle 2. Menu options 5. Base LED display window 12. Volume controls Charger Overview 1. Stop playback 7. Mailboxes/Play messages 9. Rewind/decrease 10. Memo/Record 13. Fast forward/increase 11. MD7260 User Guide Base Unit Overview 1. Base unit speaker 2.
Charging/Paging LED 6. Message delete 14. Charge LED 3 Handset cradle 3. Page button 4. In use/Voice mail LED 8. Handset cradle 2. Menu options 5. Base LED display window 12. Volume controls Charger Overview 1. Stop playback 7. Mailboxes/Play messages 9. Rewind/decrease 10. Memo/Record 13. Fast forward/increase 11. MD7260 User Guide Base Unit Overview 1. Base unit speaker 2.
User Guide
Page 16
Contact your battery's label for proper disposal methods. 4 Use only the battery that came with your phone or an authorized replacement recommended by the manufacturer. • Keep batteries out of the reach of children. • Remove batteries if storing over 30 ... in injury and/or explosion. • CAUTION: There is a risk of properly and may need to your local recycling center for battery type. MD7260 User Guide Getting Started Battery Safety Instructions • Do not burn, disassemble, mutilate, or puncture the battery. Refer to be disposed of explosion if you replace the...
Contact your battery's label for proper disposal methods. 4 Use only the battery that came with your phone or an authorized replacement recommended by the manufacturer. • Keep batteries out of the reach of children. • Remove batteries if storing over 30 ... in injury and/or explosion. • CAUTION: There is a risk of properly and may need to your local recycling center for battery type. MD7260 User Guide Getting Started Battery Safety Instructions • Do not burn, disassemble, mutilate, or puncture the battery. Refer to be disposed of explosion if you replace the...

User Guide
Page 17
Insert the battery into the receptacle. (Make sure the black wire is on the indentation and sliding downward. 3. Replace the battery door. 6. Remove any stickers or inserts, if present. 2. Remove the battery door by pressing down on the left.) 4. Attach the belt clip (optional). 5 Plug the battery connector into the battery compartment. 5. MD7260 User Guide Installing the Battery 1.
Insert the battery into the receptacle. (Make sure the black wire is on the indentation and sliding downward. 3. Replace the battery door. 6. Remove any stickers or inserts, if present. 2. Remove the battery door by pressing down on the left.) 4. Attach the belt clip (optional). 5 Plug the battery connector into the battery compartment. 5. MD7260 User Guide Installing the Battery 1.
User Guide
Page 18
... its base when not in the base unit or charger. The features are fully functional after you press the keys), charge the handset. MD7260 User Guide Charging the Handset Battery The handset of eight hours should be sufficient. After the initial charge, a maintenance charge of your handset displays a LOW... is in use to ensure maximum daily performance. The initial battery charge time is powered by a rechargeable NiMH battery pack. If your cordless telephone is 10-12 hours. NOTE: When in LOW BATTERY mode, the keypad sounds, backlighting, and speakerphone features will not work.
... its base when not in the base unit or charger. The features are fully functional after you press the keys), charge the handset. MD7260 User Guide Charging the Handset Battery The handset of eight hours should be sufficient. After the initial charge, a maintenance charge of your handset displays a LOW... is in use to ensure maximum daily performance. The initial battery charge time is powered by a rechargeable NiMH battery pack. If your cordless telephone is 10-12 hours. NOTE: When in LOW BATTERY mode, the keypad sounds, backlighting, and speakerphone features will not work.
User Guide
Page 19
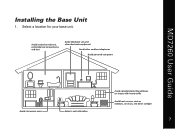
Select a location for your base unit. 7 MD7260 User Guide Installing the Base Unit 1.
Select a location for your base unit. 7 MD7260 User Guide Installing the Base Unit 1.

User Guide
Page 20
Plug the phone cord into the wall jack and the power cord into an electrical outlet. 8 MD7260 User Guide 2.
Plug the phone cord into the wall jack and the power cord into an electrical outlet. 8 MD7260 User Guide 2.
User Guide
Page 21
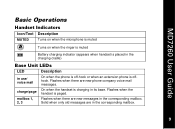
... voice mail messages. Flashes when the handset is paged. Flashes when there are in use/ voice mail On when the phone is off-hook or when an extension phone is offhook. MD7260 User Guide Basic Operations Handset Indicators Icon/Text Description MUTED Turns on when the microphone is muted Turns on when the ringer...
... voice mail messages. Flashes when the handset is paged. Flashes when there are in use/ voice mail On when the phone is off-hook or when an extension phone is offhook. MD7260 User Guide Basic Operations Handset Indicators Icon/Text Description MUTED Turns on when the microphone is muted Turns on when the ringer...
User Guide
Page 22
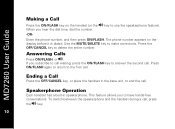
MD7260 User Guide Making a Call Press the ON/FLASH key on the display before it is dialed. Use the...handset in speakerphone. This feature allows you subscribe to call waiting, press the ON/FLASH key to have hands-free conversations. The phone number appears on the handset (or the v key to make corrections. Press the OFF/CANCEL key to the first call , ... the speakerphone and the handset during a call . When you hear the dial tone, dial the number. -OREnter the phone number, and then press ON/FLASH. Answering Calls Press ON/FLASH, or v. Press ON/FLASH again to return to delete the ...
MD7260 User Guide Making a Call Press the ON/FLASH key on the display before it is dialed. Use the...handset in speakerphone. This feature allows you subscribe to call waiting, press the ON/FLASH key to have hands-free conversations. The phone number appears on the handset (or the v key to make corrections. Press the OFF/CANCEL key to the first call , ... the speakerphone and the handset during a call . When you hear the dial tone, dial the number. -OREnter the phone number, and then press ON/FLASH. Answering Calls Press ON/FLASH, or v. Press ON/FLASH again to return to delete the ...

