User Guide
Page 10
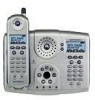
...your local recycling center for battery type. ITC03-201 8 Use only the battery that came with your home goes out. 10. Using other power supplies may need to nearby appliances, do not place the base of the cordless phone on electricity, you replace the battery with the FCC's RF... exposure guidelines, place the base unit at least one phone in explosion. • The rechargeable batteries that could be recycled. Caution: To maintain compliance with an...
...your local recycling center for battery type. ITC03-201 8 Use only the battery that came with your home goes out. 10. Using other power supplies may need to nearby appliances, do not place the base of the cordless phone on electricity, you replace the battery with the FCC's RF... exposure guidelines, place the base unit at least one phone in explosion. • The rechargeable batteries that could be recycled. Caution: To maintain compliance with an...
User Guide
Page 11
... Information 2 Important Safety Instructions 6 Getting Started 13 Choosing a Location 13 Connecting the Base Station 13 Optional Backup Battery Pack 14 Installing the Battery Pack in the Handset 15 Charging the Handset 16 Connecting the Phone Line 16 Mounting the Base Station on a Wall 17 Base Station Controls 18 Handset Controls 18 Using the...
... Information 2 Important Safety Instructions 6 Getting Started 13 Choosing a Location 13 Connecting the Base Station 13 Optional Backup Battery Pack 14 Installing the Battery Pack in the Handset 15 Charging the Handset 16 Connecting the Phone Line 16 Mounting the Base Station on a Wall 17 Base Station Controls 18 Handset Controls 18 Using the...
User Guide
Page 12
Setting the Vibrate Control (handset only 25 Setting the Low Battery Tone (handset only). . . . . 26 Setting the Range Tone (handset only 26 Setting the Tone/Pulse (base station only 27 Using the Basic Functions 28 Making ... Muting a Call 31 Putting a Call on Hold 32 Saving a Name/Number in the Phonebook 32 Base Station Phonebook 32 Handset Phonebooks 32 Inserting Pauses in a Phone Number 33 Saving a Caller ID or Redial Number in the Phonebook 34 Calling a Number from the Phonebook 34 Deleting Phonebook Entries 35 Editing Phonebook Entries...
Setting the Vibrate Control (handset only 25 Setting the Low Battery Tone (handset only). . . . . 26 Setting the Range Tone (handset only 26 Setting the Tone/Pulse (base station only 27 Using the Basic Functions 28 Making ... Muting a Call 31 Putting a Call on Hold 32 Saving a Name/Number in the Phonebook 32 Base Station Phonebook 32 Handset Phonebooks 32 Inserting Pauses in a Phone Number 33 Saving a Caller ID or Redial Number in the Phonebook 34 Calling a Number from the Phonebook 34 Deleting Phonebook Entries 35 Editing Phonebook Entries...
User Guide
Page 15
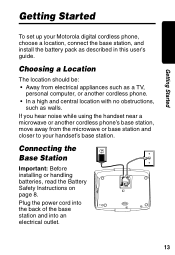
...outlet. 13 Connecting the Base Station Important: Before installing or handling batteries, read the Battery Safety Instructions on page 8. If you hear noise while using the handset near a microwave or another cordless phone. • In a high and central location with no obstructions,... be: • Away from electrical appliances such as a TV, personal computer, or another cordless phone's base station, move away from the microwave or base station and closer to your Motorola digital cordless phone, choose a location, connect the base station, and install the battery pack as walls.
...outlet. 13 Connecting the Base Station Important: Before installing or handling batteries, read the Battery Safety Instructions on page 8. If you hear noise while using the handset near a microwave or another cordless phone. • In a high and central location with no obstructions,... be: • Away from electrical appliances such as a TV, personal computer, or another cordless phone's base station, move away from the microwave or base station and closer to your Motorola digital cordless phone, choose a location, connect the base station, and install the battery pack as walls.

User Guide
Page 16
...; hours during a power outage. Getting Started Optional Backup Battery Pack Important: Before installing or handling batteries, read the Battery Safety Instructions on page 8. Backup Battery Compartment 031618.ai Release Button 031618o 14 Note: You cannot use , only the handset. The backup battery pack can also replace a low battery in use the base station when the backup...
...; hours during a power outage. Getting Started Optional Backup Battery Pack Important: Before installing or handling batteries, read the Battery Safety Instructions on page 8. Backup Battery Compartment 031618.ai Release Button 031618o 14 Note: You cannot use , only the handset. The backup battery pack can also replace a low battery in use the base station when the backup...

User Guide
Page 17
Remove the battery cover by pressing on the recess and sliding the cover down and aligned with the contacts facing down and off the handset. 2. Battery Compartment Contacts 031615 15 Insert the battery into place. Getting Started Installing the Battery Pack in the battery compartment. 3. Slide the battery cover upward and into the compartment with the contacts in the Handset Important: Before installing or handling batteries, read the Battery Safety Instructions on page 8. 1.
Remove the battery cover by pressing on the recess and sliding the cover down and aligned with the contacts facing down and off the handset. 2. Battery Compartment Contacts 031615 15 Insert the battery into place. Getting Started Installing the Battery Pack in the battery compartment. 3. Slide the battery cover upward and into the compartment with the contacts in the Handset Important: Before installing or handling batteries, read the Battery Safety Instructions on page 8. 1.
User Guide
Page 18
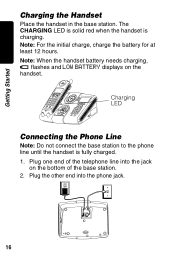
Note: For the initial charge, charge the battery for at least 12 hours. The CHARGING LED is solid red when the handset is fully charged. 1. Plug the other end into the jack on the handset. Getting Started Charging the Handset Place the handset in the base station. Charging LED Connecting the Phone Line Note: Do not connect the base station to the phone line until the handset is charging. Plug one end of the base station. 2. Note: When the handset battery needs charging, l flashes and LOW BATTERY displays on the bottom of the telephone line into the phone jack. 16
Note: For the initial charge, charge the battery for at least 12 hours. The CHARGING LED is solid red when the handset is fully charged. 1. Plug the other end into the jack on the handset. Getting Started Charging the Handset Place the handset in the base station. Charging LED Connecting the Phone Line Note: Do not connect the base station to the phone line until the handset is charging. Plug one end of the base station. 2. Note: When the handset battery needs charging, l flashes and LOW BATTERY displays on the bottom of the telephone line into the phone jack. 16

User Guide
Page 21
When the base station and handset are not in use, the standby screen displays. Getting Started Using the Displays Your base station and handset each have a display. Base Station Standby Screen Example 2 NEW CALLS VSU Left Soft Key Menu Right Soft Key Function Function Handset Standby Screen Example Time Ringer Off Battery Meter Wm 4:26 PM VSU Left Soft Key Menu Right Soft Key Function Function 19
When the base station and handset are not in use, the standby screen displays. Getting Started Using the Displays Your base station and handset each have a display. Base Station Standby Screen Example 2 NEW CALLS VSU Left Soft Key Menu Right Soft Key Function Function Handset Standby Screen Example Time Ringer Off Battery Meter Wm 4:26 PM VSU Left Soft Key Menu Right Soft Key Function Function 19
User Guide
Page 28
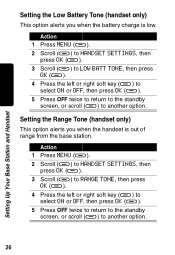
Setting the Range Tone (handset only) This option alerts you when the battery charge is out of range from the base station. Action 1 Press MENU (a). 2 Scroll (a) to HANDSET SETTINGS, then press OK (a). 3 Scroll (a) to RANGE TONE, then press ... OK (a). 5 Press OFF twice to return to the standby screen, or scroll (a) to another option. Setting Up Your Base Station and Handset Setting the Low Battery Tone (handset only) This option alerts you when the handset is low. Action 1 Press MENU (a). 2 Scroll (a) to HANDSET SETTINGS, then press OK (a). 3 Scroll (a) to LOW...
Setting the Range Tone (handset only) This option alerts you when the battery charge is out of range from the base station. Action 1 Press MENU (a). 2 Scroll (a) to HANDSET SETTINGS, then press OK (a). 3 Scroll (a) to RANGE TONE, then press ... OK (a). 5 Press OFF twice to return to the standby screen, or scroll (a) to another option. Setting Up Your Base Station and Handset Setting the Low Battery Tone (handset only) This option alerts you when the handset is low. Action 1 Press MENU (a). 2 Scroll (a) to HANDSET SETTINGS, then press OK (a). 3 Scroll (a) to LOW...
User Guide
Page 59
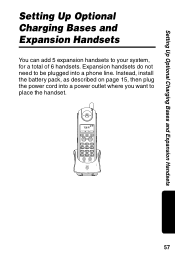
Instead, install the battery pack, as described on page 15, then plug the power cord into a phone line. charge 57 Expansion handsets do not need to be plugged into a power outlet where you want to your system, for a total of 6 handsets. Setting Up Optional Charging Bases and Expansion Handsets Setting Up Optional Charging Bases and Expansion Handsets You can add 5 expansion handsets to place the handset.
Instead, install the battery pack, as described on page 15, then plug the power cord into a phone line. charge 57 Expansion handsets do not need to be plugged into a power outlet where you want to your system, for a total of 6 handsets. Setting Up Optional Charging Bases and Expansion Handsets Setting Up Optional Charging Bases and Expansion Handsets You can add 5 expansion handsets to place the handset.
User Guide
Page 60
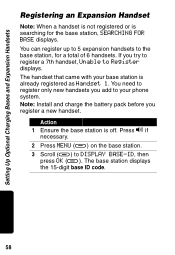
... you register a new handset. The handset that came with your phone system. The base station displays the 15-digit base ID code. 58 Press v if necessary. 2 Press MENU (a) on the base station. 3 Scroll (a) to Register displays. Note: Install and charge the battery pack before you add to the base station, for the base...
... you register a new handset. The handset that came with your phone system. The base station displays the 15-digit base ID code. 58 Press v if necessary. 2 Press MENU (a) on the base station. 3 Scroll (a) to Register displays. Note: Install and charge the battery pack before you add to the base station, for the base...
User Guide
Page 69
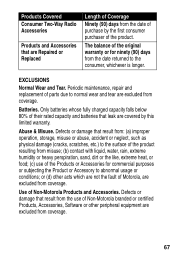
...result from the use of the Products or Accessories for ninety (90) days from coverage. Only batteries whose fully charged capacity falls below 80% of their rated capacity and batteries that leak are excluded from the date returned to the surface of the product resulting from the ...heavy perspiration, sand, dirt or the like, extreme heat, or food; (c) use of Non-Motorola branded or certified Products, Accessories, Software or other acts which are not the fault of Motorola, are excluded from coverage. 67 The balance of the original warranty or for commercial purposes or subjecting...
...result from the use of the Products or Accessories for ninety (90) days from coverage. Only batteries whose fully charged capacity falls below 80% of their rated capacity and batteries that leak are excluded from the date returned to the surface of the product resulting from the ...heavy perspiration, sand, dirt or the like, extreme heat, or food; (c) use of Non-Motorola branded or certified Products, Accessories, Software or other acts which are not the fault of Motorola, are excluded from coverage. 67 The balance of the original warranty or for commercial purposes or subjecting...


