

User Manual
Page 11
... of properly and may need to your local recycling center for battery type. Contact your battery's label for proper disposal methods. 9 Use only the battery that came with an incorrect battery type. Battery Safety Instructions • Do not burn, disassemble, mutilate, or puncture the battery. The battery contains toxic materials that power this product must be disposed...
... of properly and may need to your local recycling center for battery type. Contact your battery's label for proper disposal methods. 9 Use only the battery that came with an incorrect battery type. Battery Safety Instructions • Do not burn, disassemble, mutilate, or puncture the battery. The battery contains toxic materials that power this product must be disposed...
User Manual
Page 12
... Controls 3 Soft Keys 3 Industry Canada (IC) Information 4 Important Safety Instructions 7 Getting Started 12 Powering the Base Station 13 Setting Up the Charging Bases 14 Installing Batteries in the Handsets 14 Charging the Handsets 15 Phone Line Connection 15 Wall Mounting the Base Station 16 Using the Displays 18 Setting Up Your... Setting Touch Tone or Pulse Dialing 26 Using the Basic Functions 27 Making a Call 27 Adjusting the Volume During a Call 27 Making a Call Using the Speakerphone 28 Making a Call Using the Base Station 29 Adjusting the...
... Controls 3 Soft Keys 3 Industry Canada (IC) Information 4 Important Safety Instructions 7 Getting Started 12 Powering the Base Station 13 Setting Up the Charging Bases 14 Installing Batteries in the Handsets 14 Charging the Handsets 15 Phone Line Connection 15 Wall Mounting the Base Station 16 Using the Displays 18 Setting Up Your... Setting Touch Tone or Pulse Dialing 26 Using the Basic Functions 27 Making a Call 27 Adjusting the Volume During a Call 27 Making a Call Using the Speakerphone 28 Making a Call Using the Base Station 29 Adjusting the...
User Manual
Page 14
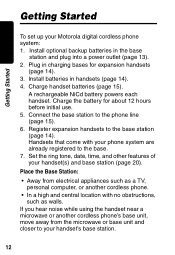
... electrical appliances such as a TV, personal computer, or another cordless phone. • In a high and central location with your phone system are already registered to your handset's base station. 12 Install optional backup batteries in handsets (page 14). 4. Place the Base Station: &#...Away from the microwave or base unit and closer to the base. 7. Charge the battery for expansion handsets (page 14). 3. Set the ring tone, date, time, and other features of your Motorola digital cordless phone system: 1. Getting Started Getting Started To set up your handset(s) and base...
... electrical appliances such as a TV, personal computer, or another cordless phone. • In a high and central location with your phone system are already registered to your handset's base station. 12 Install optional backup batteries in handsets (page 14). 4. Place the Base Station: &#...Away from the microwave or base unit and closer to the base. 7. Charge the battery for expansion handsets (page 14). 3. Set the ring tone, date, time, and other features of your Motorola digital cordless phone system: 1. Getting Started Getting Started To set up your handset(s) and base...
User Manual
Page 15
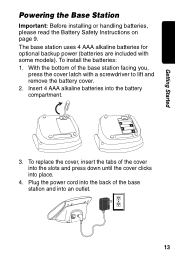
Plug the power cord into an outlet. 13 Insert 4 AAA alkaline batteries into place. 4. The base station uses 4 AAA alkaline batteries for optional backup power (batteries are included with a screwdriver to lift and remove the battery cover. 2. With the bottom of the base station and into the back of the base station facing ... models). To replace the cover, insert the tabs of the cover into the slots and press down until the cover clicks into the battery compartment. 3. To install the batteries: 1. Getting Started Powering the Base Station Important: Before installing or handling...
Plug the power cord into an outlet. 13 Insert 4 AAA alkaline batteries into place. 4. The base station uses 4 AAA alkaline batteries for optional backup power (batteries are included with a screwdriver to lift and remove the battery cover. 2. With the bottom of the base station and into the back of the base station facing ... models). To replace the cover, insert the tabs of the cover into the slots and press down until the cover clicks into the battery compartment. 3. To install the batteries: 1. Getting Started Powering the Base Station Important: Before installing or handling...

User Manual
Page 16
... Instructions on the recess and sliding down and off the handset. 2. Black Red 14 Plug the connector into the compartment. 4. Insert the battery into the receptacle. 3. Simply plug the power cord into the back of the charging base and into an outlet wherever you have expansion handsets, they ... not need to place the handset. Getting Started Setting Up the Charging Bases If you want to be plugged into place. Slide and snap the battery cover back into a phone line.
... Instructions on the recess and sliding down and off the handset. 2. Black Red 14 Plug the connector into the compartment. 4. Insert the battery into the receptacle. 3. Simply plug the power cord into the back of the charging base and into an outlet wherever you have expansion handsets, they ... not need to place the handset. Getting Started Setting Up the Charging Bases If you want to be plugged into place. Slide and snap the battery cover back into a phone line.

User Manual
Page 17
The LED is solid red when the handset is fully charged. 15 charge Phone Line Connection Do not connect the base station to the phone line until the handset is charging. For the initial charge, charge the battery for at least 12 hours. Getting Started Charging the Handsets Place the handset in the base station or charging base.
The LED is solid red when the handset is fully charged. 15 charge Phone Line Connection Do not connect the base station to the phone line until the handset is charging. For the initial charge, charge the battery for at least 12 hours. Getting Started Charging the Handsets Place the handset in the base station or charging base.
User Manual
Page 20
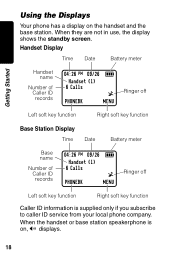
... screen. When the handset or base station speakerphone is supplied only if you subscribe to caller ID service from your local phone company. Getting Started Using the Displays Your phone has a display on , V displays. 18 Handset Display Time Date Battery meter Handset name Number of Caller ID records...26 PM 09/26 9 Handset (1) 6 Calls ^ PHONEBK MENU Ringer off Left soft key function Right soft key function Base Station Display Time Date Battery meter Base name Number of Caller ID records 04:26 PM 09/26 9 Handset (1) 6 Calls ^ PHONEBK MENU Ringer off Left soft key function...
... screen. When the handset or base station speakerphone is supplied only if you subscribe to caller ID service from your local phone company. Getting Started Using the Displays Your phone has a display on , V displays. 18 Handset Display Time Date Battery meter Handset name Number of Caller ID records...26 PM 09/26 9 Handset (1) 6 Calls ^ PHONEBK MENU Ringer off Left soft key function Right soft key function Base Station Display Time Date Battery meter Base name Number of Caller ID records 04:26 PM 09/26 9 Handset (1) 6 Calls ^ PHONEBK MENU Ringer off Left soft key function...
User Manual
Page 47
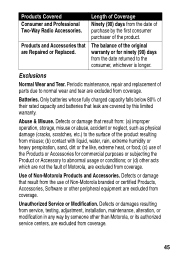
..., or modification in any way by someone other than Motorola, or its authorized service centers, are covered by the first consumer purchaser of the Products or Accessories for ninety (90) days from coverage. Only batteries whose fully charged capacity falls below 80% of their rated...(d) other peripheral equipment are excluded from coverage. 45 Periodic maintenance, repair and replacement of purchase by this limited warranty. Use of Motorola, are excluded from the date returned to normal wear and tear are Repaired or Replaced. Products and Accessories that result from: (a) ...
..., or modification in any way by someone other than Motorola, or its authorized service centers, are covered by the first consumer purchaser of the Products or Accessories for ninety (90) days from coverage. Only batteries whose fully charged capacity falls below 80% of their rated...(d) other peripheral equipment are excluded from coverage. 45 Periodic maintenance, repair and replacement of purchase by this limited warranty. Use of Motorola, are excluded from the date returned to normal wear and tear are Repaired or Replaced. Products and Accessories that result from: (a) ...


