

User Guide
Page 1
User's Guide L801 / L802 / L803 / L804 / L805 DECT 6.0 Digital Cordless Phone with Answering machine Warning Use only the adapter and telephone line cord provided in the box.
User's Guide L801 / L802 / L803 / L804 / L805 DECT 6.0 Digital Cordless Phone with Answering machine Warning Use only the adapter and telephone line cord provided in the box.

User Guide
Page 2
...time includes the pre-recorded voice menu and outgoing announcements. **You must subscribe to your records. For warranty service of your new Motorola Phone! Registration is necessary. For product-related questions, please call is not required for these features to confirm warranty status. Alternative arrangements... machine with up to 15 minutes digital recording time.* • Caller ID shows you will need to provide a copy of your Motorola product, you who is not designed for your network provider's Caller ID or Call Waiting service for warranty coverage. Welcome... to your...
...time includes the pre-recorded voice menu and outgoing announcements. **You must subscribe to your records. For warranty service of your new Motorola Phone! Registration is necessary. For product-related questions, please call is not required for these features to confirm warranty status. Alternative arrangements... machine with up to 15 minutes digital recording time.* • Caller ID shows you will need to provide a copy of your Motorola product, you who is not designed for your network provider's Caller ID or Call Waiting service for warranty coverage. Welcome... to your...
User Guide
Page 3
... • Quick Start Guide In multi-handset packs, you will need to get the most from your phone. Before you make emergency telephone calls during power failures. This equipment is not designed to make your phone. Follow the simple instructions in 'Getting Started', on the next few pages. Alternative arrangements should be...
... • Quick Start Guide In multi-handset packs, you will need to get the most from your phone. Before you make emergency telephone calls during power failures. This equipment is not designed to make your phone. Follow the simple instructions in 'Getting Started', on the next few pages. Alternative arrangements should be...
User Guide
Page 4
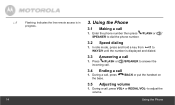
Using the Phone 14 3.1 Making a call 14 3.2 Speed dialing 14 3.3 Answering a call 14 3.4 Ending a call 14 3.5 Adjusting volume 14 3.6 Muting a call 15 3.7 Dialing from the redial list 15 3.8 ... 3.12.5 Deleting the entire calls list 17 3.13 Personal Settings 18 3.14 Intercom 19 3.14.1 Calling another handset 19 3.14.2 Transferring a call to know your phone 9 3. 1. Getting to another handset 19 3.14.3 Three-party conference call 20 3.15 Setting the dial mode 20 3.16 Setting the flash time 20 3.17 Setting...
Using the Phone 14 3.1 Making a call 14 3.2 Speed dialing 14 3.3 Answering a call 14 3.4 Ending a call 14 3.5 Adjusting volume 14 3.6 Muting a call 15 3.7 Dialing from the redial list 15 3.8 ... 3.12.5 Deleting the entire calls list 17 3.13 Personal Settings 18 3.14 Intercom 19 3.14.1 Calling another handset 19 3.14.2 Transferring a call to know your phone 9 3. 1. Getting to another handset 19 3.14.3 Three-party conference call 20 3.15 Setting the dial mode 20 3.16 Setting the flash time 20 3.17 Setting...
User Guide
Page 6
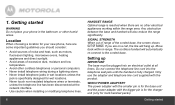
...of range of excessive dust, moisture and low temperature. • Avoid other humid areas. Getting started Location When choosing a location for your phone in range. Do not connect the telephone line cord into an electrical outlet at the network interface. • Use caution when installing or modifying... storm. • Never install telephone jacks in wet locations unless the jack is fully charged. Getting started WARNING Do not place your new phone, here are on a call, the line will hang up IMPORTANT The base must be plugged into the telephone wall jack until the handset ...
...of range of excessive dust, moisture and low temperature. • Avoid other humid areas. Getting started Location When choosing a location for your phone in range. Do not connect the telephone line cord into an electrical outlet at the network interface. • Use caution when installing or modifying... storm. • Never install telephone jacks in wet locations unless the jack is fully charged. Getting started WARNING Do not place your new phone, here are on a call, the line will hang up IMPORTANT The base must be plugged into the telephone wall jack until the handset ...
User Guide
Page 7
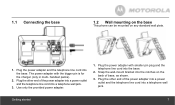
... the power adapter into a power outlet and the telephone line cord into the base. Getting started 7 1.1 Connecting the base 1.2 Wall mounting on the base This phone can be mounted on the back of base, as shown. 3. Plug the power adapter and the telephone line cord into a telephone wall jack. 3. Plug the...
... the power adapter into a power outlet and the telephone line cord into the base. Getting started 7 1.1 Connecting the base 1.2 Wall mounting on the base This phone can be mounted on the back of base, as shown. 3. Plug the power adapter and the telephone line cord into a telephone wall jack. 3. Plug the...
User Guide
Page 8
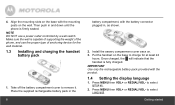
... the product. 1.4 Setting the display language 1. IMPORTANT Use only the rechargeable battery pack provided with the battery connector plugged in and down until the phone is capable of supporting the weight of anchoring device for at least 24 hours. Press MENU then VOL+ or REDIAL/VOL- Then push in , ...as shown. 2. Once charged, the will indicate that the handset is fully charged. Getting started NOTE DO NOT use the proper type of the phone, and use a power outlet controlled by a wall switch. to select SETUP HS. 2. Press MENU then VOL+ or REDIAL/VOL- Put the handset on . ...
... the product. 1.4 Setting the display language 1. IMPORTANT Use only the rechargeable battery pack provided with the battery connector plugged in and down until the phone is capable of supporting the weight of anchoring device for at least 24 hours. Press MENU then VOL+ or REDIAL/VOL- Then push in , ...as shown. 2. Once charged, the will indicate that the handset is fully charged. Getting started NOTE DO NOT use the proper type of the phone, and use a power outlet controlled by a wall switch. to select SETUP HS. 2. Press MENU then VOL+ or REDIAL/VOL- Put the handset on . ...
User Guide
Page 9
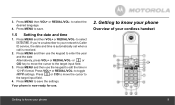
...+ or REDIAL/VOL- Press MENU and then use the keypad to save the settings. or or CID key to move the cursor to know your phone Overview of your network's Caller ID service, the date and time is automatically set when a call is now ready for use the keypad to your... VOL+ or REDIAL/VOL- to the target input field. 3. Press or CID to move the cursor to toggle AM/PM settings. Your phone is received. 2. Getting to know your phone 9 If you're a subscriber to edit the time in 12 HR format. Press MENU and then use . 2. Press MENU to save . 1.5 Setting...
...+ or REDIAL/VOL- Press MENU and then use the keypad to save the settings. or or CID key to move the cursor to know your phone Overview of your network's Caller ID service, the date and time is automatically set when a call is now ready for use the keypad to your... VOL+ or REDIAL/VOL- to the target input field. 3. Press or CID to move the cursor to toggle AM/PM settings. Your phone is received. 2. Getting to know your phone 9 If you're a subscriber to edit the time in 12 HR format. Press MENU and then use . 2. Press MENU to save . 1.5 Setting...

User Guide
Page 10
... remaining digits in the next screen page. 9 INTERCOM a) In idle mode / during a call : Press to increase volume. c) In calls list entry: Press to know your phone 1 SCROLL UP / VOLUME UP a) In menu mode: Press to scroll up the list. c) During a call: Press to transfer the call . 10 5 SKIP FORWARD a) During message...
... remaining digits in the next screen page. 9 INTERCOM a) In idle mode / during a call : Press to increase volume. c) In calls list entry: Press to know your phone 1 SCROLL UP / VOLUME UP a) In menu mode: Press to scroll up the list. c) During a call: Press to transfer the call . 10 5 SKIP FORWARD a) During message...

User Guide
Page 11
... / pre-dial / editing mode: Press to access redial list. c) In editing mode: Press to move the cursor to the left. 11 Getting to know your phone d) During a call : Press to turn on / off the speakerphone. 10 MICROPHONE 11 SPEAKER a) In idle / menu / pre-dial mode / during a call...
... / pre-dial / editing mode: Press to access redial list. c) In editing mode: Press to move the cursor to the left. 11 Getting to know your phone d) During a call : Press to turn on / off the speakerphone. 10 MICROPHONE 11 SPEAKER a) In idle / menu / pre-dial mode / during a call...
User Guide
Page 12
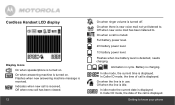
... the line is displayed. In Caller ID mode, the date of call is received. Off when new voice mail has been listened to know your phone Animation in use. Indicates when new call has been viewed. 12 On when ringer volume is new voice mail not yet listened to. Off when...
... the line is displayed. In Caller ID mode, the date of call is received. Off when new voice mail has been listened to know your phone Animation in use. Indicates when new call has been viewed. 12 On when ringer volume is new voice mail not yet listened to. Off when...
User Guide
Page 13
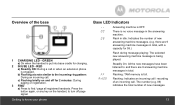
... answering machine. 09 Flash in idle: Indicates the number of an incoming call . Flashing: TAM memory is engaged. b) Flashing at a rate similar to know your phone Base LED Indicators -- Overview of new messages. 13 RED a) Steadily ON: During a call or when an extension...
... answering machine. 09 Flash in idle: Indicates the number of an incoming call . Flashing: TAM memory is engaged. b) Flashing at a rate similar to know your phone Base LED Indicators -- Overview of new messages. 13 RED a) Steadily ON: During a call or when an extension...
User Guide
Page 14
Enter the phone number then press /FLASH or / SPEAKER to adjust the volume. Press /FLASH or incoming call. /SPEAKER to WXYZ/9 until the number is in progress. 3. During a call 1. to dial the phone number. 3.2 Speed dialing 1. Using the Phone In idle mode, press and hold a key from /1 to answer the 3.4 Ending a call , press VOL+ or REDIAL/VOL- During a call 1. LA 14 Flashing: Indicates the line remote access is displayed and dialed. 3.3 Answering a call 1. Using the Phone 3.1 Making a call , press the base. /BACK or put the handset on 3.5 Adjusting volume 1.
Enter the phone number then press /FLASH or / SPEAKER to adjust the volume. Press /FLASH or incoming call. /SPEAKER to WXYZ/9 until the number is in progress. 3. During a call 1. to dial the phone number. 3.2 Speed dialing 1. Using the Phone In idle mode, press and hold a key from /1 to answer the 3.4 Ending a call , press VOL+ or REDIAL/VOL- During a call 1. LA 14 Flashing: Indicates the line remote access is displayed and dialed. 3.3 Answering a call 1. Using the Phone 3.1 Making a call , press the base. /BACK or put the handset on 3.5 Adjusting volume 1.
User Guide
Page 15
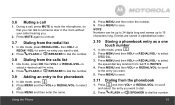
... the calls list 1. Press /FLASH or /SPEAKER to dial the number. 3.8 Dialing from the redial list 1. Press MENU and then enter the name. Using the Phone 4. Idle mode, press CID then VOL+ or REDIAL/VOL- Press MENU and then enter the number. 5. Press MENU to select SPEED DIAL. 3. Entries are stored...
... the calls list 1. Press /FLASH or /SPEAKER to dial the number. 3.8 Dialing from the redial list 1. Press MENU and then enter the name. Using the Phone 4. Idle mode, press CID then VOL+ or REDIAL/VOL- Press MENU and then enter the number. 5. Press MENU to select SPEED DIAL. 3. Entries are stored...

User Guide
Page 16
... ID service. 3.12.1 Calls List The calls list contains details of missed and received calls. Press CID to through the calls list. 16 Using the Phone Some operators may be stored. • If you have subscribed to Caller ID service, and provided the identity of the caller is used to view...
... ID service. 3.12.1 Calls List The calls list contains details of missed and received calls. Press CID to through the calls list. 16 Using the Phone Some operators may be stored. • If you have subscribed to Caller ID service, and provided the identity of the caller is used to view...
User Guide
Page 17
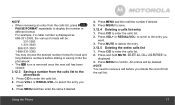
... hold MUTE. is removed once the new call has been viewed. 3.12.3 Saving a number from the calls list to the entry you want . 3. Using the Phone 17 Press VOL+ or REDIAL/VOL- Press MENU to confirm. to scroll to the phonebook 1. DELETE ALL CALL LOG ENTRIES? Press MENU to save. 3.12...
... hold MUTE. is removed once the new call has been viewed. 3.12.3 Saving a number from the calls list to the entry you want . 3. Using the Phone 17 Press VOL+ or REDIAL/VOL- Press MENU to confirm. to scroll to the phonebook 1. DELETE ALL CALL LOG ENTRIES? Press MENU to save. 3.12...

User Guide
Page 18
... OFF (If answering machine is on) ANSWERER MODE # OF RINGS ANNOUNCEMENT RECORD MEMO CALL SCREENING DEL ALL OLD REMOTE ACCESS SECURITY CODE 18 Using the Phone
... OFF (If answering machine is on) ANSWERER MODE # OF RINGS ANNOUNCEMENT RECORD MEMO CALL SCREENING DEL ALL OLD REMOTE ACCESS SECURITY CODE 18 Using the Phone
User Guide
Page 19
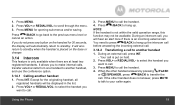
... to talk to the previous menu level or cancel an action. You need to press /BACK to hang up . Your call , press INT. - Using the Phone 19 Press VOL+ or REDIAL/VOL- Press MENU to another handset 1. Press VOL+ or REDIAL/VOL- to hang up the intercom call before answering the...
... to talk to the previous menu level or cancel an action. You need to press /BACK to hang up . Your call , press INT. - Using the Phone 19 Press VOL+ or REDIAL/VOL- Press MENU to another handset 1. Press VOL+ or REDIAL/VOL- to hang up the intercom call before answering the...

User Guide
Page 20
... TONE or PULSE. 4. to select SETUP BS. 2. Press MENU and then VOL+ or REDIAL/VOL- Press MENU and then VOL+ or REDIAL/VOL- Using the Phone to select the handset you should need to change this setting unless advised to end a three-party conference call and leave the other handset answers...
... TONE or PULSE. 4. to select SETUP BS. 2. Press MENU and then VOL+ or REDIAL/VOL- Press MENU and then VOL+ or REDIAL/VOL- Using the Phone to select the handset you should need to change this setting unless advised to end a three-party conference call and leave the other handset answers...
User Guide
Page 21
... 3.19 Resetting all settings 1. to select YES or NO. All personalized settings will remained unchanged. 21 NOTE All of handsets, and then the phone returns to the base before you can use . Press MENU and then VOL+ or REDIAL/VOL- A confirmation tone is generated if registration is ... must be registered to select YES. Press MENU and then VOL+ or REDIAL/VOL- to select REGISTRATION. 3. to select SETUP HS. 2. Using the Phone 4. Select YES then press MENU to select ALL SETTINGS. 3. Press MENU and then VOL+ or REDIAL/VOL- to enter the registration procedure as follows:...
... 3.19 Resetting all settings 1. to select YES or NO. All personalized settings will remained unchanged. 21 NOTE All of handsets, and then the phone returns to the base before you can use . Press MENU and then VOL+ or REDIAL/VOL- A confirmation tone is generated if registration is ... must be registered to select YES. Press MENU and then VOL+ or REDIAL/VOL- to select REGISTRATION. 3. to select SETUP HS. 2. Using the Phone 4. Select YES then press MENU to select ALL SETTINGS. 3. Press MENU and then VOL+ or REDIAL/VOL- to enter the registration procedure as follows:...


