User Guide
Page 3
... Key...1-5 Menus and Lists...1-5 Battery ...1-5 Battery Life...1-5 Charging the Radio...1-6 Charging using the Drop-in Charging Tray 1-6 Charging using the Plug-in Charger 1-6 Charging a Radio and Battery using a Multi-Unit Charger 1-7 Battery Meter ...1-7 Attaching the Battery ...1-7 Swivel Belt Holster...1-8 Mini Keyboard...1-8 Attaching the Mini Keyboard to the Radio 1-8 Disconnecting the Mini Keyboard...
... Key...1-5 Menus and Lists...1-5 Battery ...1-5 Battery Life...1-5 Charging the Radio...1-6 Charging using the Drop-in Charging Tray 1-6 Charging using the Plug-in Charger 1-6 Charging a Radio and Battery using a Multi-Unit Charger 1-7 Battery Meter ...1-7 Attaching the Battery ...1-7 Swivel Belt Holster...1-8 Mini Keyboard...1-8 Attaching the Mini Keyboard to the Radio 1-8 Disconnecting the Mini Keyboard...
User Guide
Page 13
...19 Hours • SNN5706 Li-Ion; Motorola rapid-rate battery chargers contain a temperature-sensing circuit to change or charge the battery in a Motorola-approved charger. 9980384R89-O February 15, 2005 To charge the battery, place the battery (with a Motorola charger and vice versa. Introduction: Battery 1-5 ...to battery damage and void the battery warranty. Battery WARNING: To avoid a possible explosion: DO NOT replace the battery in non-Motorola equipment may permanently damage the battery, void the battery warranty, and create a burn or fire hazard. Based on 5% transmit, 5%...
...19 Hours • SNN5706 Li-Ion; Motorola rapid-rate battery chargers contain a temperature-sensing circuit to change or charge the battery in a Motorola-approved charger. 9980384R89-O February 15, 2005 To charge the battery, place the battery (with a Motorola charger and vice versa. Introduction: Battery 1-5 ...to battery damage and void the battery warranty. Battery WARNING: To avoid a possible explosion: DO NOT replace the battery in non-Motorola equipment may permanently damage the battery, void the battery warranty, and create a burn or fire hazard. Based on 5% transmit, 5%...
User Guide
Page 14
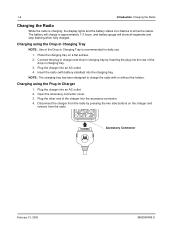
...use. 1. Insert the radio (with or without the holster. Plug the charger into an AC outlet. 4. Charging using the Plug-in approximately 1-3 hours, and battery gauge will charge in Charger 1. Connect the plug-in charger and drop-in charging tray by pressing the two side buttons on a...fully charged. Open the accessory connector cover. 3. Disconnect the charger from the radio. Place the charging tray on the charger and remove from the radio by inserting the plug into the accessory connector. 4. Plug the charger into an AC outlet. 2. Charging using the Drop-in ...
...use. 1. Insert the radio (with or without the holster. Plug the charger into an AC outlet. 4. Charging using the Plug-in approximately 1-3 hours, and battery gauge will charge in Charger 1. Connect the plug-in charger and drop-in charging tray by pressing the two side buttons on a...fully charged. Open the accessory connector cover. 3. Disconnect the charger from the radio. Place the charging tray on the charger and remove from the radio by inserting the plug into the accessory connector. 4. Plug the charger into an AC outlet. 2. Charging using the Drop-in ...

User Guide
Page 15
... a combination of the two at the top and lift the door off the radio. 2. Introduction: Attaching the Battery 1-7 Charging a Radio and Battery using a Multi-Unit Charger A Multi-Unit Charger (MUC) is available separately (RPN4040) which will charge up to secure firmly in place. 3.
... a combination of the two at the top and lift the door off the radio. 2. Introduction: Attaching the Battery 1-7 Charging a Radio and Battery using a Multi-Unit Charger A Multi-Unit Charger (MUC) is available separately (RPN4040) which will charge up to secure firmly in place. 3.
User Guide
Page 63
B Battery 1-5 Battery, Attaching 1-7 Battery Charging using a Multi-Unit Charger 1-7 Battery Life 1-5 Battery Meter 1-7 C CAPS Key Functionality 1-9 Cloning 5-1 INDEX A Accent Marks 1-11 Accessing Advanced Menu 3-1 Main Menu 2-10 Message Inbox 2-5 Accessing the Advanced Menu 3-1 Enabling ...
B Battery 1-5 Battery, Attaching 1-7 Battery Charging using a Multi-Unit Charger 1-7 Battery Life 1-5 Battery Meter 1-7 C CAPS Key Functionality 1-9 Cloning 5-1 INDEX A Accent Marks 1-11 Accessing Advanced Menu 3-1 Main Menu 2-10 Message Inbox 2-5 Accessing the Advanced Menu 3-1 Enabling ...
User Guide
Page 64
... Cloning Cable 5-1 Sending a Contact 5-3 Charging Using the 1-7 Drop-in Charging Tray 1-6 Multi-Unit Charger 1-7 Plug-in Charger 1-6 Charging a Radio and Battery using a Multi-Unit Charger 1-7 Charging the Radio 1-6 Charging using the Drop-in Charging Tray 1-6 Charging using the Plug-in Charger 1-6 Composing a Message Using the Mini Keyboard 2-8 Contacts, Adding 4-1 D Deleting a Message 2-9 Deleting a Recent Call...
... Cloning Cable 5-1 Sending a Contact 5-3 Charging Using the 1-7 Drop-in Charging Tray 1-6 Multi-Unit Charger 1-7 Plug-in Charger 1-6 Charging a Radio and Battery using a Multi-Unit Charger 1-7 Charging the Radio 1-6 Charging using the Drop-in Charging Tray 1-6 Charging using the Plug-in Charger 1-6 Composing a Message Using the Mini Keyboard 2-8 Contacts, Adding 4-1 D Deleting a Message 2-9 Deleting a Recent Call...

User Guide
Page 66
4 INDEX: N Navigation Keys 1-5 Notations Used in This Manual 1-1 O Other Special Characters 1-12 P Patent Notice 5-9 Plug-in Charger 1-6 Products and Accessories 5-7 Program Menu Navigation Chart 4-1 Q R Radio History 4-8 Receiving and Making a Call 2-3 Making a Call 2-3 Receiving a Call 2-3 Receiving a Call 2-3 Receiving an Alert 2-4 Receiving and Making ...
4 INDEX: N Navigation Keys 1-5 Notations Used in This Manual 1-1 O Other Special Characters 1-12 P Patent Notice 5-9 Plug-in Charger 1-6 Products and Accessories 5-7 Program Menu Navigation Chart 4-1 Q R Radio History 4-8 Receiving and Making a Call 2-3 Making a Call 2-3 Receiving a Call 2-3 Receiving a Call 2-3 Receiving an Alert 2-4 Receiving and Making ...


