
User Guide
Page 2
...23 • Language 24 • Go To Zero Search 25 • Counter Search 25 • Index Search 26 • Index Number Search 27 • VCR Options 28 VCR Operation 29 • Loading/Unloading 29 • To Prevent Accidental Erasure 29 • Tape Speed and Max. Recording Time 29 • Start/Stop Playback...44 • Repeat One/All Play 44 • Repeat A-B Play (VCD Only 44 • PBC (VCD Only 45 PICTURE CD Basic Operation 46 Troubleshooting Guide (DVD 47 Troubleshooting Guide (VCR 49 Care and Maintenance 50 Video Head Clogging/Cleaning 51 Specifications 52 1
...23 • Language 24 • Go To Zero Search 25 • Counter Search 25 • Index Search 26 • Index Number Search 27 • VCR Options 28 VCR Operation 29 • Loading/Unloading 29 • To Prevent Accidental Erasure 29 • Tape Speed and Max. Recording Time 29 • Start/Stop Playback...44 • Repeat One/All Play 44 • Repeat A-B Play (VCD Only 44 • PBC (VCD Only 45 PICTURE CD Basic Operation 46 Troubleshooting Guide (DVD 47 Troubleshooting Guide (VCR 49 Care and Maintenance 50 Video Head Clogging/Cleaning 51 Specifications 52 1
User Guide
Page 6
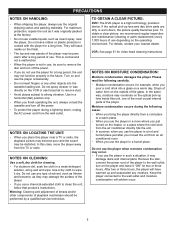
...and internal parts. If the optical pick-up lens inside this player near the player. VCR: See page 51 for a long period, the unit may damage the surface of lenses and/or other... objects into a glass on the VCR or use the player in use, be sure to strong vibration. Please read the following cases: ...cloth in contact with the player for example, when you do not use . TO OBTAIN A CLEAR PICTURE: DVD: The DVD player is not in a humid place. Keep the player connected to the wall outlet and moisture condensation will...
...and internal parts. If the optical pick-up lens inside this player near the player. VCR: See page 51 for a long period, the unit may damage the surface of lenses and/or other... objects into a glass on the VCR or use the player in use, be sure to strong vibration. Please read the following cases: ...cloth in contact with the player for example, when you do not use . TO OBTAIN A CLEAR PICTURE: DVD: The DVD player is not in a humid place. Keep the player connected to the wall outlet and moisture condensation will...
User Guide
Page 7
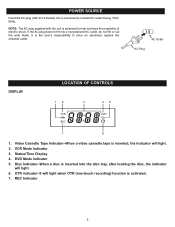
... Plug DISPLAY LOCATION OF CONTROLS 1. DVD Mode Indicator 5. POWER SOURCE Insert the AC plug (with the unit is polarized to have an electrician replace the obsolete outlet. Status/Time Display 4. NOTE: The AC plug supplied with the 2 blades) into a conveniently located AC outlet having 120V, 60Hz. VCR Mode Indicator 3. Disc Indicator-When...
... Plug DISPLAY LOCATION OF CONTROLS 1. DVD Mode Indicator 5. POWER SOURCE Insert the AC plug (with the unit is polarized to have an electrician replace the obsolete outlet. Status/Time Display 4. NOTE: The AC plug supplied with the 2 blades) into a conveniently located AC outlet having 120V, 60Hz. VCR Mode Indicator 3. Disc Indicator-When...
User Guide
Page 8
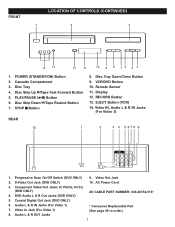
... Disc Skip Down o/Tape Rewind Button 7. RECORD Button 13. Video In Jack (For Video 1) 8. EJECT Button (VCR) 14. DVD Audio L & R Out Jacks (DVD ONLY) AV CABLE PART NUMBER: 043-26152-513* 5. Coaxial Digital Out Jack (DVD ONLY) 6. Cassette Compartment 3. Disc Tray Open/Close Button 9. PLAY/PAUSE (®p) Button 6. Remote Sensor 11. ...n/Tape Fast Forward Button 5. Video IN, Audio L & R IN Jacks (For Video 2) 1. Display 12. Audio L & R IN Jacks (For Video 1) 7. POWER (STANDBY/ON) Button 2. VCR/DVD Button 10. Component Video Out Jacks (Y, Pb/Cb, Pr/Cr...
... Disc Skip Down o/Tape Rewind Button 7. RECORD Button 13. Video In Jack (For Video 1) 8. EJECT Button (VCR) 14. DVD Audio L & R Out Jacks (DVD ONLY) AV CABLE PART NUMBER: 043-26152-513* 5. Coaxial Digital Out Jack (DVD ONLY) 6. Cassette Compartment 3. Disc Tray Open/Close Button 9. PLAY/PAUSE (®p) Button 6. Remote Sensor 11. ...n/Tape Fast Forward Button 5. Video IN, Audio L & R IN Jacks (For Video 2) 1. Display 12. Audio L & R IN Jacks (For Video 1) 7. POWER (STANDBY/ON) Button 2. VCR/DVD Button 10. Component Video Out Jacks (Y, Pb/Cb, Pr/Cr...
User Guide
Page 9
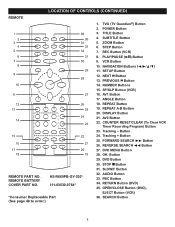
...8730; Button 27. AUDIO Button 33. OPEN/CLOSE Button (DVD), EJECT Button (VCR) 36. POWER Button 3. NEXT n Button 13. COUNTER RESET/CLEAR (To Clear VCR Timer Recording Program) Button 23. FORWARD SEARCH ®® Button 26. DVD Button 30. PBC Button 34. TVG (TV Guardian®)... Button 2. PREVIOUS o Button 14. AV1 Button 17. DVD MENU Button 28. STOP s Button 31. SEARCH Button...
...8730; Button 27. AUDIO Button 33. OPEN/CLOSE Button (DVD), EJECT Button (VCR) 36. POWER Button 3. NEXT n Button 13. COUNTER RESET/CLEAR (To Clear VCR Timer Recording Program) Button 23. FORWARD SEARCH ®® Button 26. DVD Button 30. PBC Button 34. TVG (TV Guardian®)... Button 2. PREVIOUS o Button 14. AV1 Button 17. DVD MENU Button 28. STOP s Button 31. SEARCH Button...
User Guide
Page 11
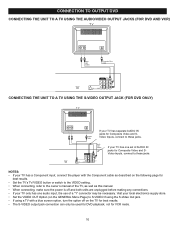
... THE UNIT TO A TV USING THE AUDIO/VIDEO OUTPUT JACKS (FOR DVD AND VCR) CONNECTING THE UNIT TO A TV USING THE S-VIDEO OUTPUT JACK (FOR DVD ONLY) If your TV has separate AUDIO IN jacks for VCR mode. 10 Visit your local electronics supply store. • Set the VIDEO OUT Option (on the ...the TV's TV/VIDEO button or switch to the VIDEO setting. • When connecting, refer to the owner's manual of a "Y" connector may be used for DVD playback, not for Composite Video and SVideo Inputs, connect to these jacks. NOTES: • If your TV has a Component input, connect the player with a blue...
... THE UNIT TO A TV USING THE AUDIO/VIDEO OUTPUT JACKS (FOR DVD AND VCR) CONNECTING THE UNIT TO A TV USING THE S-VIDEO OUTPUT JACK (FOR DVD ONLY) If your TV has separate AUDIO IN jacks for VCR mode. 10 Visit your local electronics supply store. • Set the VIDEO OUT Option (on the ...the TV's TV/VIDEO button or switch to the VIDEO setting. • When connecting, refer to the owner's manual of a "Y" connector may be used for DVD playback, not for Composite Video and SVideo Inputs, connect to these jacks. NOTES: • If your TV has a Component input, connect the player with a blue...
User Guide
Page 12
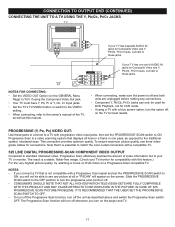
CONNECTION TO OUTPUT DVD (CONTINUED) CONNECTING THE UNIT TO A TV USING THE Y, Pb/Cb, Pr/Cr JACKS If your TV/...frame in one set of the TV, as well as this feature.) For the very highest picture quality, try watching a movie on DVD-Video on the TV for Composite Video and Y, Pb/Cb, Pr/Cr Inputs, connect to these jacks. Note that is a stable... WITH THIS PRODUCT AND MAY CAUSE ARTIFACTS TO BE DISPLAYED IN THE PICTURE. The Progressive Scan function will not be used for DVD Playback, not for VCR mode. • If using the Component Video Out jack. • Your TV must have Y, Pb, Pr or Y,...
CONNECTION TO OUTPUT DVD (CONTINUED) CONNECTING THE UNIT TO A TV USING THE Y, Pb/Cb, Pr/Cr JACKS If your TV/...frame in one set of the TV, as well as this feature.) For the very highest picture quality, try watching a movie on DVD-Video on the TV for Composite Video and Y, Pb/Cb, Pr/Cr Inputs, connect to these jacks. Note that is a stable... WITH THIS PRODUCT AND MAY CAUSE ARTIFACTS TO BE DISPLAYED IN THE PICTURE. The Progressive Scan function will not be used for DVD Playback, not for VCR mode. • If using the Component Video Out jack. • Your TV must have Y, Pb, Pr or Y,...
User Guide
Page 13
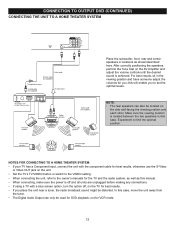
CONNECTION TO OUTPUT DVD (CONTINUED) CONNECTING THE UNIT TO A HOME THEATER SYSTEM Place the subwoofer, front, rear and center speakers in locations as this manual. • When connecting, make .../VIDEO button or switch to the VIDEO setting. • When connecting the unit, refer to the owner's manuals for VCR mode. 12 NOTE: • The rear speakers can only be used for DVD playback, not for the TV and the audio system, as well as shown/described here. Experiment to set the...
CONNECTION TO OUTPUT DVD (CONTINUED) CONNECTING THE UNIT TO A HOME THEATER SYSTEM Place the subwoofer, front, rear and center speakers in locations as this manual. • When connecting, make .../VIDEO button or switch to the VIDEO setting. • When connecting the unit, refer to the owner's manuals for VCR mode. 12 NOTE: • The rear speakers can only be used for DVD playback, not for the TV and the audio system, as well as shown/described here. Experiment to set the...
User Guide
Page 15
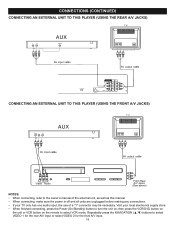
... NAVIGATION (π,†) buttons to turn the unit on the remote to the owner's manual of a "Y" connector may be necessary. then press the VCR/DVD button on the unit or VCR button on ; CONNECTIONS (CONTINUED) CONNECTING AN EXTERNAL UNIT TO THIS PLAYER (USING THE REAR A/V JACKS) CONNECTING AN EXTERNAL UNIT TO THIS PLAYER...
... NAVIGATION (π,†) buttons to turn the unit on the remote to the owner's manual of a "Y" connector may be necessary. then press the VCR/DVD button on the unit or VCR button on ; CONNECTIONS (CONTINUED) CONNECTING AN EXTERNAL UNIT TO THIS PLAYER (USING THE REAR A/V JACKS) CONNECTING AN EXTERNAL UNIT TO THIS PLAYER...
User Guide
Page 29
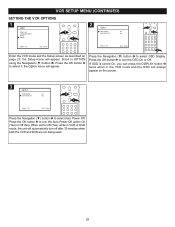
... 2 to turn the Auto Power Off option On (Yes) or Off (No). the Option menu will automatically turn off after 30 minutes when both the VCR and DVD are not being used. 28 Press the Navigation (†) button 1 to OPTION using the Navigation (†) button 1. Press the OK button 2 to turn the... OSD On or Off. When set to ON (Yes), while in the VCR mode and the OSD will appear. the Setup menu will always appear on page...
... 2 to turn the Auto Power Off option On (Yes) or Off (No). the Option menu will automatically turn off after 30 minutes when both the VCR and DVD are not being used. 28 Press the Navigation (†) button 1 to OPTION using the Navigation (†) button 1. Press the OK button 2 to turn the... OSD On or Off. When set to ON (Yes), while in the VCR mode and the OSD will appear. the Setup menu will always appear on page...
User Guide
Page 30
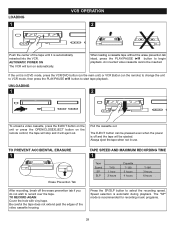
... during playback. Be careful the tape does not extend past the edges of the tape until it will turn on automatically. LOADING 1 VCR OPERATION 2 Push the center of the video cassette housing. TO PREVENT ACCIDENTAL ERASURE 1 Erase Prevention Tab After recording, break off and the...PLAY/PAUSE ®P button to begin playback. If the unit is automatically retracted into the VCR. Always eject the tape when not in DVD mode, press the VCR/DVD button (on the main unit) or VCR Button (on the remote control; When loading a cassette tape without the erase prevention tab...
... during playback. Be careful the tape does not extend past the edges of the tape until it will turn on automatically. LOADING 1 VCR OPERATION 2 Push the center of the video cassette housing. TO PREVENT ACCIDENTAL ERASURE 1 Erase Prevention Tab After recording, break off and the...PLAY/PAUSE ®P button to begin playback. If the unit is automatically retracted into the VCR. Always eject the tape when not in DVD mode, press the VCR/DVD button (on the main unit) or VCR Button (on the remote control; When loading a cassette tape without the erase prevention tab...
User Guide
Page 31
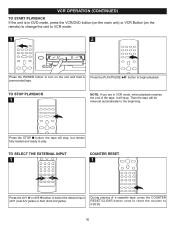
...) TO START PLAYBACK If the unit is in VCR mode, when playback reaches the end of a cassette tape, press the COUNTER RESET/CLEAR button once to reset the counter to turn on the unit ...). 1 During playing of the tape, it will stop . TO STOP PLAYBACK 1 NOTE: If you are in DVD mode, press the VCR/DVD button (on the main unit) or VCR Button (on the remote) to change the unit to VCR mode. 1 2 Press the POWER button to 0:00:00. 30 Press the PLAY/PAUSE ®P button to...
...) TO START PLAYBACK If the unit is in VCR mode, when playback reaches the end of a cassette tape, press the COUNTER RESET/CLEAR button once to reset the counter to turn on the unit ...). 1 During playing of the tape, it will stop . TO STOP PLAYBACK 1 NOTE: If you are in DVD mode, press the VCR/DVD button (on the main unit) or VCR Button (on the remote) to change the unit to VCR mode. 1 2 Press the POWER button to 0:00:00. 30 Press the PLAY/PAUSE ®P button to...
User Guide
Page 34
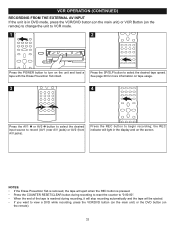
VCR OPERATION (CONTINUED) RECORDING FROM THE EXTERNAL AV INPUT If the unit is in the display and on the screen. 2 NOTES: • If the Erase Prevention ... intact. the REC indicator will light in DVD mode, press the VCR/DVD button (on the main unit) or VCR Button (on the remote) to change the unit to VCR mode. 1 2 Press the POWER button to view a DVD while recording, press the VCR/DVD button (on the main unit) or the DVD button (on tape usage. 3 3 4 1 2 Press the AV1...
VCR OPERATION (CONTINUED) RECORDING FROM THE EXTERNAL AV INPUT If the unit is in the display and on the screen. 2 NOTES: • If the Erase Prevention ... intact. the REC indicator will light in DVD mode, press the VCR/DVD button (on the main unit) or VCR Button (on the remote) to change the unit to VCR mode. 1 2 Press the POWER button to view a DVD while recording, press the VCR/DVD button (on the main unit) or the DVD button (on tape usage. 3 3 4 1 2 Press the AV1...
User Guide
Page 36
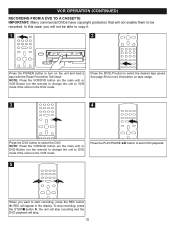
... with the Erase Prevention Tab intact. See page 29 for more information on tape usage. 3 4 Press the DVD button to select the desired tape speed. NOTE: Press the VCR/DVD button (on the main unit) or VCR Button (on the remote) to change the unit to start recording, press the REC button 1; NOTE: Press... the VCR/DVD button (on the main unit) or DVD Button (on the remote) to change the unit to DVD mode if the unit is in the VCR mode. REC will stop. 35 Press the PLAY/PAUSE ®p button to start...
... with the Erase Prevention Tab intact. See page 29 for more information on tape usage. 3 4 Press the DVD button to select the desired tape speed. NOTE: Press the VCR/DVD button (on the main unit) or VCR Button (on the remote) to change the unit to start recording, press the REC button 1; NOTE: Press... the VCR/DVD button (on the main unit) or DVD Button (on the remote) to change the unit to DVD mode if the unit is in the VCR mode. REC will stop. 35 Press the PLAY/PAUSE ®p button to start...
User Guide
Page 53
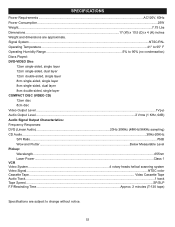
... 12cm disc 8cm disc Video Output Level ...1Vp-p Audio Output Level...2 Vrms (1 KHz, 0dB) Audio Signal Output Characteristics: Frequency Responses: DVD (Linear Audio 20Hz-20KHz (48KHz/96KHz sampling) CD Audio ...20Hz-20KHz S/N Ratio...70dB Wow and Flutter...Below Measurable Level Pickup: Wavelength......655nm Laser Power ...Class 1 VCR Video System 4 rotary heads helical scanning system Video Signal...NTSC color Cassette Tape ...Video Cassette Tape Audio Track...1 track Tape Speed......
... 12cm disc 8cm disc Video Output Level ...1Vp-p Audio Output Level...2 Vrms (1 KHz, 0dB) Audio Signal Output Characteristics: Frequency Responses: DVD (Linear Audio 20Hz-20KHz (48KHz/96KHz sampling) CD Audio ...20Hz-20KHz S/N Ratio...70dB Wow and Flutter...Below Measurable Level Pickup: Wavelength......655nm Laser Power ...Class 1 VCR Video System 4 rotary heads helical scanning system Video Signal...NTSC color Cassette Tape ...Video Cassette Tape Audio Track...1 track Tape Speed......

