
User Guide
Page 2
...; Connecting the DVD to a TV Using the S-Video Output Jack 9 • Connecting the DVD to a TV Using the Y/PB/PR Jacks 10 • Progressive (Y, PB, PR) Video OUT 10 • 525 Line Digital Progressive-scan Component Video Output 10 • Connecting the DVD to a Home Theatre System 11 About Discs 12 Setup Menu 14 • General Setup Menu 15 • Speaker Setup Menu 16 • Dolby Digital Setup Menu 16 • Preferences Menu 17 • Parental 18 • Password 18 Basic Operation 19 • Audio Mode...
...; Connecting the DVD to a TV Using the S-Video Output Jack 9 • Connecting the DVD to a TV Using the Y/PB/PR Jacks 10 • Progressive (Y, PB, PR) Video OUT 10 • 525 Line Digital Progressive-scan Component Video Output 10 • Connecting the DVD to a Home Theatre System 11 About Discs 12 Setup Menu 14 • General Setup Menu 15 • Speaker Setup Menu 16 • Dolby Digital Setup Menu 16 • Preferences Menu 17 • Parental 18 • Password 18 Basic Operation 19 • Audio Mode...
User Guide
Page 3
... SHOCK, DO NOT REMOVE COVER (OR BACK). CAUTION: THIS DIGITAL VIDEO DISC PLAYER EMPLOYS A LASER SYSTEM. TO PREVENT DIRECT EXPOSURE TO LASER BEAM, DO NOT TRY TO OPEN THE ENCLOSURE. NO USER-SERVICEABLE PARTS INSIDE. REFER SERVICING TO QUALIFIED SERVICE PERSONNEL. The lightning flash with arrowhead symbol within an equilateral triangle is intended to alert the user to other devices. WARNING: TO REDUCE...
... SHOCK, DO NOT REMOVE COVER (OR BACK). CAUTION: THIS DIGITAL VIDEO DISC PLAYER EMPLOYS A LASER SYSTEM. TO PREVENT DIRECT EXPOSURE TO LASER BEAM, DO NOT TRY TO OPEN THE ENCLOSURE. NO USER-SERVICEABLE PARTS INSIDE. REFER SERVICING TO QUALIFIED SERVICE PERSONNEL. The lightning flash with arrowhead symbol within an equilateral triangle is intended to alert the user to other devices. WARNING: TO REDUCE...
User Guide
Page 5
... 810-21) GROUND CLAMPS NEC - REPLACEMENT PARTS When replacement parts are covered by the operating instructions, as recommended by following conditions: a. If the product has been exposed to a wall or ceiling only as an adjustment of the NEC that provides guidelines for service. 23. Adjust only those controls that are required, be sure the service technician uses replacement parts specified by a qualified technician to...
... 810-21) GROUND CLAMPS NEC - REPLACEMENT PARTS When replacement parts are covered by the operating instructions, as recommended by following conditions: a. If the product has been exposed to a wall or ceiling only as an adjustment of the NEC that provides guidelines for service. 23. Adjust only those controls that are required, be sure the service technician uses replacement parts specified by a qualified technician to...
User Guide
Page 6
... directly hits the unit. • In summer, when you use the DVD player occasionally. After two or three hours, the DVD player will seldom occur. PRECAUTIONS NOTES ON HANDLING: • When shipping the DVD player, always use , be performed by a qualified service technician. Use a dry cloth to help minimize the possibility of the glass. Remove the disc, connect the power cord of the DVD player. • If you just turned...
... directly hits the unit. • In summer, when you use the DVD player occasionally. After two or three hours, the DVD player will seldom occur. PRECAUTIONS NOTES ON HANDLING: • When shipping the DVD player, always use , be performed by a qualified service technician. Use a dry cloth to help minimize the possibility of the glass. Remove the disc, connect the power cord of the DVD player. • If you just turned...
User Guide
Page 7
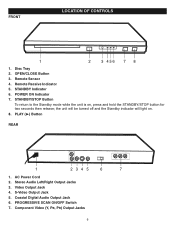
...STANDBY/STOP Button To return to the Standby mode while the unit is on . 8. AC Power Cord 2. Stereo Audio Left/Right Output Jacks 3. PROGRESSIVE SCAN ON/OFF Switch 7. the unit will be turned off and the Standby indicator will light on , press and hold the STANDBY/STOP button for two seconds then release; Video Output Jack 4. Component Video (Y, PB, PR) Output Jacks 6 Remote Sensor 4. Remote Receive Indicator 5. STANDBY Indicator 6. POWER ON Indicator 7. PLAY (®) Button REAR 1 2345 6 7 1. OPEN/CLOSE Button 3. Coaxial Digital Audio Output Jack 6. Disc Tray...
...STANDBY/STOP Button To return to the Standby mode while the unit is on . 8. AC Power Cord 2. Stereo Audio Left/Right Output Jacks 3. PROGRESSIVE SCAN ON/OFF Switch 7. the unit will be turned off and the Standby indicator will light on , press and hold the STANDBY/STOP button for two seconds then release; Video Output Jack 4. Component Video (Y, PB, PR) Output Jacks 6 Remote Sensor 4. Remote Receive Indicator 5. STANDBY Indicator 6. POWER ON Indicator 7. PLAY (®) Button REAR 1 2345 6 7 1. OPEN/CLOSE Button 3. Coaxial Digital Audio Output Jack 6. Disc Tray...
User Guide
Page 9
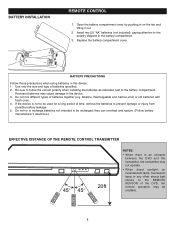
Open the battery compartment cover by pushing in on the REMOTE SENSOR of time, remove the batteries to the battery compartment. Replace the battery compartment cover. they can overheat and rupture. (Follow battery manufacturer's directions.) EFFECTIVE DISTANCE OF THE REMOTE CONTROL TRANSMITTER 20ft 45 45 NOTES: • When there is not to be recharged; BATTERY PRECAUTIONS Follow these precautions when using batteries in the battery compartment. 3. Be sure...
Open the battery compartment cover by pushing in on the REMOTE SENSOR of time, remove the batteries to the battery compartment. Replace the battery compartment cover. they can overheat and rupture. (Follow battery manufacturer's directions.) EFFECTIVE DISTANCE OF THE REMOTE CONTROL TRANSMITTER 20ft 45 45 NOTES: • When there is not to be recharged; BATTERY PRECAUTIONS Follow these precautions when using batteries in the battery compartment. 3. Be sure...
User Guide
Page 10
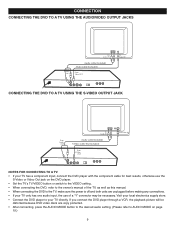
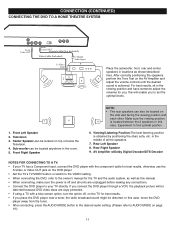
... DVD player. • Set the TV's TV/VIDEO button or switch to the VIDEO setting. • When connecting the DVD, refer to the owner's manual of a "Y" connector may be necessary. If you connect the DVD player through a VCR, the playback picture will be distorted because DVD video discs are unplugged before making any connections. • If your TV only has one audio input, the use the S-Video or Video Out jack on page 19.) 9 CONNECTION CONNECTING THE DVD TO A TV USING THE AUDIO/VIDEO OUTPUT...
... DVD player. • Set the TV's TV/VIDEO button or switch to the VIDEO setting. • When connecting the DVD, refer to the owner's manual of a "Y" connector may be necessary. If you connect the DVD player through a VCR, the playback picture will be distorted because DVD video discs are unplugged before making any connections. • If your TV only has one audio input, the use the S-Video or Video Out jack on page 19.) 9 CONNECTION CONNECTING THE DVD TO A TV USING THE AUDIO/VIDEO OUTPUT...
User Guide
Page 11
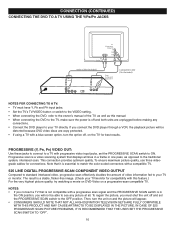
.... To ensure maximum picture quality, use three videograde cables for best results. Progressive scan is a video scanning system that displays all . Then, turn the option off, on a progressive-scan compatible TV. Note that is not compatible with this manual. • When connecting the DVD to the TV, make sure the power is essential to match the color-coded connectors with a compatible TV. 525 LINE DIGITAL PROGRESSIVE-SCAN COMPONENT VIDEO OUTPUT Compared to standard interlaced video, progressive scan effectively doubles the...
.... To ensure maximum picture quality, use three videograde cables for best results. Progressive scan is a video scanning system that displays all . Then, turn the option off, on a progressive-scan compatible TV. Note that is not compatible with this manual. • When connecting the DVD to the TV, make sure the power is essential to match the color-coded connectors with a compatible TV. 525 LINE DIGITAL PROGRESSIVE-SCAN COMPONENT VIDEO OUTPUT Compared to standard interlaced video, progressive scan effectively doubles the...
User Guide
Page 12
... power is off , on the side wall facing the viewing position and each other. If you connect the DVD player through a VCR, the playback picture will enable you ; in the middle of all units are copy protected. • If using a TV with the component cable for best results, otherwise use the S-Video or Video OUT jack on the AV Amplifier and adjust the volume controls until the desired sound...
... power is off , on the side wall facing the viewing position and each other. If you connect the DVD player through a VCR, the playback picture will enable you ; in the middle of all units are copy protected. • If using a TV with the component cable for best results, otherwise use the S-Video or Video OUT jack on the AV Amplifier and adjust the volume controls until the desired sound...

User Guide
Page 13
... manual accompanying the DVD disc. This player conforms to many variables, including recording condition, type of disc, writing software, etc., this DVD player will not operate with certain DVDs. DISC TYPES: DVD Data on most DVDs is divided into sections called "chapters", each of this unit does not guarantee playback of "MPEG1 Audio Layer 3". Some features of which is given a track number. In this DVD player: VIDEO KODAK PICTURE CD MP3 When playing...
... manual accompanying the DVD disc. This player conforms to many variables, including recording condition, type of disc, writing software, etc., this DVD player will not operate with certain DVDs. DISC TYPES: DVD Data on most DVDs is divided into sections called "chapters", each of this unit does not guarantee playback of "MPEG1 Audio Layer 3". Some features of which is given a track number. In this DVD player: VIDEO KODAK PICTURE CD MP3 When playing...
User Guide
Page 14
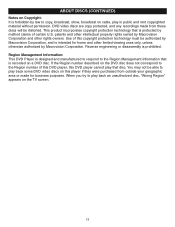
... made from these discs will be able to copy, broadcast, show, broadcast on cable, play in public and rent copyrighted material without permission. Use of this DVD player cannot play that is forbidden by law to play back an unauthorized disc, "Wrong Region" appears on the TV screen. 13 DVD video discs are copy protected, and any recordings made for home and other rights owners. ABOUT DISCS (CONTINUED) Notes on...
... made from these discs will be able to copy, broadcast, show, broadcast on cable, play in public and rent copyrighted material without permission. Use of this DVD player cannot play that is forbidden by law to play back an unauthorized disc, "Wrong Region" appears on the TV screen. 13 DVD video discs are copy protected, and any recordings made for home and other rights owners. ABOUT DISCS (CONTINUED) Notes on...
User Guide
Page 15
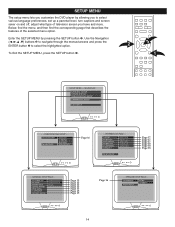
... DVD player by pressing the SETUP button 1. Enter the SETUP MENU by allowing you to select the highlighted option. MAIN PAGE GENERAL SETUP SPEAKER SETUP DOLBY DIGITAL SETUP PREFERENCE SETUP EXIT SETUP - - DOWNMIX MAIN PAGE LT/RT STEREO 14 DOLBY DIGITAL SETUP - - AUDIO SUBTITLE DISC MENU PARENTAL PASSWORD DEFAULT ENGLISH FRENCH SPANISH GERMAN JAPANESE MAIN PAGE Page 17 Page 17 Page 17 Page 18 Page 18 Page 18 - - To Exit the SETUP MENU, press the SETUP button 1. 2 3 1 SETUP MENU - - TV DISPLAY TV TYPE VIDEO...
... DVD player by pressing the SETUP button 1. Enter the SETUP MENU by allowing you to select the highlighted option. MAIN PAGE GENERAL SETUP SPEAKER SETUP DOLBY DIGITAL SETUP PREFERENCE SETUP EXIT SETUP - - DOWNMIX MAIN PAGE LT/RT STEREO 14 DOLBY DIGITAL SETUP - - AUDIO SUBTITLE DISC MENU PARENTAL PASSWORD DEFAULT ENGLISH FRENCH SPANISH GERMAN JAPANESE MAIN PAGE Page 17 Page 17 Page 17 Page 18 Page 18 Page 18 - - To Exit the SETUP MENU, press the SETUP button 1. 2 3 1 SETUP MENU - - TV DISPLAY TV TYPE VIDEO...
User Guide
Page 16
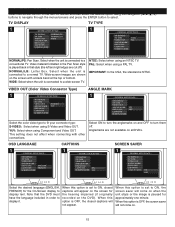
... Select the color video type to a conventional TV. GENERAL SETUP PAGE - - GENERAL SETUP PAGE - - Select when the unit is connected to fit your connector type: S-VIDEO: Select when using an NTSC TV. WIDE: Select when the unit is set to ON, closed captions will come on and OFF to turn them off ). TV DISPLAY TV TYPE VIDEO OUT ANGLE MARK OSD LANG CAPTIONS SCREEN SAVER S-VIDEO YUV ANGLE MARK 1 - - YUV: Select when using a PAL...
... Select the color video type to a conventional TV. GENERAL SETUP PAGE - - GENERAL SETUP PAGE - - Select when the unit is connected to fit your connector type: S-VIDEO: Select when using an NTSC TV. WIDE: Select when the unit is set to ON, closed captions will come on and OFF to turn them off ). TV DISPLAY TV TYPE VIDEO OUT ANGLE MARK OSD LANG CAPTIONS SCREEN SAVER S-VIDEO YUV ANGLE MARK 1 - - YUV: Select when using a PAL...
User Guide
Page 18
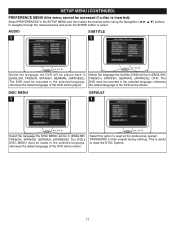
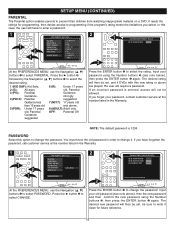
... useful to their original factory settings. AUDIO 1 - - AUDIO SUBTITLE DISC MENU PARENTAL PASSWORD DEFAULT RESET MAIN PAGE Select the language the DISC MENU will be in (ENGLISH, FRENCH, SPANISH, GERMAN, JAPANESE). This is inserted): Select PREFERENCES in (ENGLISH, FRENCH, SPANISH, GERMAN, JAPANESE). PREFERENCES PAGE - - Select the language the Subtitle (OSD) will be in the SETUP MENU and then select the desired option using the Navigation buttons to navigate through the menus/screens and press the ENTER button to select. The DVD...
... useful to their original factory settings. AUDIO 1 - - AUDIO SUBTITLE DISC MENU PARENTAL PASSWORD DEFAULT RESET MAIN PAGE Select the language the DISC MENU will be in (ENGLISH, FRENCH, SPANISH, GERMAN, JAPANESE). This is inserted): Select PREFERENCES in (ENGLISH, FRENCH, SPANISH, GERMAN, JAPANESE). PREFERENCES PAGE - - Select the language the Subtitle (OSD) will be in the SETUP MENU and then select the desired option using the Navigation buttons to navigate through the menus/screens and press the ENTER button to select. The DVD...
User Guide
Page 19
... MENU, use the Navigation (œ,ƒ) buttons ‚ to select PASSWORD. Press the ENTER button ‚ to prevent their children from watching inappropriate material on a DVD. Input your password using the Number buttons ƒ, then press the ENTER button ‚ again. You must know the old password in order to programming if the program's rating meets the limitations you select. Input your password, contact customer service at the number listed in the Warranty. AUDIO SUBTITLE DISC MENU PARENTAL PASSWORD DEFAULT...
... MENU, use the Navigation (œ,ƒ) buttons ‚ to select PASSWORD. Press the ENTER button ‚ to prevent their children from watching inappropriate material on a DVD. Input your password using the Number buttons ƒ, then press the ENTER button ‚ again. You must know the old password in order to programming if the program's rating meets the limitations you select. Input your password, contact customer service at the number listed in the Warranty. AUDIO SUBTITLE DISC MENU PARENTAL PASSWORD DEFAULT...
User Guide
Page 20
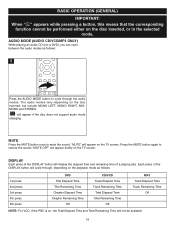
... through , depending on the playback mode as follows: 1 Press the AUDIO MODE button to restore the sound; Each press of a playing disc. The audio modes vary depending on the TV screen. MUTE Press the MUTE button once to mute the sound, "MUTE" will not be performed either on the TV screen. "MUTE OFF" will appear if the disc does not support audio mode changing. BASIC OPERATION (GENERAL) IMPORTANT: When " " appears...
... through , depending on the playback mode as follows: 1 Press the AUDIO MODE button to restore the sound; Each press of a playing disc. The audio modes vary depending on the TV screen. MUTE Press the MUTE button once to mute the sound, "MUTE" will not be performed either on the TV screen. "MUTE OFF" will appear if the disc does not support audio mode changing. BASIC OPERATION (GENERAL) IMPORTANT: When " " appears...
User Guide
Page 21
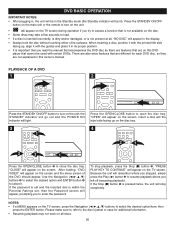
.../OFF button to open the disc tray, "OPEN" will appear on the unit; the STANDBY indicator will go out and the POWER ON indicator will light. 3 1 Press the OPEN/CLOSE button to turn on the unit. • " " will appear on the TV screen during operation if you read the manual that accompanies the DVD disc as there are on the TV screen, press the Navigation buttons to enter the password. After loading, "DVD VIDEO...
.../OFF button to open the disc tray, "OPEN" will appear on the unit; the STANDBY indicator will go out and the POWER ON indicator will light. 3 1 Press the OPEN/CLOSE button to turn on the unit. • " " will appear on the TV screen during operation if you read the manual that accompanies the DVD disc as there are on the TV screen, press the Navigation buttons to enter the password. After loading, "DVD VIDEO...
User Guide
Page 23
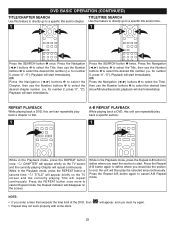
... unit will repeat continuously. Playback will start immediately. the Repeat indicator will start immediately. DVD BASIC OPERATION (CONTINUED) TITLE/CHAPTER SEARCH Use this feature to directly go to a specific title and/or chapter. 1 2 2 TITLE/TIME SEARCH Use this unit can repeatedly play back a chapter or title. 1 A-B REPEAT PLAYBACK While playing back a DVD, this feature to directly go to start. Playback will disappear on the screen. Press the Repeat A-B button again to...
... unit will repeat continuously. Playback will start immediately. the Repeat indicator will start immediately. DVD BASIC OPERATION (CONTINUED) TITLE/CHAPTER SEARCH Use this feature to directly go to a specific title and/or chapter. 1 2 2 TITLE/TIME SEARCH Use this unit can repeatedly play back a chapter or title. 1 A-B REPEAT PLAYBACK While playing back a DVD, this feature to directly go to start. Playback will disappear on the screen. Press the Repeat A-B button again to...
User Guide
Page 31
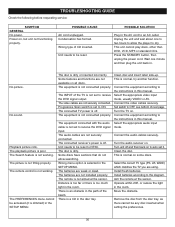
.... Progressive Scan switch is set to dry. The equipment connected with the audio cable is normal on . The disc is not connected properly. Some discs have sections that do not allow the player to receive the DVD signal input. The batteries are not available on to auto set to ON. This is not fitting properly. Select the appropriate video input mode, usually VIDEO or AV. This is not set to receive the DVD signal output. Unit needs to be reset...
.... Progressive Scan switch is set to dry. The equipment connected with the audio cable is normal on . The disc is not connected properly. Some discs have sections that do not allow the player to receive the DVD signal input. The batteries are not available on to auto set to ON. This is not fitting properly. Select the appropriate video input mode, usually VIDEO or AV. This is not set to receive the DVD signal output. Unit needs to be reset...
User Guide
Page 32
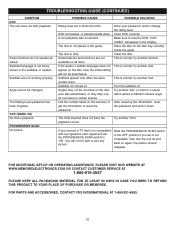
... have the playback control. Try another function. Slide the PROGRESSIVE SCAN switch to reset the password. Some functions do not operate as stated. Angle cannot be able to 'ON', you connect a TV that is not compatible with a progressive scan signal and set is not being shown in the guide. This is normal, try another disc. After receiving the information, reset the password and write it down . the picture should reappear. FOR PARTS AND...
... have the playback control. Try another function. Slide the PROGRESSIVE SCAN switch to reset the password. Some functions do not operate as stated. Angle cannot be able to 'ON', you connect a TV that is not compatible with a progressive scan signal and set is not being shown in the guide. This is normal, try another disc. After receiving the information, reset the password and write it down . the picture should reappear. FOR PARTS AND...


