
User Guide
Page 4
... it comfortably and clearly, and without affecting your protection. Once you have established a comfortable sound level: • Set the dial and leave it 's time to consider how you avoid prolonged exposure to your hearing. Taking a minute to do this manufacturer and the Electronic ...Industries Association's Consumer Electronics Group recommend you can be loud and harmful to excessive noise. Over time your hearing adapts. Since hearing damage from traffic Light traffic, normal conversation, quiet office Air conditioner at 20 feet, sewing ...
... it comfortably and clearly, and without affecting your protection. Once you have established a comfortable sound level: • Set the dial and leave it 's time to consider how you avoid prolonged exposure to your hearing. Taking a minute to do this manufacturer and the Electronic ...Industries Association's Consumer Electronics Group recommend you can be loud and harmful to excessive noise. Over time your hearing adapts. Since hearing damage from traffic Light traffic, normal conversation, quiet office Air conditioner at 20 feet, sewing ...
User Guide
Page 5
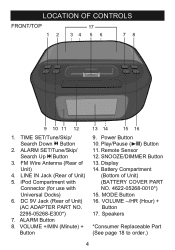
... cover Part No. 4622-05268-0010*) 15. Speakers *Consumer Replaceable Part (See page 18 to order.) 4 TIME SET/Tune/Skip/ Search Down o Button 2. SNOOZE/Dimmer Button 13. Battery Compartment (Bottom of Unit) 4. MODE Button 16. ALARM SET/Tune/Skip/ Search Up n Button 3. LINE IN Jack (Rear of Unit) (AC Adapter Part No. 2295...
... cover Part No. 4622-05268-0010*) 15. Speakers *Consumer Replaceable Part (See page 18 to order.) 4 TIME SET/Tune/Skip/ Search Down o Button 2. SNOOZE/Dimmer Button 13. Battery Compartment (Bottom of Unit) 4. MODE Button 16. ALARM SET/Tune/Skip/ Search Up n Button 3. LINE IN Jack (Rear of Unit) (AC Adapter Part No. 2295...
User Guide
Page 6
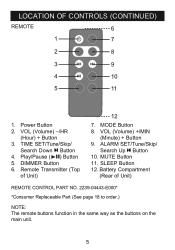
VOL (Volume) +/MIN (Minute) + Button 9. ALARM SET/Tune/Skip/ Search Up n Button 10. SLEEP Button 12. TIME SET/Tune/Skip/ Search Down o Button 4. Play/Pause (®p) Button 5. MODE Button 8. Remote Transmitter (Top of Unit) Remote control Part No. 2239-04443-E000* *Consumer Replaceable ...
VOL (Volume) +/MIN (Minute) + Button 9. ALARM SET/Tune/Skip/ Search Up n Button 10. SLEEP Button 12. TIME SET/Tune/Skip/ Search Down o Button 4. Play/Pause (®p) Button 5. MODE Button 8. Remote Transmitter (Top of Unit) Remote control Part No. 2239-04443-E000* *Consumer Replaceable ...
User Guide
Page 13
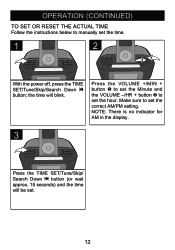
OPERATION (CONTINUED) TO SET OR RESET THE ACTUAL TIME Follow the instructions below to manually set the correct AM/PM setting. Make sure to set . 12 the time will be set the hour. NOTE: There is no indicator for AM in the display. 3 Press the TIME SET/Tune/Skip/ Search Down o button (or wait approx. 15 seconds) and the time will blink. Press the Volume +/MIN + button 1 to set the Minute and the Volume -/HR + button 2 to set the time. 1 2 21 With the power off, press the TIME SET/Tune/Skip/Search Down o button;
OPERATION (CONTINUED) TO SET OR RESET THE ACTUAL TIME Follow the instructions below to manually set the correct AM/PM setting. Make sure to set . 12 the time will be set the hour. NOTE: There is no indicator for AM in the display. 3 Press the TIME SET/Tune/Skip/ Search Down o button (or wait approx. 15 seconds) and the time will blink. Press the Volume +/MIN + button 1 to set the Minute and the Volume -/HR + button 2 to set the time. 1 2 21 With the power off, press the TIME SET/Tune/Skip/Search Down o button;
User Guide
Page 14
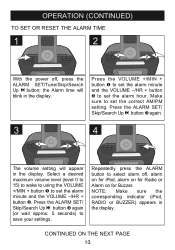
...NOTE: Make sure the corresponding indicator (iPod, RADIO or BUZZER) appears in the display. CONTINUED ON THE NEXT PAGE 13 OPERATION (CONTINUED) TO SET OR RESET THE ALARM TIME 1 2 3 21 With the power off , alarm on for iPod, alarm on for Radio or Alarm on for Buzzer. the Alarm... time will appear in the display. Repeatedly press the ALARM button to set the correct AM/PM setting. Press the Volume +/MIN + button 1 to set the alarm minute and the Volume -/HR + button 2 to save your settings. Press the ALARM SET/ Skip/Search Up n button 3 again...
...NOTE: Make sure the corresponding indicator (iPod, RADIO or BUZZER) appears in the display. CONTINUED ON THE NEXT PAGE 13 OPERATION (CONTINUED) TO SET OR RESET THE ALARM TIME 1 2 3 21 With the power off , alarm on for iPod, alarm on for Radio or Alarm on for Buzzer. the Alarm... time will appear in the display. Repeatedly press the ALARM button to set the correct AM/PM setting. Press the Volume +/MIN + button 1 to set the alarm minute and the Volume -/HR + button 2 to save your settings. Press the ALARM SET/ Skip/Search Up n button 3 again...
User Guide
Page 15
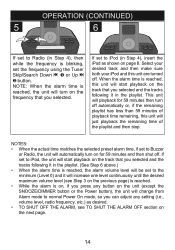
... iPod, the unit will start playback on the track that you selected. NOTES: • When the actual time matches the selected preset alarm time, if set to Buzzer or Radio, the unit will automatically turn on for 59 minutes then turn off automatically or, if the remaining playlist has less ...on the frequency that you selected and the tracks following it in the playlist. (See Step 6 above.) • When the alarm time is reached, the alarm volume level will be set to the minimum (Level 0) and it will increase one level continuously until the desired maximum volume level (see TO SHUT THE...
... iPod, the unit will start playback on the track that you selected. NOTES: • When the actual time matches the selected preset alarm time, if set to Buzzer or Radio, the unit will automatically turn on for 59 minutes then turn off automatically or, if the remaining playlist has less ...on the frequency that you selected and the tracks following it in the playlist. (See Step 6 above.) • When the alarm time is reached, the alarm volume level will be set to the minimum (Level 0) and it will increase one level continuously until the desired maximum volume level (see TO SHUT THE...
User Guide
Page 18
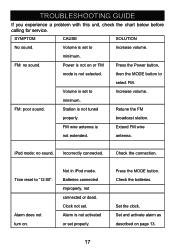
... batteries. TROUBLESHOOTING GUIDE If you experience a problem with this unit, check the chart below before calling for service. Power is set to Increase volume. then the MODE button to "12:00". SYMPTOM CAUSE SOLUTION No sound. minimum. FM wire antenna is ...not tuned Retune the FM properly. iPod mode: no sound. Time reset to select FM. Press the MODE button. Set the clock. Volume is not on . Clock not set properly. Station is Extend FM wire not extended. broadcast station. Check the connection....
... batteries. TROUBLESHOOTING GUIDE If you experience a problem with this unit, check the chart below before calling for service. Power is set to Increase volume. then the MODE button to "12:00". SYMPTOM CAUSE SOLUTION No sound. minimum. FM wire antenna is ...not tuned Retune the FM properly. iPod mode: no sound. Time reset to select FM. Press the MODE button. Set the clock. Volume is not on . Clock not set properly. Station is Extend FM wire not extended. broadcast station. Check the connection....


