User Guide
Page 2
...JUSQU'AU FOND. iPod is intended to alert the user to operate this equipment may cause harmful interference unless the modifications are expressly approved in the U.S. and other countries. 1 NO USERSERVICEABLE PARTS INSIDE. Changes or modifi...user to persons. FCC WARNING: This equipment may be of sufficient magnitude to constitute a risk of electric shock to the presence of Apple Computer, Inc., registered in the instruction manual. DANGEROUS VOLTAGE: The lightning flash with arrowhead symbol within the product's enclosure that may generate or use radio...
...JUSQU'AU FOND. iPod is intended to alert the user to operate this equipment may cause harmful interference unless the modifications are expressly approved in the U.S. and other countries. 1 NO USERSERVICEABLE PARTS INSIDE. Changes or modifi...user to persons. FCC WARNING: This equipment may be of sufficient magnitude to constitute a risk of electric shock to the presence of Apple Computer, Inc., registered in the instruction manual. DANGEROUS VOLTAGE: The lightning flash with arrowhead symbol within the product's enclosure that may generate or use radio...
User Guide
Page 3
...OR MOISTURE. If this product. SURGE PROTECTORS: It is connected. • Consult the dealer or an experienced radio/TV technician for help. This Class B digital apparatus complies with Class B digital device regulations. However, ...connection. This equipment generates, uses and can be determined by turning the equipment off and on, the user is no guarantee that to use a surge protector for this equipment does cause harmful interference to radio or television reception, which the receiver is recommended to which can radiate radio frequency energy and, if not installed and used...
...OR MOISTURE. If this product. SURGE PROTECTORS: It is connected. • Consult the dealer or an experienced radio/TV technician for help. This Class B digital apparatus complies with Class B digital device regulations. However, ...connection. This equipment generates, uses and can be determined by turning the equipment off and on, the user is no guarantee that to use a surge protector for this equipment does cause harmful interference to radio or television reception, which the receiver is recommended to which can radiate radio frequency energy and, if not installed and used...
User Guide
Page 4
... hearing adapts. To establish a safe level: • Start your volume control at a safe level BEFORE your equipment offers. This manufacturer and the Electronic Industries Association's Consumer Electronics Group want you listening for your hearing. Once you have established a comfortable sound level: • Set the dial and leave it 's time to excessive noise. Dear Customer: Selecting fine audio equipment...
... hearing adapts. To establish a safe level: • Start your volume control at a safe level BEFORE your equipment offers. This manufacturer and the Electronic Industries Association's Consumer Electronics Group want you listening for your hearing. Once you have established a comfortable sound level: • Set the dial and leave it 's time to excessive noise. Dear Customer: Selecting fine audio equipment...
User Guide
Page 5
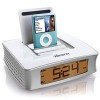
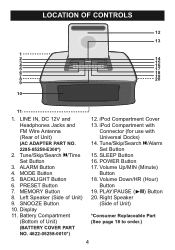
... 13. SLEEP Button 16. MODE Button 5. PRESET Button 7. Battery Compartment (Bottom of Unit) *Consumer Replaceable Part (See page 18 to order.) 4 POWER Button 17. Volume Down/HR (Hour) Button 19. Right Speaker (Side of Unit) (BATTERY COVER PART NO. 4622-05258-0010*) 12. ALARM Button 4. MEMORY Button 8. Left Speaker (Side of Unit) (AC ADAPTER PART NO. 2295-05258-E300*) 2. Display 11. Volume Up/MIN (Minute) Button 18. Tune/Skip/Search n/Alarm Set Button 15. LINE IN, DC 12V and Headphones Jacks and...
... 13. SLEEP Button 16. MODE Button 5. PRESET Button 7. Battery Compartment (Bottom of Unit) *Consumer Replaceable Part (See page 18 to order.) 4 POWER Button 17. Volume Down/HR (Hour) Button 19. Right Speaker (Side of Unit) (BATTERY COVER PART NO. 4622-05258-0010*) 12. ALARM Button 4. MEMORY Button 8. Left Speaker (Side of Unit) (AC ADAPTER PART NO. 2295-05258-E300*) 2. Display 11. Volume Up/MIN (Minute) Button 18. Tune/Skip/Search n/Alarm Set Button 15. LINE IN, DC 12V and Headphones Jacks and...

User Guide
Page 6
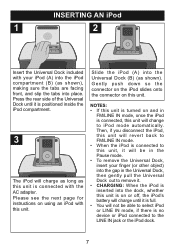
... fresh ones. 4. Connect the other end to provide a backup for the clock and alarm time for the front of unit longest playing time. 3. Place the battery door back on the tab, then removing the door. 2. If the device is a power failure. • The battery indicator will blink in on the compartment. it can also be used for a long period of batteries together (e.g. Do...
... fresh ones. 4. Connect the other end to provide a backup for the clock and alarm time for the front of unit longest playing time. 3. Place the battery door back on the tab, then removing the door. 2. If the device is a power failure. • The battery indicator will blink in on the compartment. it can also be used for a long period of batteries together (e.g. Do...
User Guide
Page 7
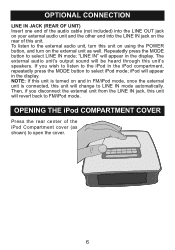
... LINE IN jack, this unit will be heard through this unit. To listen to the external audio unit, turn this unit on using the POWER button, and turn on and in the iPod compartment, repeatedly press the MODE button to FM/iPod mode. "LINE IN" will appear in the display. iPod will appear in the display. Repeatedly press the MODE button to LINE IN mode automatically. NOTE: If this unit will change to select LINE IN mode...
... LINE IN jack, this unit will be heard through this unit. To listen to the external audio unit, turn this unit on using the POWER button, and turn on and in the iPod compartment, repeatedly press the MODE button to FM/iPod mode. "LINE IN" will appear in the display. iPod will appear in the display. Repeatedly press the MODE button to LINE IN mode automatically. NOTE: If this unit will change to select LINE IN mode...
User Guide
Page 8
... will change to select iPod or LINE IN mode, if there is connected, this unit is connected with the AC adapter. Press the rear side of the Universal Dock until it is positioned inside the iPod compartment. 3 The iPod will charge as long as this unit will not be in FM/LINE IN mode, once the iPod is no device or iPod connected to the LINE IN jack...
... will change to select iPod or LINE IN mode, if there is connected, this unit is connected with the AC adapter. Press the rear side of the Universal Dock until it is positioned inside the iPod compartment. 3 The iPod will charge as long as this unit will not be in FM/LINE IN mode, once the iPod is no device or iPod connected to the LINE IN jack...
User Guide
Page 9
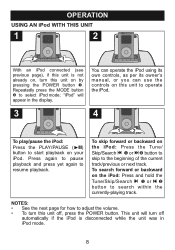
... 1 2 2 1 With an iPod connected (see previous page), if this unit is not already on, turn this unit off automatically if the iPod is disconnected while the unit was in the display. You can operate the iPod using its own controls, as per its owner's manual, or you can use the controls on this unit on the iPod: Press the Tune/ Skip/Search o 1 or n 2 button to skip...
... 1 2 2 1 With an iPod connected (see previous page), if this unit is not already on, turn this unit off automatically if the iPod is disconnected while the unit was in the display. You can operate the iPod using its own controls, as per its owner's manual, or you can use the controls on this unit on the iPod: Press the Tune/ Skip/Search o 1 or n 2 button to skip...
User Guide
Page 10
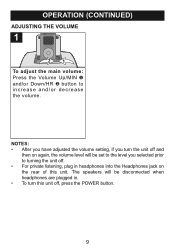
The speakers will be set to the level you turn the unit off and then on the rear of this unit off . • For private listening, plug in headphones into the Headphones jack on again, the volume level will be disconnected when headphones are plugged in. • To turn this unit. OPERATION (CONTINUED) ADJUSTING THE VOLUME 1 2 1 To adjust the main volume: Press the Volume Up/MIN 1 and/or Down/HR 2 button to turning the unit off , press the POWER button. 9 NOTES: • After you have adjusted the volume setting, if you selected prior to increase and/or decrease the volume.
The speakers will be set to the level you turn the unit off and then on the rear of this unit off . • For private listening, plug in headphones into the Headphones jack on again, the volume level will be disconnected when headphones are plugged in. • To turn this unit. OPERATION (CONTINUED) ADJUSTING THE VOLUME 1 2 1 To adjust the main volume: Press the Volume Up/MIN 1 and/or Down/HR 2 button to turning the unit off , press the POWER button. 9 NOTES: • After you have adjusted the volume setting, if you selected prior to increase and/or decrease the volume.
User Guide
Page 11
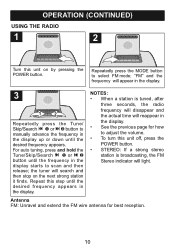
...; Repeatedly press the MODE button to adjust the volume. • To turn this unit off, press the POWER button. • STEREO: If a strong stereo station is tuned, after three seconds, the radio frequency will disappear and the actual time will light. the tuner will appear in the display. • See the previous page for best reception. 10 "FM" and the frequency will search and then stop on...
...; Repeatedly press the MODE button to adjust the volume. • To turn this unit off, press the POWER button. • STEREO: If a strong stereo station is tuned, after three seconds, the radio frequency will disappear and the actual time will light. the tuner will appear in the display. • See the previous page for best reception. 10 "FM" and the frequency will search and then stop on...
User Guide
Page 12
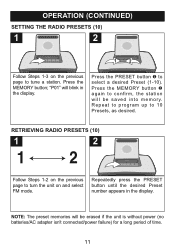
... batteries/AC adapter isn't connected/power failure) for a long period of time. 11 Repeat to program up to select a desired Preset (1-10). Press the MEMORY button 2 again to confirm, the station will blink in the display. RETRIEVING RADIO PRESETS (10) 1 2 Follow Steps 1-2 on and select FM mode. Repeatedly press the PRESET button until the desired Preset number appears in the display. OPERATION (CONTINUED) SETTING THE RADIO PRESETS (10) 1 2 1 2 Follow Steps 1-3 on the previous page to turn...
... batteries/AC adapter isn't connected/power failure) for a long period of time. 11 Repeat to program up to select a desired Preset (1-10). Press the MEMORY button 2 again to confirm, the station will blink in the display. RETRIEVING RADIO PRESETS (10) 1 2 Follow Steps 1-2 on and select FM mode. Repeatedly press the PRESET button until the desired Preset number appears in the display. OPERATION (CONTINUED) SETTING THE RADIO PRESETS (10) 1 2 1 2 Follow Steps 1-3 on the previous page to turn...
User Guide
Page 13
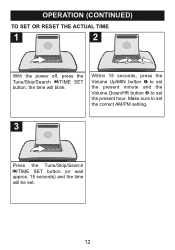
Within 15 seconds, press the Volume Up/MIN button 1 to set the present minute and the Volume Down/HR button 2 to set the correct AM/PM setting. 3 Press the Tune/Skip/Search o/TIME SET button (or wait approx. 15 seconds) and the time will blink. the time will be set the present hour. Make sure to set . 12 OPERATION (CONTINUED) TO SET OR RESET THE ACTUAL TIME 1 2 2 1 With the power off, press the Tune/Skip/Search o/TIME SET button;
Within 15 seconds, press the Volume Up/MIN button 1 to set the present minute and the Volume Down/HR button 2 to set the correct AM/PM setting. 3 Press the Tune/Skip/Search o/TIME SET button (or wait approx. 15 seconds) and the time will blink. the time will be set the present hour. Make sure to set . 12 OPERATION (CONTINUED) TO SET OR RESET THE ACTUAL TIME 1 2 2 1 With the power off, press the Tune/Skip/Search o/TIME SET button;
User Guide
Page 14
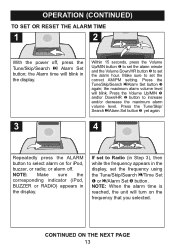
... Tune/Skip/Search n/ Alarm Set button; the Alarm time will blink. NOTE: Make sure the corresponding indicator (iPod, BUZZER or RADIO) appears in the display. NOTE: When the alarm time is reached, the unit will turn on for iPod, buzzer, or radio; CONTINUED ON THE NEXT PAGE 13 Press the Tune/Skip/ Search n/Alarm Set button 3 yet again. 3 4 1 2 Repeatedly press the ALARM button to set the alarm hour. OPERATION (CONTINUED) TO SET OR RESET THE ALARM TIME 1 2 3 2 1 With the power off . Press...
... Tune/Skip/Search n/ Alarm Set button; the Alarm time will blink. NOTE: Make sure the corresponding indicator (iPod, BUZZER or RADIO) appears in the display. NOTE: When the alarm time is reached, the unit will turn on for iPod, buzzer, or radio; CONTINUED ON THE NEXT PAGE 13 Press the Tune/Skip/ Search n/Alarm Set button 3 yet again. 3 4 1 2 Repeatedly press the ALARM button to set the alarm hour. OPERATION (CONTINUED) TO SET OR RESET THE ALARM TIME 1 2 3 2 1 With the power off . Press...
User Guide
Page 15
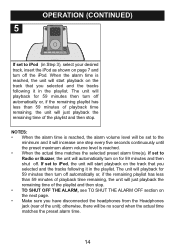
... set to Radio or Buzzer, the unit will start playback on the track that you selected and the tracks following it in the playlist. If set to iPod, the unit will automatically turn on for 59 minutes and then shut off the iPod. NOTES: • When the alarm time is reached, the unit will be no sound when the actual time matches the preset alarm time...
... set to Radio or Buzzer, the unit will start playback on the track that you selected and the tracks following it in the playlist. If set to iPod, the unit will automatically turn on for 59 minutes and then shut off the iPod. NOTES: • When the alarm time is reached, the unit will be no sound when the actual time matches the preset alarm time...
User Guide
Page 16
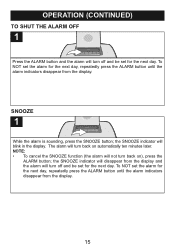
... from the display. 15 OPERATION (CONTINUED) TO SHUT THE ALARM OFF 1 Press the ALARM button and the alarm will turn off and be set for the next day, repeatedly press the ALARM button until the alarm indicators disappear from the display. The alarm will blink in the display. To NOT set for the next day. SNOOZE 1 While the alarm is sounding, press the SNOOZE button; NOTE: • To cancel the SNOOZE function (the alarm will turn back on automatically ten...
... from the display. 15 OPERATION (CONTINUED) TO SHUT THE ALARM OFF 1 Press the ALARM button and the alarm will turn off and be set for the next day, repeatedly press the ALARM button until the alarm indicators disappear from the display. The alarm will blink in the display. To NOT set for the next day. SNOOZE 1 While the alarm is sounding, press the SNOOZE button; NOTE: • To cancel the SNOOZE function (the alarm will turn back on automatically ten...
User Guide
Page 17
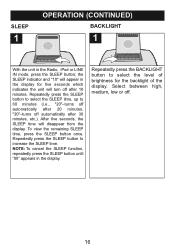
... the display. To view the remaining SLEEP time, press the SLEEP button once. the SLEEP indicator and "10" will appear in the display for the backlight of the display. Repeatedly press the BACKLIGHT button to increase the SLEEP time. After five seconds, the SLEEP time will turn off after 30 minutes, etc.). NOTE: To cancel the SLEEP function, repeatedly press the SLEEP button until "00" appears in the Radio, iPod or LINE IN mode, press the SLEEP button;
... the display. To view the remaining SLEEP time, press the SLEEP button once. the SLEEP indicator and "10" will appear in the display for the backlight of the display. Repeatedly press the BACKLIGHT button to increase the SLEEP time. After five seconds, the SLEEP time will turn off after 30 minutes, etc.). NOTE: To cancel the SLEEP function, repeatedly press the SLEEP button until "00" appears in the Radio, iPod or LINE IN mode, press the SLEEP button;
User Guide
Page 18
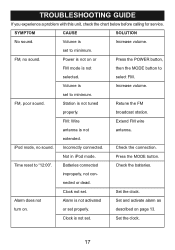
... connection. Time reset to minimum. improperly, not con- Clock not set properly. Alarm does not Alarm is not tuned Retune the FM properly. Set the clock. 17 FM, no sound. FM, poor sound. iPod mode, no sound. Incorrectly connected. Press the MODE button. nected or dead. Volume is not antenna. Not in iPod mode. broadcast station. Batteries connected Check the batteries. or set . FM: Wire Extend FM wire antenna is Increase volume. Set the clock. described on or Press the POWER button...
... connection. Time reset to minimum. improperly, not con- Clock not set properly. Alarm does not Alarm is not tuned Retune the FM properly. Set the clock. 17 FM, no sound. FM, poor sound. iPod mode, no sound. Incorrectly connected. Press the MODE button. nected or dead. Volume is not antenna. Not in iPod mode. broadcast station. Batteries connected Check the batteries. or set . FM: Wire Extend FM wire antenna is Increase volume. Set the clock. described on or Press the POWER button...
User Guide
Page 19
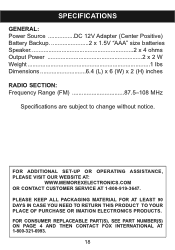
... ADDITIONAL SET-UP OR OPERATING ASSISTANCE, PLEASE VISIT OUR WEBSITE AT: WWW.MEMOREXELECTRONICS.COM OR CONTACT CUSTOMER SERVICE AT 1-800-919-3647. PLEASE KEEP ALL PACKAGING MATERIAL FOR AT LEAST 90 DAYS IN CASE YOU NEED TO RETURN THIS PRODUCT TO YOUR PLACE OF PURCHASE OR IMATION ELECTRONICS PRODUCTS. SPECIFICATIONS GENERAL: Power Source DC 12V Adapter (Center Positive) Battery Backup 2 x 1.5V "AAA" size batteries Speaker 2 x 4 ohms Output Power...
... ADDITIONAL SET-UP OR OPERATING ASSISTANCE, PLEASE VISIT OUR WEBSITE AT: WWW.MEMOREXELECTRONICS.COM OR CONTACT CUSTOMER SERVICE AT 1-800-919-3647. PLEASE KEEP ALL PACKAGING MATERIAL FOR AT LEAST 90 DAYS IN CASE YOU NEED TO RETURN THIS PRODUCT TO YOUR PLACE OF PURCHASE OR IMATION ELECTRONICS PRODUCTS. SPECIFICATIONS GENERAL: Power Source DC 12V Adapter (Center Positive) Battery Backup 2 x 1.5V "AAA" size batteries Speaker 2 x 4 ohms Output Power...


