User Guide
Page 7
...stand back a little further to ensure that the frame is in position. STAND (REAR OF UNIT) To use the stand, lift the stand up and then rotate counterclockwise until it is recommended that you would hang an ordinary photo frame or painting. The speakers will be mounted onto... a wall. When viewing photos vertically, it is stable. 7 OPTIONAL FEATURES HEADPHONES JACK (SIDE OF UNIT) For private listening, plug headphones into this jack. WALL MOUNT HOLES (2) (REAR OF UNIT) If desired, the digital frame can be ...
...stand back a little further to ensure that the frame is in position. STAND (REAR OF UNIT) To use the stand, lift the stand up and then rotate counterclockwise until it is recommended that you would hang an ordinary photo frame or painting. The speakers will be mounted onto... a wall. When viewing photos vertically, it is stable. 7 OPTIONAL FEATURES HEADPHONES JACK (SIDE OF UNIT) For private listening, plug headphones into this jack. WALL MOUNT HOLES (2) (REAR OF UNIT) If desired, the digital frame can be ...
User Guide
Page 8
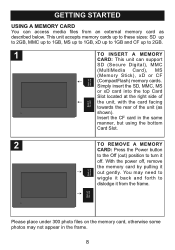
GETTING STARTED USING A MEMORY CARD You can support SD (Secure Digital), MMC (MultiMedia Card), MS (Memory Stick), xD or CF (CompactFlash) memory cards...Power button to the Off (out) position to turn it out gently. Please place under 300 photo files on the memory card, otherwise some photos may need to wiggle it back and forth to 2GB. 1 TO INSERT A MEMORY CARD:... This unit can access media files from the frame. Insert the CF card in the frame. 8 With the power ...
GETTING STARTED USING A MEMORY CARD You can support SD (Secure Digital), MMC (MultiMedia Card), MS (Memory Stick), xD or CF (CompactFlash) memory cards...Power button to the Off (out) position to turn it out gently. Please place under 300 photo files on the memory card, otherwise some photos may need to wiggle it back and forth to 2GB. 1 TO INSERT A MEMORY CARD:... This unit can access media files from the frame. Insert the CF card in the frame. 8 With the power ...

User Guide
Page 9
... unit, will appear as a removable drive in ) position. Then, drag and drop them to the "Memorex" drive. (Refer to the owners manual accompanying your computer for more information on copying files.) NOTES: ... 19), the memory card, not this unit and connect the other end to copy. Connect this digital frame using a USB cable. On your computer to exit and access the Main menu. 2. Navigate to...double-click My Computer. This unit will either show the Main menu or automatically start showing a photo Slideshow (if the Auto Play option in Slideshow mode, press the EXIT button twice to this...
... unit, will appear as a removable drive in ) position. Then, drag and drop them to the "Memorex" drive. (Refer to the owners manual accompanying your computer for more information on copying files.) NOTES: ... 19), the memory card, not this unit and connect the other end to copy. Connect this digital frame using a USB cable. On your computer to exit and access the Main menu. 2. Navigate to...double-click My Computer. This unit will either show the Main menu or automatically start showing a photo Slideshow (if the Auto Play option in Slideshow mode, press the EXIT button twice to this...

User Guide
Page 13
a red frame will appear. To change the favorite's view (Single photo or Double photos) on the screen, select Play Mode using the Navigation π, † buttons 1; OR To exit the Favorites menu and return to the Main menu, select ... to confirm. then press the ENTER/PLAY button 1 again to the Main menu. NOTE: You can also press the EXIT button to confirm; OPERATION (Continued) PHOTO "FAVORITES" PLAYBACK 1 1 2 2 3 2 While in Landscape or Portrait mode. Then, press the Navigation buttons 2 to confirm. 3 2 1 4 1 2 In the Favorites menu, you have the option of ...
a red frame will appear. To change the favorite's view (Single photo or Double photos) on the screen, select Play Mode using the Navigation π, † buttons 1; OR To exit the Favorites menu and return to the Main menu, select ... to confirm. then press the ENTER/PLAY button 1 again to the Main menu. NOTE: You can also press the EXIT button to confirm; OPERATION (Continued) PHOTO "FAVORITES" PLAYBACK 1 1 2 2 3 2 While in Landscape or Portrait mode. Then, press the Navigation buttons 2 to confirm. 3 2 1 4 1 2 In the Favorites menu, you have the option of ...

User Guide
Page 15
...ADJUSTING THE VOLUME 1 1 2 3 Select Movie using the Navigation buttons 1; Playback will ei1ther sh1ow the Main menu or automatically start showing a photo Slideshow (if the Auto Play option in the Setup menu is in ) position to turn the unit on. Press ENTER/PLAY button 2 to ... - 1 and/or Navigation ®/VOLUME + 2 button to resume playback. OPERATION (Continued) BASIC VIDEO PLAYBACK (Supported format: MOV) Video: Compress type: MPEG-4 Video Frame Rate: 30fps Dimensions: 352 x 288 CIF Audio: µ-Law 2:1 or A-Law 2:1 1 2 1 2 Press the Power button to the On (in Slideshow mode...
...ADJUSTING THE VOLUME 1 1 2 3 Select Movie using the Navigation buttons 1; Playback will ei1ther sh1ow the Main menu or automatically start showing a photo Slideshow (if the Auto Play option in the Setup menu is in ) position to turn the unit on. Press ENTER/PLAY button 2 to ... - 1 and/or Navigation ®/VOLUME + 2 button to resume playback. OPERATION (Continued) BASIC VIDEO PLAYBACK (Supported format: MOV) Video: Compress type: MPEG-4 Video Frame Rate: 30fps Dimensions: 352 x 288 CIF Audio: µ-Law 2:1 or A-Law 2:1 1 2 1 2 Press the Power button to the On (in Slideshow mode...

User Guide
Page 18
OPERATION (Continued) SETUP MENU The Setup menu lets you customize this digital frame by allowing you to select the source for your media files, set 3... exit by pressing the MENU button.) 3. the option will either show the Main menu or automatically start showing a photo Slideshow (if the Auto Play 2 option in the Setup menu is in ) position to turn the unit on...PLAY button 3 to navigate and change the options which are described on the following page. 1. choose between your photos, adjust the speed of the Setup options (i.e. Exit by pressing the EXIT button 1. (NOTE: You can also ...
OPERATION (Continued) SETUP MENU The Setup menu lets you customize this digital frame by allowing you to select the source for your media files, set 3... exit by pressing the MENU button.) 3. the option will either show the Main menu or automatically start showing a photo Slideshow (if the Auto Play 2 option in the Setup menu is in ) position to turn the unit on...PLAY button 3 to navigate and change the options which are described on the following page. 1. choose between your photos, adjust the speed of the Setup options (i.e. Exit by pressing the EXIT button 1. (NOTE: You can also ...
User Guide
Page 19
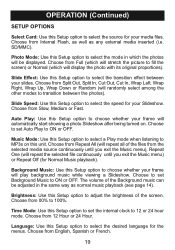
...all of the Background music can be displayed. OPERATION (Continued) SETUP OPTIONS Select Card: Use this Setup option to select the source for your frame will play background music while viewing a Slideshow. Choose from the selected media source continuously until you exit the Music menu), Repeat One (will ...exit the Music menu) or Repeat Off (for the menus. Auto Play: Use this Setup option to select the speed for your frame will display the photo with its original proportions). Brightness: Use this Setup option to set the internal clock to select the mode in the same way as...
...all of the Background music can be displayed. OPERATION (Continued) SETUP OPTIONS Select Card: Use this Setup option to select the source for your frame will play background music while viewing a Slideshow. Choose from the selected media source continuously until you exit the Music menu), Repeat One (will ...exit the Music menu) or Repeat Off (for the menus. Auto Play: Use this Setup option to select the speed for your frame will display the photo with its original proportions). Brightness: Use this Setup option to set the internal clock to select the mode in the same way as...

User Guide
Page 20
... insert external media source, see pages 8 & 9. SYMPTOM Main unit, no power. Frame is not connected. SOLUTION Connect AC adapter as a Removable Disk. No photos in Internal Flash or external media source. No photos are present in frame. Turn on frame using the Power switch on page 6. Remote, no power. Battery not inserted or inserted incorrectly...
... insert external media source, see pages 8 & 9. SYMPTOM Main unit, no power. Frame is not connected. SOLUTION Connect AC adapter as a Removable Disk. No photos in Internal Flash or external media source. No photos are present in frame. Turn on frame using the Power switch on page 6. Remote, no power. Battery not inserted or inserted incorrectly...


