User Guide
Page 1
MC7100 Suffix A User's Guide CD Clock Radio with Dual Alarm and Detachable Speaker Before operating this product, please read these instructions completely.
MC7100 Suffix A User's Guide CD Clock Radio with Dual Alarm and Detachable Speaker Before operating this product, please read these instructions completely.
User Guide
Page 2
... FOR AT LEAST 90 DAYS IN CASE YOU NEED TO RETURN THIS PRODUCT TO YOUR PLACE OF PURCHASE OR MEMOREX. 1 The exclamation point within the product's enclosure that may generate or use radio frequency energy. FCC WARNING: This equipment may be of sufficient magnitude to possible eye injury. LASER SAFETY: This unit...
... FOR AT LEAST 90 DAYS IN CASE YOU NEED TO RETURN THIS PRODUCT TO YOUR PLACE OF PURCHASE OR MEMOREX. 1 The exclamation point within the product's enclosure that may generate or use radio frequency energy. FCC WARNING: This equipment may be of sufficient magnitude to possible eye injury. LASER SAFETY: This unit...
User Guide
Page 3
... placing the product on a circuit different from the wall outlet before the product is no guarantee that to which can radiate radio frequency energy and, if not installed and used in installation such as they may not pertain to your unit. These limits are... provided by the product's manufacturer as a bookcase or rack unless proper ventilation is connected. • Consult the dealer or an experienced radio/TV technician for future reference. 3. POWER SOURCES This product should be adhered to. 4. READ INSTRUCTIONS All the safety and operating instructions should...
... placing the product on a circuit different from the wall outlet before the product is no guarantee that to which can radiate radio frequency energy and, if not installed and used in installation such as they may not pertain to your unit. These limits are... provided by the product's manufacturer as a bookcase or rack unless proper ventilation is connected. • Consult the dealer or an experienced radio/TV technician for future reference. 3. POWER SOURCES This product should be adhered to. 4. READ INSTRUCTIONS All the safety and operating instructions should...
User Guide
Page 6
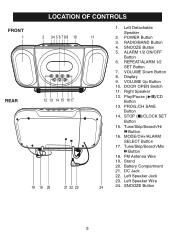
...2 3 4 5 6 7 8 9 10 REAR 12 13 14 15 16 17 18 19 20 21 22 23 11 24 1. RADIO/BAND Button 4. DOOR OPEN Switch 11. Play/Pause (®p)/CD Button 13. Stand 20. Left Speaker Jack 23. Tune/Skip/Search/Min n Button 18. Battery Compartment 21. REPEAT/ALARM 1/2 SET ...Button 7. STOP (I)/CLOCK SET Button 15. Left Detachable Speaker 2. VOLUME Up Button 10. FM Antenna Wire...
...2 3 4 5 6 7 8 9 10 REAR 12 13 14 15 16 17 18 19 20 21 22 23 11 24 1. RADIO/BAND Button 4. DOOR OPEN Switch 11. Play/Pause (®p)/CD Button 13. Stand 20. Left Speaker Jack 23. Tune/Skip/Search/Min n Button 18. Battery Compartment 21. REPEAT/ALARM 1/2 SET ...Button 7. STOP (I)/CLOCK SET Button 15. Left Detachable Speaker 2. VOLUME Up Button 10. FM Antenna Wire...
User Guide
Page 9
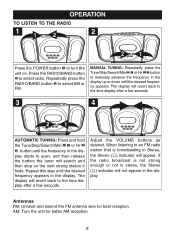
... AUTOMATIC TUNING: Press and hold the Tune/Skip/Search/Min n 1 or Hr o 2 button until the desired frequency appears. When listening to an FM radio station that is not strong enough or not in stereo, the Stereo ( ) indicator w1ill not app1ear in Stereo, the Stereo ( ) indicator will revert ...back to scan, and then release the button; play starts to the time dis- If the radio broadcast is broadcasting in the dis- Press the RADIO/BAND button 2 to manually advance the frequency in the display up or down until the frequency in the display. Antennas...
... AUTOMATIC TUNING: Press and hold the Tune/Skip/Search/Min n 1 or Hr o 2 button until the desired frequency appears. When listening to an FM radio station that is not strong enough or not in stereo, the Stereo ( ) indicator w1ill not app1ear in Stereo, the Stereo ( ) indicator will revert ...back to scan, and then release the button; play starts to the time dis- If the radio broadcast is broadcasting in the dis- Press the RADIO/BAND button 2 to manually advance the frequency in the display up or down until the frequency in the display. Antennas...
User Guide
Page 10
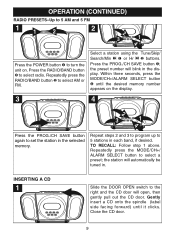
... facing forward) until the desired memory number appears on . TO RECALL: Follow step 1 above. Close the CD door. 9 Press the RADIO/BAND button 2 to the right and the CD door will open, then gently pull out the CD door. Repeatedly press the MODE/CH+/ ALARM SELECT button to select a pt2urneesedt;int.he station will...
... facing forward) until the desired memory number appears on . TO RECALL: Follow step 1 above. Close the CD door. 9 Press the RADIO/BAND button 2 to the right and the CD door will open, then gently pull out the CD door. Repeatedly press the MODE/CH+/ ALARM SELECT button to select a pt2urneesedt;int.he station will...
User Guide
Page 17
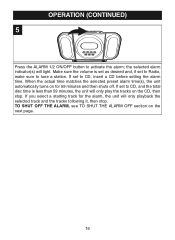
... alarm time(s), the unit automatically turns on the next page. 16 If set to CD, and the total 1 disc time is set as desired and, if set to Radio, make sure to activate the alarm; If set to CD, insert a CD before setting the alarm time. If you select a starting track for 59 minutes... and the tracks following it, then stop . Make sure the volume is less than 59 minutes, the unit will only play the tracks on the CD, then stop . OPERATION (CONTINUED) 5 Press the ALARM 1/2 ON/OFF button to tune a station.
... alarm time(s), the unit automatically turns on the next page. 16 If set to CD, and the total 1 disc time is set as desired and, if set to Radio, make sure to activate the alarm; If set to CD, insert a CD before setting the alarm time. If you select a starting track for 59 minutes... and the tracks following it, then stop . Make sure the volume is less than 59 minutes, the unit will only play the tracks on the CD, then stop . OPERATION (CONTINUED) 5 Press the ALARM 1/2 ON/OFF button to tune a station.


