User Guide
Page 3
... antenna. 1. HEED WARNINGS All warnings on , the user is connected. • Consult the dealer or an experienced radio/TV technician for help. POWER SOURCES This product should not be read all operating instructions carefully. These openings must not be determined by turning the equipment...or covered. Please note that interference will not occur in a wet basement; CLEANING Unplug this equipment does cause harmful interference to radio or television reception, which the receiver is encouraged to try to correct the interference by RETAC) stops, excessive force and uneven ...
... antenna. 1. HEED WARNINGS All warnings on , the user is connected. • Consult the dealer or an experienced radio/TV technician for help. POWER SOURCES This product should not be read all operating instructions carefully. These openings must not be determined by turning the equipment...or covered. Please note that interference will not occur in a wet basement; CLEANING Unplug this equipment does cause harmful interference to radio or television reception, which the receiver is encouraged to try to correct the interference by RETAC) stops, excessive force and uneven ...
User Guide
Page 4
... is in proper operating condition. 20. GROUNDING OR POLARIZATION This product is damaged. LIGHTNING To protect your appliance dealer or local power company. f. This plug will often require extensive work by the operating instructions, as this product, ask the service technician to... should be sure the service technician uses replacement parts specified by following conditions: a. For products intended to operate from battery power, or other controls may result in damage and will fit into this indicates a need for long periods of any type of...
... is in proper operating condition. 20. GROUNDING OR POLARIZATION This product is damaged. LIGHTNING To protect your appliance dealer or local power company. f. This plug will often require extensive work by the operating instructions, as this product, ask the service technician to... should be sure the service technician uses replacement parts specified by following conditions: a. For products intended to operate from battery power, or other controls may result in damage and will fit into this indicates a need for long periods of any type of...
User Guide
Page 6
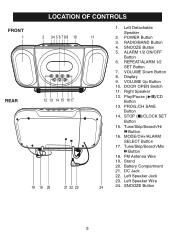
... (I)/CLOCK SET Button 15. Tune/Skip/Search/Min n Button 18. LOCATION OF CONTROLS FRONT 1 2 3 4 5 6 7 8 9 10 REAR 12 13 14 15 16 17 18 19 20 21 22 23 11 24 1. ALARM 1/2 ON/OFF Button 6. Play/Pause (®p)/CD Button 13. Battery Compartment 21. POWER Button... 3. REPEAT/ALARM 1/2 SET Button 7. Display 9. DOOR OPEN Switch 11. Tune/Skip/Search/Hr o Button 16. Stand 20. PROG./CH SAVE Button 14. VOLUME Up Button 10. MODE/CH+/ALARM SELECT Button 17. FM Antenna Wire 19. SNOOZE Button 5. SNOOZE Button 5 RADIO...
... (I)/CLOCK SET Button 15. Tune/Skip/Search/Min n Button 18. LOCATION OF CONTROLS FRONT 1 2 3 4 5 6 7 8 9 10 REAR 12 13 14 15 16 17 18 19 20 21 22 23 11 24 1. ALARM 1/2 ON/OFF Button 6. Play/Pause (®p)/CD Button 13. Battery Compartment 21. POWER Button... 3. REPEAT/ALARM 1/2 SET Button 7. Display 9. DOOR OPEN Switch 11. Tune/Skip/Search/Hr o Button 16. Stand 20. PROG./CH SAVE Button 14. VOLUME Up Button 10. MODE/CH+/ALARM SELECT Button 17. FM Antenna Wire 19. SNOOZE Button 5. SNOOZE Button 5 RADIO...
User Guide
Page 7
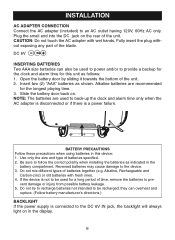
...light on . Z DC 6V INSERTING BATTERIES Two AAA size batteries can overheat and rupture. (Follow battery manufacturer's directions.) BACKLIGHT If the power supply is connected to pre- vent damage or injury from possible battery leakage. 5. Be sure to the device. 3. Reversed batteries may ... AC only. INSTALLATION AC ADAPTER CONNECTION Connect the AC adapter (included) to back-up the clock and alarm time only when the AC adapter is disconnected or if there is a power failure. ++ BATTERY PRECAUTIONS Follow these precautions when using batteries in this unit as follows: 1....
...light on . Z DC 6V INSERTING BATTERIES Two AAA size batteries can overheat and rupture. (Follow battery manufacturer's directions.) BACKLIGHT If the power supply is connected to pre- vent damage or injury from possible battery leakage. 5. Be sure to the device. 3. Reversed batteries may ... AC only. INSTALLATION AC ADAPTER CONNECTION Connect the AC adapter (included) to back-up the clock and alarm time only when the AC adapter is disconnected or if there is a power failure. ++ BATTERY PRECAUTIONS Follow these precautions when using batteries in this unit as follows: 1....
User Guide
Page 9
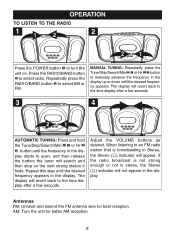
...TUNING: Repeatedly press the Tune/Skip/Search/Min n 1 or Hr o 2 button to manually advance the frequency in the display. play . If the radio broadcast is broadcasting in Stereo, the Stereo ( ) indicator will revert back to the time display after a few seconds. 4 11 21 AUTOMATIC TUNING:...the Tune/Skip/Search/Min n 1 or Hr o 2 button until the desired frequency appears. OPERATION TO LISTEN TO THE RADIO 11 2 2 21 Press the POWER button 1 to turn the unit on finds. Repeat tthhei1s next step ustnrt1oilntghestdaetisoirnedit frequency appears in the display up or down until ...
...TUNING: Repeatedly press the Tune/Skip/Search/Min n 1 or Hr o 2 button to manually advance the frequency in the display. play . If the radio broadcast is broadcasting in Stereo, the Stereo ( ) indicator will revert back to the time display after a few seconds. 4 11 21 AUTOMATIC TUNING:...the Tune/Skip/Search/Min n 1 or Hr o 2 button until the desired frequency appears. OPERATION TO LISTEN TO THE RADIO 11 2 2 21 Press the POWER button 1 to turn the unit on finds. Repeat tthhei1s next step ustnrt1oilntghestdaetisoirnedit frequency appears in the display up or down until ...
User Guide
Page 10
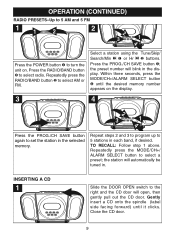
... the spindle (label side facing forward) until the desired memory number appears on . Close the CD door. 9 OPERATION (CONTINUED) RADIO PRESETS-Up to 5 AM and 5 FM 11 2 2 2 3 1 4 Press the POWER button 1 to turn the unit on the display. 4 2 3 1 4 Press the PROG./CH SAVE button again to set the ...+/ ALARM SELECT button to select a pt2urneesedt;int.he station will automatically be INSERTING A CD 1 Slide the DOOR OPEN switch to the right and the CD door will blink in each band, if desired. Press the RADIO/BAND button 2 to select AM or FM. 3 11 Select a station using the ...
... the spindle (label side facing forward) until the desired memory number appears on . Close the CD door. 9 OPERATION (CONTINUED) RADIO PRESETS-Up to 5 AM and 5 FM 11 2 2 2 3 1 4 Press the POWER button 1 to turn the unit on the display. 4 2 3 1 4 Press the PROG./CH SAVE button again to set the ...+/ ALARM SELECT button to select a pt2urneesedt;int.he station will automatically be INSERTING A CD 1 Slide the DOOR OPEN switch to the right and the CD door will blink in each band, if desired. Press the RADIO/BAND button 2 to select AM or FM. 3 11 Select a station using the ...
User Guide
Page 11
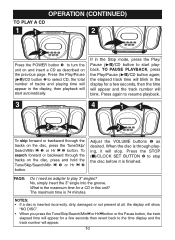
...will appear. 10 back. When the disc is 74 minutes. in the 1 display for a CD in the Stop mode, press the Play/ Pause (®p)/CD button to start play 3" singles? Press the STOP (I need an adapter to play - ...Press the Play/Pause (®p)/CD button 2 to stop . OPERATION (CONTINUED) TO PLAY A CD 11 2 2 Press the POWER button 1 to turn the unit on and insert a CD as desired. To search forward or backward through the tracks on...1 or Hr o 2 button. No, simply insert the 3" single into the groove. FAQS: Do I )/CLOCK SET BUTTON 2 to select...
...will appear. 10 back. When the disc is 74 minutes. in the 1 display for a CD in the Stop mode, press the Play/ Pause (®p)/CD button to start play 3" singles? Press the STOP (I need an adapter to play - ...Press the Play/Pause (®p)/CD button 2 to stop . OPERATION (CONTINUED) TO PLAY A CD 11 2 2 Press the POWER button 1 to turn the unit on and insert a CD as desired. To search forward or backward through the tracks on...1 or Hr o 2 button. No, simply insert the 3" single into the groove. FAQS: Do I )/CLOCK SET BUTTON 2 to select...
User Guide
Page 12
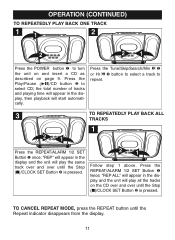
...the Tune/Skip/Search/Min n 1 or Hr o 2 button to select a track to 2 select CD; play the same track over and over until the Stop (I )/CLOCK SET Button 2 is pressed. Press the Play/Pause (®p)/CD button 2 to repeat. 11 3 21 TO REPEATEDLY PLAY BACK ALL TRACKS 1 Press the REPEAT/ALARM... play all the tracks on page 9. OPERATION (CONTINUED) TO REPEATEDLY PLAY BACK ONE TRACK 11 2 2 21 Press the POWER button 1 to turn the unit on and insert a CD as described on the CD over and over until the Stop (I )/1CLOCK SET Button 2 is pressed. 1 21 Follow step 1 above.
...the Tune/Skip/Search/Min n 1 or Hr o 2 button to select a track to 2 select CD; play the same track over and over until the Stop (I )/CLOCK SET Button 2 is pressed. Press the Play/Pause (®p)/CD button 2 to repeat. 11 3 21 TO REPEATEDLY PLAY BACK ALL TRACKS 1 Press the REPEAT/ALARM... play all the tracks on page 9. OPERATION (CONTINUED) TO REPEATEDLY PLAY BACK ONE TRACK 11 2 2 21 Press the POWER button 1 to turn the unit on and insert a CD as described on the CD over and over until the Stop (I )/1CLOCK SET Button 2 is pressed. 1 21 Follow step 1 above.
User Guide
Page 13
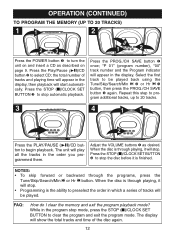
...it will show the total tracks and time of the disc again. 12 Repeat this step to program additional tracks, up to select CD; FAQ: How do I )/CLOCK SET BUTTON 2 to clear the program and exit the program mode. the total number of tracks will appear in the order you ...When the disc is the ability to be played. OPERATION (CONTINUED) TO PROGRAM THE MEMORY (UP TO 20 TRACKS) 11 2 23 3 1 2 Press the POWER button 1 to begin playback. cally. When the disc is through playing, it will stop . • Programming is through the programs, press the Tune/Skip/Search...
...it will show the total tracks and time of the disc again. 12 Repeat this step to program additional tracks, up to select CD; FAQ: How do I )/CLOCK SET BUTTON 2 to clear the program and exit the program mode. the total number of tracks will appear in the order you ...When the disc is the ability to be played. OPERATION (CONTINUED) TO PROGRAM THE MEMORY (UP TO 20 TRACKS) 11 2 23 3 1 2 Press the POWER button 1 to begin playback. cally. When the disc is through playing, it will stop . • Programming is through the programs, press the Tune/Skip/Search...
User Guide
Page 15
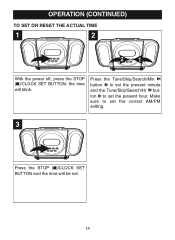
set 1the cor1rect AM/PM 3 Press the STOP (I )/CLOCK SET BUTTON; OPERATION (CONTINUED) TO SET OR RESET THE ACTUAL TIME 1 2 21 With the power off, press the STOP (I )/CLOCK SET BUTTON and the time will blink. 11 Press the Tune/Skip/Search/Min n button 1 to setting. Make sure to set the present hour. ton 2 to set the present minute and the Tune/Skip/Search/Hr o but- the time will be set. 11 14
set 1the cor1rect AM/PM 3 Press the STOP (I )/CLOCK SET BUTTON; OPERATION (CONTINUED) TO SET OR RESET THE ACTUAL TIME 1 2 21 With the power off, press the STOP (I )/CLOCK SET BUTTON and the time will blink. 11 Press the Tune/Skip/Search/Min n button 1 to setting. Make sure to set the present hour. ton 2 to set the present minute and the Tune/Skip/Search/Hr o but- the time will be set. 11 14
User Guide
Page 16
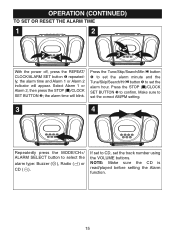
... sure to 1 set the correct AM/PM setting. 3 4 Repeatedly press the MODE/CH+/ If set to CD, set the alarm hour. the alarm time and Alarm 1 or Alarm 2 indicator will blink. Press the STOP (I )/CLOCK 1 SET BUTTON 2; Press the Tune/Skip/Search/Min n button 1 to set the alarm minute and the Tune.../Hr o button 2 to set the track number using ALARM SELECT button to confirm. OPERATION (CONTINUED) TO SET OR RESET THE ALARM TIME 1 2 2 21 3 1 With the power off, press the REPEAT/ CLOCK/ALARM SET button 1 repeatedly;
... sure to 1 set the correct AM/PM setting. 3 4 Repeatedly press the MODE/CH+/ If set to CD, set the alarm hour. the alarm time and Alarm 1 or Alarm 2 indicator will blink. Press the STOP (I )/CLOCK 1 SET BUTTON 2; Press the Tune/Skip/Search/Min n button 1 to set the alarm minute and the Tune.../Hr o button 2 to set the track number using ALARM SELECT button to confirm. OPERATION (CONTINUED) TO SET OR RESET THE ALARM TIME 1 2 2 21 3 1 With the power off, press the REPEAT/ CLOCK/ALARM SET button 1 repeatedly;
User Guide
Page 19
... furniture. BENZENE CLEANER • This unit is probably dirty or damaged (scratched). • When cleaning the disc, wipe in their cases after each use a CD cleaning kit. • If a disc skips or gets stuck on a section of the disc, it is designed to play properly. • Discs should be... stored in straight lines from the AC power source when cleaning. • The finish on the front panel. 18 Other discs may not conform to direct sunlight, high humidity, high temperatures...
... furniture. BENZENE CLEANER • This unit is probably dirty or damaged (scratched). • When cleaning the disc, wipe in their cases after each use a CD cleaning kit. • If a disc skips or gets stuck on a section of the disc, it is designed to play properly. • Discs should be... stored in straight lines from the AC power source when cleaning. • The finish on the front panel. 18 Other discs may not conform to direct sunlight, high humidity, high temperatures...
User Guide
Page 20
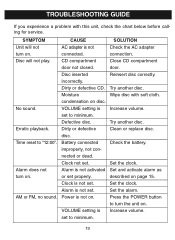
... set to minimum. CD compartment door not closed. Clock not set to minimum. Alarm is not connected. Wipe disc with this unit, check the chart below before calling for service. Set the clock. Set the clock. No sound. Dirty or defective disc. Clock is set . VOLUME...condensation on . VOLUME setting is not activated or set . Power is not on disc. Close CD compartment door. Check the battery. AM or FM, no sound. SOLUTION Check the AC adapter connection. Dirty or defective CD. Reinsert disc correctly. Battery connected improperly, not connected or...
... set to minimum. CD compartment door not closed. Clock not set to minimum. Alarm is not connected. Wipe disc with this unit, check the chart below before calling for service. Set the clock. Set the clock. No sound. Dirty or defective disc. Clock is set . VOLUME...condensation on . VOLUME setting is not activated or set . Power is not on disc. Close CD compartment door. Check the battery. AM or FM, no sound. SOLUTION Check the AC adapter connection. Dirty or defective CD. Reinsert disc correctly. Battery connected improperly, not connected or...
User Guide
Page 21
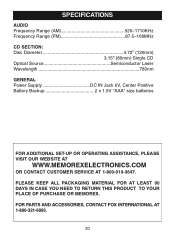
... TO YOUR PLACE OF PURCHASE OR MEMOREX. FOR PARTS AND ACCESSORIES, CONTACT FOX INTERNATIONAL AT 1-800-321-6993. 20 SPECIFICATIONS AUDIO Frequency Range (AM 520-1710KHz Frequency Range (FM 87.5-108MHz CD SECTION: Disc Diameter 4.72" (120mm) 3.15" (80mm) Single CD Optical Source Semiconductor Laser Wavelength 780nm GENERAL Power Supply DC IN Jack 6V...
... TO YOUR PLACE OF PURCHASE OR MEMOREX. FOR PARTS AND ACCESSORIES, CONTACT FOX INTERNATIONAL AT 1-800-321-6993. 20 SPECIFICATIONS AUDIO Frequency Range (AM 520-1710KHz Frequency Range (FM 87.5-108MHz CD SECTION: Disc Diameter 4.72" (120mm) 3.15" (80mm) Single CD Optical Source Semiconductor Laser Wavelength 780nm GENERAL Power Supply DC IN Jack 6V...
