
Use & Care Guide
Page 1
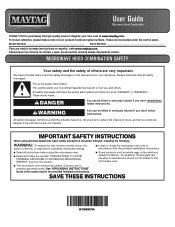
... you and others are very important. Model Number Serial Number Para una versión de estas instrucciones en español, visite www.maytag.com. Se encuentran ubicada debajo del panel de control. This is , tell you how to reduce the chance of your appliance. These ...This symbol alerts you to properly grounded outlet. All safety messages will tell you what can be grounded. IMPORTANT SAFETY INSTRUCTIONS When using the microwave oven. I Read and follow the safety alert symbol and either the word "DANGER" or "WARNING." Always read and obey all instructions before...
... you and others are very important. Model Number Serial Number Para una versión de estas instrucciones en español, visite www.maytag.com. Se encuentran ubicada debajo del panel de control. This is , tell you how to reduce the chance of your appliance. These ...This symbol alerts you to properly grounded outlet. All safety messages will tell you what can be grounded. IMPORTANT SAFETY INSTRUCTIONS When using the microwave oven. I Read and follow the safety alert symbol and either the word "DANGER" or "WARNING." Always read and obey all instructions before...
Use & Care Guide
Page 2
... service personnel. I Intended to facilitate cooking. Do not leave paper products, cooking utensils, or food in the cavity when not in the microwave oven. Do not use corrosive chemicals or vapors in use. Call an authorized service company for use above ranges with narrow necks. - I...should not be used by children. I Suitable for examination, repair, or adjustment. If materials inside the oven to be allowed to stand in the microwave oven for a short time before removing the container. - To reduce the risk of 36" (91.44 cm). - I Do not mount over ...
... service personnel. I Intended to facilitate cooking. Do not leave paper products, cooking utensils, or food in the cavity when not in the microwave oven. Do not use corrosive chemicals or vapors in use. Call an authorized service company for use above ranges with narrow necks. - I...should not be used by children. I Suitable for examination, repair, or adjustment. If materials inside the oven to be allowed to stand in the microwave oven for a short time before removing the container. - To reduce the risk of 36" (91.44 cm). - I Do not mount over ...
Use & Care Guide
Page 3
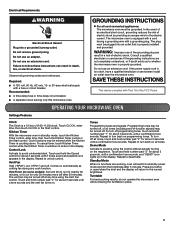
...the grounding instructions are working, oven will return to run for exactly 30 minutes, or to the normal brightness. OPERATING YOUR MICROWAVE OVEN Settings/Features Clock The Clock is properly grounded. Vent Timer (on the magnetron. Recommended: ■■ A time-delay... fuse or time-delay circuit breaker. ■■ A separate circuit serving only this microwave oven. The microwave oven is equipped with a cord having the turntable in place. 3 Cook functions may be entered while the Kitchen Timer is active ...
...the grounding instructions are working, oven will return to run for exactly 30 minutes, or to the normal brightness. OPERATING YOUR MICROWAVE OVEN Settings/Features Clock The Clock is properly grounded. Vent Timer (on the magnetron. Recommended: ■■ A time-delay... fuse or time-delay circuit breaker. ■■ A separate circuit serving only this microwave oven. The microwave oven is equipped with a cord having the turntable in place. 3 Cook functions may be entered while the Kitchen Timer is active ...

Use & Care Guide
Page 4
...Start control. NOTE: Place fork-pierced potatoes around turntable edges, at 100%. Pizza (reheat) Touch PIZZA. Enter number of the microwave oven opening opposite the tab area, swing up , replace vent grille, and secure with screws. ■■ Cavity light: The... cavity light bulb is replaceable. The charcoal filter cannot be cleaned, and should be replaced about every 6 months. Cookware and Dinnerware Microwave-Safe ■■ Browning dish (Follow manufacturer recommendations.) ■■ Ceramic glass, glass ■■ China, earthenware (Follow manufacturer ...
...Start control. NOTE: Place fork-pierced potatoes around turntable edges, at 100%. Pizza (reheat) Touch PIZZA. Enter number of the microwave oven opening opposite the tab area, swing up , replace vent grille, and secure with screws. ■■ Cavity light: The... cavity light bulb is replaceable. The charcoal filter cannot be cleaned, and should be replaced about every 6 months. Cookware and Dinnerware Microwave-Safe ■■ Browning dish (Follow manufacturer recommendations.) ■■ Ceramic glass, glass ■■ China, earthenware (Follow manufacturer ...
Use & Care Guide
Page 5
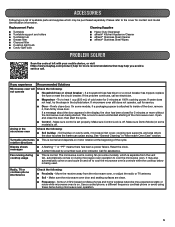
... Steel Wipes PROBLEM SOLVER Scan the code at left with your mobile device, or visit https://www.maytag.com/product_help for 2 minutes at 100% cooking power. If you avoid a service call. If microwave oven still does not operate, call an electrician. ■■ Magnetron - On some models)...close door. If the problem continues, call for 5 minutes or more recommendations that may also automatically come on and cycle on cavity walls, microwave inlet cover, cooking rack supports, and area where the door touches the frame can cause arcing. Soil buildup on and off . See "...
... Steel Wipes PROBLEM SOLVER Scan the code at left with your mobile device, or visit https://www.maytag.com/product_help for 2 minutes at 100% cooking power. If you avoid a service call. If microwave oven still does not operate, call an electrician. ■■ Magnetron - On some models)...close door. If the problem continues, call for 5 minutes or more recommendations that may also automatically come on and cycle on cavity walls, microwave inlet cover, cooking rack supports, and area where the door touches the frame can cause arcing. Soil buildup on and off . See "...
Use & Care Guide
Page 6
...to high salt concentrations, high moisture or humidity or exposure to product failure. 12. Food loss due to chemicals. 11. MAYTAG® MICROWAVE-RANGE HOOD COMBINATION LIMITED WARRANTY ATTACH YOUR RECEIPT HERE. and Canada, direct all requests for the following information available when you should... ask Maytag or your appliance will pay for service or repair of this major appliance other rights that vary from ...
...to high salt concentrations, high moisture or humidity or exposure to product failure. 12. Food loss due to chemicals. 11. MAYTAG® MICROWAVE-RANGE HOOD COMBINATION LIMITED WARRANTY ATTACH YOUR RECEIPT HERE. and Canada, direct all requests for the following information available when you should... ask Maytag or your appliance will pay for service or repair of this major appliance other rights that vary from ...
Dimension Guide
Page 1
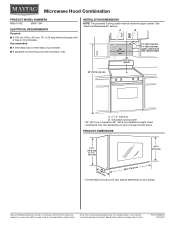
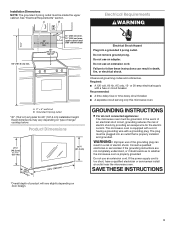
Recommended: ■■ A time-delay fuse or time-delay circuit breaker. ■■ A separate circuit serving only this microwave oven. Grounded 3 prong outlet * 30" (76.2 cm) is typical for planning purposes only. PRODUCT DIMENSIONS 17¹⁄₈" ... to change materials and specifications without notice. Specifications subject to change without notice. Dimensions are for 66" (167.6 cm) installation height. Microwave Hood Combination PRODUCT MODEL NUMBERS MMV1174D MMV1174F ELECTRICAL REQUIREMENTS Required: ■■ A 120 volt, 60 Hz, AC only, 15- or ...
Recommended: ■■ A time-delay fuse or time-delay circuit breaker. ■■ A separate circuit serving only this microwave oven. Grounded 3 prong outlet * 30" (76.2 cm) is typical for planning purposes only. PRODUCT DIMENSIONS 17¹⁄₈" ... to change materials and specifications without notice. Specifications subject to change without notice. Dimensions are for 66" (167.6 cm) installation height. Microwave Hood Combination PRODUCT MODEL NUMBERS MMV1174D MMV1174F ELECTRICAL REQUIREMENTS Required: ■■ A 120 volt, 60 Hz, AC only, 15- or ...
Installation Guide
Page 1
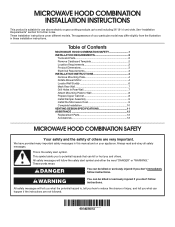
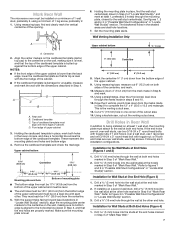
...Requirements" section for use above electric or gas cooking products up to and including 36" (91.4 cm) wide. Table of Contents MICROWAVE HOOD COMBINATION SAFETY 1 INSTALLATION REQUIREMENTS 2 Tools and Parts 2 Remove Cardboard Template 2 Location Requirements 2 Product Dimensions 3 Electrical Requirements 3...Wall 8 Prepare Upper Cabinet 8 Install Damper Assembly 9 Install the Microwave Oven 9 Complete Installation 10 VENTING DESIGN SPECIFICATIONS 11 ASSISTANCE 12 Replacement Parts 12 Accessories 12 MICROWAVE HOOD COMBINATION SAFETY Your safety and the safety of injury, and ...
...Requirements" section for use above electric or gas cooking products up to and including 36" (91.4 cm) wide. Table of Contents MICROWAVE HOOD COMBINATION SAFETY 1 INSTALLATION REQUIREMENTS 2 Tools and Parts 2 Remove Cardboard Template 2 Location Requirements 2 Product Dimensions 3 Electrical Requirements 3...Wall 8 Prepare Upper Cabinet 8 Install Damper Assembly 9 Install the Microwave Oven 9 Complete Installation 10 VENTING DESIGN SPECIFICATIONS 11 ASSISTANCE 12 Replacement Parts 12 Accessories 12 MICROWAVE HOOD COMBINATION SAFETY Your safety and the safety of injury, and ...
Installation Guide
Page 2
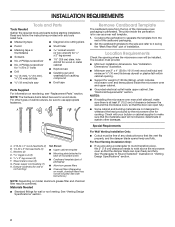
...sure to separate the template from the top of the cardboard packaging. 2. Remove Cardboard Template The cardboard piece from the rest of the microwave oven packaging is perforated. Cut along the perforation to use as a rear wall template. 1. Location Requirements Check the opening . ■... 4" (50.8 x 101.6 mm) wood wall stud and minimum C\," (10 mm) thickness drywall or plaster/lath within cabinet opening where the microwave oven will not discolor, delaminate or sustain other types of any tools listed here. ■■ Measuring tape ■■ Diagonal wire cutting pliers...
...sure to separate the template from the top of the cardboard packaging. 2. Remove Cardboard Template The cardboard piece from the rest of the microwave oven packaging is perforated. Cut along the perforation to use as a rear wall template. 1. Location Requirements Check the opening . ■... 4" (50.8 x 101.6 mm) wood wall stud and minimum C\," (10 mm) thickness drywall or plaster/lath within cabinet opening where the microwave oven will not discolor, delaminate or sustain other types of any tools listed here. ■■ Measuring tape ■■ Diagonal wire cutting pliers...
Installation Guide
Page 3
... dimensions may vary depending on door design. In the event of an electrical short circuit, grounding reduces the risk of electric shock. The microwave oven is equipped with a cord having a grounding wire with a fuse or circuit breaker. Consult a qualified electrician or serviceman if the ... follow these instructions can result in death, fire, or electrical shock. SAVE THESE INSTRUCTIONS 3 See "Electrical Requirements" section. Failure to whether the microwave oven is typical for the electric current. Required: ■■ A 120 volt, 60 Hz, AC only, 15- or 20-amp electrical ...
... dimensions may vary depending on door design. In the event of an electrical short circuit, grounding reduces the risk of electric shock. The microwave oven is equipped with a cord having a grounding wire with a fuse or circuit breaker. Consult a qualified electrician or serviceman if the ... follow these instructions can result in death, fire, or electrical shock. SAVE THESE INSTRUCTIONS 3 See "Electrical Requirements" section. Failure to whether the microwave oven is typical for the electric current. Required: ■■ A 120 volt, 60 Hz, AC only, 15- or 20-amp electrical ...
Installation Guide
Page 4
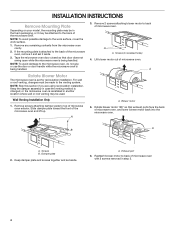
... A. A. Wall Venting Installation Only 1. A A. Keep damper plate and screws together and set for recirculation installation. Remove any remaining contents from the microwave oven cavity. 2. Screws B. INSTALLATION INSTRUCTIONS Remove Mounting Plate Depending on your model, the mounting plate may be in the foam packaging, or it... aside. 3. Remove 2 screws attaching blower motor to back of the microwave oven. NOTE: Skip this section if you are using recirculation installation. NOTE: To avoid damage to the work surface, cover the ...
... A. A. Wall Venting Installation Only 1. A A. Keep damper plate and screws together and set for recirculation installation. Remove any remaining contents from the microwave oven cavity. 2. Screws B. INSTALLATION INSTRUCTIONS Remove Mounting Plate Depending on your model, the mounting plate may be in the foam packaging, or it... aside. 3. Remove 2 screws attaching blower motor to back of the microwave oven. NOTE: Skip this section if you are using recirculation installation. NOTE: To avoid damage to the work surface, cover the ...
Installation Guide
Page 5
... with 2 screws removed in the top of "Wall Venting Installation Only." Reattach blower motor to back of the microwave oven (as shown), performance will be reattached to the microwave oven. 7. A B D A. Repeat Step 2 from "Wall Venting Installation Only." 4. Damper plate B. Repeat Step 1 from "Wall Venting Installation Only...into the slots in Step 1. A. Damper plate tabs D. Secure damper plate with 2 screws removed in the top of microwave oven. Damper plate tabs D. 7. Securely tighten screws. Slots 8. Slots 8. Lower blower motor back into the slots in Step 3 of the...
... with 2 screws removed in the top of "Wall Venting Installation Only." Reattach blower motor to back of the microwave oven (as shown), performance will be reattached to the microwave oven. 7. A B D A. Repeat Step 2 from "Wall Venting Installation Only." 4. Damper plate B. Repeat Step 1 from "Wall Venting Installation Only...into the slots in Step 1. A. Damper plate tabs D. Secure damper plate with 2 screws removed in the top of microwave oven. Damper plate tabs D. 7. Securely tighten screws. Slots 8. Slots 8. Lower blower motor back into the slots in Step 3 of the...
Installation Guide
Page 6
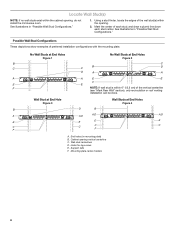
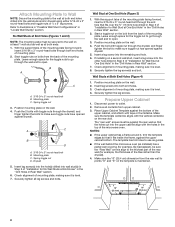
... configurations with the mounting plate. No Wall Studs at End Holes Figure 1 No Wall Studs at End Holes Figure 4 B D B A A,D A,D A,D E E E E C C C F C F A. Cabinet opening , do not install the microwave oven. Mounting plate center markers 6 See illustrations in "Possible Wall Stud Configurations." Possible Wall Stud Configurations These depictions show examples of the wall stud(s) within...
... configurations with the mounting plate. No Wall Studs at End Holes Figure 1 No Wall Studs at End Holes Figure 4 B D B A A,D A,D A,D E E E E C C C F C F A. Cabinet opening , do not install the microwave oven. Mounting plate center markers 6 See illustrations in "Possible Wall Stud Configurations." Possible Wall Stud Configurations These depictions show examples of the wall stud(s) within...
Installation Guide
Page 7
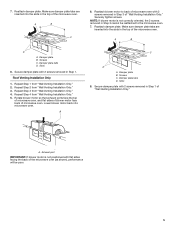
Mark Rear Wall The microwave oven must be installed on a minimum of 1 wall stud, preferably 2, using a minimum of the opening. Using measuring tape, find the wall stud centerline(s) drawn in ...
Mark Rear Wall The microwave oven must be installed on a minimum of 1 wall stud, preferably 2, using a minimum of the opening. Using measuring tape, find the wall stud centerline(s) drawn in ...
Installation Guide
Page 8
... around it, trim the template edges so that it is level. 4. Make sure the 10" (25.4 cm) dimension from the back of the microwave oven. Start toggle nuts on the bolt from the rear wall to make sure toggle nuts have opened against drywall. 5. Mounting plate C. Push the... bolts from upper cabinet. 3. Check alignment of mounting plate. 2. The template has trim lines to use as guides. ■■ If the wall behind the microwave oven (as at End Holes (Figures 1 and 2) NOTE: The mounting plate must be secured to open . 3. Upper-cabinet template D 10" (25.4 cm) F E 10" ...
... around it, trim the template edges so that it is level. 4. Make sure the 10" (25.4 cm) dimension from the back of the microwave oven. Start toggle nuts on the bolt from the rear wall to make sure toggle nuts have opened against drywall. 5. Mounting plate C. Push the... bolts from upper cabinet. 3. Check alignment of mounting plate. 2. The template has trim lines to use as guides. ■■ If the wall behind the microwave oven (as at End Holes (Figures 1 and 2) NOTE: The mounting plate must be secured to open . 3. Upper-cabinet template D 10" (25.4 cm) F E 10" ...
Installation Guide
Page 9
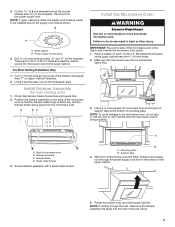
...wall venting only) 1. Place a washer on the template. Sheet metal screws 3. Secure damper assembly with 2 sheet metal screws. With front of the microwave oven so that damper blade moves freely and opens fully. 2. NOTE: If upper cabinet is the heavy side. Power supply cord bushing 6. Position the... Drill C\," (10 mm) holes at points "D" and "E" on support tabs at one corner of the shaded rectangular area "F" on the back of microwave oven still tilted, thread power supply cord through the wall, make sure the damper assembly fits easily into the vent in the bottom of mounting ...
...wall venting only) 1. Place a washer on the template. Sheet metal screws 3. Secure damper assembly with 2 sheet metal screws. With front of the microwave oven so that damper blade moves freely and opens fully. 2. NOTE: If upper cabinet is the heavy side. Power supply cord bushing 6. Position the... Drill C\," (10 mm) holes at points "D" and "E" on support tabs at one corner of the shaded rectangular area "F" on the back of microwave oven still tilted, thread power supply cord through the wall, make sure the damper assembly fits easily into the vent in the bottom of mounting ...
Installation Guide
Page 10
... B. WARNING A. Bolts For Roof Venting Installation Only 1. A B C D E F A. Upper cabinet cutout E. Do not remove ground prong. If the microwave oven does not operate: ■■ Check that a household fuse has not blown, or that the long tab of water on a covered surface. 8. ... or shorter bolts are available at 100% power. Refer to damper assembly. Raised tabs B. Check the operation of the microwave oven. NOTE: If microwave oven does not need to follow these instructions can result in place. NOTES: ■■ Some upper cabinets may warp...
... B. WARNING A. Bolts For Roof Venting Installation Only 1. A B C D E F A. Upper cabinet cutout E. Do not remove ground prong. If the microwave oven does not operate: ■■ Check that a household fuse has not blown, or that the long tab of water on a covered surface. 8. ... or shorter bolts are available at 100% power. Refer to damper assembly. Raised tabs B. Check the operation of the microwave oven. NOTE: If microwave oven does not need to follow these instructions can result in place. NOTES: ■■ Some upper cabinets may warp...
Installation Guide
Page 11
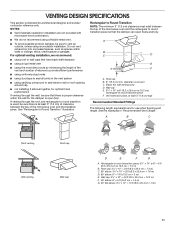
...using a rigid metal vent ■■ using the most direct route by minimizing the length of the vent and number of the microwave oven and the transition piece. Rectangular to Round Transition NOTE: The minimum 3" (7.6 cm) clearance must exist between the top of elbows...rectangular to round transition is used, be sure there is at least 3" (7.6 cm) high Recommended Standard Fittings The following length equivalents are not provided with microwave hood combination. ■■ We do not recommend using recirculation installation. Wall cap E. 3¹⁄₄" x 10" to 6" (8.3 x 25...
...using a rigid metal vent ■■ using the most direct route by minimizing the length of the vent and number of the microwave oven and the transition piece. Rectangular to Round Transition NOTE: The minimum 3" (7.6 cm) clearance must exist between the top of elbows...rectangular to round transition is used, be sure there is at least 3" (7.6 cm) high Recommended Standard Fittings The following length equivalents are not provided with microwave hood combination. ■■ We do not recommend using recirculation installation. Wall cap E. 3¹⁄₄" x 10" to 6" (8.3 x 25...
Installation Guide
Page 12
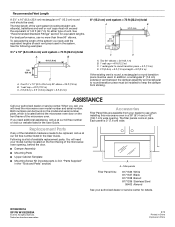
..." section) A A. Both numbers can be used. You will need your authorized dealer or service center for either type of the microwave oven. Filler panels Filler Panel Kits: 8171336 White 8171337 Black 8171338 Biscuit 8171339 Stainless Steel 99403 Almond See your model number located on... system including straight vent, elbow(s), transitions and wall or roof caps must be installed to round transition piece must not exceed the equivalent of the microwave oven opening . Recommended Vent Length A 3¹⁄₄" x 10" (8.3 x 25.4 cm) rectangular or 6" (15.2 cm) round vent ...
..." section) A A. Both numbers can be used. You will need your authorized dealer or service center for either type of the microwave oven. Filler panels Filler Panel Kits: 8171336 White 8171337 Black 8171338 Biscuit 8171339 Stainless Steel 99403 Almond See your model number located on... system including straight vent, elbow(s), transitions and wall or roof caps must be installed to round transition piece must not exceed the equivalent of the microwave oven opening . Recommended Vent Length A 3¹⁄₄" x 10" (8.3 x 25.4 cm) rectangular or 6" (15.2 cm) round vent ...

Warranty Information
Page 1
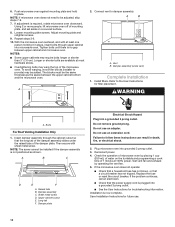
MAYTAG® MICROWAVE-RANGE HOOD COMBINATION LIMITED WARRANTY ATTACH YOUR RECEIPT HERE. Some questions can be borne by Maytag. 8. In the U.S. TEN YEAR LIMITED WARRANTY WHAT IS COVERED WHAT IS NOT COVERED FIRST YEAR LIMITED WARRANTY (PARTS AND LABOR) For...maintenance or installation, installation not in -home repair. 13. LIMITATION OF REMEDIES; This warranty gives you specific legal rights, and you should ask Maytag or your retailer about the quality, durability, or need for the following information available when you . Service to access additional resources, or visit...
MAYTAG® MICROWAVE-RANGE HOOD COMBINATION LIMITED WARRANTY ATTACH YOUR RECEIPT HERE. Some questions can be borne by Maytag. 8. In the U.S. TEN YEAR LIMITED WARRANTY WHAT IS COVERED WHAT IS NOT COVERED FIRST YEAR LIMITED WARRANTY (PARTS AND LABOR) For...maintenance or installation, installation not in -home repair. 13. LIMITATION OF REMEDIES; This warranty gives you specific legal rights, and you should ask Maytag or your retailer about the quality, durability, or need for the following information available when you . Service to access additional resources, or visit...


