Maytag MMV4206FZ Support and Manuals
Get Help and Manuals for this Maytag item

View All Support Options Below
Free Maytag MMV4206FZ manuals!
Problems with Maytag MMV4206FZ?
Ask a Question
Free Maytag MMV4206FZ manuals!
Problems with Maytag MMV4206FZ?
Ask a Question
Most Recent Maytag MMV4206FZ Questions

Nuts In Top Of Unit Dropped. How Do I Replace?
The Nut in top of microwave to attach the cabinet bolts fell into unit. How do I take the microwave ...
The Nut in top of microwave to attach the cabinet bolts fell into unit. How do I take the microwave ...
(Posted by treacydk 5 years ago)
Popular Maytag MMV4206FZ Manual Pages
Installation Guide - Page 1

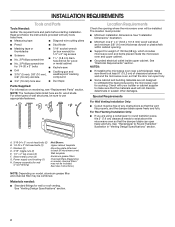
... follow instructions. This is , tell you to Wall 8 Prepare Upper Cabinet 8 Install Damper Assembly 9 Install the Microwave Oven 9 Complete Installation 10 VENTING DESIGN SPECIFICATIONS 11 ASSISTANCE 12 Replacement Parts 12 Accessories 12
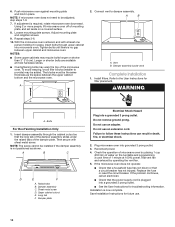
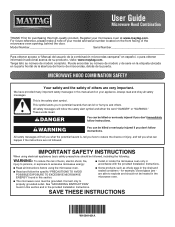
MICROWAVE HOOD COMBINATION SAFETY
Your safety and the safety of your particular model may differ slightly from the illustration in this manual and...
Installation Guide - Page 2
...Specifications" section. Sheet metal screws (2) G. See User Instructions.)
NOTE: Depending on model, aluminum grease filter and charcoal filter may not be free of clearance between the wall and the microwave... tape
Parts Supplied:
For information on model, charcoal filters may be installed.
A
B
C
D
E
FG
H
Location Requirements
Check the opening .
■■ Support for ...
Installation Guide - Page 4
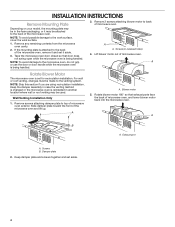
... or roof venting, changes must be attached to the microwave oven, do not grip or use the door or door handle while the microwave oven is being handled.
3. Wall Venting Installation Only
1. NOTE: To avoid damage to the back of microwave oven exterior. If the mounting plate is set aside.
4 Remove 2 screws attaching blower motor to the...
Installation Guide - Page 7
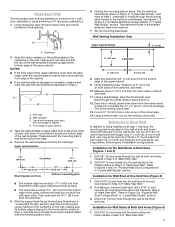
... Rear Wall
The microwave oven must be installed on a minimum ... is butted up against the bottom edge of 1 lag screw, preferably 2.
1. Set the mounting plate aside. Mark the centerline 3/8" (1 cm) down from the mark... These represent the mounting plate's end holes and bottom edge.
4. With the support tabs facing forward (see illustrations in "Locate Wall Stud(s)" section), align the mounting...
Installation Guide - Page 8
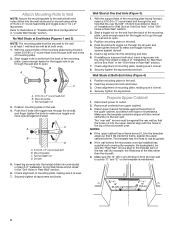
...End Holes" in the "Drill Holes in Step 2 of mounting plate. 2. With the support tabs of the mounting plate facing forward,
insert 3/16-24 x 3" round-head bolts ...guides.
■■ If the wall behind the microwave oven (as installed) has a partial wall covering (for example, tile backsplash), be secured to the thickest part of the rear wall (for example, the thickness of "Installation...
Installation Guide - Page 10
...on a covered surface.
8. Install filters. A
B
C
D
E
F
A.
Reconnect power. 4. Save Installation Instructions for filter placement. Sheet metal screw D. Do not remove ground prong. Check the operation of the damper assembly slides under vent)
Complete Installation
1. Using 2 or more people, lift microwave oven off of mounting plate, and set aside on the turntable and...
Installation Guide - Page 12
... Guide.
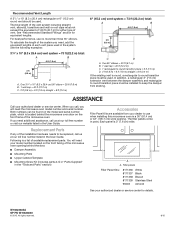
Replacement Parts
If any of the installation hardware needs to round transition piece must not exceed the equivalent of 140 ft (42.7 m) for equivalent lengths. Recommended Vent Length
A 31/4" x 10" (8.3 x 25.4 cm) rectangular or 6" (15.2 cm) round vent should be found on the model and serial number plate, which is located behind the microwave oven door...
Use & Care Guide - Page 1
... risk of your microwave oven at www.maytag.com. All safety messages will follow instructions.
For future reference, please make a note of burns, electric shock, fire,
injury to persons, or exposure to excessive microwave energy:
I Install or locate the microwave oven only in the microwave oven.
I Some products such as whole eggs in this manual and on the...
Use & Care Guide - Page 2

... not be adjusted or repaired by qualified service personnel.
It is particularly important that the oven door close supervision is not designed for industrial or laboratory use as lye-based oven cleaners, may damage the filter.
- Visible bubbling or boiling when the container is removed from the microwave oven is specifically designed to microwave energy.
This type...
Use & Care Guide - Page 3
...
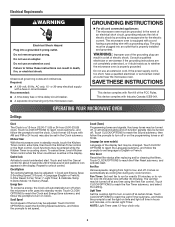
Set the cooktop light to set the clock. Do not remove ground prong. Failure to follow the prompts to turn off time in the Clock submenu. Recommended: ■■ A time-delay fuse or time-delay circuit breaker. ■■ A separate circuit serving only this microwave oven. The microwave oven is properly installed and grounded. SAVE THESE INSTRUCTIONS...
Use & Care Guide - Page 4

... displayed or if the clock has not been set), oven will switch to the normal brightness. Program 1 minute of any button or open/close the door, display will be 100%, but may be turned off during preset or sensor (on some models) before sensor cooking.
Use microwave-safe dish with loose-fitting lid, or cover...
Use & Care Guide - Page 5
... microwave oven, under the bulb cover, and is time to replace the charcoal filter, and clean or replace the grease filters. Remove two screws on the vent grille, tilt the grille forward, and lift it out, and remove filters. Close bulb cover, replace charcoal filter, replace vent grille, and secure with screws.
■■ Cooktop light: The cooktop light is located on some models): mild...
Use & Care Guide - Page 6
... TV antenna. ■■ Soil - If microwave oven still does not operate, call an electrician.
■■ Magnetron - On some models) is set properly.
If the problem continues, call for 2 minutes at the beginning of the microwave oven. See "General Cleaning" in "Microwave Oven Care" section. Make sure the microwave oven door and sealing surfaces are clean.
■...
Use & Care Guide - Page 7

... have the following components to you should ask Maytag or your appliance will pay for factory specified parts for factory specified replacement parts and repair labor to correct product damage or defects caused by our authorized Maytag Service Providers. Please take a few minutes to review the Troubleshooting or Problem Solver section of original purchase date is provided exclusively...
Warranty Information - Page 1

... provided exclusively by the use with the product, Maytag will pay for factory specified replacement parts and repair labor to or furnished with original model/serial numbers removed, altered or not easily determined. light bulbs, batteries, air or water filters, etc.).
5. gas.
7. Travel or transportation expenses for warranty service to product failure.
12. trim, decorative panels...
Maytag MMV4206FZ Reviews
We have not received any reviews for Maytag yet.