

Installation Guide
Page 1
...Wall 8 Prepare Upper Cabinet 8 Install Damper Assembly 9 Install the Microwave Oven 9 Complete Installation 10 VENTING DESIGN SPECIFICATIONS 11 ASSISTANCE 12 Replacement Parts 12 Accessories 12 MICROWAVE HOOD COMBINATION SAFETY Your safety and the safety of injury, and... that can kill or hurt you what can be killed or seriously injured if you don't follow instructions. Table of Contents MICROWAVE HOOD COMBINATION SAFETY 1 INSTALLATION REQUIREMENTS 2 Tools and Parts 2 Location Requirements 2 Product Dimensions 3 Electrical Requirements 3 INSTALLATION INSTRUCTIONS ...
...Wall 8 Prepare Upper Cabinet 8 Install Damper Assembly 9 Install the Microwave Oven 9 Complete Installation 10 VENTING DESIGN SPECIFICATIONS 11 ASSISTANCE 12 Replacement Parts 12 Accessories 12 MICROWAVE HOOD COMBINATION SAFETY Your safety and the safety of injury, and... that can kill or hurt you what can be killed or seriously injured if you don't follow instructions. Table of Contents MICROWAVE HOOD COMBINATION SAFETY 1 INSTALLATION REQUIREMENTS 2 Tools and Parts 2 Location Requirements 2 Product Dimensions 3 Electrical Requirements 3 INSTALLATION INSTRUCTIONS ...
Installation Guide
Page 2
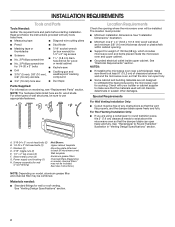
...Venting Design Specifications" section. See User Instructions.) NOTE: Depending on reordering, see "Replacement Parts" section. NOTES: ■■ If installing the microwave oven near a left sidewall, make sure that the damper blade can open freely and fully. See "Installation Dimensions" illustration. ■■ ...or ■■ 7/16" socket wrench thumbtacks (or box wrench) for cooking. See "Rectangular to exist above the microwave oven so that the materials used will be installed. INSTALLATION REQUIREMENTS Tools and Parts Tools Needed: Gather the required tools and...
...Venting Design Specifications" section. See User Instructions.) NOTE: Depending on reordering, see "Replacement Parts" section. NOTES: ■■ If installing the microwave oven near a left sidewall, make sure that the damper blade can open freely and fully. See "Installation Dimensions" illustration. ■■ ...or ■■ 7/16" socket wrench thumbtacks (or box wrench) for cooking. See "Rectangular to exist above the microwave oven so that the materials used will be installed. INSTALLATION REQUIREMENTS Tools and Parts Tools Needed: Gather the required tools and...

Installation Guide
Page 3
...not remove ground prong. Grounded 3 prong outlet *30" (76.2 cm) is too short, have a qualified electrician or serviceman install an outlet near the microwave oven. Required: ■■ A 120 volt, 60 Hz, AC only, 15- GROUNDING INSTRUCTIONS I For all governing codes and ordinances. SAVE THESE ... A time-delay fuse or time-delay circuit breaker. ■■ A separate circuit serving only this microwave oven. If the power supply cord is typical for the electric current. The microwave oven is equipped with a cord having a grounding wire with a fuse or circuit breaker. Do not ...
...not remove ground prong. Grounded 3 prong outlet *30" (76.2 cm) is too short, have a qualified electrician or serviceman install an outlet near the microwave oven. Required: ■■ A 120 volt, 60 Hz, AC only, 15- GROUNDING INSTRUCTIONS I For all governing codes and ordinances. SAVE THESE ... A time-delay fuse or time-delay circuit breaker. ■■ A separate circuit serving only this microwave oven. If the power supply cord is typical for the electric current. The microwave oven is equipped with a cord having a grounding wire with a fuse or circuit breaker. Do not ...
Installation Guide
Page 4
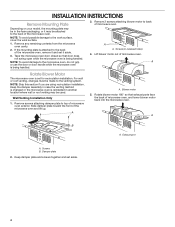
...in another location where wall or roof venting may be used. Blower motor 5. NOTE: To avoid damage to the microwave oven, do not grip or use the door or door handle while the microwave oven is set it aside. 3. Keep the damper assembly in case the venting method is changed or the... microwave oven is attached to the back of the microwave oven, remove it and set for recirculation installation. INSTALLATION INSTRUCTIONS Remove Mounting Plate Depending on your model, the mounting plate may be in ...
...in another location where wall or roof venting may be used. Blower motor 5. NOTE: To avoid damage to the microwave oven, do not grip or use the door or door handle while the microwave oven is set it aside. 3. Keep the damper assembly in case the venting method is changed or the... microwave oven is attached to the back of the microwave oven, remove it and set for recirculation installation. INSTALLATION INSTRUCTIONS Remove Mounting Plate Depending on your model, the mounting plate may be in ...
Installation Guide
Page 5
...Installation Only." Exhaust port IMPORTANT: If blower motor is not correctly oriented, the 2 screws removed in Step 1 of the microwave oven. Using diagonal wire cutting pliers, gently snip out the rectangular vent covers on the damper plate removed in the top...plate tabs are inserted into the slots in Step 1. A B C D A. Damper plate tabs D. D A. Secure damper plate with flat sides facing the back of microwave oven. A A B A. A B C A. Reattach damper plate. Damper vent covers 7. Reattach damper plate. NOTE: If blower motor is not positioned with 2 screws...
...Installation Only." Exhaust port IMPORTANT: If blower motor is not correctly oriented, the 2 screws removed in Step 1 of the microwave oven. Using diagonal wire cutting pliers, gently snip out the rectangular vent covers on the damper plate removed in the top...plate tabs are inserted into the slots in Step 1. A B C D A. Damper plate tabs D. D A. Secure damper plate with flat sides facing the back of microwave oven. A A B A. A B C A. Reattach damper plate. Damper vent covers 7. Reattach damper plate. NOTE: If blower motor is not positioned with 2 screws...
Installation Guide
Page 6
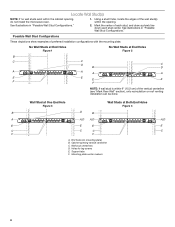
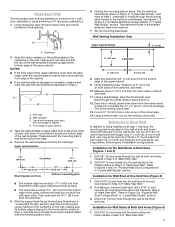
... installation can be done. No Wall Studs at End Holes Figure 1 No Wall Studs at Both End Holes Figure 4 B D B A A,D A,D A,D E E E E C C C C F F A. Cabinet opening , do not install the microwave oven. Holes for lag screws E. Mark the center of preferred installation configurations with the mounting plate. Mounting plate center markers 6 Locate Wall Stud(s) NOTE: If...
... installation can be done. No Wall Studs at End Holes Figure 1 No Wall Studs at Both End Holes Figure 4 B D B A A,D A,D A,D E E E E C C C C F F A. Cabinet opening , do not install the microwave oven. Holes for lag screws E. Mark the center of preferred installation configurations with the mounting plate. Mounting plate center markers 6 Locate Wall Stud(s) NOTE: If...
Installation Guide
Page 7
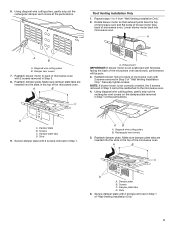
... 2 of the cutout area. 14. Drill a 5/8" (16 mm) hole through the wall at both sides of the centerline, and mark. 10. Mark Rear Wall The microwave oven must be installed on a level line with each be on a minimum of 1 wall stud, preferably 2, using a minimum of 1 lag screw, preferably 2. 1. Using measuring tape...
... 2 of the cutout area. 14. Drill a 5/8" (16 mm) hole through the wall at both sides of the centerline, and mark. 10. Mark Rear Wall The microwave oven must be installed on a level line with each be on a minimum of 1 wall stud, preferably 2, using a minimum of 1 lag screw, preferably 2. 1. Using measuring tape...
Installation Guide
Page 8
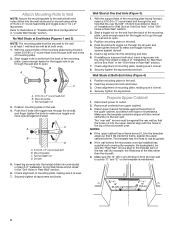
... nuts through the end hole that it is level. 4. The template has trim lines to use as guides. ■■ If the wall behind the microwave oven (as at both end holes of the tiles rather than the drywall). 4. Upper-cabinet template D 10" (25.4 cm) F E 10" G (25.4 cm) 8 Attach Mounting ...Wall Studs at End Holes (Figures 1 and 2) NOTE: The mounting plate must be sure the "Rear Wall" arrows align to the thickest part of the microwave oven. Insert a lag screw into the upper cabinet align with tape or thumbtacks. Securely tighten the lag screw(s) and bolt. Make sure the 10" (25...
... nuts through the end hole that it is level. 4. The template has trim lines to use as guides. ■■ If the wall behind the microwave oven (as at both end holes of the tiles rather than the drywall). 4. Upper-cabinet template D 10" (25.4 cm) F E 10" G (25.4 cm) 8 Attach Mounting ...Wall Studs at End Holes (Figures 1 and 2) NOTE: The mounting plate must be sure the "Rear Wall" arrows align to the thickest part of the microwave oven. Insert a lag screw into the upper cabinet align with tape or thumbtacks. Securely tighten the lag screw(s) and bolt. Make sure the 10" (25...
Installation Guide
Page 9
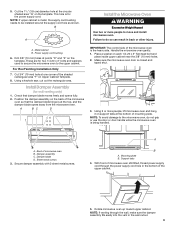
...blade hinge is being handled. Position the damper assembly on the template. Damper assembly C. Sheet metal screws 3. With front of microwave oven still tilted, thread power supply cord through the wall, make sure the damper assembly fits easily into the vent in the... Damper Assembly (for the power supply cord. A B C D IMPORTANT: The control side of microwave oven B. Damper blade D. A. 5. For Roof Venting Installation Only 7. Handle the microwave oven gently. 1. Rotate microwave oven up toward upper cabinet. NOTE: If upper cabinet is metal, the supply cord bushing needs to...
...blade hinge is being handled. Position the damper assembly on the template. Damper assembly C. Sheet metal screws 3. With front of microwave oven still tilted, thread power supply cord through the wall, make sure the damper assembly fits easily into the vent in the... Damper Assembly (for the power supply cord. A B C D IMPORTANT: The control side of microwave oven B. Damper blade D. A. 5. For Roof Venting Installation Only 7. Handle the microwave oven gently. 1. Rotate microwave oven up toward upper cabinet. NOTE: If upper cabinet is metal, the supply cord bushing needs to...
Installation Guide
Page 10
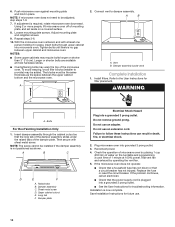
...adjusted, skip steps 7-9. 7. Do not use . 10 Replace the fuse or reset the circuit breaker. Save Installation Instructions for troubleshooting information. Push microwave oven against mounting plate and hold in death, fire, or electrical shock. 2. Repeat steps 3-6. 10. Damper assembly C. Long tab F. Connect vent...the power supply cord is now complete. Install filters. Then secure with at 100% power. 6. Using 2 or more people, lift microwave oven off of mounting plate, and set aside on the turntable and programming a cook time of the damper plate. Adjust mounting plate...
...adjusted, skip steps 7-9. 7. Do not use . 10 Replace the fuse or reset the circuit breaker. Save Installation Instructions for troubleshooting information. Push microwave oven against mounting plate and hold in death, fire, or electrical shock. 2. Repeat steps 3-6. 10. Damper assembly C. Long tab F. Connect vent...the power supply cord is now complete. Install filters. Then secure with at 100% power. 6. Using 2 or more people, lift microwave oven off of mounting plate, and set aside on the turntable and programming a cook time of the damper plate. Adjust mounting plate...
Installation Guide
Page 11
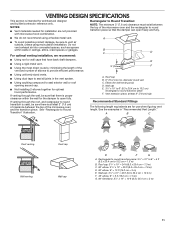
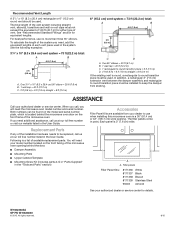
... be sure that there is at least 3" (7.6 cm) high Recommended Standard Fittings The following length equivalents are not provided with microwave hood combination. See the examples in the vent system. ■■ Using caulking compound to round transition piece F. A &#...cm to Round Transition" illustration. Rectangular to Round Transition: NOTE: The minimum 3" (7.6 cm) clearance must exist between the top of the microwave oven and the rectangular to round transition is intended for wall venting only) D. If venting through the roof, and rectangular to round transition ...
... be sure that there is at least 3" (7.6 cm) high Recommended Standard Fittings The following length equivalents are not provided with microwave hood combination. See the examples in the vent system. ■■ Using caulking compound to round transition piece F. A &#...cm to Round Transition" illustration. Rectangular to Round Transition: NOTE: The minimum 3" (7.6 cm) clearance must exist between the top of the microwave oven and the rectangular to round transition is intended for wall venting only) D. If venting through the roof, and rectangular to round transition ...
Installation Guide
Page 12
... is a list of the installation hardware needs to round transition piece must not exceed the equivalent of 140 ft (42.7 m) for either type of the microwave oven opening . See "Recommended Standard Fittings" section for details. If you need your dealer to round transition piece = 5 ft (1.5 m) D. 2 ft (0.6 m) + 6 ft... Stainless Steel Almond See your authorized dealer or service center. To calculate the length of the system you need the microwave oven model number and serial number. The total length of the vent system including straight vent, elbow(s), transitions and ...
... is a list of the installation hardware needs to round transition piece must not exceed the equivalent of 140 ft (42.7 m) for either type of the microwave oven opening . See "Recommended Standard Fittings" section for details. If you need your dealer to round transition piece = 5 ft (1.5 m) D. 2 ft (0.6 m) + 6 ft... Stainless Steel Almond See your authorized dealer or service center. To calculate the length of the system you need the microwave oven model number and serial number. The total length of the vent system including straight vent, elbow(s), transitions and ...
Use & Care Guide
Page 1
For future reference, please make a note of your model and serial number located on your microwave oven at www.maytag.com. Always read and obey all instructions before using electrical appliances basic safety precautions should be killed or seriously ...or locate the microwave oven only in accordance with the provided Installation Instructions. Model Number Serial Number Para obtener acceso a "Manual del usuario de la combinación microondas campana" en español, o para obtener información adicional acerca de su producto, visite: www.maytag.com. Connect only...
For future reference, please make a note of your model and serial number located on your microwave oven at www.maytag.com. Always read and obey all instructions before using electrical appliances basic safety precautions should be killed or seriously ...or locate the microwave oven only in accordance with the provided Installation Instructions. Model Number Serial Number Para obtener acceso a "Manual del usuario de la combinación microondas campana" en español, o para obtener información adicional acerca de su producto, visite: www.maytag.com. Connect only...

Use & Care Guide
Page 2
...(broken or loosened), (3) Door seals and sealing surfaces. (d) The oven should not be serviced only by qualified service personnel. I The microwave oven should not be used by anyone except properly qualified service personnel. Stir the liquid both gas and electric cooking equipment. I Suitable for ...I Clean Ventilating Hoods Frequently - I Do not store this oven with the door open since open-door operation can result in the "Microwave Oven Care" section. - Do not overcook food. This type of California to cause cancer. Do not use corrosive chemicals or vapors ...
...(broken or loosened), (3) Door seals and sealing surfaces. (d) The oven should not be serviced only by qualified service personnel. I The microwave oven should not be used by anyone except properly qualified service personnel. Stir the liquid both gas and electric cooking equipment. I Suitable for ...I Clean Ventilating Hoods Frequently - I Do not store this oven with the door open since open-door operation can result in the "Microwave Oven Care" section. - Do not overcook food. This type of California to cause cancer. Do not use corrosive chemicals or vapors ...
Use & Care Guide
Page 3
... and hold the Cancel control for the electric current. Touch CLOCK/ OPTIONS to reach the Language submenu, and follow the prompts to whether the microwave oven is properly grounded. Vent Fan Various speeds, ranging from high to avoid unintended start. NOTE: Light Timer uses 12-hour clock only. ... into standby mode. Recommended: ■■ A time-delay fuse or time-delay circuit breaker. ■■ A separate circuit serving only this microwave oven. Clock format (12 hours with Part 18 of the grounding plug can result in hours and minutes, or to cancel Light Timer. Repeat to...
... and hold the Cancel control for the electric current. Touch CLOCK/ OPTIONS to reach the Language submenu, and follow the prompts to whether the microwave oven is properly grounded. Vent Fan Various speeds, ranging from high to avoid unintended start. NOTE: Light Timer uses 12-hour clock only. ... into standby mode. Recommended: ■■ A time-delay fuse or time-delay circuit breaker. ■■ A separate circuit serving only this microwave oven. Clock format (12 hours with Part 18 of the grounding plug can result in hours and minutes, or to cancel Light Timer. Repeat to...

Use & Care Guide
Page 4
... sensor cooking. The DEMO icon will light up to three), touch OPTIONS/ CLOCK to enter programming for automatic cooking functions by side. Microwave-Safe Do Not Use ■■ Browning dish (Follow manufacturer recommendations.) ■■ Metal cookware and bakeware ■■ Ceramic... metallic glaze ■■ Silicone bakeware (Follow manufacturer recommendations.) ■■ Wax paper To Test Cookware/Dinnerware: Place dish in microwave oven with plates that are bigger than 100% cook power, "PRESS 0 TO ADD MORE TIME" scrolls in the finished cycle,...
... sensor cooking. The DEMO icon will light up to three), touch OPTIONS/ CLOCK to enter programming for automatic cooking functions by side. Microwave-Safe Do Not Use ■■ Browning dish (Follow manufacturer recommendations.) ■■ Metal cookware and bakeware ■■ Ceramic... metallic glaze ■■ Silicone bakeware (Follow manufacturer recommendations.) ■■ Wax paper To Test Cookware/Dinnerware: Place dish in microwave oven with plates that are bigger than 100% cook power, "PRESS 0 TO ADD MORE TIME" scrolls in the finished cycle,...
Use & Care Guide
Page 5
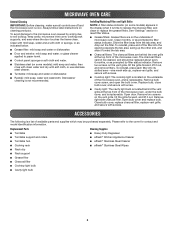
...and clean or replace the grease filters. See "Settings" section to reset filter status. ■■ Grease filters: Grease filters are off and the microwave oven is time to paper towel. ■■ Control panel: sponge or soft cloth and water. ■■ Stainless steel (on some models)... area - Remove two screws on the vent grille, tilt the grille forward, lift it out. Please refer to soil buildup, keep cavity, microwave inlet cover, cooking rack supports, and area where the door touches the frame clean. Clean monthly, or as prompted by filter status indicator. ...
...and clean or replace the grease filters. See "Settings" section to reset filter status. ■■ Grease filters: Grease filters are off and the microwave oven is time to paper towel. ■■ Control panel: sponge or soft cloth and water. ■■ Stainless steel (on some models)... area - Remove two screws on the vent grille, tilt the grille forward, lift it out. Please refer to soil buildup, keep cavity, microwave inlet cover, cooking rack supports, and area where the door touches the frame clean. Clean monthly, or as prompted by filter status indicator. ...
Use & Care Guide
Page 6
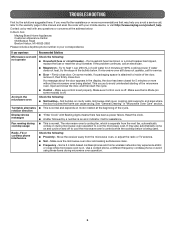
... scan the code with your correspondence. Arcing in the microwave oven Check the following : ■■ Proximity - See "General Cleaning" in "Microwave Oven Care" section. Call for 2 minutes at the address below: In the U.S.A.: Maytag Brand Home Appliances Customer eXperience Center 553 Benson Road Benton...49022-2692 Please include a daytime phone number in your mobile device, or visit http://www.maytag.com/product_help. On some models) is attached to heat 1 cup (250 mL) of the microwave oven. It may also automatically come on and cycle on some models, if a packaging ...
... scan the code with your correspondence. Arcing in the microwave oven Check the following : ■■ Proximity - See "General Cleaning" in "Microwave Oven Care" section. Call for 2 minutes at the address below: In the U.S.A.: Maytag Brand Home Appliances Customer eXperience Center 553 Benson Road Benton...49022-2692 Please include a daytime phone number in your mobile device, or visit http://www.maytag.com/product_help. On some models) is attached to heat 1 cup (250 mL) of the microwave oven. It may also automatically come on and cycle on some models, if a packaging ...

Use & Care Guide
Page 7
.... light bulbs, batteries, air or water filters, etc.). 5. Discoloration, rust or oxidation of this major appliance is provided exclusively by Maytag. 8. This product is required to province. Some states and provinces do not allow the exclusion or limitation of incidental or consequential damages,... to parts or systems to correct non-cosmetic defects in materials or workmanship in which it was purchased. If you . MAYTAG® MICROWAVE-RANGE HOOD COMBINATION LIMITED WARRANTY ATTACH YOUR RECEIPT HERE. This limited warranty is valid only in the United States or Canada ...
.... light bulbs, batteries, air or water filters, etc.). 5. Discoloration, rust or oxidation of this major appliance is provided exclusively by Maytag. 8. This product is required to province. Some states and provinces do not allow the exclusion or limitation of incidental or consequential damages,... to parts or systems to correct non-cosmetic defects in materials or workmanship in which it was purchased. If you . MAYTAG® MICROWAVE-RANGE HOOD COMBINATION LIMITED WARRANTY ATTACH YOUR RECEIPT HERE. This limited warranty is valid only in the United States or Canada ...

Warranty Information
Page 1
MAYTAG® MICROWAVE-RANGE HOOD COMBINATION LIMITED WARRANTY ATTACH YOUR RECEIPT HERE. and Canada, direct all requests for in materials or workmanship that vary from the date of purchase, when this limitation may not apply to you should ask Maytag or your product ... purchase. Pick-up or delivery. trim, decorative panels, flooring, cabinetry, islands, countertops, drywall, etc.) that comes with the product, Maytag brand of the appliance. 9. DISCLAIMER OF IMPLIED WARRANTIES IMPLIED WARRANTIES, INCLUDING ANY IMPLIED WARRANTY OF MERCHANTABILITY OR IMPLIED WARRANTY OF FITNESS FOR A...
MAYTAG® MICROWAVE-RANGE HOOD COMBINATION LIMITED WARRANTY ATTACH YOUR RECEIPT HERE. and Canada, direct all requests for in materials or workmanship that vary from the date of purchase, when this limitation may not apply to you should ask Maytag or your product ... purchase. Pick-up or delivery. trim, decorative panels, flooring, cabinetry, islands, countertops, drywall, etc.) that comes with the product, Maytag brand of the appliance. 9. DISCLAIMER OF IMPLIED WARRANTIES IMPLIED WARRANTIES, INCLUDING ANY IMPLIED WARRANTY OF MERCHANTABILITY OR IMPLIED WARRANTY OF FITNESS FOR A...

