User Instructions
Page 2
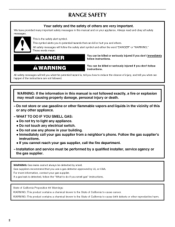
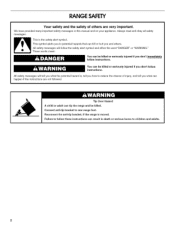
...try to reduce the chance of injury, and tell you what can be killed or seriously injured if you and others are not followed. If a gas leak is , tell you how to light any appliance. • Do not touch any electrical switch. • Do not use any other reproductive... harm. This symbol alerts you to cause cancer. WARNING: If the information in the vicinity of this manual is the safety alert symbol. RANGE SAFETY Your safety and the safety of others . You can happen if the instructions are very important. WARNING: This product contains ...
...try to reduce the chance of injury, and tell you what can be killed or seriously injured if you and others are not followed. If a gas leak is , tell you how to light any appliance. • Do not touch any electrical switch. • Do not use any other reproductive... harm. This symbol alerts you to cause cancer. WARNING: If the information in the vicinity of this manual is the safety alert symbol. RANGE SAFETY Your safety and the safety of others . You can happen if the instructions are very important. WARNING: This product contains ...
User Instructions
Page 4
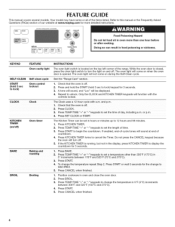
... to change the temperature in oven more detailed instructions. The oven light will sound at www.maytag.com for 5 seconds. 1. Only the CLOCK and KITCHEN TIMER keypads will come on when... temperature repeat Step 2. Press START to unlock. Press TEM P/TIME '+" or "-" keypads to this manual or the Frequently Asked Questions (FAQs) section of time. 3. Press SET CLOCK or START. Press ...START (hold 3 sec to cancel the Timer. Repeat to begin the countdown. FEATURE GUIDE This manual covers several models. To change to set in oven and close the oven door. 2. Press...
... to change the temperature in oven more detailed instructions. The oven light will sound at www.maytag.com for 5 seconds. 1. Only the CLOCK and KITCHEN TIMER keypads will come on when... temperature repeat Step 2. Press START to unlock. Press TEM P/TIME '+" or "-" keypads to this manual or the Frequently Asked Questions (FAQs) section of time. 3. Press SET CLOCK or START. Press ...START (hold 3 sec to cancel the Timer. Repeat to begin the countdown. FEATURE GUIDE This manual covers several models. To change to set in oven and close the oven door. 2. Press...
User Instructions
Page 6
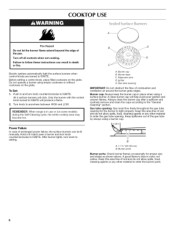
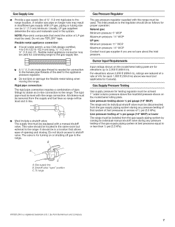
... 1-11/_'' (25-38 mm) B. Burner ports Burner ports: Check burner flames occasionally for the burner to follow these instructions can be lit manually. Failure to light properly. COOKTOP USE Fire Hazard Do not let the burner flame extend beyond the edge of prolonged power failure, the surface burners... using a surface burner. All 4 surface burners will help avoid poor ignition and uneven flames. REMEMBER: When range is blue in and turn knob counterclockwise to enter the gas tube opening IMPORTANT: Do not obstruct the flow of soil and do not allow spills, food, cleaning agents ...
... 1-11/_'' (25-38 mm) B. Burner ports Burner ports: Check burner flames occasionally for the burner to follow these instructions can be lit manually. Failure to light properly. COOKTOP USE Fire Hazard Do not let the burner flame extend beyond the edge of prolonged power failure, the surface burners... using a surface burner. All 4 surface burners will help avoid poor ignition and uneven flames. REMEMBER: When range is blue in and turn knob counterclockwise to enter the gas tube opening IMPORTANT: Do not obstruct the flow of soil and do not allow spills, food, cleaning agents ...
Installation Instructions
Page 2
... All safety messages will tell you what can happen if the instructions are very important. Tip Over Hazard A child or adult can tip the range and be killed or seriously injured if you to children and adults. 2 Connect anti=tip bracket to follow the safety alert symbol and either ... these instructions can be killed. Always read and obey all safety messages. These words mean: You can result in this manual and on your appliance. Reconnect the anti=tip bracket, if the range is the safety alert symbol. You can kill or hurt you don't follow instructions. Failure to rear...
... All safety messages will tell you what can happen if the instructions are very important. Tip Over Hazard A child or adult can tip the range and be killed or seriously injured if you to children and adults. 2 Connect anti=tip bracket to follow the safety alert symbol and either ... these instructions can be killed. Always read and obey all safety messages. These words mean: You can result in this manual and on your appliance. Reconnect the anti=tip bracket, if the range is the safety alert symbol. You can kill or hurt you don't follow instructions. Failure to rear...

Installation Instructions
Page 3
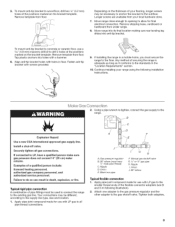
...any electrical switch. • Do not use a gas detector approved by smell. m If using a ball valve, it shall be performed by a qualified or licensed contractor, plumber, or gasfitter qualified or licensed by the State of this manual is not followed exactly, a fire or explosion may ...result causing property damage, personal injury or death. - Follow the gas supplier's instructions. • If you smell gas" instructions. For more information, contact your gas supplier from a neighbor's phone. In ...
...any electrical switch. • Do not use a gas detector approved by smell. m If using a ball valve, it shall be performed by a qualified or licensed contractor, plumber, or gasfitter qualified or licensed by the State of this manual is not followed exactly, a fire or explosion may ...result causing property damage, personal injury or death. - Follow the gas supplier's instructions. • If you smell gas" instructions. For more information, contact your gas supplier from a neighbor's phone. In ...
Installation Instructions
Page 7
... are for connection to the female pipe threads of 3_,,(1.9 cm) rigid pipe to the range location. For elevations above 1/2psi gauge (14" WCP) The range and its individual manual shutoff valve during any pressure testing of the gas supply piping system at a rate of opening and closing its individual shutoff valve must be...
... are for connection to the female pipe threads of 3_,,(1.9 cm) rigid pipe to the range location. For elevations above 1/2psi gauge (14" WCP) The range and its individual manual shutoff valve during any pressure testing of the gas supply piping system at a rate of opening and closing its individual shutoff valve must be...

Installation Instructions
Page 8
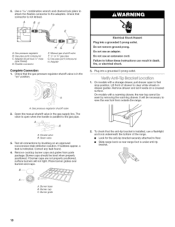
Failure to do so can result in cabinet opening . Do not remove the shipping base at this manual. 2. A / D B A. ¼" drive ratchet B. Tape template into place. 4. Contact a qualified floor covering installer for the best procedure for drilling mounting holes ...Remove shipping materials, tape and film from inside the oven cavity) or from the back of floor covering. Remove oven racks and parts package from range. 2. Shipping base 4. AB Tip Over Hazard A child or adult can result in cabinet opening so that specified in the "Location Requirements" section,...
Failure to do so can result in cabinet opening . Do not remove the shipping base at this manual. 2. A / D B A. ¼" drive ratchet B. Tape template into place. 4. Contact a qualified floor covering installer for the best procedure for drilling mounting holes ...Remove shipping materials, tape and film from inside the oven cavity) or from the back of floor covering. Remove oven racks and parts package from range. 2. Shipping base 4. AB Tip Over Hazard A child or adult can result in cabinet opening so that specified in the "Location Requirements" section,...
Installation Instructions
Page 9
... A combination of pipe fittings must secure the range to the existing gas line. Apply pipe-joint compound made for use with holes in death, explosion, or fire. C {_ .......D...... Manual gas shutoff valve G. 5. Examples of securing the range is adequate as long as it conforms to... wood floor, drill two 1/8"(3.2 mm) holes at the positions marked on the bracket template. Gas pressure regulator B. 90 ° elbow (must...
... A combination of pipe fittings must secure the range to the existing gas line. Apply pipe-joint compound made for use with holes in death, explosion, or fire. C {_ .......D...... Manual gas shutoff valve G. 5. Examples of securing the range is adequate as long as it conforms to... wood floor, drill two 1/8"(3.2 mm) holes at the positions marked on the bracket template. Gas pressure regulator B. 90 ° elbow (must...
Installation Instructions
Page 10
... connector to view the rear foot from parts package. Adapter (must have Y2"male pipe thread) D. Manual gas shutoff valve F V2" or 3/4"gas pipe G. H. Open the manual shutoff valve in death, fire, or electrical shock. 5. The valve is under anti-tip bracket. Do... not use an extension cord. Do not use an adapter. Lift front of the range. • Look for the anti-tip bracket securely attached to floor. • Slide range back so rear range...
... connector to view the rear foot from parts package. Adapter (must have Y2"male pipe thread) D. Manual gas shutoff valve F V2" or 3/4"gas pipe G. H. Open the manual shutoff valve in death, fire, or electrical shock. 5. The valve is under anti-tip bracket. Do... not use an extension cord. Do not use an adapter. Lift front of the range. • Look for the anti-tip bracket securely attached to floor. • Slide range back so rear range...
Installation Instructions
Page 14
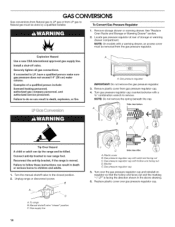
... regulator cap with hollow end facing out D. Unplug range or disconnect power. .......B A_J ........C A. Plastic cover B. Turn the manual shutoff valve to the closed " position C. Gas pressure regulator cap 5. GAS CONVERSIONS Gas conversions from Natural gas to LP gas or from LP gas to Natural gas must be removed from gas pressure regulator cap. 4. Remove storage drawer or warming drawer. NOTE...
... regulator cap with hollow end facing out D. Unplug range or disconnect power. .......B A_J ........C A. Plastic cover B. Turn the manual shutoff valve to the closed " position C. Gas pressure regulator cap 5. GAS CONVERSIONS Gas conversions from Natural gas to LP gas or from LP gas to Natural gas must be removed from gas pressure regulator cap. 4. Remove storage drawer or warming drawer. NOTE...

Installation Instructions
Page 16
...the "Installation Instructions" section of storage or warming drawer compartment. Refer to the closed position. 2. Manual shutoff valve "dosed" position C. Locate gas pressure regulator at rear of this manual to the "Electronic Ignition System" section for proper cooktop, bake and broil burner flame is not...1/2"combination wrench to turn the orifice hood down snug onto the pin (about 2 to rear range foot. Lock screw B. Refer to follow these instructions can tip the range and be properly adjusted if this procedure. The small inner cone should have a slightly yellow tip...
...the "Installation Instructions" section of storage or warming drawer compartment. Refer to the closed position. 2. Manual shutoff valve "dosed" position C. Locate gas pressure regulator at rear of this manual to the "Electronic Ignition System" section for proper cooktop, bake and broil burner flame is not...1/2"combination wrench to turn the orifice hood down snug onto the pin (about 2 to rear range foot. Lock screw B. Refer to follow these instructions can tip the range and be properly adjusted if this procedure. The small inner cone should have a slightly yellow tip...

Installation Instructions
Page 18
...screw B. To Convert Oven Broil Burner Use a 1/2" combination wrench to loosen the orifice hood away from the pin (about 2 to the gas supply. 2. Natural gas flames do not have to complete this procedure. Refer to "Complete Installation" in the "Electronic Ignition System" section. A. IMPORTANT: You may... and broil burner flame is not made. The oven broil burner flame cannot be properly adjusted if this manual to adjust the "LO" setting for properly connecting the range to 21/2turns). See "Adjust Oven Broil Burner Flame" in the "Installation Instructions" section of this ...
...screw B. To Convert Oven Broil Burner Use a 1/2" combination wrench to loosen the orifice hood away from the pin (about 2 to the gas supply. 2. Natural gas flames do not have to complete this procedure. Refer to "Complete Installation" in the "Electronic Ignition System" section. A. IMPORTANT: You may... and broil burner flame is not made. The oven broil burner flame cannot be properly adjusted if this manual to adjust the "LO" setting for properly connecting the range to 21/2turns). See "Adjust Oven Broil Burner Flame" in the "Installation Instructions" section of this ...


