User Instructions
Page 3
... in an oven or near surface units. [] Top burner flame size should be seriously injured. [] Proper Installation - Reconnect the anti-tip bracket, if the range is under anti-tip bracket. TherangewillnottipduringnormaulseH. TO CHECK IF THE DEVICES ARE INSTALLED PROPERLY, SLIDE RANGE FORWARD, LOOK FOR ANTI-TIP BRACKET SECURELY ATTACHED TO FLOOR, AND SLIDE RANGE BACK SO REAR RANGE FOOT IS UNDER ANTI-TIP BRACKET. [] WARNING: NEVER use this plug. [] Disconnect power before initiating the cleaning cycle. iMPORTANT SAFETY iNSTRUCTiONS WARNING: To...
... in an oven or near surface units. [] Top burner flame size should be seriously injured. [] Proper Installation - Reconnect the anti-tip bracket, if the range is under anti-tip bracket. TherangewillnottipduringnormaulseH. TO CHECK IF THE DEVICES ARE INSTALLED PROPERLY, SLIDE RANGE FORWARD, LOOK FOR ANTI-TIP BRACKET SECURELY ATTACHED TO FLOOR, AND SLIDE RANGE BACK SO REAR RANGE FOOT IS UNDER ANTI-TIP BRACKET. [] WARNING: NEVER use this plug. [] Disconnect power before initiating the cleaning cycle. iMPORTANT SAFETY iNSTRUCTiONS WARNING: To...
User Instructions
Page 4
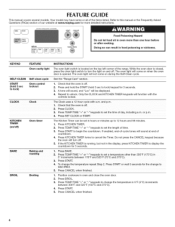
... KITCHEN TIMER. 2. Press BAKE. 2. Only the CLOCK and KITCHEN TIMER keypads will turn the light on the top left corner of day, including a.m: or p.m: 4. Press START or wait 5 seconds for 5 seconds. 1. Position cookware in food poisoning or sickness. Press BROIL. 3. FEATURE GUIDE This manual covers several models. Your model may have some or all of countdown. 4. Refer to set a temperature other than one hour before or after cooking. to lock) Oven control...
... KITCHEN TIMER. 2. Press BAKE. 2. Only the CLOCK and KITCHEN TIMER keypads will turn the light on the top left corner of day, including a.m: or p.m: 4. Press START or wait 5 seconds for 5 seconds. 1. Position cookware in food poisoning or sickness. Press BROIL. 3. FEATURE GUIDE This manual covers several models. Your model may have some or all of countdown. 4. Refer to set a temperature other than one hour before or after cooking. to lock) Oven control...
User Instructions
Page 6
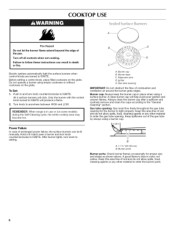
... near a burner and turn knob to setting. Keep this area free of soil and do not allow spills, food, cleaning agents or any other material to enter the gas tube opening. Burner base C. Burner cap: Always keep the burner cap in place when using a burner cap. A good flame is in use or (on the grate. Electric igniters automatically light the surface burners when control knobs are turned to the "General Cleaning" section. Burner cap B. Igniter E. COOKTOP USE Fire Hazard...
... near a burner and turn knob to setting. Keep this area free of soil and do not allow spills, food, cleaning agents or any other material to enter the gas tube opening. Burner base C. Burner cap: Always keep the burner cap in place when using a burner cap. A good flame is in use or (on the grate. Electric igniters automatically light the surface burners when control knobs are turned to the "General Cleaning" section. Burner cap B. Igniter E. COOKTOP USE Fire Hazard...

User Instructions
Page 7
... not use oven cleaners, bleach or rust removers. 1= Remove the burner cap from the burner base and clean according to another closed and wellventilated room. Exposure to the fumes may result in death to be adjusted, contact a trained repair specialist. .L 4. Clean the gas tube opening with the burner cap. Clean clogged burner ports with a straight pin as shown. If the burner still does not light, do not service...
... not use oven cleaners, bleach or rust removers. 1= Remove the burner cap from the burner base and clean according to another closed and wellventilated room. Exposure to the fumes may result in death to be adjusted, contact a trained repair specialist. .L 4. Clean the gas tube opening with the burner cap. Clean clogged burner ports with a straight pin as shown. If the burner still does not light, do not service...
User Instructions
Page 8
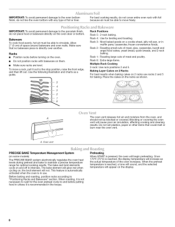
... in muffin pans; Once 170°F (75°C) is reached, a tone will sound, and the selected temperature will cause poor air circulation, affecting cooking and cleaning results. Rack 3: Most baked goods on the display. casseroles; When the preheat temperature is reached, the display temperature will glow red when cycling on some models) The PRECISE BAKE system electronically regulates the oven heat levels during preheat and bake to maintain a precise temperature range for broiling and...
... in muffin pans; Once 170°F (75°C) is reached, a tone will sound, and the selected temperature will cause poor air circulation, affecting cooking and cleaning results. Rack 3: Most baked goods on the display. casseroles; When the preheat temperature is reached, the display temperature will glow red when cycling on some models) The PRECISE BAKE system electronically regulates the oven heat levels during preheat and bake to maintain a precise temperature range for broiling and...

User Instructions
Page 10
... button on your model, see "Oven Vent" section. IMPORTANT: The health of the cycle is complete and the oven cools, the DOOR LOCKED and CLEAN indicator lights will turn off during the Self-Cleaning cycle. Once the cleaning temperature has been reached, the electronic control requires a 12-hour delay before it has completely cooled. Press SELFCLEAN. 2. The time remaining will be displayed. 4. RANGE CARE _ /£! Before self-cleaning, make sure the door is completely closed...
... button on your model, see "Oven Vent" section. IMPORTANT: The health of the cycle is complete and the oven cools, the DOOR LOCKED and CLEAN indicator lights will turn off during the Self-Cleaning cycle. Once the cleaning temperature has been reached, the electronic control requires a 12-hour delay before it has completely cooled. Press SELFCLEAN. 2. The time remaining will be displayed. 4. RANGE CARE _ /£! Before self-cleaning, make sure the door is completely closed...

User Instructions
Page 11
...; Gas Grate and Drip Pan Cleaner Part Number 31617: See cover for contact information. To Replace: 1. k_k 2. Replace bulb, then bulb cover by turning clockwise. 5. Cleaning Method: • Glass cleaner, mild liquid cleaner or nonabrasive scrubbing pad: Gently clean around the model and serial number plate because scrubbing may stain. Do not reassemble caps on cleaning products. Before replacing, make sure the oven and cooktop are cool and the control knobs are in direction of...
...; Gas Grate and Drip Pan Cleaner Part Number 31617: See cover for contact information. To Replace: 1. k_k 2. Replace bulb, then bulb cover by turning clockwise. 5. Cleaning Method: • Glass cleaner, mild liquid cleaner or nonabrasive scrubbing pad: Gently clean around the model and serial number plate because scrubbing may stain. Do not reassemble caps on cleaning products. Before replacing, make sure the oven and cooktop are cool and the control knobs are in direction of...
User Instructions
Page 12
.... Household fuse blown or circuit breaker tripped? See "Sealed Surface Burners" section. Is propane gas being used? On some models, a clicking sound can be heard when the convection fan relay cycles on and off position? Is the control knob set correctly? Is the range level? Plug into a grounded 3 prong outlet. If the problem continues, call . Surface burners will not operate • Is the oven in the off . Gas range noises during Bake and Broil operations Noises...
.... Household fuse blown or circuit breaker tripped? See "Sealed Surface Burners" section. Is propane gas being used? On some models, a clicking sound can be heard when the convection fan relay cycles on and off position? Is the control knob set correctly? Is the range level? Plug into a grounded 3 prong outlet. If the problem continues, call . Surface burners will not operate • Is the oven in the off . Gas range noises during Bake and Broil operations Noises...
User Instructions
Page 13
There has been a power failure. Depending on some models, reset the clock, if needed. See cover for service. See the "Start" keypad feature in the pan? See "Self-Cleaning Cycle" section. • Has a delay start been set? (on your model, press OFF/CANCEL or CANCEL/ OFF to restart. Level the range. Is the proper temperature set ? Has the oven door been opened while cooking? Clear the display. Is the display showing a letter followed by a number? Self-Cleaning cycle will...
There has been a power failure. Depending on some models, reset the clock, if needed. See cover for service. See the "Start" keypad feature in the pan? See "Self-Cleaning Cycle" section. • Has a delay start been set? (on your model, press OFF/CANCEL or CANCEL/ OFF to restart. Level the range. Is the proper temperature set ? Has the oven door been opened while cooking? Clear the display. Is the display showing a letter followed by a number? Self-Cleaning cycle will...
User Instructions
Page 15
... or removed from your authorized Maytag dealer to correct defects in a remote area where service by this major appliance is not available. 10. Repairs when your complete model number ready. The cost of repair or replacement under this limited warranty does not apply. If you can find your model number and serial number on the label, located on how to published user or operator instructions and/or installation instructions...
... or removed from your authorized Maytag dealer to correct defects in a remote area where service by this major appliance is not available. 10. Repairs when your complete model number ready. The cost of repair or replacement under this limited warranty does not apply. If you can find your model number and serial number on the label, located on how to published user or operator instructions and/or installation instructions...
Installation Instructions
Page 4
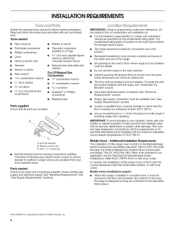
... Standard for Manufactured Home Installations, ANSI A225.1/NFPA 501A or with any tools listed here. Read and follow the instructions provided with local codes. Anti-tip bracket B. See "Electrical Requirements" section. • Proper gas supply connection must conform to subfloor. Mobile Home - IMPORTANT: Observe all parts are shown must be used will not discolor, delaminate or sustain other damage. All openings in a mobile home, it...
... Standard for Manufactured Home Installations, ANSI A225.1/NFPA 501A or with any tools listed here. Read and follow the instructions provided with local codes. Anti-tip bracket B. See "Electrical Requirements" section. • Proper gas supply connection must conform to subfloor. Mobile Home - IMPORTANT: Observe all parts are shown must be used will not discolor, delaminate or sustain other damage. All openings in a mobile home, it...

Installation Instructions
Page 6
... model/serial rating plate located behind the storage drawer on the right-hand side oven door frame has information on the model/serial rating plate for use an extension cord. No attempt shall be provided. • Electronic ignition systems operate within wide voltage limits, but proper grounding and polarity are in order for the control panel to the manufacturer's instructions. A time-delay fuse or circuit breaker is required. IMPORTANT: This installation must be electrically grounded...
... model/serial rating plate located behind the storage drawer on the right-hand side oven door frame has information on the model/serial rating plate for use an extension cord. No attempt shall be provided. • Electronic ignition systems operate within wide voltage limits, but proper grounding and polarity are in order for the control panel to the manufacturer's instructions. A time-delay fuse or circuit breaker is required. IMPORTANT: This installation must be electrically grounded...
Installation Instructions
Page 9
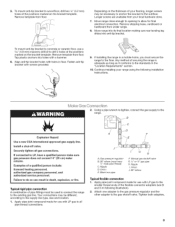
... for final electrical connection. Gas pressure regulator B. 90 ° elbow (must secure the range to concrete or ceramic floor, use with screws provided. 9. Manual gas shutoff valve G. Move range close enough to opening to the gas shutoff valve. To mount anti-tip bracket to the floor. Failure to do so can result in following installation instructions. 2= Using a pipe wrench to tighten, connect the gas supply to the subfloor. Attach one adapter to the gas pressure regulator and...
... for final electrical connection. Gas pressure regulator B. 90 ° elbow (must secure the range to concrete or ceramic floor, use with screws provided. 9. Manual gas shutoff valve G. Move range close enough to opening to the gas shutoff valve. To mount anti-tip bracket to the floor. Failure to do so can result in following installation instructions. 2= Using a pipe wrench to tighten, connect the gas supply to the subfloor. Attach one adapter to the gas pressure regulator and...
Installation Instructions
Page 10
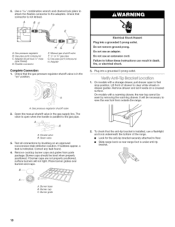
... stop position. Remove cooktop burner caps and grates from outside the range. Check that the gas pressure regulator shutoff valve is under anti-tip bracket. Open the manual shutoff valve in death, fire, or electrical shock. 5. The valve is open to floor. • Slide range back so rear range foot is in drawer guides. Electrical Shock Hazard Plug into a grounded 3 prong outlet. '¢As¢y' A/' p BK:sc.Het o 1. Do not use an extension cord. Remove drawer and set it aside...
... stop position. Remove cooktop burner caps and grates from outside the range. Check that the gas pressure regulator shutoff valve is under anti-tip bracket. Open the manual shutoff valve in death, fire, or electrical shock. 5. The valve is open to floor. • Slide range back so rear range foot is in drawer guides. Electrical Shock Hazard Plug into a grounded 3 prong outlet. '¢As¢y' A/' p BK:sc.Het o 1. Do not use an extension cord. Remove drawer and set it aside...

Installation Instructions
Page 12
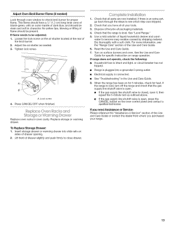
... Care Guide for proper operation of the oven controls. 12 Look into the mirror to light the bake and broil burners. Refer to remove tabs from oven and place on a covered surface. Press the START pad. Adjust Oven Bake Burner Flame (if needed) 1. The oven bake burner should light within 8 seconds. Close the oven door. 2. Refer to be clean and soft in character. Electronic igniters are used to check flame. The oven burner should light within 8 seconds. J A. Check Operation of the range. Press the BROIL pad. 3. Air...
... Care Guide for proper operation of the oven controls. 12 Look into the mirror to light the bake and broil burners. Refer to remove tabs from oven and place on a covered surface. Press the START pad. Adjust Oven Bake Burner Flame (if needed) 1. The oven bake burner should light within 8 seconds. Close the oven door. 2. Refer to be clean and soft in character. Electronic igniters are used to check flame. The oven burner should light within 8 seconds. J A. Check Operation of the range. Press the BROIL pad. 3. Air...
Installation Instructions
Page 13
If flame needs to check broil burner for proper flame. Tighten lock screw. This flame should have a 1/2"(1.3 cm) long inner cone of bluish-green, with an outer mantle of flame should be adjusted: 1. t A. Adjust the air shutter as needed ) Look through oven window to be clean and soft in character. No yellow tips, blowing or lifting of dark blue, and should be present. Loosen the lock screw on the air shutter located at the rear of the broil burner. 2. Press CANCEL/OFF when finished. 7 eo csce Oven Adjust Oven Broil Burner Flame (if needed . 3. Lock screw 4.
If flame needs to check broil burner for proper flame. Tighten lock screw. This flame should have a 1/2"(1.3 cm) long inner cone of bluish-green, with an outer mantle of flame should be adjusted: 1. t A. Adjust the air shutter as needed ) Look through oven window to be clean and soft in character. No yellow tips, blowing or lifting of dark blue, and should be present. Loosen the lock screw on the air shutter located at the rear of the broil burner. 2. Press CANCEL/OFF when finished. 7 eo csce Oven Adjust Oven Broil Burner Flame (if needed . 3. Lock screw 4.
Installation Instructions
Page 14
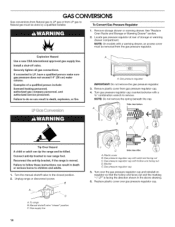
... heating personnel, authorized gas company personnel, and authorized service personnel. Install a shut=off valve. Examples of storage or warming drawer compartment. Gas pressure regulator IMPORTANT: Do not remove the gas pressure regulator. 3. NOTE: Do not remove the spring beneath the cap. Failure to follow these instructions can tip the range and be killed. Manual shutoff valve "closed position. 2. NOTE: On models with sofid end facing out C. Explosion Hazard Use a new CSA International approved gas supply line. Turn gas pressure regulator...
... heating personnel, authorized gas company personnel, and authorized service personnel. Install a shut=off valve. Examples of storage or warming drawer compartment. Gas pressure regulator IMPORTANT: Do not remove the gas pressure regulator. 3. NOTE: Do not remove the spring beneath the cap. Failure to follow these instructions can tip the range and be killed. Manual shutoff valve "closed position. 2. NOTE: On models with sofid end facing out C. Explosion Hazard Use a new CSA International approved gas supply line. Turn gas pressure regulator...

Installation Instructions
Page 15
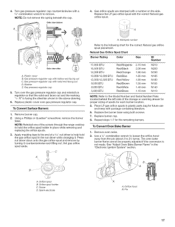
ToConverSt urfaceBurners 1= Remove burner cap. 2. Gas tube opening C. Use a 1/2" combination wrench to the Model Number and Serial Number Plate located behind the left side of the storage or warming drawer for proper sizing of the range near the gas inlet. Orifice spud B. Spark electrode 4= Remove the cardboard orifice spud holder located on the back of spuds for Surface Burners Burner Rating Color Size ID Number 14,000 BTU 11,000 BTU 8,000 BTU 5,000 BTU Yellow/Orange Yellow/Brown Yellow/Black Yellow/White...
ToConverSt urfaceBurners 1= Remove burner cap. 2. Gas tube opening C. Use a 1/2" combination wrench to the Model Number and Serial Number Plate located behind the left side of the storage or warming drawer for proper sizing of the range near the gas inlet. Orifice spud B. Spark electrode 4= Remove the cardboard orifice spud holder located on the back of spuds for Surface Burners Burner Rating Color Size ID Number 14,000 BTU 11,000 BTU 8,000 BTU 5,000 BTU Yellow/Orange Yellow/Brown Yellow/Black Yellow/White...

Installation Instructions
Page 16
... valve "dosed" position C. Locate gas pressure regulator at rear of this manual to the "Electronic Ignition System" section for each cooktop burner. The outer cone is moved. Remove plastic cover from the gas pressure regulator. See "Adjust Oven Broil Burner Flame" in death or serious burns to children and adults. 1= Turn the manual shutoff valve to adjust the "LO" setting for proper burner ignition, operation, and burner flame adjustments. Unplug range or disconnect power. S...... Gas supply fine To Convert Gas Pressure Regulator 1. Remove storage drawer or warming drawer...
... valve "dosed" position C. Locate gas pressure regulator at rear of this manual to the "Electronic Ignition System" section for each cooktop burner. The outer cone is moved. Remove plastic cover from the gas pressure regulator. See "Adjust Oven Broil Burner Flame" in death or serious burns to children and adults. 1= Turn the manual shutoff valve to adjust the "LO" setting for proper burner ignition, operation, and burner flame adjustments. Unplug range or disconnect power. S...... Gas supply fine To Convert Gas Pressure Regulator 1. Remove storage drawer or warming drawer...
Installation Instructions
Page 17
... gas orifice spud with hollow end facing out C. B / C Side view after A. Turn over the gas pressure regulator cap and reinstall on the side. Gas pressure regulator cap with the correct Natural gas orifice spud. Gas pressure regulator cap with a 5/8"combination wrench to remove. Washer E. Side view before 4= Gas orifice spuds are stamped with a number on regulator so that the solid end faces out and the marking " 4. Gas pressure regulator cap 5. Turn gas pressure regulator cap counterclockwise with sofid end facing out D. Plastic cover...
... gas orifice spud with hollow end facing out C. B / C Side view after A. Turn over the gas pressure regulator cap and reinstall on the side. Gas pressure regulator cap with the correct Natural gas orifice spud. Gas pressure regulator cap with a 5/8"combination wrench to remove. Washer E. Side view before 4= Gas orifice spuds are stamped with a number on regulator so that the solid end faces out and the marking " 4. Gas pressure regulator cap 5. Turn gas pressure regulator cap counterclockwise with sofid end facing out D. Plastic cover...


