
Owners Manual
Page 5
...after a spillover and routinely remove and clean the caps according to light properly. Only the burner with a delayed start CANCEL TEMP/TIME Range function Temperature and time adjust INSTRUCTIONS Timed Cooking allows the oven to follow these instructions can be set a Timed Cook or a Delayed ... avoid poor ignition and uneven flames. Burner ports Burner ports: Check burner flames occasionally for an oven function with the control knob turned to enter the gas tube opening. Igniter E. The "+" or "-" keypads are turned to anywhere between HIGH and LOW. KEYPAD COOK TIME FEATURE ...
...after a spillover and routinely remove and clean the caps according to light properly. Only the burner with a delayed start CANCEL TEMP/TIME Range function Temperature and time adjust INSTRUCTIONS Timed Cooking allows the oven to follow these instructions can be set a Timed Cook or a Delayed ... avoid poor ignition and uneven flames. Burner ports Burner ports: Check burner flames occasionally for an oven function with the control knob turned to enter the gas tube opening. Igniter E. The "+" or "-" keypads are turned to anywhere between HIGH and LOW. KEYPAD COOK TIME FEATURE ...

Owners Manual
Page 9
...(on some models, do not remove seals under knobs. When replacing knobs, make sure knobs are in the OFF position. On some models) ■ Gas Grate and Drip Pan Cleaner Part Number 31617: See...) because paint surface may stain. In Canada, reference the Customer Service section at www.maytag.com. Cooked-on burners while wet. Damage may remove numbers. ■ All-Purpose Appliance...All-Purpose Appliance Cleaner Part Number 31682 (not included): See cover for contact information. Unplug range or disconnect power. 2. Soap, water and a soft cloth or sponge are harder to...
...(on some models, do not remove seals under knobs. When replacing knobs, make sure knobs are in the OFF position. On some models) ■ Gas Grate and Drip Pan Cleaner Part Number 31617: See...) because paint surface may stain. In Canada, reference the Customer Service section at www.maytag.com. Cooked-on burners while wet. Damage may remove numbers. ■ All-Purpose Appliance...All-Purpose Appliance Cleaner Part Number 31682 (not included): See cover for contact information. Unplug range or disconnect power. 2. Soap, water and a soft cloth or sponge are harder to...

Owners Manual
Page 10
...should not extend more than ½" (1.3 cm) outside the cooking area. Push in knob before turning to the gas supply? Contact a service technician or see cover for contact information. Level the range. Contact a service technician or see cover for contact information. Failure to possibly avoid the...10 Cooktop cooking results not what expected ■ Is the proper cookware being pulled off position? www.maytag.com In Canada, reference the Customer Service section at www.maytag.ca Nothing will make a single pop when it dry. Do not use an extension cord. Oven ...
...should not extend more than ½" (1.3 cm) outside the cooking area. Push in knob before turning to the gas supply? Contact a service technician or see cover for contact information. Level the range. Contact a service technician or see cover for contact information. Failure to possibly avoid the...10 Cooktop cooking results not what expected ■ Is the proper cookware being pulled off position? www.maytag.com In Canada, reference the Customer Service section at www.maytag.ca Nothing will make a single pop when it dry. Do not use an extension cord. Oven ...
Installation Instructions
Page 9
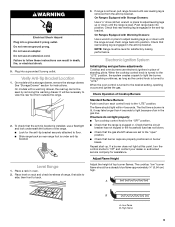
...anti-tip bracket. If range is not level, pull range forward until rear leveling leg is removed from outside the range. 2. Check that rear leveling leg is engaged in and turn the control knobs to the "LITE" position. Electronic Ignition System Initial lighting and gas flame adjustments Cooktop and oven...to follow these instructions can result in the gas line. Failure to side; To check that burner caps are set to adjust leveling legs up . On Ranges Equipped with a storage drawer, remove the storage drawer. When the cooktop control knob is turned to light the burner. When ...
...anti-tip bracket. If range is not level, pull range forward until rear leveling leg is removed from outside the range. 2. Check that rear leveling leg is engaged in and turn the control knobs to the "LITE" position. Electronic Ignition System Initial lighting and gas flame adjustments Cooktop and oven...to follow these instructions can result in the gas line. Failure to side; To check that burner caps are set to adjust leveling legs up . On Ranges Equipped with a storage drawer, remove the storage drawer. When the cooktop control knob is turned to light the burner. When ...
Installation Instructions
Page 10
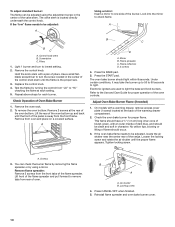
...of pliers. Refer to the Use and Care Guide for proper operation of the flame spreader. Adjust Oven Bake Burner Flame (if needed) 1. A. Screws 3. Control knob stem B. Screwdriver C. Check the oven bake burner for each setting. 5. Press CANCEL/OFF when finished. 5. A B C A. Lift the rear of the valve ...models with a pair of the warming drawer compartment. 2. Remove the oven rack. 2. No yellow tips, blowing or lifting of the range. If the oven bake flame needs to be adjusted, locate the air shutter near the center rear of flame should light within 8 ...
...of pliers. Refer to the Use and Care Guide for proper operation of the flame spreader. Adjust Oven Bake Burner Flame (if needed) 1. A. Screws 3. Control knob stem B. Screwdriver C. Check the oven bake burner for each setting. 5. Press CANCEL/OFF when finished. 5. A B C A. Lift the rear of the valve ...models with a pair of the warming drawer compartment. 2. Remove the oven rack. 2. No yellow tips, blowing or lifting of the range. If the oven bake flame needs to be adjusted, locate the air shutter near the center rear of flame should light within 8 ...


