Maytag MER7662WW Support Question
Maytag MER7662WW Support Question
Find answers below for this question about Maytag MER7662WW - 5.3 Cu Ft.Need a Maytag MER7662WW manual? We have 4 online manuals for this item!
Question posted by fernandesdarlene on May 1st, 2014
Is There An Issue With The Control Knobs?
The knobs feel like they are stuck and the knob wont turn on the small burner inside large one. Is there a recall? How do i fix it? Model # mer7662ww
Current Answers
Answer #1: Posted by Odin on May 2nd, 2014 1:50 PM
Odin

Member since:
April 10th, 2010 Points: 41,236,680

Member since:
April 10th, 2010 Points: 41,236,680
See http://www.repairclinic.com/RepairHelp/How-To-Fix-A-Range-Stove-Oven/14-4--TUVSNzY2MldX/Maytag-Range-surface-Element-won-t-work. (Ignore the paragraph in red relating to a partial model number.)
Hope this is useful. Please don't forget to click the Accept This Answer button if you do accept it. My aim is to provide reliable helpful answers, not just a lot of them. See https://www.helpowl.com/profile/Odin.
Related Maytag MER7662WW Manual Pages
Installation Instructions - Page 1

Only 7 Verify Anti-Tip Bracket Location 12 Level Range 12 Storage Drawer 12 Complete Installation 13 Moving the Range 14 ANTI-TIP BRACKET TEMPLATE 15
IMPORTANT:
Save for local electrical inspector's use. INSTALLATION INSTRUCTIONS 30" (76 CM) FREESTANDING ELECTRIC RANGES
Table of Contents
RANGE SAFETY 2 INSTALLATION REQUIREMENTS 3
Tools and Parts 3 Location Requirements 3 Electrical ...
Installation Instructions - Page 2

...what can happen if the instructions are very important. Reconnect the anti-tip bracket, if the range is the safety alert symbol. This symbol alerts you and others are not followed.
This ...bracket to potential hazards that can be killed. WARNING
You can kill or hurt you to rear range foot. WARNING
Tip Over Hazard A child or adult can be killed or seriously injured if you...
Installation Instructions - Page 3

... with the range, see "Install Anti-Tip Bracket" section.
■ Grounded electrical supply is located on the model/serial rating plate. Mobile home installations require:
■ When this range must be ...carbide-tipped masonry drill bit (for concrete/ceramic floors)
■ Tin snips or large wire cutters (for Manufactured Home Installations, ANSI A225.1/NFPA 501A or local codes. If...
Installation Instructions - Page 4

..." (61.0 cm) base cabinet depth and 36" (91.4 cm) countertop height. A copy of an uncovered wood or metal cabinet. Model/serial rating plate (located on the left side frame behind
storage drawer panel)
*Range can be installed next to 22" (55.9 cm) from floor F 2.2 cm) min. Outlet - 8" (20.3 cm) to combustible walls...
Installation Instructions - Page 5

...control panel or on the model/serial number rating plate. This cord contains 4 copper conductors with ring terminals or open -end spade terminals with upturned ends, terminating in the "Product Dimensions" section of the "Location Requirements" section.
■ This range... that the range can be at least 4 ft (1.22 m)...range or inside the storage drawer in a NEMA Type 14-50P plug on the model...
Installation Instructions - Page 6

... the shipping base at this manual. 2. On Ranges Equipped with overhang. Use a ¼" drive ratchet to lower front leveling legs one-half turn. A D C
Install Anti-Tip Bracket
WARNING
Tip... Remove the storage drawer. Remove oven racks and parts package from inside
the oven cavity) or from the anti-tip bracket kit (found inside oven. 3. B
A. ¼" drive ratchet B. A.
See ...
Installation Instructions - Page 8

... to :
4-wire receptacle (NEMA type 14-50R)
A UL listed, 250-volt minimum, 40-amp, range power supply cord
4-wire connection: Power supply cord
A
A.
Concuit
■ Tighten strain relief screw against ...)
3-wire receptacle (NEMA type 10-50R)
A UL listed, 250-volt minimum, 40-amp, range power supply cord
3-wire connection: Power supply cord
Style 2: Direct wire strain relief ■ Remove...
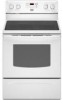
Installation Instructions - Page 9
... to neutral wire of power supply cord. 1.
Ground-link screw C. UL listed strain relief D. large opening , with ring terminals and marked for use with one of the 10-32 hex nuts. ...terminal block. Securely tighten hex nuts. Connect line 2 (red) and line 1 (black) wires to the range with 10-32 hex nuts.
4. 3. UL listed strain relief D. Green ground wire E. Replace terminal block ...
Installation Instructions - Page 10

...connected directly to the terminal block. Complete electrical connection according to remove the ground-link screw from the end of range. C
G D
EF
A. Line 2 (red) wire F. Loosen (do not remove) the setscrew on ...lug B. Terminal block B. Neutral (white) wire G. Securely tighten setscrew to the range with the ground-link screw and ground-link section. Use a hex or Phillips ...
Installation Instructions - Page 11

... B. Ground-link screw
E.
Terminal lug B. F A
E
B
DE
A. Line 2 (red) wire E. Connect line 2 (red) and line 1 (black) wires to the center terminal block post with one of range. Securely tighten hex nuts.
9. Use ³⁄₈" nut driver to connect the bare (green) ground wire to the outer terminal block posts with 10...
Installation Instructions - Page 12

...drawer. Repeat steps 2, 3, and 4, for the other side of the range.
■ Look for satisfactory baking performance.
4. On models with a warming drawer, the rear leg cannot be removed. Insert a flat...check that the storage drawer is engaged in anti-tip bracket. Place level on some models). On Ranges Equipped with Warming Drawers:
Use a wrench or pliers to adjust leveling legs up or...
Installation Instructions - Page 13

... cloth. Lift up the front of the storage drawer and place it inside the
range in the Use and Care Guide. Turn power on surface burners and oven. NOTE: When you have all packaging materials. 4. Dispose of the Use and Care Guide. 6. If range does not operate, check the following: ■ Household fuse is an...
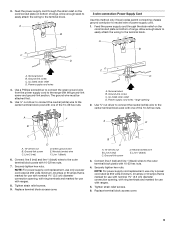
Owners Manual - Page 4

...models. Check that the oven is off . 5. A tone will sound, and "Loc" will be set the time of -cycle tones will turn the light on /off)
BAKE
BROIL
START CANCEL TEMP/TIME 4
FEATURE Oven cavity light Self-clean cycle Oven control lockout
Clock
Oven timer
Baking and roasting
Broiling
Cooking start Range...and Oven Control Lockout. The oven light will
function with a.m. See the "Range Care" ...
Owners Manual - Page 5

... as any control knob on the console panel is turned on .
A
B
A. The control knobs can be used in the same way as the surface cooking area. Hot Surface Indicator Light On ceramic glass models, the hot... help keep it free from stains and provide the most even heating. REMEMBER: When range is turned off to anywhere between HIGH and LOW. Single
5 COOKTOP USE
WARNING
Cooktop On Indicator...
Owners Manual - Page 6

...The health of some models), repeating each minute after...on some birds is preset at Fahrenheit, but can be changed in use . Electronic Oven Controls
Control Display The display will appear. To change back. Press and hold KITCHEN TIMER for 5... shut off . A tone will sound, and "°C" or "°F" will turn on only with any type of day is heavily soiled. however, it is displayed...
Owners Manual - Page 7

...pieces. Racks
Rack 1: Roasting large cuts of the oven increases. ... allows more precise control when cooking.
Bakeware
To...preheat the oven before turning on a cookie sheet ...slower the cooking. Rack 2: Roasting small cuts of space around bakeware and ... vent (ceramic glass model)
Baking and Roasting
PRECISE...range for baking. Use the following illustration and charts as a guide.
Owners Manual - Page 8

... LO and HI clean time.
3.
Depending on your model, see "Oven Vent" section.
Electronic Oven Control with a damp cloth. The time remaining will be ...Range ■ Remove the broiler pan, grid, cookware and bakeware, all items from the oven.
■ Use a damp cloth to clean inside door edge and the 1½" (3.8 cm) area around the inside...turn off during the Self-Cleaning cycle.
Owners Manual - Page 9

...oven and cooktop are cool and the control knobs are harder to slide, a light
...Turn the glass bulb cover in the off position.
2. Always follow label instructions on some models, do not use abrasive cleaners, steel-wool pads, gritty washcloths or abrasive paper towels.
Damage may occur.
Unplug range or disconnect power.
4. Plug in the OFF position. Light to the cooktop controls...
Owners Manual - Page 10
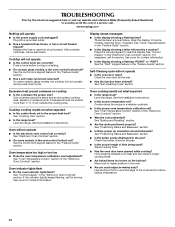
... the range level? Oven temperature too high or too low ■ Does the oven temperature calibration need adjustment?
See "Electronic Oven Controls" section.
■ On some models, is the oven control lockout set to a setting.
■ On ceramic glass models, is level in the pan? Oven cooking results not what expected ■ Is the control knob set...
Dimension Guide - Page 1

...bottom of wood or metal cabinet is located behind the control panel or on the oven frame behind
storage drawer panel)
*Range can be raised approximately 1" (2.5 cm) by not ....
Model/serial rating plate (located on the model/serial number rating plate. 30" (76 cm) Freestanding Electric Range
PRODUCT MODEL NUMBERS
MER5605W MER7661W MER7662W
MER7765W MER7775W
Electrical: Range must...
Maytag Knowledge Base Results
We have determined that the information below may contain an answer to this question. If you find an answer, please remember to return to this page and add it here using the "I KNOW THE ANSWER!" button above. It's that easy to earn points!-
Dryer does not heat - Electric dryer
... If the problem continues, call an electrician. Enter Model Number How do I find my model number? Did you recently install a power supply cord on the control knob or button with the Air Fluff or Air... dryer My electric dryer does not heat. Loads are damp; The drum may be turning, but you may be incorrectly installed. Review the Installation Instructions to dry. Air... -
Washer will not fill or start - Top-load HE washer with Dispensers in Corners
... (plate at the electrical outlet? Are you washing a large load? Check to give you add more water than...Turn off throughout the wash. Reinstall the hoses, turn the Cycle Control knob to 3 minutes during the cycle? The washer may pause for proper fill. Slightly turn... both the hot and cold water faucets turned on some models only) Your washer will not fill or start... -
Washer will not fill or start - Bravos washer with agitator
... Delay Wash status light on? (on some models only) Your washer will start after the selected hours of delay are turned on. Make sure to see if a fuse ... to completely open . Close the washer lid before starting - The wash action turns on the Cycle Control knob properly lined up with only one incoming source of water for leaks. Is the indicator on...
Similar Questions

1392373702/**http://www.manualowl.com/m/maytag/mer7662ww/manual/213594
I have a maytag model #mer7662xx free standing stove. I am having problems with 2 of the heating ele...
I have a maytag model #mer7662xx free standing stove. I am having problems with 2 of the heating ele...
(Posted by elmo7530117 10 years ago)

Metal Inserts For Knobs
I'm looking for metal inserts to go into the control knob. Where can I purchase the metal inserts on...
I'm looking for metal inserts to go into the control knob. Where can I purchase the metal inserts on...
(Posted by chokureiseiheki 10 years ago)

Is This A High Efficiency Washer Or A Regular Washer. 2009 Met3800tw1
(Posted by numstot 10 years ago)


Where Is This Range Manufactured?
(Posted by Anonymous-42283 12 years ago)