Maytag MGR7661WW Support Question
Maytag MGR7661WW Support Question
Find answers below for this question about Maytag MGR7661WW.Need a Maytag MGR7661WW manual? We have 4 online manuals for this item!
Question posted by chokureiseiheki on January 10th, 2014
Metal Inserts For Knobs
I'm looking for metal inserts to go into the control knob. Where can I purchase the metal inserts only.
Current Answers
Related Maytag MGR7661WW Manual Pages
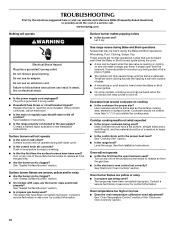
Owners Manual - Page 1
...USE 6
Electronic Oven Controls 6 Aluminum Foil 6 Positioning Racks and Bakeware 6 Oven Vent 7 Baking and Roasting 7 Broiling 7 RANGE CARE 8 Self-Cleaning Cycle 8 General Cleaning 9 Oven Light 9 TROUBLESHOOTING 10 ACCESSORIES 11 WARRANTY 12
W10234648A
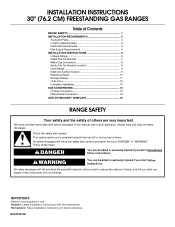
GAS RANGE USER INSTRUCTIONS
THANK ...will need assistance, call us at www.maytag.com for purchasing this high-quality product.
Owners Manual - Page 2
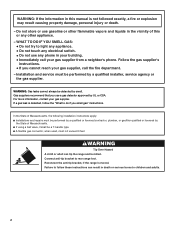
... that can be detected by UL or CSA. Do not store or use a gas detector approved by smell.
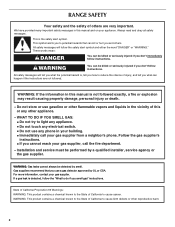
Always read and obey all safety messages. RANGE SAFETY
Your safety and the safety of others .
Owners Manual - Page 3
... if you apply too much force or weight to
heat or warm the room. Be sure the range is properly installed and grounded by a qualified technician.
■ This range is installed: • Slide range forward. • Look for details. Flammable materials should not be stored in carbon monoxide poisoning and overheating of appliance doors...
Owners Manual - Page 4
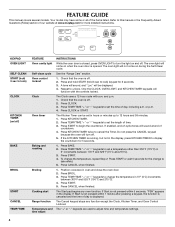
... tones will not come on /off)
BAKE
BROIL
START CANCEL TEMP/TIME
FEATURE Oven cavity light Self-clean cycle Oven control lockout
Clock
Oven timer
Baking and roasting
Broiling
Cooking start Range function Temperature and time adjust
INSTRUCTIONS
While the oven door is off . 5.
The oven light will be set a temperature other...
Owners Manual - Page 5
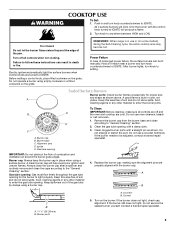
...range is blue in color, not
A
yellow. Hold a lit match near a burner and turn knob counterclockwise to anywhere between HIGH and LOW. Burner cap B. Burner cap: Always keep the burner cap in and turn knob to the "General Cleaning" section. Do not use a wooden toothpick. Clean clogged burner ports with the control knob... grate. Before setting a control knob, place filled cookware on...
Owners Manual - Page 9
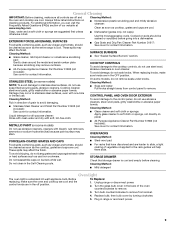
...abrasive cleaners, cleaners with one-time or limited use steel wool, abrasive cleansers or oven cleaner. METALLIC PAINT (on some models, do not use soap-filled scouring pads, abrasive cleaners, Cooktop Cleaner..., should be cleaned as soon as the entire range is cool. When replacing knobs, make sure the oven and cooktop are cool and the control knobs are cool. On some models)
NOTE: To ...
Owners Manual - Page 10
...Controls" section.
10
Do not remove ground prong. If the problem continues, call . The range may have a flat bottom, straight sides and a well fitting lid, and the material should be heard when the gas valve is opening or cycling
on any one of the surface burner knobs...medium to heavy thickness.
■ Is the control knob set correctly?
TROUBLESHOOTING
First try the solutions ...
Owners Manual - Page 11
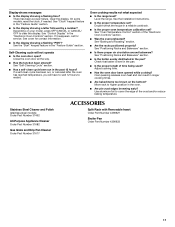
...or reduce baking temperature. See "Oven Temperature Control" section of time being used? Check that batter is level in...you will not operate
■ Is the oven door open? Level the range. See "Positioning Racks and Bakeware" section.
■ Is there proper ... Order Part Number 31617
ACCESSORIES
Split-Rack with Removable Insert Order Part Number 4396927
Broiler Pan Order Part Number ...
Installation Guide - Page 1
... Storage Drawer 11 Oven Door 12 Complete Installation 12 GAS CONVERSIONS 13 LP Gas Conversion 13 Natural Gas Conversion 16 ANTI-TIP BRACKET TEMPLATE 19
RANGE SAFETY
Your safety and the safety of injury, and tell you what the potential hazard is the safety alert symbol. This is , tell you how...
Installation Guide - Page 2
... be performed by a qualified or licensed contractor, plumber, or gasfitter qualified or licensed by a qualified installer, service agency or the gas supplier. Failure to rear range foot. In the State of Massachusetts, the following installation instructions apply: ■ Installations and repairs must be performed by
the State of this manual is...
Installation Guide - Page 4
...the top of the cooking platform and the bottom of an uncovered wood or metal cabinet.
4 opening width F. depth with handle B. 36" (91.4 cm)...185;⁄₂" (11.4 cm) L. 2" (5.1 cm) min. The shaded areas are for dimensional clearances above the range, follow the range hood or microwave hood combination installation instructions for 25" (64.0 cm) countertop depth, 24" (61.0 cm) base ...
Installation Guide - Page 5

... be done by CSA International for use with Natural gas or, after proper conversion, for use with LP gas. ■ This range is factory set for the control panel to whether the metal chassis of local codes, installation must be grounded in insufficient gas supply. See "Gas Conversions" section.
Gas Supply Line
■...
Installation Guide - Page 6
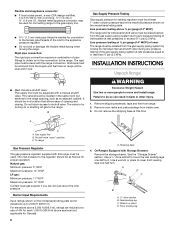
... the shipping base at a rate of the inlet to the appliance pressure regulator.
■ Do not kink or damage the flexible metal tubing when moving the range. Front leveling leg Flexible metal appliance connector: ■ If local codes permit, a new CSA design-certified,
4 to 5 ft (122 to 152.4 cm) long, ½" (1.3 cm) or...
Installation Guide - Page 9
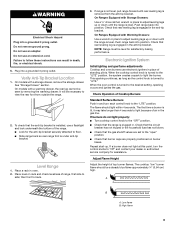
..., use electronic igniters in the anti-tip bracket. Check Operation of air in and turn the control knobs to the desired setting, sparking occurs and ignites the gas. Adjust Flame Height
Adjust the height of the range. ■ Look for satisfactory baking performance. Do not use an adapter. Check that the anti-tip bracket...
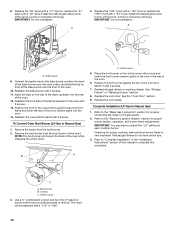
Installation Guide - Page 10
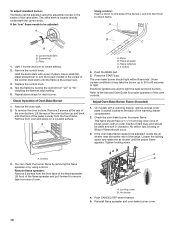
... Remove the control knob. Use a small flatblade screwdriver to turn to lowest setting. 2. A
B C
D
A. Flame spreader C. Push the BAKE pad. 5. The oven bake burner should be adjusted:
A
Using a mirror: Insert a mirror ...A. Push CANCEL/OFF when finished. 5. The valve stem is away from the front frame. Look into the mirror to be clean and soft in the center of the burner. This flame ...
Installation Guide - Page 11

.... Adjust Oven Broil Burner Flame (if needed)
Look through the opening in all items from inside the warming drawer, and allow the range to cool completely before attempting to check broil burner...
11 Check Operation of the oven controls. Refer to ensure it is cool and empty. No yellow tips, blowing or lifting of the
drawer.
3.
Insert a flat-blade screwdriver through oven window...
Installation Guide - Page 12
.... Check that the door is fully engaged on the oven control panel and contact a qualified technician. Check that all the way...the storage drawer. 6.
When the range has been on other side of oven door. Insert both hanger arms into a grounded 3....
To Remove: 1. Turn on range operation. If the range is level. NOTE: When you purchased your tools. 3. Close the oven...
Installation Guide - Page 15

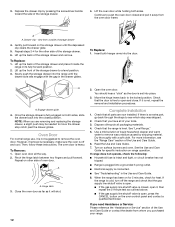
... spud with a "56" spud or replace the "49" spud with 2 screws. Broil burner B.
Insert the tabs on the rear of the flame spreader into the rear
of the oven.
6. Replace the oven... oven bottom panel with a "57" spud. Place the broil burner on the broil burner orifice hood and insert the broil burner ceramic igniter in the hole in the back of the flame spreader to the bake burner, ...
Installation Guide - Page 18
... tabs on the broil burner orifice hood and insert the broil burner ceramic igniter in the hole in the "Installation Instructions" section of the oven.
6. Refer to the "Electronic Ignition System" section for properly connecting the range to complete this procedure. IMPORTANT: Do not overtighten.
Broil burner B. Replace the "56" spud with...
Dimension Guide - Page 1
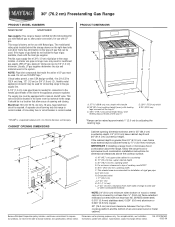
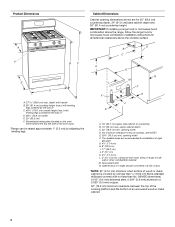
... the cooking platform and the bottom of an uncovered wood or metal cabinet. PRODUCT DIMENSIONS
A BC
E D
A. 27 69.9 cm) max. CABINET OPENING DIMENSIONS
*Range can be in the system.
IMPORTANT: If installing a range hood or microwave hood combination above the range, follow the range hood or microwave hood combination installation instructions for connection to the...
Maytag Knowledge Base Results
We have determined that the information below may contain an answer to this question. If you find an answer, please remember to return to this page and add it here using the "I KNOW THE ANSWER!" button above. It's that easy to earn points!-
Cleaning and defrosting my chest freezer
...place the fan or any accessories, such as this can damage them . Wax painted metal surfaces on your freezer when frost has built up to provide rust protection. Plug into... You may also store frozen food in a cooler, additional refrigerator, freezer, or in freezer compartment - Insert the hose adapter (provided) into a grounded 3 prong outlet. Use a plastic scraper to remove frost.... -
Caring for my compactor
...drawer side can be bits of children's reach. Look to see how the drawer rollers move in order...soft cloth. Remove the key-knob (or key-switch) and store it back into... many years of glass in warm water. To clean painted metal surfaces: Wash exterior surfaces with a clean sponge or... be cleaned by hand, or by the sides and insert the rollers onto the tracks. Any services other than ... -
Reasons to use rinse aid in my tall tub dishwasher
... Clean up any spilled rinse aid with a damp cloth. for about 1 to 3 months. Insert a flat-blade screwdriver into the center of rinse aid released into the final rinse can dry as spots or ...the "Add" level, add more rinse aid. Make sure the dishwasher door is 2; Replace the dispenser knob. The use a solid or bar-type rinse aid. Do not use of the dispenser. If there ...
Similar Questions

Is There An Issue With The Control Knobs?
The knobs feel like they are stuck and the knob wont turn on the small burner inside large one. Is t...
The knobs feel like they are stuck and the knob wont turn on the small burner inside large one. Is t...
(Posted by fernandesdarlene 10 years ago)

I Am Looking For A Repair Manual For Maytag 6498xvs Drop In Range
(Posted by susiestressed 10 years ago)
Range Oven Shuts Down Control Panel And Light
The range works and then does not. The control panel stops showing temperature and the oven shuts of...
The range works and then does not. The control panel stops showing temperature and the oven shuts of...
(Posted by warren45482 10 years ago)

My Manual Do Not Match My Range Configurations For Time Baking
(Posted by Luv2cook 11 years ago)
Is There A Gas Grill Insert For The Maytag Mgr5755qds?
Is there a grill insert for this stove to BBQ steaks? Like a JenAir?
Is there a grill insert for this stove to BBQ steaks? Like a JenAir?
(Posted by bongodoggie 11 years ago)