
Owners Manual
Page 1
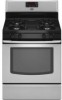
...visit our website at 1-800-688-9900. In Canada, visit our website at www.maytag.ca or call us at 1-800-807-6777 for additional information. You will need assistance, call us at www.maytag.com for purchasing this high-quality product. Para obtener acceso a "Instrucciones para el ... 11 WARRANTY 12 W10234649A GAS RANGE USER INSTRUCTIONS THANK YOU for additional information. Puede encontrar su número de modelo y de serie ubicado en el marco del horno, detrás del panel del cajón de almacenamiento. If you still need your model and serial number located on the oven...
...visit our website at 1-800-688-9900. In Canada, visit our website at www.maytag.ca or call us at 1-800-807-6777 for additional information. You will need assistance, call us at www.maytag.com for purchasing this high-quality product. Para obtener acceso a "Instrucciones para el ... 11 WARRANTY 12 W10234649A GAS RANGE USER INSTRUCTIONS THANK YOU for additional information. Puede encontrar su número de modelo y de serie ubicado en el marco del horno, detrás del panel del cajón de almacenamiento. If you still need your model and serial number located on the oven...

Owners Manual
Page 9
... spills may affect the finish. Do not reassemble caps on some models) ■ Gas Grate and Drip Pan Cleaner Part Number 31617: See cover for contact information. STORAGE DRAWER Check that have... should be soaked or scrubbed before cleaning. In Canada, reference the Customer Service section at www.maytag.com. STAINLESS STEEL (on burners while wet. Do not soak knobs. Cleaning Method: ■...control knobs are in the off and the oven and cooktop are in range or reconnect power. 9 Unplug range or disconnect power. 2. Turn bulb counterclockwise to remove from control panel to...
... spills may affect the finish. Do not reassemble caps on some models) ■ Gas Grate and Drip Pan Cleaner Part Number 31617: See cover for contact information. STORAGE DRAWER Check that have... should be soaked or scrubbed before cleaning. In Canada, reference the Customer Service section at www.maytag.com. STAINLESS STEEL (on burners while wet. Do not soak knobs. Cleaning Method: ■...control knobs are in the off and the oven and cooktop are in range or reconnect power. 9 Unplug range or disconnect power. 2. Turn bulb counterclockwise to remove from control panel to...

Owners Manual
Page 11
... Oven Controls" section. See "Control Display" in the "Feature Guide" section. ■ Is the display showing a letter followed by a number? See "Self-Cleaning Cycle" section. ■ Has a self-clean cycle been run , or canceled after the oven has reached temperature, you...models) Order Part Number 31462 All-Purpose Appliance Cleaner Order Part Number 31682 Gas Grate and Drip Pan Cleaner Order Part Number 31617 ACCESSORIES Split-Rack with Removable Insert Order Part Number 4396927 Broiler Pan Order Part Number 4396923 11 Clear the display. Depending on the bottom? Level the range...
... Oven Controls" section. See "Control Display" in the "Feature Guide" section. ■ Is the display showing a letter followed by a number? See "Self-Cleaning Cycle" section. ■ Has a self-clean cycle been run , or canceled after the oven has reached temperature, you...models) Order Part Number 31462 All-Purpose Appliance Cleaner Order Part Number 31682 Gas Grate and Drip Pan Cleaner Order Part Number 31617 ACCESSORIES Split-Rack with Removable Insert Order Part Number 4396927 Broiler Pan Order Part Number 4396923 11 Clear the display. Depending on the bottom? Level the range...

Owners Manual
Page 12
... with published installation instructions. 11. The cost of repair or replacement under this User Instructions and model number information for future reference. 12 DISCLAIMER OF IMPLIED WARRANTIES; MAYTAG SHALL NOT BE LIABLE FOR INCIDENTAL OR CONSEQUENTIAL DAMAGES. Outside the 50 United States and Canada, ..., altered or cannot be repaired in the home and only in materials or workmanship and is reported to Maytag within 30 days from the date of purchase. 6. Repairs when your model number and serial number on the label, located on how to use or when it was purchased.
... with published installation instructions. 11. The cost of repair or replacement under this User Instructions and model number information for future reference. 12 DISCLAIMER OF IMPLIED WARRANTIES; MAYTAG SHALL NOT BE LIABLE FOR INCIDENTAL OR CONSEQUENTIAL DAMAGES. Outside the 50 United States and Canada, ..., altered or cannot be repaired in the home and only in materials or workmanship and is reported to Maytag within 30 days from the date of purchase. 6. Repairs when your model number and serial number on the label, located on how to use or when it was purchased.
Installation Instructions
Page 13
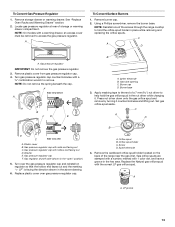
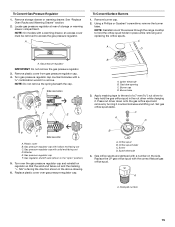
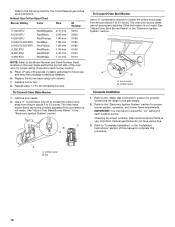
NOTE: Reinstall one of the screws through the range cooktop to remove. Burner base 3. Gas pressure regulator cap with hollow end facing out D. Gas pressure regulator cap with solid end facing out C. Gas pressure regulator cap F. See "Replace Oven Racks and Warming Drawer" section. 2. NOTE: On models with a ⁵⁄₈" combination wrench to hold the...
NOTE: Reinstall one of the screws through the range cooktop to remove. Burner base 3. Gas pressure regulator cap with hollow end facing out D. Gas pressure regulator cap with solid end facing out C. Gas pressure regulator cap F. See "Replace Oven Racks and Warming Drawer" section. 2. NOTE: On models with a ⁵⁄₈" combination wrench to hold the...
Installation Instructions
Page 14
... overtighten. Reconnect the anti-tip bracket, if the range is not made . Replace the burner base using both screws. 7. The oven bake burner flame cannot be killed. Complete Installation 1. Natural Gas Conversion WARNING A B A A A. Manual shutoff valve "closed position. Refer to the Model Number and Serial Number Plate located on the oven frame behind the top...
... overtighten. Reconnect the anti-tip bracket, if the range is not made . Replace the burner base using both screws. 7. The oven bake burner flame cannot be killed. Complete Installation 1. Natural Gas Conversion WARNING A B A A A. Manual shutoff valve "closed position. Refer to the Model Number and Serial Number Plate located on the oven frame behind the top...
Installation Instructions
Page 15
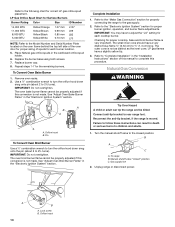
NOTE: Reinstall one of the screws through the range cooktop to help hold the orifice spud holder in the "open" position) 5. Gas pressure regulator IMPORTANT: Do not remove the gas pressure regulator. 3. Remove plastic cover from gas pressure regulator cap. 4. Apply masking tape to the end ... shutoff valve (shown in place while removing and replacing the orifice spuds. NOTE: On models with hollow end facing out C. NOTE: Do not remove the spring beneath the cap. Set gas orifice spud aside. A To Convert Surface Burners 1. Using a Phillips or Quadrex® screwdriver, remove the ...
NOTE: Reinstall one of the screws through the range cooktop to help hold the orifice spud holder in the "open" position) 5. Gas pressure regulator IMPORTANT: Do not remove the gas pressure regulator. 3. Remove plastic cover from gas pressure regulator cap. 4. Apply masking tape to the end ... shutoff valve (shown in place while removing and replacing the orifice spuds. NOTE: On models with hollow end facing out C. NOTE: Do not remove the spring beneath the cap. Set gas orifice spud aside. A To Convert Surface Burners 1. Using a Phillips or Quadrex® screwdriver, remove the ...
Installation Instructions
Page 16
...N210 N200 N190 N185 N180 N155 N140 N110 NOTE: Refer to the Model Number and Serial Number Plate located on the oven frame behind the top left side of the oven door for the correct Natural gas orifice spud placement. Place LP gas orifice spuds in the "Electronic Ignition System" section. Use a ½... future use and keep with package containing literature. 6. IMPORTANT: You may have yellow tips. 3. Orifice hood B. Lock screw B. Refer to the "Make Gas Connection" section for properly connecting the range to adjust the "LO" setting for the remaining burners. A A.
...N210 N200 N190 N185 N180 N155 N140 N110 NOTE: Refer to the Model Number and Serial Number Plate located on the oven frame behind the top left side of the oven door for the correct Natural gas orifice spud placement. Place LP gas orifice spuds in the "Electronic Ignition System" section. Use a ½... future use and keep with package containing literature. 6. IMPORTANT: You may have yellow tips. 3. Orifice hood B. Lock screw B. Refer to the "Make Gas Connection" section for properly connecting the range to adjust the "LO" setting for the remaining burners. A A.


