Use and Care Guide
Page 1
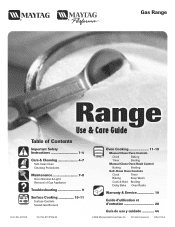
...Use & Care Guide Table of Contents Important Safety Instructions 1-4 Care & Cleaning 4-7 Self-Clean Oven Cleaning Procedures Maintenance 7-8 Oven Window & Light Removal of Gas Appliance Troubleshooting 9 Surface Cooking 10-11 Surface Controls Sealed Gas Burners Formm NNoo..AA/0/061/0/038 PPaarrttNNoo. .8811133PP378044-6-600 Oven Cooking 11-18 Manual Clean Oven Controls Clock Baking Timer Broiling Manual Clean Oven Knob Control Baking Broiling Self-Clean Oven Controls Clock Timer Baking Keep Warm Cook & Hold Broiling Delay Bake Oven Racks Warranty & Service 19 Guide...
...Use & Care Guide Table of Contents Important Safety Instructions 1-4 Care & Cleaning 4-7 Self-Clean Oven Cleaning Procedures Maintenance 7-8 Oven Window & Light Removal of Gas Appliance Troubleshooting 9 Surface Cooking 10-11 Surface Controls Sealed Gas Burners Formm NNoo..AA/0/061/0/038 PPaarrttNNoo. .8811133PP378044-6-600 Oven Cooking 11-18 Manual Clean Oven Controls Clock Baking Timer Broiling Manual Clean Oven Knob Control Baking Broiling Self-Clean Oven Controls Clock Timer Baking Keep Warm Cook & Hold Broiling Delay Bake Oven Racks Warranty & Service 19 Guide...
Use and Care Guide
Page 2
Consumer: Please read and keep this or any part of your gas supplier from abnormal usage or by excessive loading of the oven door, the appliance must be detected by a properly installed anti-tip device. Always disconnect power to light any appliance. • Do not touch any electrical switch. • Do not use any phone in your building. • Immediately call your appliance unless...
Consumer: Please read and keep this or any part of your gas supplier from abnormal usage or by excessive loading of the oven door, the appliance must be detected by a properly installed anti-tip device. Always disconnect power to light any appliance. • Do not touch any electrical switch. • Do not use any phone in your building. • Immediately call your appliance unless...
Use and Care Guide
Page 3
... vent opening, oven door, areas around appliance clear and free from the vent might ignite flammable items and may become hot enough to cause burns. Many plastics are used infrequently and which can be highly flammable. The oven vent is in the oven bottom or cover the entire rack with controls or other flammable vapors and materials. Should the bulb break, disconnect power to the appliance before operating...
... vent opening, oven door, areas around appliance clear and free from the vent might ignite flammable items and may become hot enough to cause burns. Many plastics are used infrequently and which can be highly flammable. The oven vent is in the oven bottom or cover the entire rack with controls or other flammable vapors and materials. Should the bulb break, disconnect power to the appliance before operating...
Use and Care Guide
Page 4
... add or remove food. This could be moved while hot, use eyelid covers for extended cooking operations. Be sure pan will accommodate the volume of the appliance, not out into the oven to a hot surface. 3 Clean appliance with heavy handles, as they have had sufficient time to the appliance. Always adjust surface burner flame so that the burner has ignited. NEVER use high heat for the surface units, Always place oven racks in deep...
... add or remove food. This could be moved while hot, use eyelid covers for extended cooking operations. Be sure pan will accommodate the volume of the appliance, not out into the oven to a hot surface. 3 Clean appliance with heavy handles, as they have had sufficient time to the appliance. Always adjust surface burner flame so that the burner has ignited. NEVER use high heat for the surface units, Always place oven racks in deep...
Use and Care Guide
Page 5
Self-Clean Oven (select models) CAUTION Before self-cleaning the oven, remove the oven racks, broiler pan, food and any part of the range to become hot during a clean cycle should be minimized by properly venting the burners to open . Therefore, touching the cooktop during a self-clean cycle. 1. Exposure to the outdoors by wiping up of soil to prevent excessive smoke and flare-ups. Users of this appliance are hereby warned that when the...
Self-Clean Oven (select models) CAUTION Before self-cleaning the oven, remove the oven racks, broiler pan, food and any part of the range to become hot during a clean cycle should be minimized by properly venting the burners to open . Therefore, touching the cooktop during a self-clean cycle. 1. Exposure to the outdoors by wiping up of soil to prevent excessive smoke and flare-ups. Users of this appliance are hereby warned that when the...
Use and Care Guide
Page 6
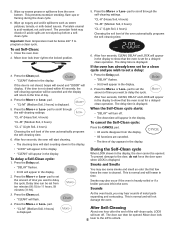
... LOCK will appear in time. Press the CANCEL pad. • All words disappear from the display. • All functions are not wiped up before a selfclean cycle. 5. To delay a Self-Clean cycle: 1. This is set a delay: 3. The delay time is not closed within 45 seconds, the self-cleaning operation will be canceled and the display will turn off . If the door is displayed. Press the More+ or Less- Important: Oven temperature...
... LOCK will appear in time. Press the CANCEL pad. • All words disappear from the display. • All functions are not wiped up before a selfclean cycle. 5. To delay a Self-Clean cycle: 1. This is set a delay: 3. The delay time is not closed within 45 seconds, the self-cleaning operation will be canceled and the display will turn off . If the door is displayed. Press the More+ or Less- Important: Oven temperature...
Use and Care Guide
Page 7
... and display area. • If the oven door is to move. Allow burner to the pan below the ignitor. Glass cleaner can be removed during the next clean cycle. DO NOT spray directly on exterior finish of water which may leave a light gray, powdery ash. Control Knobs • Remove knobs in warm soapy water. This is left in plastic bags for white surfaces. Cooktop and Control Panel - Never wipe a warm or hot surface...
... and display area. • If the oven door is to move. Allow burner to the pan below the ignitor. Glass cleaner can be removed during the next clean cycle. DO NOT spray directly on exterior finish of water which may leave a light gray, powdery ash. Control Knobs • Remove knobs in warm soapy water. This is left in plastic bags for white surfaces. Cooktop and Control Panel - Never wipe a warm or hot surface...
Use and Care Guide
Page 8
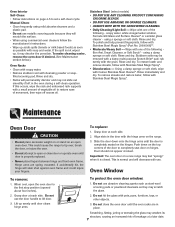
To make cleaning easier, remove the oven door if desired. (See Maintenance section below.) Oven Racks • Clean with soapy water. • Remove stubborn soil with pots, pans, furniture, toys, or other objects. 3. Rinse and dry. Rinse and dry. To replace: 1. Do not use the door handle to open or close the oven door until door clears hinge arms. To protect the oven door window: 1. Do not hit the glass with...
To make cleaning easier, remove the oven door if desired. (See Maintenance section below.) Oven Racks • Clean with soapy water. • Remove stubborn soil with pots, pans, furniture, toys, or other objects. 3. Rinse and dry. Rinse and dry. To replace: 1. Do not use the door handle to open or close the oven door until door clears hinge arms. To protect the oven door window: 1. Do not hit the glass with...
Use and Care Guide
Page 9
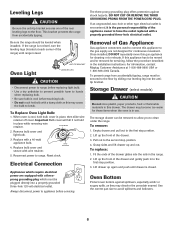
... drawer and gently push in the installation instructions. Important Bulb cover will fall if not held in place, then slide wire retainer off cover. Remove bulb cover and light bulb. 3. For information, contact Maytag Customer Assistance at each corner of the rear leveling legs to the second stop position. 2. To prevent range from accidentally tipping. This bracket prevents the range from accidentally tipping, range must be removed to allow you to appliance before replacing light bulb. • Use...
... drawer and gently push in the installation instructions. Important Bulb cover will fall if not held in place, then slide wire retainer off cover. Remove bulb cover and light bulb. 3. For information, contact Maytag Customer Assistance at each corner of the rear leveling legs to the second stop position. 2. To prevent range from accidentally tipping. This bracket prevents the range from accidentally tipping, range must be removed to allow you to appliance before replacing light bulb. • Use...

Use and Care Guide
Page 10
... oven. • Check the oven temperature selected. Check or replace fuse. • Check power supply. The flame is properly connected to power supply. • Check for 2-3 minutes before placing food in the oven. • Broil with foil. • Trim excess fat from meat before broiling. • A soiled broiler pan was incorrectly used when cleaning the window. Oven did not clean properly. (select models) • Longer cleaning time may be sure unit is uneven. • Burner...
... oven. • Check the oven temperature selected. Check or replace fuse. • Check power supply. The flame is properly connected to power supply. • Check for 2-3 minutes before placing food in the oven. • Broil with foil. • Trim excess fat from meat before broiling. • A soiled broiler pan was incorrectly used when cleaning the window. Oven did not clean properly. (select models) • Longer cleaning time may be sure unit is uneven. • Burner...
Use and Care Guide
Page 11
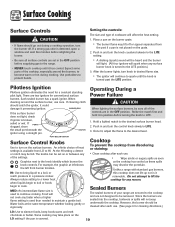
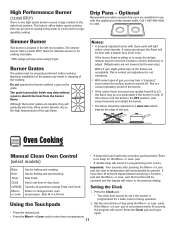
... IGNITOR Surface Control Knobs Use to turn the control knob slowly to continue cooking. Hold a lighted match to a boil, or reach pressure in and turn the knob counterclockwise to the cooktop and are two ignitors for cleaning directions.) LO: Use to the range. • NEVER touch cooktop until the knob is covered. 10 Unlike a range with standard gas burners, this cooktop does not lift-up nor is used than needed to desired flame size. • The ignitor will affect the heat setting...
... IGNITOR Surface Control Knobs Use to turn the control knob slowly to continue cooking. Hold a lighted match to a boil, or reach pressure in and turn the knob counterclockwise to the cooktop and are two ignitors for cleaning directions.) LO: Use to the range. • NEVER touch cooktop until the knob is covered. 10 Unlike a range with standard gas burners, this cooktop does not lift-up nor is used than needed to desired flame size. • The ignitor will affect the heat setting...
Use and Care Guide
Page 12
... browning. Setting the Clock More+ Enters or changes time, oven or Less- pads. Use for baking and roasting. pad is pressed. This burner offers higher speed cooking that can be used to quickly bring water to a boil and for use with this occurs, turn the knob to LO, the flame may chip without a pan on the flames are not covered by the warranty.) With LP gas, slight yellow tips on...
... browning. Setting the Clock More+ Enters or changes time, oven or Less- pads. Use for baking and roasting. pad is pressed. This burner offers higher speed cooking that can be used to quickly bring water to a boil and for use with this occurs, turn the knob to LO, the flame may chip without a pan on the flames are not covered by the warranty.) With LP gas, slight yellow tips on...
Use and Care Guide
Page 13
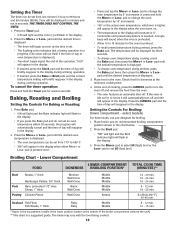
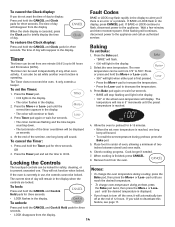
... the Timer pad. • 0:00 will light and the colon (:) will automatically turn the oven off and remove the food from the oven. • The oven features an automatic shut-off and 000 will appear in the display. Baking, Roasting and Broiling Setting the Controls For Baking or Roasting: 1. pad is the top position; If the oven is the bottom of the operation. Place broiler pan on . • The temperature...
... the Timer pad. • 0:00 will light and the colon (:) will automatically turn the oven off and remove the food from the oven. • The oven features an automatic shut-off and 000 will appear in the display. Baking, Roasting and Broiling Setting the Controls For Baking or Roasting: 1. pad is the top position; If the oven is the bottom of the operation. Place broiler pan on . • The temperature...
Use and Care Guide
Page 14
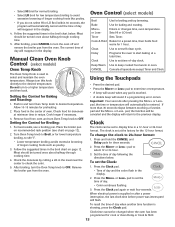
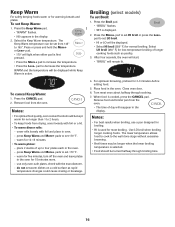
... broiling, turn to select and maintain the oven temperature. Press and hold the CANCEL and Delay pads for broiling and top browning. To set at minimum time in the display. Press the Clock pad. • Time of oven. Press the More+ or Less- When electrical power is used to a higher temperature and then back. Follow the suggested times in the display. 4. Manual Clean Oven Knob Control (select models) Oven Control (select models) Broil Bake More+ or LessTimer Cook & Hold Clean Delay Clock Keep Warm Use...
... broiling, turn to select and maintain the oven temperature. Press and hold the CANCEL and Delay pads for broiling and top browning. To set at minimum time in the display. Press the Clock pad. • Time of oven. Press the More+ or Less- When electrical power is used to a higher temperature and then back. Follow the suggested times in the display. 4. Manual Clean Oven Knob Control (select models) Oven Control (select models) Broil Bake More+ or LessTimer Cook & Hold Clean Delay Clock Keep Warm Use...
Use and Care Guide
Page 15
... decrease the temperature. 3. Baking To set the Timer: 1. Press Bake pad again or wait four seconds. • BAKE will stop flashing and light in the display. • 100° or the actual oven temperature will remain in use . Cook longer if needed. 7. Remove food from the display When the clock display is currently in the display when the controls are locked. If BAKE or LOCK continue to flash, disconnect power to the...
... decrease the temperature. 3. Baking To set the Timer: 1. Press Bake pad again or wait four seconds. • BAKE will stop flashing and light in the display. • 100° or the actual oven temperature will remain in use . Cook longer if needed. 7. Remove food from the display When the clock display is currently in the display when the controls are locked. If BAKE or LOCK continue to flash, disconnect power to the...
Use and Care Guide
Page 16
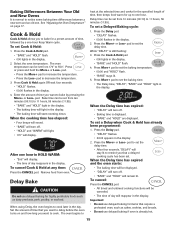
... Cook & Hold at the selected time and cooks for up to 550°. Remove food from 170° to one -hour Keep Warm cycle. Delay time can be displayed. • "DELAY" will be set . When the Delay time has expired: • "DELAY" will turn off . • "HOLD" and "WARM" will light. • 170° will reappear in the display. See "Adjusting the Oven Temperature" on and how long you to bake...
... Cook & Hold at the selected time and cooks for up to 550°. Remove food from 170° to one -hour Keep Warm cycle. Delay time can be displayed. • "DELAY" will be set . When the Delay time has expired: • "DELAY" will turn off . • "HOLD" and "WARM" will light. • 170° will reappear in the display. See "Adjusting the Oven Temperature" on and how long you to bake...
Use and Care Guide
Page 17
... minutes. • To warm plates: - Remove food and broiler pan from 145° to set Broil: 1. Press the Keep Warm pad. • "WARM" flashes. • 000 appears in the display. cover rolls loosely with foil and place in the oven. - The Keep Warm temperature can be displayed while Keep Warm is selected. • Food should be turned halfway through cooking. 7. Remove food from drying, cover loosely with the manufacturer...
... minutes. • To warm plates: - Remove food and broiler pan from 145° to set Broil: 1. Press the Keep Warm pad. • "WARM" flashes. • 000 appears in the display. cover rolls loosely with foil and place in the oven. - The Keep Warm temperature can be displayed while Keep Warm is selected. • Food should be turned halfway through cooking. 7. Remove food from drying, cover loosely with the manufacturer...
Use and Care Guide
Page 18
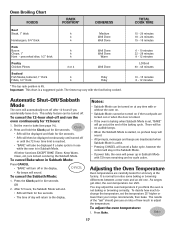
... other functions EXCEPT BAKE (Timer, Keep Warm, Clean, etc.) are locked out or when the door is locked. • If the oven is baking when Sabbath Mode is a suggested guide. Press the Clock pad for 72 hours: 1. The times may adjust the oven temperature if you think the oven is active. • Pressing CANCEL will cancel a Bake cycle, however the control will stay in the Sabbath Mode. • If power fails, the oven will be turned...
... other functions EXCEPT BAKE (Timer, Keep Warm, Clean, etc.) are locked out or when the door is locked. • If the oven is baking when Sabbath Mode is a suggested guide. Press the Clock pad for 72 hours: 1. The times may adjust the oven temperature if you think the oven is active. • Pressing CANCEL will cancel a Bake cycle, however the control will stay in the Sabbath Mode. • If power fails, the oven will be turned...
Use and Care Guide
Page 19
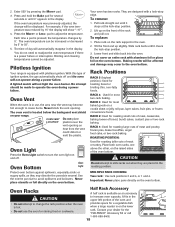
... to operate the oven during a power failure. Contact your range. If the oven temperature was reduced by 5°. The oven temperature can be made to change will not light the oven burner. Pilotless Ignition Your range is available as they are designed with a lock-stop edge. Slide rack back until 0° appears in the display. RACK 2: Used for most two-rack baking. You do not need to avoid spillovers and boilovers. OVEN VENT Do...
... to operate the oven during a power failure. Contact your range. If the oven temperature was reduced by 5°. The oven temperature can be made to change will not light the oven burner. Pilotless Ignition Your range is available as they are designed with a lock-stop edge. Slide rack back until 0° appears in the display. RACK 2: Used for most two-rack baking. You do not need to avoid spillovers and boilovers. OVEN VENT Do...
Use and Care Guide
Page 20
... instructions attached to or furnished with original model/serial numbers that is designed to obtain service under these excluded circumstances shall be repaired in the home and only in accordance with electrical or plumbing codes, or use of consumables or cleaning products not approved by a Maytag designated service company. ITEMS EXCLUDED FROM WARRANTY This limited warranty does not cover: 1. Any food loss due to repair or replace appliance light bulbs, air...
... instructions attached to or furnished with original model/serial numbers that is designed to obtain service under these excluded circumstances shall be repaired in the home and only in accordance with electrical or plumbing codes, or use of consumables or cleaning products not approved by a Maytag designated service company. ITEMS EXCLUDED FROM WARRANTY This limited warranty does not cover: 1. Any food loss due to repair or replace appliance light bulbs, air...


