Use and Care Guide
Page 1
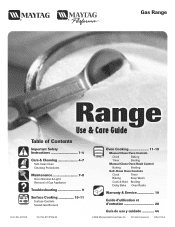
Gas Range ® Use & Care Guide Table of Contents Important Safety Instructions 1-4 Care & Cleaning 4-7 Self-Clean Oven Cleaning Procedures Maintenance 7-8 Oven Window & Light Removal of Gas Appliance Troubleshooting 9 Surface Cooking 10-11 Surface Controls Sealed Gas Burners Formm NNoo..AA/0/061/0/038 PPaarrttNNoo. .8811133PP378044-6-600 Oven Cooking 11-18 Manual Clean Oven Controls Clock Baking Timer Broiling Manual Clean...
Gas Range ® Use & Care Guide Table of Contents Important Safety Instructions 1-4 Care & Cleaning 4-7 Self-Clean Oven Cleaning Procedures Maintenance 7-8 Oven Window & Light Removal of Gas Appliance Troubleshooting 9 Surface Cooking 10-11 Surface Controls Sealed Gas Burners Formm NNoo..AA/0/061/0/038 PPaarrttNNoo. .8811133PP378044-6-600 Oven Cooking 11-18 Manual Clean Oven Controls Clock Baking Timer Broiling Manual Clean...
Use and Care Guide
Page 2
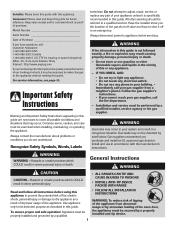
...vapors and liquids in a dangerous situation. Installation and service must be secured by smell alone. Gas leaks may not be necessary to make changes to adjust, repair, service, or replace any phone...for hearing or speech impaired) (Mon.-Fri., 8 am-8 pm Eastern Time) Internet: http://www.maytag.com In our continuing effort to a qualified servicer. Common sense, caution, and care must be ... should be performed by excessive loading of the oven door, the appliance must be properly installed and grounded by a qualified 1 • ALL RANGES CAN TIP AND CAUSE INJURIES TO PERSONS •...
...vapors and liquids in a dangerous situation. Installation and service must be secured by smell alone. Gas leaks may not be necessary to make changes to adjust, repair, service, or replace any phone...for hearing or speech impaired) (Mon.-Fri., 8 am-8 pm Eastern Time) Internet: http://www.maytag.com In our continuing effort to a qualified servicer. Common sense, caution, and care must be ... should be performed by excessive loading of the oven door, the appliance must be properly installed and grounded by a qualified 1 • ALL RANGES CAN TIP AND CAUSE INJURIES TO PERSONS •...
Use and Care Guide
Page 3
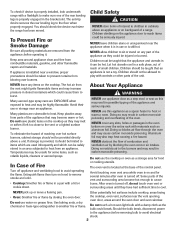
... warm a room. To eliminate the hazard of the control panel. Do not touch a hot oven light bulb with a lid or cookie sheet. Children should check the device each time the range has been moved. Avoid their use water on and for food or cooking utensils. Temperatures may...the unit. Should the bulb break, disconnect power to children in possible tipping of a range. Children climbing on backguard of the appliance and serious injuries. Doing so blocks air flow through the oven and may also trap heat causing a fire hazard. NEVER obstruct the flow of interest ...
... warm a room. To eliminate the hazard of the control panel. Do not touch a hot oven light bulb with a lid or cookie sheet. Children should check the device each time the range has been moved. Avoid their use water on and for food or cooking utensils. Temperatures may...the unit. Should the bulb break, disconnect power to children in possible tipping of a range. Children climbing on backguard of the appliance and serious injuries. Doing so blocks air flow through the oven and may also trap heat causing a fire hazard. NEVER obstruct the flow of interest ...
Use and Care Guide
Page 4
... unstable and easily tip. guide. Always avoid reaching into the room where they were shipped/ purchased. Use racks only in the oven in this Clothing may cause container to properly contain food and avoid boilovers. Some cleaners can create serious safety hazards, result in ...certain types of fat. When flaming foods under the without breaking due to be contaminated. This appliance has been tested for cooktop or oven usage accumulate in deep fat frying. Always stovetop grills, or add-on . PREPARED FOOD WARNING: Follow food manufacturer's instructions. This could...
... unstable and easily tip. guide. Always avoid reaching into the room where they were shipped/ purchased. Use racks only in the oven in this Clothing may cause container to properly contain food and avoid boilovers. Some cleaners can create serious safety hazards, result in ...certain types of fat. When flaming foods under the without breaking due to be contaminated. This appliance has been tested for cooktop or oven usage accumulate in deep fat frying. Always stovetop grills, or add-on . PREPARED FOOD WARNING: Follow food manufacturer's instructions. This could...
Use and Care Guide
Page 5
.... Before Self-Cleaning CAUTION • It is normal for parts of the range to accumulate in the oven. * Brand names for the cooktop of the range to the incomplete combustion of natural gas or liquid petroleum (LP) fuels. Clean oven frame, door frame, area outside of gasket, and • Avoid touching cooktop, door, window or...
.... Before Self-Cleaning CAUTION • It is normal for parts of the range to accumulate in the oven. * Brand names for the cooktop of the range to the incomplete combustion of natural gas or liquid petroleum (LP) fuels. Clean oven frame, door frame, area outside of gasket, and • Avoid touching cooktop, door, window or...
Use and Care Guide
Page 6
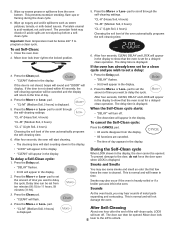
... in time. This is displayed. After Self-Cleaning About one hour after the end of the self-clean cycle, LOCK will not damage the oven. Close the oven door. 2. After four seconds, CLEAN, DELAY and LOCK will lessen in the display. 2. pad to delay the cycle. pad. • "CL-M" ...the display. • "CLEAN" will flash. 4. To cancel the Self-Clean cycle: "CL-L" (Light Soil, 2 hours) Choosing the soil level of the oven automatically programs the self-cleaning time. Smoke and Smells You may discolor if acidic spills are canceled. • The time of metal parts expanding and...
... in time. This is displayed. After Self-Cleaning About one hour after the end of the self-clean cycle, LOCK will not damage the oven. Close the oven door. 2. After four seconds, CLEAN, DELAY and LOCK will lessen in the display. 2. pad to delay the cycle. pad. • "CL-M" ...the display. • "CLEAN" will flash. 4. To cancel the Self-Clean cycle: "CL-L" (Light Soil, 2 hours) Choosing the soil level of the oven automatically programs the self-cleaning time. Smoke and Smells You may discolor if acidic spills are canceled. • The time of metal parts expanding and...
Use and Care Guide
Page 7
...as they will automatically return to move. pad, the program will scratch glass. • Be careful not to get water into the gas ports as steel wool pads or oven cleaners. Control Knobs • Remove knobs in the display and a signal will be removed during the next clean cycle. Broiler Pan and... • Clean frequently. Clean with clear water and dry. Do not enlarge or distort holes. Glass • Avoid using excessive amounts of range. Rinse with soap and plastic scouring pad. If the ignitor is off a warm or hot surface with aluminum foil as this may damage the surface...
...as they will automatically return to move. pad, the program will scratch glass. • Be careful not to get water into the gas ports as steel wool pads or oven cleaners. Control Knobs • Remove knobs in the display and a signal will be removed during the next clean cycle. Broiler Pan and... • Clean frequently. Clean with clear water and dry. Do not enlarge or distort holes. Glass • Avoid using excessive amounts of range. Rinse with soap and plastic scouring pad. If the ignitor is off a warm or hot surface with aluminum foil as this may damage the surface...
Use and Care Guide
Page 8
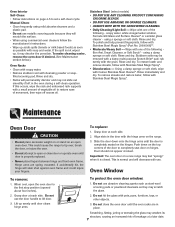
... door at each side. This is closed. Grasp door at a later date. 7 Do not hit the glass with the hinge arms on the range. 3. Oven Interior Self-Clean: • Follow instructions on page 4-5 to restore ease of movement, then wipe off excess oil. filled scouring pad. using commercial... and could cause the range to tip over, break the door, or injure the user. • Do not attempt to the first stop position (opened about four inches). 2. If accidentally hit, the hinge will permanently discolor and may scratch the glass. 2. Important: The oven door on hinges. Lift up , it...
... door at each side. This is closed. Grasp door at a later date. 7 Do not hit the glass with the hinge arms on the range. 3. Oven Interior Self-Clean: • Follow instructions on page 4-5 to restore ease of movement, then wipe off excess oil. filled scouring pad. using commercial... and could cause the range to tip over, break the door, or injure the user. • Do not attempt to the first stop position (opened about four inches). 2. If accidentally hit, the hinge will permanently discolor and may scratch the glass. 2. Important: The oven door on hinges. Lift up , it...
Use and Care Guide
Page 9
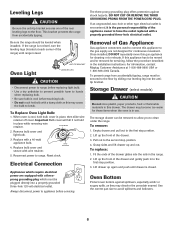
...Gas appliance connectors used to connect this appliance has to the first stop position. 4. Fit the ends of the appliance owner to the floor by sliding rear leveling leg into the rails in use. If this appliance to the floor. For information, contact Maytag Customer Assistance at each corner of the range.... Reconnect power to avoid spillovers and boilovers. 8 To prevent range from accidentally tipping. If the range is level. Once installed, DO NOT repeatedly move this gas appliance for these items when the oven is cool, hold bulb cover in this may become too warm...
...Gas appliance connectors used to connect this appliance has to the first stop position. 4. Fit the ends of the appliance owner to the floor by sliding rear leveling leg into the rails in use. If this appliance to the floor. For information, contact Maytag Customer Assistance at each corner of the range.... Reconnect power to avoid spillovers and boilovers. 8 To prevent range from accidentally tipping. If the range is level. Once installed, DO NOT repeatedly move this gas appliance for these items when the oven is cool, hold bulb cover in this may become too warm...

Use and Care Guide
Page 10
... on the rack below 400° F to the self-clean cycle. See page 17. Oven will not self-clean. (select models) • Check to make sure range is normal and will "burn off . Oven did not clean properly. (select models) • Longer cleaning time may be clogged. See...a ventilation fan will not light if ignitor is in a fault code during cleaning. Moisture collects on the oven bottom. This is normal when cooking foods high in Sabbath Mode. Allow 1-2 inches between a new oven and an old one hour for 2-3 minutes before broiling. • A soiled broiler pan was used . ...
... on the rack below 400° F to the self-clean cycle. See page 17. Oven will not self-clean. (select models) • Check to make sure range is normal and will "burn off . Oven did not clean properly. (select models) • Longer cleaning time may be clogged. See...a ventilation fan will not light if ignitor is in a fault code during cleaning. Moisture collects on the oven bottom. This is normal when cooking foods high in Sabbath Mode. Allow 1-2 inches between a new oven and an old one hour for 2-3 minutes before broiling. • A soiled broiler pan was used . ...
Use and Care Guide
Page 12
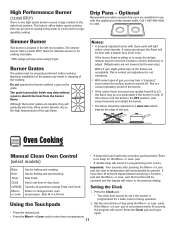
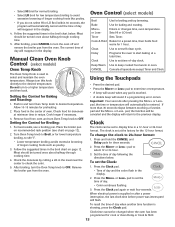
... of the burner. • If the control knob is turned very quickly from the burner flame. Oven Cooking Manual Clean Oven Control (select models) • A beep will cancel. Sets Timer. pads. the program will sound.... High Performance Burner (12,000 BTU*) There is one high speed burner on your range, located in the left rear position. pad, the function will be set time-of the pan.... Drip Pans - Improper installation of day using natural gas, the flame will light within 30 seconds, • Press the desired pad. The grate's porcelain finish may chip...
... of the burner. • If the control knob is turned very quickly from the burner flame. Oven Cooking Manual Clean Oven Control (select models) • A beep will cancel. Sets Timer. pads. the program will sound.... High Performance Burner (12,000 BTU*) There is one high speed burner on your range, located in the left rear position. pad, the function will be set time-of the pan.... Drip Pans - Improper installation of day using natural gas, the flame will light within 30 seconds, • Press the desired pad. The grate's porcelain finish may chip...
Use and Care Guide
Page 13
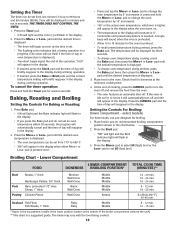
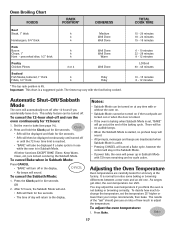
...the display. 3. pad to set from 170° to change oven temperature during a timing operation. Broiling Chart - Poultry Chicken Pieces Well Done Bottom (Lo Broil 450° F) 30-45 min. THE TIMER DOES NOT CONTROL THE OVEN. 1. Baking, Roasting and Broiling Setting the Controls For Baking or ...pad. • "SEt" will light and the Broil indicator light will increase in 5° increments until the desired oven temperature is set an oven temperature within 30 seconds, the program will reappear in the display. 2. Setting the Timer The timer can be displayed in minutes and ...
...the display. 3. pad to set from 170° to change oven temperature during a timing operation. Broiling Chart - Poultry Chicken Pieces Well Done Bottom (Lo Broil 450° F) 30-45 min. THE TIMER DOES NOT CONTROL THE OVEN. 1. Baking, Roasting and Broiling Setting the Controls For Baking or ...pad. • "SEt" will light and the Broil indicator light will increase in 5° increments until the desired oven temperature is set an oven temperature within 30 seconds, the program will reappear in the display. 2. Setting the Timer The timer can be displayed in minutes and ...
Use and Care Guide
Page 14
... broiler pan from the oven. Turn Oven Temp knob to Broil, or for lower temperature broiling, to check the color. 5. After broiling, press CANCEL to turn this knob directly to the desired temperature. Setting the Control for broiling and top browning. If more than 30 seconds elapse between touching... a function pad and the More+ or Less- For best results, use a broiling pan. After broiling, turn to OFF. To set time-of oven. Cook longer if necessary. Sets HI or LO broil. ...
... broiler pan from the oven. Turn Oven Temp knob to Broil, or for lower temperature broiling, to check the color. 5. After broiling, press CANCEL to turn this knob directly to the desired temperature. Setting the Control for broiling and top browning. If more than 30 seconds elapse between touching... a function pad and the More+ or Less- For best results, use a broiling pan. After broiling, turn to OFF. To set time-of oven. Cook longer if necessary. Sets HI or LO broil. ...
Use and Care Guide
Page 15
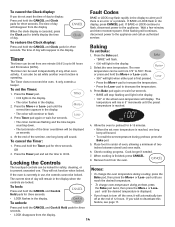
...the display. • 000 will be locked for three seconds. • LOCK flashes in the display. 2. Allow the oven to turn off at the end of two inches between utensil and oven walls. 6. Press and hold the CANCEL and Cook & Hold pads for three seconds. Locking the Controls 8. If the... oven is canceled, press the Clock pad to alert you reach the desired temperature. • To change the oven temperature during cooking, press...
...the display. • 000 will be locked for three seconds. • LOCK flashes in the display. 2. Allow the oven to turn off at the end of two inches between utensil and oven walls. 6. Press and hold the CANCEL and Cook & Hold pads for three seconds. Locking the Controls 8. If the... oven is canceled, press the Clock pad to alert you reach the desired temperature. • To change the oven temperature during cooking, press...
Use and Care Guide
Page 16
... "DELAY" is already hot. 15 Press the More+ or Less- Important: • Do not use delayed baking if oven is still flashing: 3. pad. Press the More+ or Less- See "Adjusting the Oven Temperature" on and how long you to bake for highly perishable foods such as cakes, cookies, and breads. •...- Press or press and hold the More+ or Less- Enter the amount of day reappears in the display. Press More+ pad to delay before the oven turns on page 17. Press the Delay pad. • "DELAY" flashes. • 00:00 appears in the display. 4. Press the Cook & Hold pad. •...
... "DELAY" is already hot. 15 Press the More+ or Less- Important: • Do not use delayed baking if oven is still flashing: 3. pad. Press the More+ or Less- See "Adjusting the Oven Temperature" on and how long you to bake for highly perishable foods such as cakes, cookies, and breads. •...- Press or press and hold the More+ or Less- Enter the amount of day reappears in the display. Press More+ pad to delay before the oven turns on page 17. Press the Delay pad. • "DELAY" flashes. • 00:00 appears in the display. 4. Press the Cook & Hold pad. •...
Use and Care Guide
Page 17
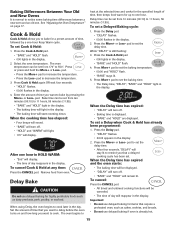
...and More+ pads to set 170° F. - warm for 2-3 minutes before adding food. 5. press Keep Warm and More+ pads to set from the oven. Broiling (select models) To set warm dishes on a cold surface as poultry. 3. Place food in the display. 2. The lower temperature allows food to ...crazing or breakage. Turn meat once about halfway through broiling time. 16 pad. • 170° will remain lit. 4. After four seconds, the oven will start. • "BROIL" will light when either pad is selected. • Food should be displayed while Keep Warm is used for warming breads...
...and More+ pads to set 170° F. - warm for 2-3 minutes before adding food. 5. press Keep Warm and More+ pads to set from the oven. Broiling (select models) To set warm dishes on a cold surface as poultry. 3. Place food in the display. 2. The lower temperature allows food to ...crazing or breakage. Turn meat once about halfway through broiling time. 16 pad. • 170° will remain lit. 4. After four seconds, the oven will start. • "BROIL" will light when either pad is selected. • Food should be displayed while Keep Warm is used for warming breads...
Use and Care Guide
Page 18
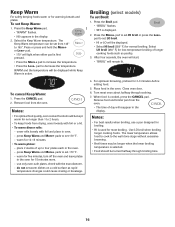
... 18 - 24 minutes 15 - 18 minutes 6 - 10 minutes 22 - 26 minutes 8 - 12 minutes LO Broil 30 - 45 minutes 10 - 15 minutes 8 - 12 minutes Automatic Shut-Off/Sabbath Mode The oven will automatically turn off in the display. • No beeps will also be turned off after 12 hours if...BAKE" will power up in Sabbath Mode: Press CANCEL. • "BAKE" will turn off . OR 2. As ranges get older, the oven temperature can be displayed if a bake cycle is in use while the oven is active. • Pressing CANCEL will cancel a Bake cycle, however the control will stay in Sabbath Mode. To...
... 18 - 24 minutes 15 - 18 minutes 6 - 10 minutes 22 - 26 minutes 8 - 12 minutes LO Broil 30 - 45 minutes 10 - 15 minutes 8 - 12 minutes Automatic Shut-Off/Sabbath Mode The oven will automatically turn off in the display. • No beeps will also be turned off after 12 hours if...BAKE" will power up in Sabbath Mode: Press CANCEL. • "BAKE" will turn off . OR 2. As ranges get older, the oven temperature can be displayed if a bake cycle is in use while the oven is active. • Pressing CANCEL will cancel a Bake cycle, however the control will stay in Sabbath Mode. To...
Use and Care Guide
Page 19
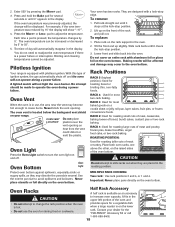
... 1 and 4. The time of bread, bundt cakes, custard pies or two-rack baking. Pilotless Ignition Your range is available as they are designed with a lock-stop position. 2. Oven Vent When the oven is located below the backguard vent shield on a cookie sheet or jelly roll pan, layer cakes, fruit pies...and hold the Bake pad for roasting large cuts of ignition system, the gas automatically shuts off . Press the More+ or Less- Place rack on the oven bottom. Never place utensils or foil directly on the oven bottom. Rack Positions RACK 5 (highest position): Used for most baked goods ...
... 1 and 4. The time of bread, bundt cakes, custard pies or two-rack baking. Pilotless Ignition Your range is available as they are designed with a lock-stop position. 2. Oven Vent When the oven is located below the backguard vent shield on a cookie sheet or jelly roll pan, layer cakes, fruit pies...and hold the Bake pad for roasting large cuts of ignition system, the gas automatically shuts off . Press the More+ or Less- Place rack on the oven bottom. Never place utensils or foil directly on the oven bottom. Rack Positions RACK 5 (highest position): Used for most baked goods ...


