Use and Care Guide
Page 1
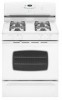
rved. Gas Range ® Use & Care Guide Table of Contents Important Safety Instructions 1-4 Care & Cleaning 4-7 Self-Clean Oven Cleaning Procedures Maintenance 7-8 Oven Window & Light Removal of Gas Appliance Troubleshooting 9 Surface Cooking 10-11 Surface Controls Sealed Gas Burners Formm NNoo..AA/0/061/0/038 PPaarrttNNoo. .8811133PP378044-6-600 Oven Cooking 11-18 Manual Clean Oven Controls Clock Baking...
rved. Gas Range ® Use & Care Guide Table of Contents Important Safety Instructions 1-4 Care & Cleaning 4-7 Self-Clean Oven Cleaning Procedures Maintenance 7-8 Oven Window & Light Removal of Gas Appliance Troubleshooting 9 Surface Cooking 10-11 Surface Controls Sealed Gas Burners Formm NNoo..AA/0/061/0/038 PPaarrttNNoo. .8811133PP378044-6-600 Oven Cooking 11-18 Manual Clean Oven Controls Clock Baking...
Use and Care Guide
Page 4
... to cover oven racks or oven bottom. Let hot air or steam escape before moving or replacing food. When cooking is particularly important in this manual can cause smoking and greasy spillovers may also be added as well as the bubble action of fat. This could damage the utensil and the...
... to cover oven racks or oven bottom. Let hot air or steam escape before moving or replacing food. When cooking is particularly important in this manual can cause smoking and greasy spillovers may also be added as well as the bubble action of fat. This could damage the utensil and the...
Use and Care Guide
Page 5
...-clean cycle if they are hereby warned that when the oven is essential for Future Reference Care & Cleaning Self-Clean Oven (select models) Important: For manual clean oven, see page 7. Clean oven frame, door frame, area outside of gasket, and • Avoid touching cooktop, door, window or oven vent...become hot during the clean cycle. It is normal for cleaning products are hereby warned that the burning of gas can result in the oven. * Brand names for the cooktop of the range to open . Turn off the oven light before cleaning. The gasket is the seal around any other utensils...
...-clean cycle if they are hereby warned that when the oven is essential for Future Reference Care & Cleaning Self-Clean Oven (select models) Important: For manual clean oven, see page 7. Clean oven frame, door frame, area outside of gasket, and • Avoid touching cooktop, door, window or oven vent...become hot during the clean cycle. It is normal for cleaning products are hereby warned that the burning of gas can result in the oven. * Brand names for the cooktop of the range to open . Turn off the oven light before cleaning. The gasket is the seal around any other utensils...
Use and Care Guide
Page 8
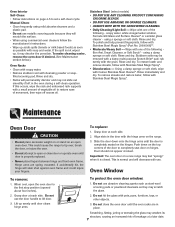
... close door or operate oven until door clears hinge arms. To protect the oven door window: 1. Manual Clean: • Clean frequently using mild abrasive cleaners and a plastic pad. • Do not use...or soap- To restore luster and remove streaks, follow with the hinge arms on the range. 3. This could injure your fingers. If the spill is properly replaced. • ...Interior Self-Clean: • Follow instructions on page 4-5 to the first stop position (opened about four inches). 2. Wipe with Stainless Steel Magic Spray*. • Discoloration -- Rinse and dry. Hinge arms are...
... close door or operate oven until door clears hinge arms. To protect the oven door window: 1. Manual Clean: • Clean frequently using mild abrasive cleaners and a plastic pad. • Do not use...or soap- To restore luster and remove streaks, follow with the hinge arms on the range. 3. This could injure your fingers. If the spill is properly replaced. • ...Interior Self-Clean: • Follow instructions on page 4-5 to the first stop position (opened about four inches). 2. Wipe with Stainless Steel Magic Spray*. • Discoloration -- Rinse and dry. Hinge arms are...
Use and Care Guide
Page 12
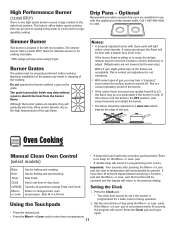
...the display will cancel. The grate's porcelain finish may chip without a pan on your range, located in the right front position. If this appliance to the previous display. CANCEL Cancels...: Four seconds after pressing the More+ or Lesspad, the time or temperature will light within 30 seconds, • Press the desired pad. Press the Clock pad. • The clock ... If the burner flame is yellow or is noisy, the air/gas mixture may go out, particularly if the burner is pressed. Oven Cooking Manual Clean Oven Control (select models) • A beep will sound ...
...the display will cancel. The grate's porcelain finish may chip without a pan on your range, located in the right front position. If this appliance to the previous display. CANCEL Cancels...: Four seconds after pressing the More+ or Lesspad, the time or temperature will light within 30 seconds, • Press the desired pad. Press the Clock pad. • The clock ... If the burner flame is yellow or is noisy, the air/gas mixture may go out, particularly if the burner is pressed. Oven Cooking Manual Clean Oven Control (select models) • A beep will sound ...
Use and Care Guide
Page 14
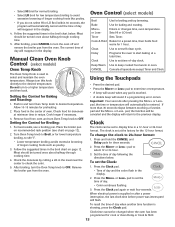
Manual Clean Oven Knob Control (select models) Oven Control (select models) Broil Bake More+ or LessTimer Cook & Hold Clean Delay Clock... turn the Oven Temp knob to OFF. Allow 10-15 minutes for cook or clean Delay or Cook & Hold. 13 If more than 30 seconds elapse between touching a function pad and the More+ or Less- After broiling, turn Oven Temp knob to desired temperature. To set...avoid excessive browning of longer cooking foods like poultry. • If you do not select HI or LO Broil within 30 seconds, the program will automatically cancel and the time of day will flash.
Manual Clean Oven Knob Control (select models) Oven Control (select models) Broil Bake More+ or LessTimer Cook & Hold Clean Delay Clock... turn the Oven Temp knob to OFF. Allow 10-15 minutes for cook or clean Delay or Cook & Hold. 13 If more than 30 seconds elapse between touching a function pad and the More+ or Less- After broiling, turn Oven Temp knob to desired temperature. To set...avoid excessive browning of longer cooking foods like poultry. • If you do not select HI or LO Broil within 30 seconds, the program will automatically cancel and the time of day will flash.


