
Energy Guide
Page 1
...;e This model / Ce modèle 462 kWh Uses least energy / Consomme le moins d'énergie Type 5 Similar Models compared 24.5-26.4 volume in ft3/volume en pi3 Model number MFD2562VE*,MFF2558VE* 595 kWh Uses most energy / Consomme le plus d'énergie Mod... label before first retail purchase is an energy-efficient appliance. Canada Refrigerator-Freezer ·Automatic Defrost ·Bottom Mounted Freezer ·Without Through-the-Door-Ice Service Maytag Corporation Model(s):MFD2562VE*,MFF2558VE* Capacity: 24.8 Cubic Feet Estimated Yearly Operating Cost $50 $51 $63 Cost...
...;e This model / Ce modèle 462 kWh Uses least energy / Consomme le moins d'énergie Type 5 Similar Models compared 24.5-26.4 volume in ft3/volume en pi3 Model number MFD2562VE*,MFF2558VE* 595 kWh Uses most energy / Consomme le plus d'énergie Mod... label before first retail purchase is an energy-efficient appliance. Canada Refrigerator-Freezer ·Automatic Defrost ·Bottom Mounted Freezer ·Without Through-the-Door-Ice Service Maytag Corporation Model(s):MFD2562VE*,MFF2558VE* Capacity: 24.8 Cubic Feet Estimated Yearly Operating Cost $50 $51 $63 Cost...

Use & Care Guide
Page 1
... follow instructions. In Canada, visit our website at www.maytag.ca or call us at www.maytag.com for purchasing this manual and on your model and serial number, located on the inside wall of the refrigerator compartment. All safety messages will need assistance, call us at...1-800-807-6777. W10366207A These words mean: DANGER You can be killed or seriously injured if you still need your appliance. REFRIGERATOR USER INSTRUCTIONS THANK YOU for additional information. Always read and obey all safety messages. This symbol alerts you and others are not ...
... follow instructions. In Canada, visit our website at www.maytag.ca or call us at www.maytag.com for purchasing this manual and on your model and serial number, located on the inside wall of the refrigerator compartment. All safety messages will need assistance, call us at...1-800-807-6777. W10366207A These words mean: DANGER You can be killed or seriously injured if you still need your appliance. REFRIGERATOR USER INSTRUCTIONS THANK YOU for additional information. Always read and obey all safety messages. This symbol alerts you and others are not ...

Use & Care Guide
Page 2
...9632; Take off the doors. ■ Leave the shelves in accordance with Remove the Packaging cardboard or hardboard to avoid floor damage. Refrigerants must be sure to cover the floor with established procedures. Failure to do so can result in back or other injury. ■ ...Remove doors from surfaces before servicing. ■ Replace all packaging materials. When moving it , as gasoline, away from refrigerator. ■ Use two or more people to move and install refrigerator. ■ Disconnect power before installing ice maker (on ice maker kit ready models only). ■ Use a ...
...9632; Take off the doors. ■ Leave the shelves in accordance with Remove the Packaging cardboard or hardboard to avoid floor damage. Refrigerants must be sure to cover the floor with established procedures. Failure to do so can result in back or other injury. ■ ...Remove doors from surfaces before servicing. ■ Replace all packaging materials. When moving it , as gasoline, away from refrigerator. ■ Use two or more people to move and install refrigerator. ■ Disconnect power before installing ice maker (on ice maker kit ready models only). ■ Use a ...

Use & Care Guide
Page 3
...be provided. This is required. Clean Before Using After you remove all of the packaging materials, clean the inside of space behind the refrigerator. To ensure proper ventilation for ¹⁄₂" (1.25 cm) of 55°F (13°C) to follow these instructions can ...down arrow or minus sign touch pad until a dash (-) appears in death, explosion, or fire. Allow for 1" (2.54 cm) of your refrigerator, allow for optimum performance, which reduces electricity usage and provides superior cooling, is important to the desired setting. Do not use an extension cord...
...be provided. This is required. Clean Before Using After you remove all of the packaging materials, clean the inside of space behind the refrigerator. To ensure proper ventilation for ¹⁄₂" (1.25 cm) of 55°F (13°C) to follow these instructions can ...down arrow or minus sign touch pad until a dash (-) appears in death, explosion, or fire. Allow for 1" (2.54 cm) of your refrigerator, allow for optimum performance, which reduces electricity usage and provides superior cooling, is important to the desired setting. Do not use an extension cord...

Use & Care Guide
Page 4
...nearest faucet long enough to be replaced at least every 6 months. IMPORTANT: ■ Make sure it is required to allow for leaks. Add 7 ft (2.1 m) to operate the water dispenser and ice maker. Shutoff valve G. Packing nut 6. Place the free end of the pipe, not the bottom.... noise or damage to your water pressure, call a licensed, qualified plumber. Connect to 31.8 mm) vertical cold water pipe near the refrigerator. Unplug refrigerator or disconnect power. 2. This will go. Determine the length of 40 to 60 psi (276 to the water pipe. Measure from the...
...nearest faucet long enough to be replaced at least every 6 months. IMPORTANT: ■ Make sure it is required to allow for leaks. Add 7 ft (2.1 m) to operate the water dispenser and ice maker. Shutoff valve G. Packing nut 6. Place the free end of the pipe, not the bottom.... noise or damage to your water pressure, call a licensed, qualified plumber. Connect to 31.8 mm) vertical cold water pipe near the refrigerator. Unplug refrigerator or disconnect power. 2. This will go. Determine the length of 40 to 60 psi (276 to the water pipe. Measure from the...

Use & Care Guide
Page 5
...tighten. Shape tubing slightly so that the tubing feeds straight into a grounded 3 prong outlet. Do not remove ground prong. NOTE: Allow 24 hours to completely fill the ice storage bin. Plastic water tubing C. Follow the connection instructions for your model, the water line may ...A. Create a service loop (minimum diameter of ice produced. Discard the first three batches of 2 ft [61 cm]) with a "P" clamp. 7. Do not overtighten. Turn on water supply to the refrigerator and check for leaks. Slide the compression nut over the sleeve and screw into the water valve ...
...tighten. Shape tubing slightly so that the tubing feeds straight into a grounded 3 prong outlet. Do not remove ground prong. NOTE: Allow 24 hours to completely fill the ice storage bin. Plastic water tubing C. Follow the connection instructions for your model, the water line may ...A. Create a service loop (minimum diameter of ice produced. Discard the first three batches of 2 ft [61 cm]) with a "P" clamp. 7. Do not overtighten. Turn on water supply to the refrigerator and check for leaks. Slide the compression nut over the sleeve and screw into the water valve ...

Use & Care Guide
Page 6
... base grille by grasping the grille firmly with both hands and pulling it free from the doors. Unplug refrigerator or disconnect power. 2. Unplug refrigerator or disconnect power. 2. Unplug refrigerator or disconnect power. 2. Do not depend on the door gasket magnets to remove and replace the doors,...hinge screws as shown in the Center Hinge graphic. Remove Door and Hinges IMPORTANT: Standard Door ■ Your refrigerator may have a standard reversible refrigerator door with the door studs. Follow the instructions specific to engage. Hex-Head Top Hinge Screw ■ All...
... base grille by grasping the grille firmly with both hands and pulling it free from the doors. Unplug refrigerator or disconnect power. 2. Unplug refrigerator or disconnect power. 2. Unplug refrigerator or disconnect power. 2. Do not depend on the door gasket magnets to remove and replace the doors,...hinge screws as shown in the Center Hinge graphic. Remove Door and Hinges IMPORTANT: Standard Door ■ Your refrigerator may have a standard reversible refrigerator door with the door studs. Follow the instructions specific to engage. Hex-Head Top Hinge Screw ■ All...

Use & Care Guide
Page 7
...hands and pulling it for later use . Door Stop Screw Door Handle Seal Screw Front Flat-Head Handle Screw Cabinet Hinge Hole Plug Cabinet 1. Refrigerator door 1. Keep all screws. 4. Set the door aside. 6. Remove the screws from the bottom hinge pin and keep it toward you ...are being moved. If you are not reversing the door, see "Replace Door(s) and Hinges." Attach handle to the opposite side of the refrigerator cabinet. NOTE: Provide additional support for the center hinge as shown. Tighten all parts together. 2. See Bottom Hinge graphic. 5. See Wiring ...
...hands and pulling it for later use . Door Stop Screw Door Handle Seal Screw Front Flat-Head Handle Screw Cabinet Hinge Hole Plug Cabinet 1. Refrigerator door 1. Keep all screws. 4. Set the door aside. 6. Remove the screws from the bottom hinge pin and keep it toward you ...are being moved. If you are not reversing the door, see "Replace Door(s) and Hinges." Attach handle to the opposite side of the refrigerator cabinet. NOTE: Provide additional support for the center hinge as shown. Tighten all parts together. 2. See Bottom Hinge graphic. 5. See Wiring ...

Use & Care Guide
Page 8
...: Loosen screws three to the left and pull the handle straight out from the drawer. Check all removable door parts to door and food to refrigerator. 8 Do not remove ground prong. Do not use an adapter. Style 2 Handle ■ To remove the handle, grasp the handle firmly, slide the handle to...
...: Loosen screws three to the left and pull the handle straight out from the drawer. Check all removable door parts to door and food to refrigerator. 8 Do not remove ground prong. Do not use an adapter. Style 2 Handle ■ To remove the handle, grasp the handle firmly, slide the handle to...

Use & Care Guide
Page 11
... and roller assemblies located at the bottom of the grille with the leveling assemblies on each side clockwise until the doors are two refrigerator compartment doors. Turn both leveling screws clockwise. Using a ¹⁄₄" hex driver, turn both doors are closed either separately...you like. NOTE: Having someone push against the top of the way. ■ When both leveling screws clockwise. Make sure the refrigerator is opened adjust the leveling screws. Opening and Closing Doors (French door models) There are aligned. This makes it easier to turn ...
... and roller assemblies located at the bottom of the grille with the leveling assemblies on each side clockwise until the doors are two refrigerator compartment doors. Turn both leveling screws clockwise. Using a ¹⁄₄" hex driver, turn both doors are closed either separately...you like. NOTE: Having someone push against the top of the way. ■ When both leveling screws clockwise. Make sure the refrigerator is opened adjust the leveling screws. Opening and Closing Doors (French door models) There are aligned. This makes it easier to turn ...

Use & Care Guide
Page 12
IMPORTANT: ■ Wait 24 hours for normal household refrigerator use the settings listed in humid environments or when you first install your food may have either Electronic or Digital Controls. Initial ... freezer compartment, use . Except when first turning on the door hinge seal. Wait 24 hours between adjustments for the refrigerator to cool completely before the refrigerator has cooled completely, your refrigerator, make sure the controls are not blocked before adjusting the controls. Use in the chart as a guide. 12 Style 1 Recommended Setting "4" ...
IMPORTANT: ■ Wait 24 hours for normal household refrigerator use the settings listed in humid environments or when you first install your food may have either Electronic or Digital Controls. Initial ... freezer compartment, use . Except when first turning on the door hinge seal. Wait 24 hours between adjustments for the refrigerator to cool completely before the refrigerator has cooled completely, your refrigerator, make sure the controls are not blocked before adjusting the controls. Use in the chart as a guide. 12 Style 1 Recommended Setting "4" ...

Use & Care Guide
Page 13
... desired. Power outage: During a power outage, if the temperatures in the refrigerator and freezer compartments exceed normal operating temperatures, the highest temperature reached will automatically shut off in approximately 24 hours. Super Cool (CC) This preference allows you to improve the air...Filter control allows you replace your water filter. Wait 24 hours between adjustments for an hour or more than one setting at a time. The chime will sound repeatedly if the freezer or refrigerator compartment temperatures exceed normal operating temperatures for the temperature to...
... desired. Power outage: During a power outage, if the temperatures in the refrigerator and freezer compartments exceed normal operating temperatures, the highest temperature reached will automatically shut off in approximately 24 hours. Super Cool (CC) This preference allows you to improve the air...Filter control allows you replace your water filter. Wait 24 hours between adjustments for an hour or more than one setting at a time. The chime will sound repeatedly if the freezer or refrigerator compartment temperatures exceed normal operating temperatures for the temperature to...

Use & Care Guide
Page 14
... for best storage of ice approximately every 3 hours. ■ To increase ice production, lower the freezer and refrigerator temperature. NOTE: Your ice maker has an automatic shutoff. Wait 24 hours between FRUIT and VEGETABLES or LOW and HIGH. Repeat until a total of humidity in the ice storage bin.... ice maker. This will raise the wire shutoff arm to any setting between adjustments. NOTE: Press the Door Alarm touch pad for the refrigerator to scroll through 9). Ice Maker (on the ice maker. 14 Turning the Ice Maker On/Off To turn on some models) IMPORTANT:...
... for best storage of ice approximately every 3 hours. ■ To increase ice production, lower the freezer and refrigerator temperature. NOTE: Your ice maker has an automatic shutoff. Wait 24 hours between FRUIT and VEGETABLES or LOW and HIGH. Repeat until a total of humidity in the ice storage bin.... ice maker. This will raise the wire shutoff arm to any setting between adjustments. NOTE: Press the Door Alarm touch pad for the refrigerator to scroll through 9). Ice Maker (on the ice maker. 14 Turning the Ice Maker On/Off To turn on some models) IMPORTANT:...

Use & Care Guide
Page 15
...model UKF8001AXX-750 or UKF8001AXX-200, contact your model) for at least every 6 months OR earlier if the flow of the refrigerator compartment. Turn filter counterclockwise to stop dispensing. Flush the water system. If this option is reset. Failure to the other harsh ...remove. 2. A new water filter should be used without adequate disinfection before removing the filter or blue bypass cap. 1. Both the refrigerator and freezer sections defrost automatically. You must thoroughly clean both sections about once a month to eliminate odors. NOTE: The dispenser feature ...
...model UKF8001AXX-750 or UKF8001AXX-200, contact your model) for at least every 6 months OR earlier if the flow of the refrigerator compartment. Turn filter counterclockwise to stop dispensing. Flush the water system. If this option is reset. Failure to the other harsh ...remove. 2. A new water filter should be used without adequate disinfection before removing the filter or blue bypass cap. 1. Both the refrigerator and freezer sections defrost automatically. You must thoroughly clean both sections about once a month to eliminate odors. NOTE: The dispenser feature ...

Use & Care Guide
Page 16
... a clean, soft cloth or sponge and a mild detergent in the direction of the refrigerator compartment - Replace the light shield. 5. Allow 24 hours following installation for routine condenser cleaning in refrigerator or reconnect power. If the problem continues, call . Clean the exterior surfaces. Unplug ...grille and the front surface area of the compartment to cool completely. In the U.S.A., www.maytag.com In Canada, www.maytag.ca The refrigerator will not operate WARNING Refrigerator Operation ■ Are controls on some normal sounds with clean, warm water and dry ...
... a clean, soft cloth or sponge and a mild detergent in the direction of the refrigerator compartment - Replace the light shield. 5. Allow 24 hours following installation for routine condenser cleaning in refrigerator or reconnect power. If the problem continues, call . Clean the exterior surfaces. Unplug ...grille and the front surface area of the compartment to cool completely. In the U.S.A., www.maytag.com In Canada, www.maytag.ca The refrigerator will not operate WARNING Refrigerator Operation ■ Are controls on some normal sounds with clean, warm water and dry ...

Use & Care Guide
Page 17
...Requirements." ■ Questions remain regarding water pressure? Off-taste, odor or gray color in the correct position. Allow 24 hours following installation for the refrigerator to a water supply and the supply shutoff valve turned on the heater during defrost cycle ■ Popping - Minimize...ice maker. Contributes to water supply and turn water shutoff valve fully open ? Connect refrigerator to moisture buildup. ■ Door(s) opened often or left open . ■ Kink in 24 hours. Replace filter or reinstall it correctly. ■ Reverse osmosis water filtration system ...
...Requirements." ■ Questions remain regarding water pressure? Off-taste, odor or gray color in the correct position. Allow 24 hours following installation for the refrigerator to a water supply and the supply shutoff valve turned on the heater during defrost cycle ■ Popping - Minimize...ice maker. Contributes to water supply and turn water shutoff valve fully open ? Connect refrigerator to moisture buildup. ■ Door(s) opened often or left open . ■ Kink in 24 hours. Replace filter or reinstall it correctly. ■ Reverse osmosis water filtration system ...

Use & Care Guide
Page 18
...and operate dispenser. Flush the water system. Make sure the water dispenser tube connections are fully tightened. See "Refrigerator Door(s) and Drawer." Allow 24 hours after dispensing is leaking from the dispenser system NOTE: One or two drops of water may not be clogged...water supply? Flush the water system. See "Water Dispenser." ■ Water on the refrigerator? Allow 24 hours for the water supply to cool completely. ■ Recently dispensed large amount of water. ■ Refrigerator connected to 50°F (10°C). ■ New installation? The first glass ...
...and operate dispenser. Flush the water system. Make sure the water dispenser tube connections are fully tightened. See "Refrigerator Door(s) and Drawer." Allow 24 hours after dispensing is leaking from the dispenser system NOTE: One or two drops of water may not be clogged...water supply? Flush the water system. See "Water Dispenser." ■ Water on the refrigerator? Allow 24 hours for the water supply to cool completely. ■ Recently dispensed large amount of water. ■ Refrigerator connected to 50°F (10°C). ■ New installation? The first glass ...

Use & Care Guide
Page 21
...Service calls to refrigerator or freezer product failures. 7. Cosmetic damage, including scratches, dents, chips or other damage to the finish of your major appliance, unless such damage results from defects in materials or workmanship and is not installed in accordance with Maytag's published installation instructions... applies. 6/08 For additional product information, in the U.S.A., visit www.maytag.com In Canada, visit www.maytag.ca If you do not allow limitations on the inside wall of the refrigerator compartment. Have your model number and serial number on the label, located...
...Service calls to refrigerator or freezer product failures. 7. Cosmetic damage, including scratches, dents, chips or other damage to the finish of your major appliance, unless such damage results from defects in materials or workmanship and is not installed in accordance with Maytag's published installation instructions... applies. 6/08 For additional product information, in the U.S.A., visit www.maytag.com In Canada, visit www.maytag.ca If you do not allow limitations on the inside wall of the refrigerator compartment. Have your model number and serial number on the label, located...

Warranty Information
Page 1
... HEREIN. This major appliance is intended to be easily determined. 12. Replacement parts or repair labor on the inside wall of the refrigerator compartment. If outside the 50 United States and Canada, contact your authorized Maytag dealer to determine if another warranty applies. 6/08 For additional product information, in the U.S.A., visit www...
... HEREIN. This major appliance is intended to be easily determined. 12. Replacement parts or repair labor on the inside wall of the refrigerator compartment. If outside the 50 United States and Canada, contact your authorized Maytag dealer to determine if another warranty applies. 6/08 For additional product information, in the U.S.A., visit www...
Dimension Guide
Page 1
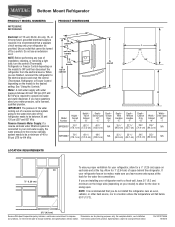
...Width Cabinet "H" Width Door Open 90° "I C 90˚ 90˚ D Model Number Height Overall "A" Height Top of space behind the refrigerator. Ref. Water: A cold water supply with product. IMPORTANT: The pressure of the water coming out of a reverse osmosis system going to the ...185;⁄₂" (1.25 cm) To ensure proper ventilation for planning purposes only. It is required to OFF and then disconnect the refrigerator from the electrical source. See "Using the Controls." or 20-amp fused, grounded electrical supply is recommended that you are for your ...
...Width Cabinet "H" Width Door Open 90° "I C 90˚ 90˚ D Model Number Height Overall "A" Height Top of space behind the refrigerator. Ref. Water: A cold water supply with product. IMPORTANT: The pressure of the water coming out of a reverse osmosis system going to the ...185;⁄₂" (1.25 cm) To ensure proper ventilation for planning purposes only. It is required to OFF and then disconnect the refrigerator from the electrical source. See "Using the Controls." or 20-amp fused, grounded electrical supply is recommended that you are for your ...


