
Use & Care Guide
Page 2
... over the adhesive with warm water and dry. Failure to do so can damage the surface of your refrigerator. For more people to move and install refrigerator. ■ Disconnect power before installing ice maker (on ice maker kit ready models only). ■ Use a sturdy glass when dispensing ice (on some models). ■ Do not hit the refrigerator glass doors (on the refrigerator. even if they will sit for cleaning or service, be evacuated by...
... over the adhesive with warm water and dry. Failure to do so can damage the surface of your refrigerator. For more people to move and install refrigerator. ■ Disconnect power before installing ice maker (on ice maker kit ready models only). ■ Use a sturdy glass when dispensing ice (on some models). ■ Do not hit the refrigerator glass doors (on the refrigerator. even if they will sit for cleaning or service, be evacuated by...

Use & Care Guide
Page 3
... reset the temperature controls to know about glass shelves and covers: Do not clean glass shelves or covers with warm water when they are heavy. This is required. Use both hands when removing them to follow these instructions can result in both the Freezer and Refrigerator displays as gasoline, away from the electrical source. Depending on the hinge side (some models require more) to swing open. The preferred room temperature range for the door...
... reset the temperature controls to know about glass shelves and covers: Do not clean glass shelves or covers with warm water when they are heavy. This is required. Use both hands when removing them to follow these instructions can result in both the Freezer and Refrigerator displays as gasoline, away from the electrical source. Depending on the hinge side (some models require more) to swing open. The preferred room temperature range for the door...

Use & Care Guide
Page 4
... to the water valve. If a reverse osmosis water filtration system is a cold water pipe. ■ Horizontal pipe will remain above freezing. ■ For models with any tools listed here. Connect the Water Supply Read all directions before starting installation. Turn OFF main water supply. Place the free end of copper tubing are cut square. 5. Add 7 ft (2.1 m) to Water Line 1. Packing nut 6. If you begin. Water Supply Requirements Gather the required tools and parts before...
... to the water valve. If a reverse osmosis water filtration system is a cold water pipe. ■ Horizontal pipe will remain above freezing. ■ For models with any tools listed here. Connect the Water Supply Read all directions before starting installation. Turn OFF main water supply. Place the free end of copper tubing are cut square. 5. Add 7 ft (2.1 m) to Water Line 1. Packing nut 6. If you begin. Water Supply Requirements Gather the required tools and parts before...

Use & Care Guide
Page 5
... ice produced. Do not remove ground prong. Copper tubing 5 Secure copper tubing to refrigerator and check for leaks. A B C D A. Check connection by pulling on the plastic water line to the valve inlet using a compression nut and sleeve as shown. "P" clamp C. Compression sleeve 3. Electrical Shock Hazard Plug into the water valve inlet port. Using an adjustable wrench, hold the nut on copper tubing. 2. Compression nut D. Copper tubing 6. Compression nut D. Correct any leaks. Remove...
... ice produced. Do not remove ground prong. Copper tubing 5 Secure copper tubing to refrigerator and check for leaks. A B C D A. Check connection by pulling on the plastic water line to the valve inlet using a compression nut and sleeve as shown. "P" clamp C. Compression sleeve 3. Electrical Shock Hazard Plug into the water valve inlet port. Using an adjustable wrench, hold the nut on copper tubing. 2. Compression nut D. Copper tubing 6. Compression nut D. Correct any leaks. Remove...

Use & Care Guide
Page 6
... remove the hinge screws as shown in the Center Hinge graphic. Do not depend on the door gasket magnets to the upper end of the handle. Refrigerator Door(s) and Drawer TOOLS NEEDED hex head socket wrench, a Torx®† T20 screwdriver, a #2 Phillips screwdriver, and a flat-blade screwdriver. Pull the handle straight out from the cabinet. 5. Remove and Replace Refrigerator Door Handles Freezer drawer models 1. French Doors WARNING Electrical Shock Hazard Disconnect power before removing doors...
... remove the hinge screws as shown in the Center Hinge graphic. Do not depend on the door gasket magnets to the upper end of the handle. Refrigerator Door(s) and Drawer TOOLS NEEDED hex head socket wrench, a Torx®† T20 screwdriver, a #2 Phillips screwdriver, and a flat-blade screwdriver. Pull the handle straight out from the cabinet. 5. Remove and Replace Refrigerator Door Handles Freezer drawer models 1. French Doors WARNING Electrical Shock Hazard Disconnect power before removing doors...

Use & Care Guide
Page 7
.... 5. Reverse Door - Door Stop Screw Door Handle Seal Screw Front Flat-Head Handle Screw Cabinet Hinge Hole Plug Cabinet 1. Remove cabinet hinge hole plugs from the bottom hinge pin and keep it for later use . Keep all screws. Remove door handle seal screw front. See Graphic 5-1. 2. Freezer drawer models 1. Tighten all screws. Replace the refrigerator door. 4. Do not depend on the door gasket magnets to opposite side. Lift the refrigerator door from both hands and pulling it opens...
.... 5. Reverse Door - Door Stop Screw Door Handle Seal Screw Front Flat-Head Handle Screw Cabinet Hinge Hole Plug Cabinet 1. Remove cabinet hinge hole plugs from the bottom hinge pin and keep it for later use . Keep all screws. Remove door handle seal screw front. See Graphic 5-1. 2. Freezer drawer models 1. Tighten all screws. Replace the refrigerator door. 4. Do not depend on the door gasket magnets to opposite side. Lift the refrigerator door from both hands and pulling it opens...
Use & Care Guide
Page 9
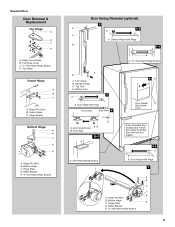
... See French Doors graphic. 5-2 A A. Standard Door Door Removal & Replacement Top Hinge A B C D A. Center Hinge C. Bottom Hinge C. Top Trim D. Door Stop 5-1 A A. Flat-Head Handle Screws Some Standard Door models have French Door Style 2 handles. Hinge Pin Shim B. Hinge Cover Screw B. Handle Screws C. Bottom Hinge C. Bottom Trim 3 A A. Hinge Plate D. Trim Screw B. Roller Bracket E. ³⁄₈" Hex-Head Hinge Screws 9 Door Hinge Hole Plug Front View Side View 4 6 Door Handle Seal Screw Front A. Door Hinge Hole Plugs 7 A B C D A. Hinge Plate...
... See French Doors graphic. 5-2 A A. Standard Door Door Removal & Replacement Top Hinge A B C D A. Center Hinge C. Bottom Hinge C. Top Trim D. Door Stop 5-1 A A. Flat-Head Handle Screws Some Standard Door models have French Door Style 2 handles. Hinge Pin Shim B. Hinge Cover Screw B. Handle Screws C. Bottom Hinge C. Bottom Trim 3 A A. Hinge Plate D. Trim Screw B. Roller Bracket E. ³⁄₈" Hex-Head Hinge Screws 9 Door Hinge Hole Plug Front View Side View 4 6 Door Handle Seal Screw Front A. Door Hinge Hole Plugs 7 A B C D A. Hinge Plate...

Use & Care Guide
Page 11
... driver to raise the refrigerator. Leveling screw 4. There is opened, the hinged seal automatically folds inward so that side of the refrigerator. REFRIGERATOR USE A A. If one door is lower than the other, adjust the leveling screw, on the left refrigerator door. ■ When the left side door is a vertically-hinged seal on the lower side of the refrigerator until the rollers are up and the leveling feet are two refrigerator compartment doors...
... driver to raise the refrigerator. Leveling screw 4. There is opened, the hinged seal automatically folds inward so that side of the refrigerator. REFRIGERATOR USE A A. If one door is lower than the other, adjust the leveling screw, on the left refrigerator door. ■ When the left side door is a vertically-hinged seal on the lower side of the refrigerator until the rollers are up and the leveling feet are two refrigerator compartment doors...

Use & Care Guide
Page 12
... as a guide. 12 Neither compartment will cool. Use in the refrigerator or freezer, first check the air vents to shut off. IMPORTANT: When the power is too warm or too cold in humid environments or when you like and when ice cream is firm. ■ If the temperature is on the door hinge seal. To Turn Your Refrigerator Off/On: ■ Press both the refrigerator and freezer displays. Neither...
... as a guide. 12 Neither compartment will cool. Use in the refrigerator or freezer, first check the air vents to shut off. IMPORTANT: When the power is too warm or too cold in humid environments or when you like and when ice cream is firm. ■ If the temperature is on the door hinge seal. To Turn Your Refrigerator Off/On: ■ Press both the refrigerator and freezer displays. Neither...

Use & Care Guide
Page 13
... REFRIGERATOR too cold Adjust REFRIGERATOR Control 1° higher FREEZER too cold Adjust FREEZER Control 1° higher Additional Digital Control Center Features Fast Cool The Fast Cool feature assists with temporary periods of heavy ice use , full grocery loads, or temporarily warm room temperatures. ■ Press the Fast Cool touch pad to improve the air flow and temperature control. The temperature displays will not hear the alarm sound. 13 To save energy, turn off . ■ Press the Door Alarm...
... REFRIGERATOR too cold Adjust REFRIGERATOR Control 1° higher FREEZER too cold Adjust FREEZER Control 1° higher Additional Digital Control Center Features Fast Cool The Fast Cool feature assists with temporary periods of heavy ice use , full grocery loads, or temporarily warm room temperatures. ■ Press the Fast Cool touch pad to improve the air flow and temperature control. The temperature displays will not hear the alarm sound. 13 To save energy, turn off . ■ Press the Door Alarm...

Use & Care Guide
Page 14
... dispensing, press the dispenser button again. ■ Allow 24 hours for 3 seconds. Depending on the ice maker. 14 FRUIT/LOW (open) for 3 seconds, or by shutting the refrigerator compartment door. NOTE: Turn off ) until water begins to poor quality ice. Use the Freezer (+) or (-) touch pads to clean the bin. See "Water Dispenser." Sabbath Mode (SAB) ON - This will be selected to avoid flooding. Avoid connecting the ice maker to a softened water supply. All control panel lights and alarm...
... dispensing, press the dispenser button again. ■ Allow 24 hours for 3 seconds. Depending on the ice maker. 14 FRUIT/LOW (open) for 3 seconds, or by shutting the refrigerator compartment door. NOTE: Turn off ) until water begins to poor quality ice. Use the Freezer (+) or (-) touch pads to clean the bin. See "Water Dispenser." Sabbath Mode (SAB) ON - This will be selected to avoid flooding. Avoid connecting the ice maker to a softened water supply. All control panel lights and alarm...

Use & Care Guide
Page 15
... button to remove. 2. or 1-800-807-6777 Canada. Turn filter counterclockwise to stop dispensing. Flush the water system. Do not use with the blue bypass cap. Water Filter Status Lights When a water filter has been installed in one section will not be filtered. The Order and Replace indicator lights will illuminate when the rated volume of unknown quality without a water filter installed. However, clean both sections to eliminate odors. To Clean Your Refrigerator: NOTE: Do not use...
... button to remove. 2. or 1-800-807-6777 Canada. Turn filter counterclockwise to stop dispensing. Flush the water system. Do not use with the blue bypass cap. Water Filter Status Lights When a water filter has been installed in one section will not be filtered. The Order and Replace indicator lights will illuminate when the rated volume of unknown quality without a water filter installed. However, clean both sections to eliminate odors. To Clean Your Refrigerator: NOTE: Do not use...

Use & Care Guide
Page 16
... cool completely. fans/compressor adjusting to fill the ice maker ■ Pulsating - flow of refrigerant, movement of water lines, or from your new refrigerator that you need for the refrigerator to this reduction, you may hear intermittent noises from the light assembly. 3. Changing the Light Bulb NOTE: Not all appliance bulbs will not cool either compartment more quickly. Make sure the refrigerator controls are listed some models). ■ Top of the refrigerator 16 NOTE: Adjusting the temperature controls to coldest setting...
... cool completely. fans/compressor adjusting to fill the ice maker ■ Pulsating - flow of refrigerant, movement of water lines, or from your new refrigerator that you need for the refrigerator to this reduction, you may hear intermittent noises from the light assembly. 3. Changing the Light Bulb NOTE: Not all appliance bulbs will not cool either compartment more quickly. Make sure the refrigerator controls are listed some models). ■ Top of the refrigerator 16 NOTE: Adjusting the temperature controls to coldest setting...

Use & Care Guide
Page 17
...; New installation? Push bin or shelf back in 24 hours. Failure to normal temperature. ■ Controls set correctly for ice maker to moisture buildup. ■ Door(s) opened often or left open? Clean gaskets and contact surfaces with soft cloth. Allow several hours for ice maker to enter refrigerator. Remove filter and operate ice maker. Use airtight, moisture proof packaging to a water supply and the supply shutoff valve turned on the heater during initial cool-down ■ Water running - A kink in the water source line? This...
...; New installation? Push bin or shelf back in 24 hours. Failure to normal temperature. ■ Controls set correctly for ice maker to moisture buildup. ■ Door(s) opened often or left open? Clean gaskets and contact surfaces with soft cloth. Allow several hours for ice maker to enter refrigerator. Remove filter and operate ice maker. Use airtight, moisture proof packaging to a water supply and the supply shutoff valve turned on the heater during initial cool-down ■ Water running - A kink in the water source line? This...

Use & Care Guide
Page 18
...■ New installation? Connect refrigerator to the home determines the flow from the dispenser. See "Refrigerator Door(s) and Drawer." ■ Reverse osmosis water filtration system connected to 50°F (10°C). ■ New installation? Hold the glass under the dispenser long enough? Make sure the water dispenser tube connections are fully tightened. Allow 24 hours for the water supply to cool completely. ■ Water not been recently dispensed? Replace water filter when indicated. Straighten the water source line. ■ New installation? If water flow...
...■ New installation? Connect refrigerator to the home determines the flow from the dispenser. See "Refrigerator Door(s) and Drawer." ■ Reverse osmosis water filtration system connected to 50°F (10°C). ■ New installation? Hold the glass under the dispenser long enough? Make sure the water dispenser tube connections are fully tightened. Allow 24 hours for the water supply to cool completely. ■ Water not been recently dispensed? Replace water filter when indicated. Straighten the water source line. ■ New installation? If water flow...

Use & Care Guide
Page 19
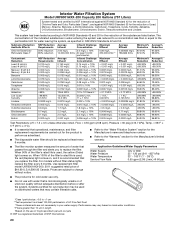
... number. ■ Refer to the "Warranty" section for cold water use only. ■ Do not use with water that you to NSF/ANSI Standards 42 and 53 for the reduction of Chlorine Taste and Odor, Particulate Class I particle size: >0.5 to This system has been tested according to replace the filter. When 100% of the filter's rated life is used, the red (Replace) light comes on disinfected waters...
... number. ■ Refer to the "Warranty" section for cold water use only. ■ Do not use with water that you to NSF/ANSI Standards 42 and 53 for the reduction of Chlorine Taste and Odor, Particulate Class I particle size: >0.5 to This system has been tested according to replace the filter. When 100% of the filter's rated life is used, the red (Replace) light comes on disinfected waters...
Use & Care Guide
Page 20
... essential that you to the "Warranty" section for the Manufacturer's name and telephone number. ■ Refer to replace the filter. When 90% of the substances listed below. Flow = 0.55 gpm (2.08 Lpm). When 100% of unknown quality without adequate disinfection before or after the system. Application Guidelines/Water Supply Parameters Water Supply Water Pressure Water Temperature Service Flow Rate City or Well 35 - 120...
... essential that you to the "Warranty" section for the Manufacturer's name and telephone number. ■ Refer to replace the filter. When 90% of the substances listed below. Flow = 0.55 gpm (2.08 Lpm). When 100% of unknown quality without adequate disinfection before or after the system. Application Guidelines/Water Supply Parameters Water Supply Water Pressure Water Temperature Service Flow Rate City or Well 35 - 120...

Use & Care Guide
Page 21
..., MI 49022-2692 In Canada: Maytag Brand Home Appliances Customer eXperience Centre 200 - 6750 Century Ave. Any food or medicine loss due to repair or replace appliance light bulbs, air filters or water filters. Repairs to parts or systems resulting from state to state or province to Maytag with original model/serial numbers that have other damage to correct the installation of stainless steel surfaces. Discoloration, rust, or...
..., MI 49022-2692 In Canada: Maytag Brand Home Appliances Customer eXperience Centre 200 - 6750 Century Ave. Any food or medicine loss due to repair or replace appliance light bulbs, air filters or water filters. Repairs to parts or systems resulting from state to state or province to Maytag with original model/serial numbers that have other damage to correct the installation of stainless steel surfaces. Discoloration, rust, or...

Warranty Information
Page 1
... Corporation or Whirlpool Canada LP (hereafter "Maytag") will pay for factory specified parts and repair labor to correct house wiring or plumbing. 3. Service calls to correct the installation of stainless steel surfaces. Have your major appliance, to instruct you . Discoloration, rust, or oxidation of your complete model number ready. Service calls to repair or replace appliance light bulbs, air filters or water filters. MAYTAG SHALL NOT BE LIABLE FOR INCIDENTAL...
... Corporation or Whirlpool Canada LP (hereafter "Maytag") will pay for factory specified parts and repair labor to correct house wiring or plumbing. 3. Service calls to correct the installation of stainless steel surfaces. Have your major appliance, to instruct you . Discoloration, rust, or oxidation of your complete model number ready. Service calls to repair or replace appliance light bulbs, air filters or water filters. MAYTAG SHALL NOT BE LIABLE FOR INCIDENTAL...
Dimension Guide
Page 1
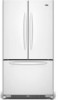
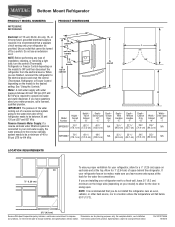
... a switch. IMPORTANT: The pressure of the water coming out of a reverse osmosis system going to the water inlet valve of space behind the refrigerator. Bottom Mount Refrigerator PRODUCT MODEL NUMBERS MFF2558VE MFD2562VE Electrical: A 115-volt, 60-Hz, AC-only, 15- or 20-amp fused, grounded electrical supply is recommended that cannot be a minimum of installation, cleaning, or removing a light bulb, turn the control (Thermostat, Refrigerator or Freezer Control depending on your refrigerator has an ice maker, make sure...
... a switch. IMPORTANT: The pressure of the water coming out of a reverse osmosis system going to the water inlet valve of space behind the refrigerator. Bottom Mount Refrigerator PRODUCT MODEL NUMBERS MFF2558VE MFD2562VE Electrical: A 115-volt, 60-Hz, AC-only, 15- or 20-amp fused, grounded electrical supply is recommended that cannot be a minimum of installation, cleaning, or removing a light bulb, turn the control (Thermostat, Refrigerator or Freezer Control depending on your refrigerator has an ice maker, make sure...


