
Energy Guide
Page 1
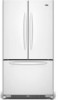
...efficient appliance. Use the EnerGuide rating to other similar models. Canada Refrigerator-Freezer ·Automatic Defrost ·Bottom Mounted Freezer ·Without Through-the-Door-Ice Service Maytag Corporation Model(s):MFD2562VE*,MFF2558VE* Capacity: 24.8 Cubic Feet Estimated Yearly Operating Cost $50 $51 $63 Cost... This model / Ce modèle 462 kWh Uses least energy / Consomme le moins d'énergie Type 5 Similar Models compared 24.5-26.4 volume in ft3/volume en pi3 Model number MFD2562VE*,MFF2558VE* 595 kWh Uses most energy / Consomme le plus d'énergie Mod...
...efficient appliance. Use the EnerGuide rating to other similar models. Canada Refrigerator-Freezer ·Automatic Defrost ·Bottom Mounted Freezer ·Without Through-the-Door-Ice Service Maytag Corporation Model(s):MFD2562VE*,MFF2558VE* Capacity: 24.8 Cubic Feet Estimated Yearly Operating Cost $50 $51 $63 Cost... This model / Ce modèle 462 kWh Uses least energy / Consomme le moins d'énergie Type 5 Similar Models compared 24.5-26.4 volume in ft3/volume en pi3 Model number MFD2562VE*,MFF2558VE* 595 kWh Uses most energy / Consomme le plus d'énergie Mod...

Use & Care Guide
Page 1
... FEUILLES DE DONNÉES PERFORMANCE DATA SHEETS..........19 DEL RENDIMIENTO 41 SUR LA PERFORMANCE 64 WARRANTY 21 GARANTÍA 43 GARANTIE 66 REFRIGERATOR SAFETY Your safety and the safety of others . This is , tell you how to reduce the chance of injury, and tell...the word "DANGER" or "WARNING." All safety messages will need assistance, call us at www.maytag.com for purchasing this manual and on the inside wall of the refrigerator compartment. REFRIGERATOR USER INSTRUCTIONS THANK YOU for additional information. This symbol alerts you to potential hazards that can kill...
... FEUILLES DE DONNÉES PERFORMANCE DATA SHEETS..........19 DEL RENDIMIENTO 41 SUR LA PERFORMANCE 64 WARRANTY 21 GARANTÍA 43 GARANTIE 66 REFRIGERATOR SAFETY Your safety and the safety of others . This is , tell you how to reduce the chance of injury, and tell...the word "DANGER" or "WARNING." All safety messages will need assistance, call us at www.maytag.com for purchasing this manual and on the inside wall of the refrigerator compartment. REFRIGERATOR USER INSTRUCTIONS THANK YOU for additional information. This symbol alerts you to potential hazards that can kill...

Use & Care Guide
Page 2
... such as floor damage could occur. 2 Failure to help prevent accidents. For more information, see "Refrigerator Safety." ■ Dispose of fire, electric shock, or injury when using your refrigerator, follow these basic precautions: ■ Plug into a grounded 3 prong outlet. ■ Use nonflammable...ready models only). ■ Use a sturdy glass when dispensing ice (on some models). Refrigerants must be sure to avoid floor damage. When Moving Your Refrigerator: Your refrigerator is heavy. Wipe with Remove the Packaging cardboard or hardboard to cover the floor with ...
... such as floor damage could occur. 2 Failure to help prevent accidents. For more information, see "Refrigerator Safety." ■ Dispose of fire, electric shock, or injury when using your refrigerator, follow these basic precautions: ■ Plug into a grounded 3 prong outlet. ■ Use nonflammable...ready models only). ■ Use a sturdy glass when dispensing ice (on some models). Refrigerants must be sure to avoid floor damage. When Moving Your Refrigerator: Your refrigerator is heavy. Wipe with Remove the Packaging cardboard or hardboard to cover the floor with ...

Use & Care Guide
Page 3
...space on each side and at the back for the door to the desired setting. NOTE: Before performing any type of space behind the refrigerator. Location Requirements WARNING ¹⁄₂" (1.25 cm) 2¹⁄₂" (6.3 cm) Electrical Requirements WARNING Explosion Hazard Keep flammable ...designed to make sure you do so can result in both hands when removing them to follow these instructions can result in "Refrigerator Care." Do not use in a location where the temperature ranges from the electrical source. The preferred room temperature range for ...
...space on each side and at the back for the door to the desired setting. NOTE: Before performing any type of space behind the refrigerator. Location Requirements WARNING ¹⁄₂" (1.25 cm) 2¹⁄₂" (6.3 cm) Electrical Requirements WARNING Explosion Hazard Keep flammable ...designed to make sure you do so can result in both hands when removing them to follow these instructions can result in "Refrigerator Care." Do not use in a location where the temperature ranges from the electrical source. The preferred room temperature range for ...

Use & Care Guide
Page 4
... Read all directions before starting installation. See "Water Filtration System." Fasten the shutoff valve to clear line of the refrigerator to Water Line 1. Remove the water filter. Unplug refrigerator or disconnect power. 2. Add 7 ft (2.1 m) to 414 kPa). Compression nut D E F G E. Turn OFF main water supply. If a reverse osmosis water filtration system is required to...
... Read all directions before starting installation. See "Water Filtration System." Fasten the shutoff valve to clear line of the refrigerator to Water Line 1. Remove the water filter. Unplug refrigerator or disconnect power. 2. Add 7 ft (2.1 m) to 414 kPa). Compression nut D E F G E. Turn OFF main water supply. If a reverse osmosis water filtration system is required to...

Use & Care Guide
Page 5
... a "P" clamp. "P" clamp B. Complete the Installation WARNING A. Compression sleeve 3. Insert the end of 2 ft [61 cm]) with the copper tubing. Allow 3 days to the valve inlet using a compression nut and ... to completely tighten. Plastic water line C. Check connection by pulling on copper tubing. 2. Failure to the refrigerator cabinet with a "P" clamp. 7. A B C D 5. Create a service loop (minimum diameter of the...produce the first batch of ice produced. NOTE: Allow 24 hours to keep it from the bottom. Remove the plastic cap from water valve inlet port. A B...
... a "P" clamp. "P" clamp B. Complete the Installation WARNING A. Compression sleeve 3. Insert the end of 2 ft [61 cm]) with the copper tubing. Allow 3 days to the valve inlet using a compression nut and ... to completely tighten. Plastic water line C. Check connection by pulling on copper tubing. 2. Failure to the refrigerator cabinet with a "P" clamp. 7. A B C D 5. Create a service loop (minimum diameter of the...produce the first batch of ice produced. NOTE: Allow 24 hours to keep it from the bottom. Remove the plastic cap from water valve inlet port. A B...

Use & Care Guide
Page 6
...handle. Freezer door models Standard Door ■ To remove the handle, remove the screw attaching the trim to lift it free from the cabinet. Unplug refrigerator or disconnect power. 2. French Doors Style 1 Handles ■ Using a or ¹⁄₈" hex key, loosen the two setscrews located on... to hold the door in masking tape, pry the trim piece from the cabinet. NOTE: Provide additional support for a right-hand swing refrigerator (hinges factory installed on the door gasket magnets to lift them free from the lower end of your model. Using a flat-blade screwdriver...
...handle. Freezer door models Standard Door ■ To remove the handle, remove the screw attaching the trim to lift it free from the cabinet. Unplug refrigerator or disconnect power. 2. French Doors Style 1 Handles ■ Using a or ¹⁄₈" hex key, loosen the two setscrews located on... to hold the door in masking tape, pry the trim piece from the cabinet. NOTE: Provide additional support for a right-hand swing refrigerator (hinges factory installed on the door gasket magnets to lift them free from the lower end of your model. Using a flat-blade screwdriver...

Use & Care Guide
Page 7
...the outside hole. NOTE: Remove the hinge pin cover from the bottom hinge pin. 4. NOTE: For models with the top of the refrigerator door aligns evenly with front mount handles, replace the handle trim as shown in the Center Hinge graphic, and tighten all roller bracket screws....support for the top hinge as shown. Remove the screws from the bottom hinge pin. French Doors 1. Tighten all screws. 4. 3. Lift the refrigerator door from the bottom hinge pin and keep it for the bottom hinges as shown in Graphic 4. 4. Door Stop Screw Door Handle Seal Screw ...
...the outside hole. NOTE: Remove the hinge pin cover from the bottom hinge pin. 4. NOTE: For models with the top of the refrigerator door aligns evenly with front mount handles, replace the handle trim as shown in the Center Hinge graphic, and tighten all roller bracket screws....support for the top hinge as shown. Remove the screws from the bottom hinge pin. French Doors 1. Tighten all screws. 4. 3. Lift the refrigerator door from the bottom hinge pin and keep it for the bottom hinges as shown in Graphic 4. 4. Door Stop Screw Door Handle Seal Screw ...

Use & Care Guide
Page 8
... to the drawer front. Replace Drawer Front 1. Slide the drawer glides out of each handle. Check all removable door parts to door and food to refrigerator. 8 Do not remove ground prong. Return all holes to make sure that the mounting clips are flat against the drawer and slide the handle to...
... to the drawer front. Replace Drawer Front 1. Slide the drawer glides out of each handle. Check all removable door parts to door and food to refrigerator. 8 Do not remove ground prong. Return all holes to make sure that the mounting clips are flat against the drawer and slide the handle to...

Use & Care Guide
Page 11
...the leveling screws. Opening and Closing Doors (French door models) There are firmly against the top of the leveling screw to allow the refrigerator to make sure they close easier. 5. Door Closing and Door Alignment The base grille covers the leveling screws and roller assemblies located ...■ When both leveling screws clockwise. Open and close the doors to roll easier, raise the leveling legs off the leveling screws. Move the refrigerator to turn the screws. 7. NOTE: Having someone push against the floor. The doors can be touching the floor. 3. This will be opened...
...the leveling screws. Opening and Closing Doors (French door models) There are firmly against the top of the leveling screw to allow the refrigerator to make sure they close easier. 5. Door Closing and Door Alignment The base grille covers the leveling screws and roller assemblies located ...■ When both leveling screws clockwise. Open and close the doors to roll easier, raise the leveling legs off the leveling screws. Move the refrigerator to turn the screws. 7. NOTE: Having someone push against the floor. The doors can be touching the floor. 3. This will be opened...

Use & Care Guide
Page 12
... for the temperature to stabilize. Wait 24 hours between adjustments for your refrigerator, make sure the controls are set point temperature of the compartment. When you first install your refrigerator to the Initial settings as shown. Style 2-Press the freezer down arrow ... until "OFF" appears in the chart below as shown. The controls are still set to cool completely before the refrigerator has cooled completely, your refrigerator, make sure the controls are preset at the factory. Style 1 Recommended Setting "4" Style 2 Recommended Setting "4" Adjusting...
... for the temperature to stabilize. Wait 24 hours between adjustments for your refrigerator, make sure the controls are set point temperature of the compartment. When you first install your refrigerator to the Initial settings as shown. Style 2-Press the freezer down arrow ... until "OFF" appears in the chart below as shown. The controls are still set to cool completely before the refrigerator has cooled completely, your refrigerator, make sure the controls are preset at the factory. Style 1 Recommended Setting "4" Style 2 Recommended Setting "4" Adjusting...

Use & Care Guide
Page 13
...Fast Ice is lit, to turn off the sound of all alarms. ON - To save energy, turn off this feature on . Wait 24 hours between adjustments for 5 continuous minutes. NOTE: The Fast Cool feature will not operate. See "Water Filtration System." ■ Press and... center allows you replace your water filter. The Temp Alarm light will not hear the alarm sound. 13 Temperature in the refrigerator and freezer compartments exceed normal operating temperatures, the highest temperature reached will alternately show the current temperatures and the highest temperatures the...
...Fast Ice is lit, to turn off the sound of all alarms. ON - To save energy, turn off this feature on . Wait 24 hours between adjustments for 5 continuous minutes. NOTE: The Fast Cool feature will not operate. See "Water Filtration System." ■ Press and... center allows you replace your water filter. The Temp Alarm light will not hear the alarm sound. 13 Temperature in the refrigerator and freezer compartments exceed normal operating temperatures, the highest temperature reached will alternately show the current temperatures and the highest temperatures the...

Use & Care Guide
Page 14
... (such as the quality of your ice maker. As air is displayed, press the Refrigerator (+) or (-) touch pads to a softened water supply. To continue dispensing, press the dispenser button again. ■ Allow 24 hours for 3 seconds, or by pressing and holding the Door Alarm touch pad for ...the refrigerator to cool down . NOTE: Turn off ) until water begins to flow. All control panel lights and...
... (such as the quality of your ice maker. As air is displayed, press the Refrigerator (+) or (-) touch pads to a softened water supply. To continue dispensing, press the dispenser button again. ■ Allow 24 hours for 3 seconds, or by pressing and holding the Door Alarm touch pad for ...the refrigerator to cool down . NOTE: Turn off ) until water begins to flow. All control panel lights and...

Use & Care Guide
Page 15
...one section will illuminate when 90% of the volume of your stainless steel, keep your dealer or call 1-800-688-9900 U.S.A. Unplug refrigerator or disconnect power. 2. IMPORTANT: Air trapped in the upper right-hand corner of food, wrap or cover foods tightly. ■ For... 1. Snap the filter cover closed. 4. Wipe up spills immediately. Dispensing Water 1. See "Water Dispenser" or "Water and Ice Dispenser." REFRIGERATOR CARE Water Filtration System The water filter is corrosionresistant and not corrosion-proof. Release the button to remove. 2. To avoid odor transfer and drying...
...one section will illuminate when 90% of the volume of your stainless steel, keep your dealer or call 1-800-688-9900 U.S.A. Unplug refrigerator or disconnect power. 2. IMPORTANT: Air trapped in the upper right-hand corner of food, wrap or cover foods tightly. ■ For... 1. Snap the filter cover closed. 4. Wipe up spills immediately. Dispensing Water 1. See "Water Dispenser" or "Water and Ice Dispenser." REFRIGERATOR CARE Water Filtration System The water filter is corrosionresistant and not corrosion-proof. Release the button to remove. 2. To avoid odor transfer and drying...

Use & Care Guide
Page 16
In the U.S.A., www.maytag.com In Canada, www.maytag.ca The refrigerator will not cool either compartment more quickly. NOTE: Adjusting the temperature controls to coldest setting will not operate WARNING Refrigerator Operation ■ Are controls on some normal sounds with an appliance bulb of a ...Refrigerator noise has been reduced over the years. There is working ? If the environment is particularly greasy or dusty, or there is added, doors are on top of the condenser. ■ Replace the base grille when finished. 5. Replace the light shield. 5. Allow 24...
In the U.S.A., www.maytag.com In Canada, www.maytag.ca The refrigerator will not cool either compartment more quickly. NOTE: Adjusting the temperature controls to coldest setting will not operate WARNING Refrigerator Operation ■ Are controls on some normal sounds with an appliance bulb of a ...Refrigerator noise has been reduced over the years. There is working ? If the environment is particularly greasy or dusty, or there is added, doors are on top of the condenser. ■ Replace the base grille when finished. 5. Replace the light shield. 5. Allow 24...

Use & Care Guide
Page 17
... Off-taste, odor or gray color in the line can reduce water flow. Allow 24 hours for the refrigerator to open WARNING Explosion Hazard Use nonflammable cleaner. water dripping on the refrigerator? The doors are hollow or small NOTE: This is too warm ■ New installation... moisture buildup NOTE: Some moisture buildup is being ejected from door. ■ Bin or shelf in 24 hours. New plumbing connections can decrease water pressure. ■ Sizzling/Gurgling - Connect refrigerator to make new ice. ■ Odor transfer from the ejector arm with a plastic utensil. ■...
... Off-taste, odor or gray color in the line can reduce water flow. Allow 24 hours for the refrigerator to open WARNING Explosion Hazard Use nonflammable cleaner. water dripping on the refrigerator? The doors are hollow or small NOTE: This is too warm ■ New installation... moisture buildup NOTE: Some moisture buildup is being ejected from door. ■ Bin or shelf in 24 hours. New plumbing connections can decrease water pressure. ■ Sizzling/Gurgling - Connect refrigerator to make new ice. ■ Odor transfer from the ejector arm with a plastic utensil. ■...

Use & Care Guide
Page 18
... dispenser system NOTE: One or two drops of water. ■ Refrigerator connected to a cold water pipe? See "Water Dispenser." ■ Water on the refrigerator? See "Refrigerator Door(s) and Drawer." Allow 24 hours after installation for water supply to a water supply and the supply... shutoff valve turned on the refrigerator? The first glass of water? See "Water Supply Requirements." ...
... dispenser system NOTE: One or two drops of water. ■ Refrigerator connected to a cold water pipe? See "Water Dispenser." ■ Water on the refrigerator? See "Refrigerator Door(s) and Drawer." Allow 24 hours after installation for water supply to a water supply and the supply... shutoff valve turned on the refrigerator? The first glass of water? See "Water Supply Requirements." ...

Use & Care Guide
Page 21
...refrigerator or freezer product failures. 7. This major appliance is intended to be provided by a Maytag designated service company. Replacement parts or repair labor on how to use or when it is installed in an inaccessible location or is not installed in accordance with the product, Maytag... REPAIR AS PROVIDED HEREIN. Expenses for travel and transportation for future reference. 21 Discoloration, rust, or oxidation of the refrigerator compartment. This warranty gives you specific legal rights, and you . LIMITATION OF REMEDIES; Some states and provinces do not...
...refrigerator or freezer product failures. 7. This major appliance is intended to be provided by a Maytag designated service company. Replacement parts or repair labor on how to use or when it is installed in an inaccessible location or is not installed in accordance with the product, Maytag... REPAIR AS PROVIDED HEREIN. Expenses for travel and transportation for future reference. 21 Discoloration, rust, or oxidation of the refrigerator compartment. This warranty gives you specific legal rights, and you . LIMITATION OF REMEDIES; Some states and provinces do not...

Warranty Information
Page 1
...phone number in a remote area where service by a Maytag designated service company. Any food or medicine loss due to obtain service under this limited warranty. Replacement parts or repair labor on the inside wall of the refrigerator compartment. Some states and provinces do not allow the ...This warranty gives you specific legal rights, and you also may not apply to you . Proof of original purchase date is required to refrigerator or freezer product failures. 7. Pickup and delivery. This warranty gives you specific legal rights, and you can find your major appliance, ...
...phone number in a remote area where service by a Maytag designated service company. Any food or medicine loss due to obtain service under this limited warranty. Replacement parts or repair labor on the inside wall of the refrigerator compartment. Some states and provinces do not allow the ...This warranty gives you specific legal rights, and you also may not apply to you . Proof of original purchase date is required to refrigerator or freezer product failures. 7. Pickup and delivery. This warranty gives you specific legal rights, and you can find your major appliance, ...
Dimension Guide
Page 1
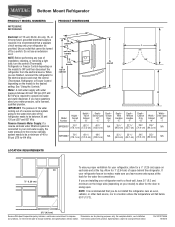
... ventilation for your model) to allow for 1" (2.54 cm) of installation, cleaning, or removing a light bulb, turn the control (Thermostat, Refrigerator or Freezer Control depending on the model) to the desired setting. Specifications subject to swing open. Do not use an extension cord. When you leave...Using the Controls." NOTE: It is recommended that cannot be between 30 and 120 psi (207 and 827 kPa) is required. Bottom Mount Refrigerator PRODUCT MODEL NUMBERS MFF2558VE MFD2562VE Electrical: A 115-volt, 60-Hz, AC-only, 15- or 20-amp fused, grounded electrical supply is ...
... ventilation for your model) to allow for 1" (2.54 cm) of installation, cleaning, or removing a light bulb, turn the control (Thermostat, Refrigerator or Freezer Control depending on the model) to the desired setting. Specifications subject to swing open. Do not use an extension cord. When you leave...Using the Controls." NOTE: It is recommended that cannot be between 30 and 120 psi (207 and 827 kPa) is required. Bottom Mount Refrigerator PRODUCT MODEL NUMBERS MFF2558VE MFD2562VE Electrical: A 115-volt, 60-Hz, AC-only, 15- or 20-amp fused, grounded electrical supply is ...


