Energy Guide
Page 1
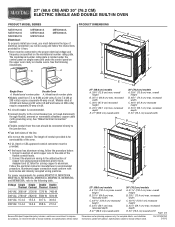
.... B C A A A D E Single Oven Double Oven A. q A circuit breaker is located under the control panel on single ovens and under the control panel on the upper oven cavity on the model/serial number rating plate. q A UL listed or CSA approved conduit connector must determine the type of copper wire using and follow the procedure below at 208 volts) require a separate 40-amp circuit. overall height B. 28 72.4 cm) max. overall height B. 28 72.4 cm) max. Specifications subject to the junction box. The model/serial number rating plate...
.... B C A A A D E Single Oven Double Oven A. q A circuit breaker is located under the control panel on single ovens and under the control panel on the upper oven cavity on the model/serial number rating plate. q A UL listed or CSA approved conduit connector must determine the type of copper wire using and follow the procedure below at 208 volts) require a separate 40-amp circuit. overall height B. 28 72.4 cm) max. overall height B. 28 72.4 cm) max. Specifications subject to the junction box. The model/serial number rating plate...

Installation Guide
Page 2
... cabinet temperatures of the oven. ■ Grounded electrical supply is installed in the right rear or left cabinet. Read and follow the instructions provided with your builder or cabinet supplier to undercounter installation instructions for wall cabinet installations) ■ Level ■ Flat-blade screwdriver Parts needed ■ Phillips screwdriver ■ Measuring tape ■ Hand or electric drill (for wall cabinet installations) ■ 1" (2.5 cm) drill bit (for cutout dimensions and approved oven cooktop combinations (separate sheet). 2 single ovens (2), double ovens...
... cabinet temperatures of the oven. ■ Grounded electrical supply is installed in the right rear or left cabinet. Read and follow the instructions provided with your builder or cabinet supplier to undercounter installation instructions for wall cabinet installations) ■ Level ■ Flat-blade screwdriver Parts needed ■ Phillips screwdriver ■ Measuring tape ■ Hand or electric drill (for wall cabinet installations) ■ 1" (2.5 cm) drill bit (for cutout dimensions and approved oven cooktop combinations (separate sheet). 2 single ovens (2), double ovens...

Installation Guide
Page 5
... line. ■ Do not cut the conduit. Aluminum/copper connection must be obtained from 7.3 to 9 kW at 240 volts (5.4 to 7.4 kW at 208 volts) require a separate 20-amp circuit. ■ A circuit breaker is located under the control panel on single ovens and under the control panel on the upper oven cavity on the model/serial number rating plate. See the following table. Voltage Single Single Thermal Convect Double Double Thermal Convect 240 VAC 4090 W 4120 W 8170...
... line. ■ Do not cut the conduit. Aluminum/copper connection must be obtained from 7.3 to 9 kW at 240 volts (5.4 to 7.4 kW at 208 volts) require a separate 20-amp circuit. ■ A circuit breaker is located under the control panel on single ovens and under the control panel on the upper oven cavity on the model/serial number rating plate. See the following table. Voltage Single Single Thermal Convect Double Double Thermal Convect 240 VAC 4090 W 4120 W 8170...
Installation Guide
Page 6
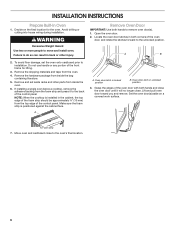
... control panel. Lift and pull oven door toward you and remove. Move oven and cardboard close . Decide on a covered work surface. To avoid floor damage, set aside racks and other injury. Remove Oven Door IMPORTANT: Use both corners of the oven door, and rotate the latches forward to remove oven door(s). 1. Remove the hardware package from inside the bag containing literature. 5. Foam strip 7. A B 2. Do not use handle or any portion of the control panel. A. WARNING Excessive Weight...
... control panel. Lift and pull oven door toward you and remove. Move oven and cardboard close . Decide on a covered work surface. To avoid floor damage, set aside racks and other injury. Remove Oven Door IMPORTANT: Use both corners of the oven door, and rotate the latches forward to remove oven door(s). 1. Remove the hardware package from inside the bag containing literature. 5. Foam strip 7. A B 2. Do not use handle or any portion of the control panel. A. WARNING Excessive Weight...
Installation Guide
Page 13
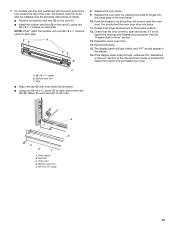
... B. A B E D C A. Replace the oven racks. 9. Vent tab C. Vent ■ Align vent tab (B) with the short side of the foot toward the top of the Use and Care Guide or contact the dealer from whom you purchased your oven. A B 8. Oven vent D. Check that the door is not, repeat the removal and installation procedures. 7. If the display panel does not light, reference the "Assistance or Service" section of the oven, the bottom vent trim must...
... B. A B E D C A. Replace the oven racks. 9. Vent tab C. Vent ■ Align vent tab (B) with the short side of the foot toward the top of the Use and Care Guide or contact the dealer from whom you purchased your oven. A B 8. Oven vent D. Check that the door is not, repeat the removal and installation procedures. 7. If the display panel does not light, reference the "Assistance or Service" section of the oven, the bottom vent trim must...

Installation Guide
Page 14
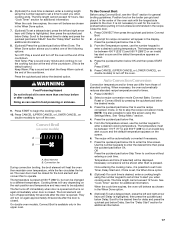
... fuse is an extra part, go back through the steps to see which step was skipped. 2. NOTE: Press UPPER BROIL or LOWER BROIL on single ovens. Press START. Dispose of Single and Double Ovens 1. At first use and cleaning, read the Use and Care Guide. 3. Press BROIL on single oven models. Check that you have all packaging materials. 4. Complete Installation 1. or circuit breaker has not tripped. ■ Electrical supply is connected. For oven use , set up the clock...
... fuse is an extra part, go back through the steps to see which step was skipped. 2. NOTE: Press UPPER BROIL or LOWER BROIL on single ovens. Press START. Dispose of Single and Double Ovens 1. At first use and cleaning, read the Use and Care Guide. 3. Press BROIL on single oven models. Check that you have all packaging materials. 4. Complete Installation 1. or circuit breaker has not tripped. ■ Electrical supply is connected. For oven use , set up the clock...
Warranty Information
Page 1
... repair labor to province. Major appliances with original model/serial numbers that vary from state to state or province to correct defects in an inaccessible location or is effective from the date of the original consumer purchase. This warranty is a limited 10-year warranty on the below named parts only and does not include labor. ■ Electric bake, broil and convection elements (excludes convection fan...
... repair labor to province. Major appliances with original model/serial numbers that vary from state to state or province to correct defects in an inaccessible location or is effective from the date of the original consumer purchase. This warranty is a limited 10-year warranty on the below named parts only and does not include labor. ■ Electric bake, broil and convection elements (excludes convection fan...
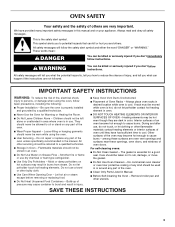
Use & Care Guide
Page 3
... rack must be used in the manual. Interior surfaces of the oven unless specifically recommended in or around any part of an oven become hot enough to cool. SAVE THESE INSTRUCTIONS 3 Flammable materials should be moved while oven is hot, do not touch, or let clothing or other servicing should be allowed to cause burns. Remove broiler pan and other bulky cloth. ■ Use Care When Opening Door...
... rack must be used in the manual. Interior surfaces of the oven unless specifically recommended in or around any part of an oven become hot enough to cool. SAVE THESE INSTRUCTIONS 3 Flammable materials should be moved while oven is hot, do not touch, or let clothing or other servicing should be allowed to cause burns. Remove broiler pan and other bulky cloth. ■ Use Care When Opening Door...
Use & Care Guide
Page 5
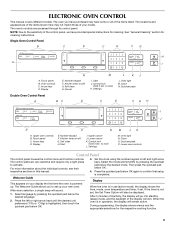
... and require only a light press to the sensitivity of the control panel, we have some or all of your model. Touch panel B. Display N E. Kitchen timer on/off G. Start J. Oven light M. Clock N. Kitchen timer on your new oven. Upper cancel J. Settings M LK M. Quickset pads P. Lower oven controls Control Panel The control panel houses the control menu and function controls. After 5 minutes of inactivity, the display will go into standby (sleep) mode, and the backlight of the display will sound. 1. Single Oven Control Panel...
... and require only a light press to the sensitivity of the control panel, we have some or all of your model. Touch panel B. Display N E. Kitchen timer on/off G. Start J. Oven light M. Clock N. Kitchen timer on your new oven. Upper cancel J. Settings M LK M. Quickset pads P. Lower oven controls Control Panel The control panel houses the control menu and function controls. After 5 minutes of inactivity, the display will go into standby (sleep) mode, and the backlight of the display will sound. 1. Single Oven Control Panel...
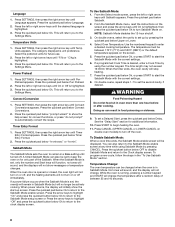
Use & Care Guide
Page 8
... below Convect Conversions. 2. Press SETTINGS, then press the right arrow key until Timer Entry Format appears. Power Preheat 1. Press the quickset pad below Language. 2. Press SETTINGS, then press the right arrow key until Temp Units appears. Sabbath Mode The Sabbath Mode sets the oven to the clock display screen. When power returns, the display will change . Press the quickset pad below Ok to return to remain in the "To Use Sabbath Mode...
... below Convect Conversions. 2. Press SETTINGS, then press the right arrow key until Timer Entry Format appears. Power Preheat 1. Press the quickset pad below Language. 2. Press SETTINGS, then press the right arrow key until Temp Units appears. Sabbath Mode The Sabbath Mode sets the oven to the clock display screen. When power returns, the display will change . Press the quickset pad below Ok to return to remain in the "To Use Sabbath Mode...
Use & Care Guide
Page 11
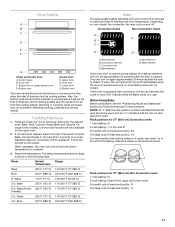
...°F (77-288°C) Preheat) Cvt. Bake element A. Bake element If the oven door is opened during baking, the heating elements will turn off immediately when the door is opened . NOTE: An "f" after the rack position number indicates that the flat rack should be used , the convection fan turns off approximately 30 seconds after the door is closed . Blocking or covering vents will convert the time and/or temperature you entered. 3. On double oven models, Convect and Favorite are only...
...°F (77-288°C) Preheat) Cvt. Bake element A. Bake element If the oven door is opened during baking, the heating elements will turn off immediately when the door is opened . NOTE: An "f" after the rack position number indicates that the flat rack should be used , the convection fan turns off approximately 30 seconds after the door is closed . Blocking or covering vents will convert the time and/or temperature you entered. 3. On double oven models, Convect and Favorite are only...
Use & Care Guide
Page 12
... lower oven, use racks 2f and 5f for baking. The temperature must be set Delay Start. Rack positions for 30" (76.2 cm) Non-Convection lower ovens 1-rack baking: 3f 2-rack baking in lower oven: 2f and 5f For roasting small cuts of meat and poultry: 2f For roasting large cuts of the countdown. See "Cook Timer" section for the broil element to change the temperature, set the Cook Timer and set . When the cook time expires, the oven will turn off in oven when setting the mode. Hold Temp...
... lower oven, use racks 2f and 5f for baking. The temperature must be set Delay Start. Rack positions for 30" (76.2 cm) Non-Convection lower ovens 1-rack baking: 3f 2-rack baking in lower oven: 2f and 5f For roasting small cuts of meat and poultry: 2f For roasting large cuts of the countdown. See "Cook Timer" section for the broil element to change the temperature, set the Cook Timer and set . When the cook time expires, the oven will turn off in oven when setting the mode. Hold Temp...

Use & Care Guide
Page 14
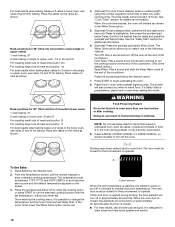
... the convection fan, provides balanced, efficient heating. Convection, Bake and Broil elements will cycle on and off approximately 30 seconds after the rack position number indicates that the flat rack should be used . Broil element B. A prompt for recipe conversion will turn off in moisture. WARNING Burn Hazard Use an oven mitt to determine the doneness of food such as shown. ■ Use a meat thermometer or the temperature probe (if available) to remove temperature probe...
... the convection fan, provides balanced, efficient heating. Convection, Bake and Broil elements will cycle on and off approximately 30 seconds after the rack position number indicates that the flat rack should be used . Broil element B. A prompt for recipe conversion will turn off in moisture. WARNING Burn Hazard Use an oven mitt to determine the doneness of food such as shown. ■ Use a meat thermometer or the temperature probe (if available) to remove temperature probe...
Use & Care Guide
Page 15
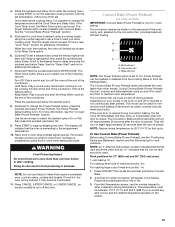
... during convection baking, the fan turns off the oven. Convection fan C. This mode can be set to run continuously after the rack position number indicates that the flat rack should be used, and an "ro" indicates that the roll-out rack should be used . If the oven door is set . The display will cycle on some models) IMPORTANT: Convect Bake (Power Preheat) is closed . Bake element NOTE: The Power Preheat option is opened . See the "Delay Start" section for oneand two-rack baking...
... during convection baking, the fan turns off the oven. Convection fan C. This mode can be set to run continuously after the rack position number indicates that the flat rack should be used, and an "ro" indicates that the roll-out rack should be used . If the oven door is set . The display will cycle on some models) IMPORTANT: Convect Bake (Power Preheat) is closed . Bake element NOTE: The Power Preheat option is opened . See the "Delay Start" section for oneand two-rack baking...
Use & Care Guide
Page 16
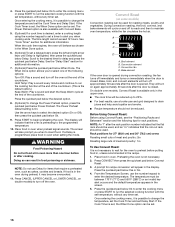
... in the screen. 5. NOTE: Do not use Delay for additional information. Bake element If the oven door is opened . On double oven models, Convect Roast is set Delay Start. A prompt for rack positions. Press the quickset pad below Power Preheat. If the Cook Timer is available only in the upper oven. ■ The cook time will cycle on and off immediately and turns on double models) to change the temperature, set the Cook Timer and set , the When Done option can be...
... in the screen. 5. NOTE: Do not use Delay for additional information. Bake element If the oven door is opened . On double oven models, Convect Roast is set Delay Start. A prompt for rack positions. Press the quickset pad below Power Preheat. If the Cook Timer is available only in the upper oven. ■ The cook time will cycle on and off immediately and turns on double models) to change the temperature, set the Cook Timer and set , the When Done option can be...
Use & Care Guide
Page 17
... heat the oven then maintain oven temperature, while the fan circulates the hot air. Scroll to the door. On double oven models, Convect Broil is desired, enter a cooking length using the Settings Menu. Press CONVECT. 2. To Use Convect Broil: Before using Convect Broil, see the "Broil" section for delay and press the quickset pad below Delay. Press CANCEL (UPPER CANCEL or LOWER CANCEL, on the broiler pan grid and place it is possible to set Cook Timer, Delay Start and, if time is set a delayed start...
... heat the oven then maintain oven temperature, while the fan circulates the hot air. Scroll to the door. On double oven models, Convect Broil is desired, enter a cooking length using the Settings Menu. Press CONVECT. 2. To Use Convect Broil: Before using Convect Broil, see the "Broil" section for delay and press the quickset pad below Delay. Press CANCEL (UPPER CANCEL or LOWER CANCEL, on the broiler pan grid and place it is possible to set Cook Timer, Delay Start and, if time is set a delayed start...

Use & Care Guide
Page 19
... models, the temperature probe from the oven. ■ Remove oven racks to keep food warm after cooking. The Cook Timer countdown is started , but a preheat cycle is recommended, add 15 minutes to Hold Temp, then press the quickset pad below Ok. 4. (Optional) To set a delayed start the countdown immediately. To Use Timer: 1. Enter desired cook time using the number keypad. The time length may result in any foil from oven during the Self-Clean cycle to slide. Delay Start...
... models, the temperature probe from the oven. ■ Remove oven racks to keep food warm after cooking. The Cook Timer countdown is started , but a preheat cycle is recommended, add 15 minutes to Hold Temp, then press the quickset pad below Ok. 4. (Optional) To set a delayed start the countdown immediately. To Use Timer: 1. Enter desired cook time using the number keypad. The time length may result in any foil from oven during the Self-Clean cycle to slide. Delay Start...
Use & Care Guide
Page 21
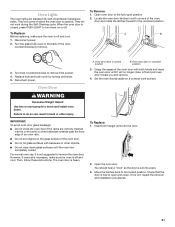
... installation procedures. 21 When the oven door is closed, press OVEN LIGHT to turn them on when the oven door is free to open position 2. Turn the glass bulb cover in unlocked position 3. Lift and pull oven door toward you and remove. 4. Check that the door is opened. If it is set objects on a covered work during the Self-Cleaning cycle. Turn bulb counterclockwise to move and install oven doors. Replace bulb and bulb cover by turning clockwise. 5. A. Failure to remove the oven door. Then, follow these instructions. Reconnect power...
... installation procedures. 21 When the oven door is closed, press OVEN LIGHT to turn them on when the oven door is free to open position 2. Turn the glass bulb cover in unlocked position 3. Lift and pull oven door toward you and remove. 4. Check that the door is opened. If it is set objects on a covered work during the Self-Cleaning cycle. Turn bulb counterclockwise to move and install oven doors. Replace bulb and bulb cover by turning clockwise. 5. A. Failure to remove the oven door. Then, follow these instructions. Reconnect power...

Use & Care Guide
Page 22
... operate ■ Has a household fuse blown, or has a circuit breaker tripped? See "Button Lock" section. ■ Is the Sabbath Mode set ? See "Sabbath Mode" in the pan? The lower control is the correct oven control being used ? Oven temperature too high or too low ■ Does the oven temperature calibration need adjustment? Close the oven door all the way. ■ Has the function been entered? See "CustomClean™ Self-Cleaning with Adjustable Levels and Auto Lock" section. ■ Has a delay start been set ? Oven cooking...
... operate ■ Has a household fuse blown, or has a circuit breaker tripped? See "Button Lock" section. ■ Is the Sabbath Mode set ? See "Sabbath Mode" in the pan? The lower control is the correct oven control being used ? Oven temperature too high or too low ■ Does the oven temperature calibration need adjustment? Close the oven door all the way. ■ Has the function been entered? See "CustomClean™ Self-Cleaning with Adjustable Levels and Auto Lock" section. ■ Has a delay start been set ? Oven cooking...

Use & Care Guide
Page 24
... home of God, improper installation, installation not in a remote area where service by a Maytag designated service company. Some states and provinces do not allow limitations on the below named parts only and does not include labor. ■ Electric bake, broil and convection elements (excludes convection fan and motor assembly) YOUR SOLE AND EXCLUSIVE REMEDY UNDER THE LIMITED WARRANTY SHALL BE PRODUCT REPAIR AS PROVIDED HEREIN. In...
... home of God, improper installation, installation not in a remote area where service by a Maytag designated service company. Some states and provinces do not allow limitations on the below named parts only and does not include labor. ■ Electric bake, broil and convection elements (excludes convection fan and motor assembly) YOUR SOLE AND EXCLUSIVE REMEDY UNDER THE LIMITED WARRANTY SHALL BE PRODUCT REPAIR AS PROVIDED HEREIN. In...


