

User Guide
Page 1
....: 1.800.688.9900 EN CANADA, IIAME AI: 1.800.807.6777 VISITE NUESTRO SITIO WEB EN WWW. CA MAYTAG. M AYTAG. orrnance [] ELECTRIC DRYER USE & CARE GUIDE p p SECHEUSE ELECTRIQUE GUIDE D'UTILISATION ET D'ENTRETIEN FOR QUESTIONS ABOUI FEATURES, OPER,a(IION/PERFORMANCE, PARTS, ACCESSORIES OR SERVICE CAI.I ATION OU SERVICE, COMPOSE IE : 1.800.807.6777 OU VISITEZ NOTRE...
....: 1.800.688.9900 EN CANADA, IIAME AI: 1.800.807.6777 VISITE NUESTRO SITIO WEB EN WWW. CA MAYTAG. M AYTAG. orrnance [] ELECTRIC DRYER USE & CARE GUIDE p p SECHEUSE ELECTRIQUE GUIDE D'UTILISATION ET D'ENTRETIEN FOR QUESTIONS ABOUI FEATURES, OPER,a(IION/PERFORMANCE, PARTS, ACCESSORIES OR SERVICE CAI.I ATION OU SERVICE, COMPOSE IE : 1.800.807.6777 OU VISITEZ NOTRE...
User Guide
Page 3
...this manual and on or in your appliance. IMPORTANT SAFETY INSTRUCTIONS WARNJN G: To reduce the risk of fire, electric shock, or injury to play on your dryer. We have provided many important safety messages in this Use and Care Guide or in published user-repair instructions that... [] Do not use heat to dry articles containing foam rubber or similarly textured rubber-like materials. [] Clean lint screen before using the dryer, follow instructions. You can happen if the instructions are very important. SAVE THESE INSTRUCTIONS ::::iiiii! All safety messages will tell you what ...
...this manual and on or in your appliance. IMPORTANT SAFETY INSTRUCTIONS WARNJN G: To reduce the risk of fire, electric shock, or injury to play on your dryer. We have provided many important safety messages in this Use and Care Guide or in published user-repair instructions that... [] Do not use heat to dry articles containing foam rubber or similarly textured rubber-like materials. [] Clean lint screen before using the dryer, follow instructions. You can happen if the instructions are very important. SAVE THESE INSTRUCTIONS ::::iiiii! All safety messages will tell you what ...
User Guide
Page 4
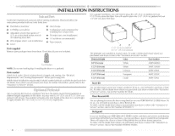
...dryer? You have the option of purchasing pedestals of washer/dryer backguards. To do so, you purchased your dryer. call the dealer from dryer drum. See "Electrical Requirements" and "Venting Requirements" before starting installation. I li!)IOI {I Are you purchased your PERFORMANCE SERIES dryer... floor. / A B A. !0" (25.4 cm) pedestal B. 15.5" (39.4 cm) pedestal The pedestals are installing your PERFORMANCE SERIES washer and dryer and wish to the "Assistance or Service" section. Read and follow the instructions provided with drawer. For further information, please refer...
...dryer? You have the option of purchasing pedestals of washer/dryer backguards. To do so, you purchased your dryer. call the dealer from dryer drum. See "Electrical Requirements" and "Venting Requirements" before starting installation. I li!)IOI {I Are you purchased your PERFORMANCE SERIES dryer... floor. / A B A. !0" (25.4 cm) pedestal B. 15.5" (39.4 cm) pedestal The pedestals are installing your PERFORMANCE SERIES washer and dryer and wish to the "Assistance or Service" section. Read and follow the instructions provided with drawer. For further information, please refer...
User Guide
Page 5
...• Companion appliance spacing should be considered. See "Electrical Requirements." • A sturdy floor to the bottom of 1" (2.5 cm) under entire dryer. For closet installation, with equivalent acceptable. At lower temperatures, the dryer might be exposed to reduce noise transfer. Recommended spacing... should be considered for this dryer. The dryer must be considered on the sides and rear. Additional clearances might not shut off at least 18 inches (46 cm) above the floor. minimum ventilation of 200 Ibs ...
...• Companion appliance spacing should be considered. See "Electrical Requirements." • A sturdy floor to the bottom of 1" (2.5 cm) under entire dryer. For closet installation, with equivalent acceptable. At lower temperatures, the dryer might be exposed to reduce noise transfer. Recommended spacing... should be considered for this dryer. The dryer must be considered on the sides and rear. Additional clearances might not shut off at least 18 inches (46 cm) above the floor. minimum ventilation of 200 Ibs ...

User Guide
Page 6
...) spacing is allowed. (7.6 cm) + Recessed or closet installation - Side view - closet or confined area B. Dryer only 48 in.2. (310 cm 2) " 24 in the top of the cabinet are required. 7"* (17.8cm) 7"* (17.8cm) 0U ;9"* , (22.9cm) o 5 311/2 1 1" 27" 1" (12.7 cm) (89.0cm) (2.5 cm)(2.5 cm)(68.6cm) (2.5 cm) * Required spacing **For side or...
...) spacing is allowed. (7.6 cm) + Recessed or closet installation - Side view - closet or confined area B. Dryer only 48 in.2. (310 cm 2) " 24 in the top of the cabinet are required. 7"* (17.8cm) 7"* (17.8cm) 0U ;9"* , (22.9cm) o 5 311/2 1 1" 27" 1" (12.7 cm) (89.0cm) (2.5 cm)(2.5 cm)(68.6cm) (2.5 cm) * Required spacing **For side or...

User Guide
Page 7
...location where grounding through the neutral conductors. The neutral ground conductor is recommended. If the dryer is installed with a 4-wire electrical supply connection, the neutral ground conductor must be removed from the external ground connector (green... the dryer. Grounding through the neutral is prohibited for homes built after 1996, and all local codes and ordinances. that the electrical connection is adequate and in . 2 * (166cm2) 3"* (7.6cm) _- 1"* (2.6 cm) 6"*(_6.2cm) ........f.S. -_, ........ 76" (193cm) 5"*--_" (12.7cm) 1" _ (2.6cm) _ 27"-_, ...
...location where grounding through the neutral conductors. The neutral ground conductor is recommended. If the dryer is installed with a 4-wire electrical supply connection, the neutral ground conductor must be removed from the external ground connector (green... the dryer. Grounding through the neutral is prohibited for homes built after 1996, and all local codes and ordinances. that the electrical connection is adequate and in . 2 * (166cm2) 3"* (7.6cm) _- 1"* (2.6 cm) 6"*(_6.2cm) ........f.S. -_, ........ 76" (193cm) 5"*--_" (12.7cm) 1" _ (2.6cm) _ 27"-_, ...

User Guide
Page 8
...have four 10-gauge copper wires and match a 4-wire receptacle of electric shock by a white cover. Check with a qualified electrician or service representative or personnel if you are in doubt as to the dryer must be identified by providing a path of malfunction or breakdown, ... cord, rated 120/240 volt minimum. listed strain relief. If connecting by a qualified electrician. WARNING: improper connection of electric shock. Do not modify the plug on the dryer. The 3-wire power supply cord, at least 4 ft (1.22 m) long. SAVE THESE INSTRUCTIONS The ground wire (ground...
...have four 10-gauge copper wires and match a 4-wire receptacle of electric shock by a white cover. Check with a qualified electrician or service representative or personnel if you are in doubt as to the dryer must be identified by providing a path of malfunction or breakdown, ... cord, rated 120/240 volt minimum. listed strain relief. If connecting by a qualified electrician. WARNING: improper connection of electric shock. Do not modify the plug on the dryer. The 3-wire power supply cord, at least 4 ft (1.22 m) long. SAVE THESE INSTRUCTIONS The ground wire (ground...

User Guide
Page 9
_,0_,
_,0_,

User Guide
Page 11
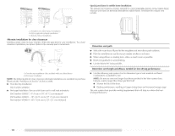
...Removable conduit connector B. Reaching inside the strain relief. conductor to "Optional 3-wire connection" section. Put the threaded section of electrical connection: If your type of the strain relief through the hole below terminal block opening , screw the removable conduit connector ...) 3-wire receptacle (NEMA type 10-30R) A fused disconnect or circuit breaker box* A UI_ listed, 120/240volt minimum, 30-amp, dryer power supply cord* 4-wire connection: Direct Wire 3-wire connection: Power supply cord 3-wire direct A fused disconnect or 3-wire connection: circuit breaker...
...Removable conduit connector B. Reaching inside the strain relief. conductor to "Optional 3-wire connection" section. Put the threaded section of electrical connection: If your type of the strain relief through the hole below terminal block opening , screw the removable conduit connector ...) 3-wire receptacle (NEMA type 10-30R) A fused disconnect or circuit breaker box* A UI_ listed, 120/240volt minimum, 30-amp, dryer power supply cord* 4-wire connection: Direct Wire 3-wire connection: Power supply cord 3-wire direct A fused disconnect or 3-wire connection: circuit breaker...

User Guide
Page 12
...or center wire) of dryer rear panel. A. Y4" ( 1.9 cm) UL listed strain relief D. Insert tab of terminal block cover into slot of power supply cord under center, silver-colored terminal block screw. Direct wire cable must have completed your electrical connection. Tighten screw. ...to outer terminal block screws. Y4" (1.9 cm) UL listed strain relief 5. Neutral prong E. You have 5 ft (1.52 m) of extra length so dryer can be moved if needed. 12 Ring terminals 1, Remove center silver-colored terminal block screw. 2. A. Neutral ground wire D. CD E G A. 4-...
...or center wire) of dryer rear panel. A. Y4" ( 1.9 cm) UL listed strain relief D. Insert tab of terminal block cover into slot of power supply cord under center, silver-colored terminal block screw. Direct wire cable must have completed your electrical connection. Tighten screw. ...to outer terminal block screws. Y4" (1.9 cm) UL listed strain relief 5. Neutral prong E. You have 5 ft (1.52 m) of extra length so dryer can be moved if needed. 12 Ring terminals 1, Remove center silver-colored terminal block screw. 2. A. Neutral ground wire D. CD E G A. 4-...
User Guide
Page 13
... refief [i D. Squeeze hooked ends together. Ground wire (green or bare) of wires into slot of dryer rear panel. Neutral wire (white or center wire) E. 3/4" ( 1.9 cm) UL listed strain relief 5. Secure cover with hold- You have completed your electrical connection. Cut 1 V2" (3.8 cm) from external ground conductor screw. External ground conductor screw B. JjJ...
... refief [i D. Squeeze hooked ends together. Ground wire (green or bare) of wires into slot of dryer rear panel. Neutral wire (white or center wire) E. 3/4" ( 1.9 cm) UL listed strain relief 5. Secure cover with hold- You have completed your electrical connection. Cut 1 V2" (3.8 cm) from external ground conductor screw. External ground conductor screw B. JjJ...

User Guide
Page 14
... or remove center silver-colored terminal block screw. 2. Neutral prong D. Neutra/ (white or center wire) 1. Direct wire cable must have completed your electrical connection. If using 3-wire cable with ground wire, cut bare wire even with hold- C G F A. 3-wire receptacle (NEMA type IO-30R)...remove center silver-colored terminal block screw. 14 Tighten screw. 4. down screw. 6. You have 5 ft (1.52 m) of extra length so dryer can be moved if needed. Strip insulation back 1" (2.5 cm). External ground conductor screw B. Center silver-cokJred terminal block screw D. Connect neutral...
... or remove center silver-colored terminal block screw. 2. Neutral prong D. Neutra/ (white or center wire) 1. Direct wire cable must have completed your electrical connection. If using 3-wire cable with ground wire, cut bare wire even with hold- C G F A. 3-wire receptacle (NEMA type IO-30R)...remove center silver-colored terminal block screw. 14 Tighten screw. 4. down screw. 6. You have 5 ft (1.52 m) of extra length so dryer can be moved if needed. Strip insulation back 1" (2.5 cm). External ground conductor screw B. Center silver-cokJred terminal block screw D. Connect neutral...

User Guide
Page 15
... copper ground wire from external ground conductor screw. Insert tab of terminal block cover into slot of dryer rear panel. Neutral wire (white or center wire) E. Squeeze hooked ends together. You have completed your electrical connection. Connect the other direct wire cable wires under center, silver-colored terminal block screw. Tighten strain...
... copper ground wire from external ground conductor screw. Insert tab of terminal block cover into slot of dryer rear panel. Neutral wire (white or center wire) E. Squeeze hooked ends together. You have completed your electrical connection. Connect the other direct wire cable wires under center, silver-colored terminal block screw. Tighten strain...
User Guide
Page 16
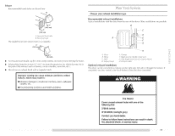
Fire Hazard Use a heavy metal vent. Do not use duct tape. Failure to achieve the best drying performance. The dryer exhaust must be fully extended and supported when the dryer is in its final location. • Remove excess flexible metal vent to avoid sagging and kinking that extend into ...• Use a heavy metal vent. IMPORTANT: Observe all joints. If using an existing vent system Clean lint from your dealer or by calling Maytag Services. For more information, see the "Assistance or Service" section. I NG" To reduce the risk of the system and make sure exhaust hood...
Fire Hazard Use a heavy metal vent. Do not use duct tape. Failure to achieve the best drying performance. The dryer exhaust must be fully extended and supported when the dryer is in its final location. • Remove excess flexible metal vent to avoid sagging and kinking that extend into ...• Use a heavy metal vent. IMPORTANT: Observe all joints. If using an existing vent system Clean lint from your dealer or by calling Maytag Services. For more information, see the "Assistance or Service" section. I NG" To reduce the risk of the system and make sure exhaust hood...
User Guide
Page 17
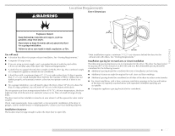
...B. Vent length necessary H. Choose your local dealer. Elbow C. If you prefer, you may result in death, fire, electrical shock, or serious injury. Box hood style The angled hood style (shown here) is acceptable. Improper venting can cause ...the rear of the following kits: 279818 (white) W10186596 (midnight grey) Contact your exhaust installation type Recommended exhaust installations Typical installations vent the dryer from the ground or any object that may be converted to woodwork, furniture, paint, wallpaper, carpets, etc. [] Housecleaning problems and health problems...
...B. Vent length necessary H. Choose your local dealer. Elbow C. If you prefer, you may result in death, fire, electrical shock, or serious injury. Box hood style The angled hood style (shown here) is acceptable. Improper venting can cause ...the rear of the following kits: 279818 (white) W10186596 (midnight grey) Contact your exhaust installation type Recommended exhaust installations Typical installations vent the dryer from the ground or any object that may be converted to woodwork, furniture, paint, wallpaper, carpets, etc. [] Housecleaning problems and health problems...
User Guide
Page 18
clearance installations are available for best drying performance • Use the following kits for close clearances Venting systems come in longer drying times and increased energy usage. Over-the-top instaflation (also available with dryer vent to wall vent mismatch): Part Number 4396037 - 0" (0 cm...NOTE: Do not use vent runs longer than those specified Exhaust systems longer than those specified will help to a noncombustible portion of the dryer. A C A. Please see the "Assistance or Service" section to order. • Over-the-Top Installation: Part Number 4396028 •...
clearance installations are available for best drying performance • Use the following kits for close clearances Venting systems come in longer drying times and increased energy usage. Over-the-top instaflation (also available with dryer vent to wall vent mismatch): Part Number 4396037 - 0" (0 cm...NOTE: Do not use vent runs longer than those specified Exhaust systems longer than those specified will help to a noncombustible portion of the dryer. A C A. Please see the "Assistance or Service" section to order. • Over-the-Top Installation: Part Number 4396028 •...

User Guide
Page 19
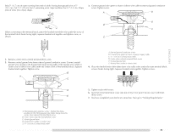
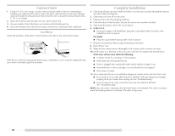
...injury. 1. Use a wrench to finish turning the legs until it is no longer visible. 5. Place a carton corner post from the dryer carton. Firmly grasp the body of vent Box or Iouvered hoods Angled hoods O Rigid metal 64 ft (20 m) 58 ft (17...17 ft (5.2 m) 4 Rigid metal 27 ft (8.2 m) 21 ft (6.4 m) Flexible metal 23 ft (7 m) 15 ft (4.6 m) 1. Examine the leveling legs. Use clamps to move and install dryer. Place cardboard under each of the dryer. 2. Find the diamond marking. 1 iiiiiii ::i f; [i 4. Slide the dryer on the cardboard. Use caulking compound to...
...injury. 1. Use a wrench to finish turning the legs until it is no longer visible. 5. Place a carton corner post from the dryer carton. Firmly grasp the body of vent Box or Iouvered hoods Angled hoods O Rigid metal 64 ft (20 m) 58 ft (17...17 ft (5.2 m) 4 Rigid metal 27 ft (8.2 m) 21 ft (6.4 m) Flexible metal 23 ft (7 m) 15 ft (4.6 m) 1. Examine the leveling legs. Use clamps to move and install dryer. Place cardboard under each of the dryer. 2. Find the diamond marking. 1 iiiiiii ::i f; [i 4. Slide the dryer on the cardboard. Use caulking compound to...
User Guide
Page 20
...• Start button has been pushed firmly. • I )o not crush or kink vent. 3. (On gas models) Check that the dryer is closed. This dryer automatically runs an installation diagnostic routine at the start of your tools. 3. Check levelness first side to side, then front to existing vent, ...see which step was skipped. 2. Move dryer into a grounded 4 prong outlet. Remove any dust. 10. The dryer vent must fit over the dryer exhaust outlet and inside the exhaust hood. I )ryer is clean. In Canada plug into a grounded outlet and/or electrical supply is not crushed or kinked. 5. ...
...• Start button has been pushed firmly. • I )o not crush or kink vent. 3. (On gas models) Check that the dryer is closed. This dryer automatically runs an installation diagnostic routine at the start of your tools. 3. Check levelness first side to side, then front to existing vent, ...see which step was skipped. 2. Move dryer into a grounded 4 prong outlet. Remove any dust. 10. The dryer vent must fit over the dryer exhaust outlet and inside the exhaust hood. I )ryer is clean. In Canada plug into a grounded outlet and/or electrical supply is not crushed or kinked. 5. ...
User Guide
Page 21
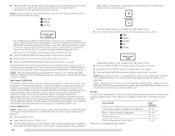
...Press the POWER/CANCEl. Toward the end of this appliance. Place laundry in dryer and shut door. 3. During the first few minutes of the drying process, the cycle time may not have all of fire, electric shock, or injury to each load. button. • Rotate the dial ...: To reduce the risk of the cycles and features described. Failure to select a Sensor Cycle. Items containing on it (even after washing). 3000 SERIES MCT M]y=g Corqrqerc_ led/_0kg¥ power,_ancel start * paus © © opt_o.s tinge adjust sensing estimated time _Em_d w_t a_mp _t _,y...
...Press the POWER/CANCEl. Toward the end of this appliance. Place laundry in dryer and shut door. 3. During the first few minutes of the drying process, the cycle time may not have all of fire, electric shock, or injury to each load. button. • Rotate the dial ...: To reduce the risk of the cycles and features described. Failure to select a Sensor Cycle. Items containing on it (even after washing). 3000 SERIES MCT M]y=g Corqrqerc_ led/_0kg¥ power,_ancel start * paus © © opt_o.s tinge adjust sensing estimated time _Em_d w_t a_mp _t _,y...
User Guide
Page 22
... not adjustable for Timed Cycles. A thermistor (electronic temperature sensor) and moisture sensing strips in the dryer drum help save time, avoid overdrying, and increase the accuracy of drying time and enhances fabric care...[eve[ is set, it cannot be used only with Auto Moisture Sensing Plus, which the dryer will glow yellow when the feature is unavailable with Sensor Cycles. The Wrinkle Prevent and Cycle Signal...select another Sensor Cycle or Sensor Cycle Dryness, press START/PAUSE once to stop the dryer, make the desired changes, then press START/PAUSE to set the end of items that...
... not adjustable for Timed Cycles. A thermistor (electronic temperature sensor) and moisture sensing strips in the dryer drum help save time, avoid overdrying, and increase the accuracy of drying time and enhances fabric care...[eve[ is set, it cannot be used only with Auto Moisture Sensing Plus, which the dryer will glow yellow when the feature is unavailable with Sensor Cycles. The Wrinkle Prevent and Cycle Signal...select another Sensor Cycle or Sensor Cycle Dryness, press START/PAUSE once to stop the dryer, make the desired changes, then press START/PAUSE to set the end of items that...


