User Guide
Page 3
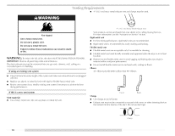
... published user-repair instructions that could cause a load to cooking oils in the dryer. Always read and obey all instructions before or after each load. [] Keep area around the exhaust opening and adjacent surrounding areas free from service or discarded, remove the door to the weather. [] Do not repair or replace any part of the dryer or attempt any servicing unless specifically recommended in this Use and Care Guide or in this manual...
... published user-repair instructions that could cause a load to cooking oils in the dryer. Always read and obey all instructions before or after each load. [] Keep area around the exhaust opening and adjacent surrounding areas free from service or discarded, remove the door to the weather. [] Do not repair or replace any part of the dryer or attempt any servicing unless specifically recommended in this Use and Care Guide or in this manual...
User Guide
Page 4
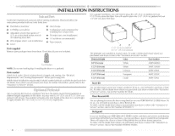
... PERFORMANCE SERIES dryer? Door Reversal Kit Are you planing to reverse the door swing direction on your machines, you will need to the "Assistance or Service" section. Check that opens to 1" (2.5 cm) or hex-head socket wrench (for adjusting dryer feet) • Wire stripper (direct wire installations) • I.eve[ • Caulking gun and compound (for installing new exhaust vent) • Tin snips (new vent installations) • Vg' nut driver (recommended) • Tape measure Parts supplied Remove parts...
... PERFORMANCE SERIES dryer? Door Reversal Kit Are you planing to reverse the door swing direction on your machines, you will need to the "Assistance or Service" section. Check that opens to 1" (2.5 cm) or hex-head socket wrench (for adjusting dryer feet) • Wire stripper (direct wire installations) • I.eve[ • Caulking gun and compound (for installing new exhaust vent) • Tin snips (new vent installations) • Vg' nut driver (recommended) • Tape measure Parts supplied Remove parts...
User Guide
Page 5
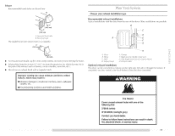
See "Venting Requirements." • A separate 30-amp circuit. • If you are required. If using a power supply cord, a grounded electrical outlet located within 2 ft (61 cm) of either side of the dryer to reduce noise transfer. Some codes limit, or do so can result in longer drying times. minimum ventilation of the door are using a pedestal, you will need 18" (46 cm) to place the dryer at least 18 inches (46 cm...
See "Venting Requirements." • A separate 30-amp circuit. • If you are required. If using a power supply cord, a grounded electrical outlet located within 2 ft (61 cm) of either side of the dryer to reduce noise transfer. Some codes limit, or do so can result in longer drying times. minimum ventilation of the door are using a pedestal, you will need 18" (46 cm) to place the dryer at least 18 inches (46 cm...

User Guide
Page 7
... ground connector (green screw), and secured under the neutral terminal (center or white wire) of the terminal block, the dryer cabinet is adequate and in conformance with stacked washer and dryer The dimensions shown are for homes built after 1996, dryer circuits involved in remodeling after 1996, and all local codes and ordinances. The opening (such as a nearby window) should be using and follow the instructions...
... ground connector (green screw), and secured under the neutral terminal (center or white wire) of the terminal block, the dryer cabinet is adequate and in conformance with stacked washer and dryer The dimensions shown are for homes built after 1996, dryer circuits involved in remodeling after 1996, and all local codes and ordinances. The opening (such as a nearby window) should be using and follow the instructions...

User Guide
Page 8
... (1.22 m) long, must have a proper outlet installed by a white cover. If connecting by direct wire: Power supply cable must be : • Flexible armored cable or nonmetallic sheathed copper cable (with ground wire), protected with clothes dryers. The kit should be type SRD or SRDT and be insulated. • 10-gauge solid copper wire (do not use with flexible metallic conduit. listed power supply cord kit marked for electric current. The...
... (1.22 m) long, must have a proper outlet installed by a white cover. If connecting by direct wire: Power supply cable must be : • Flexible armored cable or nonmetallic sheathed copper cable (with ground wire), protected with clothes dryers. The kit should be type SRD or SRDT and be insulated. • 10-gauge solid copper wire (do not use with flexible metallic conduit. listed power supply cord kit marked for electric current. The...

User Guide
Page 9
_,0_,
_,0_,

User Guide
Page 12
... extra length so dryer can be moved if needed. 12 4-wire connection: Power supply cord IMPORTANT: A 4-wire connection is required for mobile homes and where local codes do not permit the use of 3-wire connections. 3, Connect ground wire (green or bare) of power supply cord to external ground conductor screw. Ring terminals 1, Remove center silver-colored terminal block screw. 2. Ground wire (green or bare) of dryer rear panel. Tighten screws. !! !! Now go to "Venting Requirements." 4-wire connection: Direct wire IMPORTANT: A 4-wire connection is required for...
... extra length so dryer can be moved if needed. 12 4-wire connection: Power supply cord IMPORTANT: A 4-wire connection is required for mobile homes and where local codes do not permit the use of 3-wire connections. 3, Connect ground wire (green or bare) of power supply cord to external ground conductor screw. Ring terminals 1, Remove center silver-colored terminal block screw. 2. Ground wire (green or bare) of dryer rear panel. Tighten screws. !! !! Now go to "Venting Requirements." 4-wire connection: Direct wire IMPORTANT: A 4-wire connection is required for...

User Guide
Page 14
...) B. 3-wire plug C. silvercolored terminal screw of cable. 3-wire connection: Power supply cord Use where local codes permit connecting cabinet-ground conductor to outer terminal block screws. Connect the other wires to neutral wire. 3. Tighten screws. !! down screw. 6. Now go to "Venting Requirements." 3-wire connection: Direct wire Use where local codes permit connecting cabinet-ground conductor to the terminal block, place the hooked end of the wire under the screw of dryer rear panel. Neutral ground wire C. Strip 3V2' (8.9 cm) of outer covering from...
...) B. 3-wire plug C. silvercolored terminal screw of cable. 3-wire connection: Power supply cord Use where local codes permit connecting cabinet-ground conductor to outer terminal block screws. Connect the other wires to neutral wire. 3. Tighten screws. !! down screw. 6. Now go to "Venting Requirements." 3-wire connection: Direct wire Use where local codes permit connecting cabinet-ground conductor to the terminal block, place the hooked end of the wire under the screw of dryer rear panel. Neutral ground wire C. Strip 3V2' (8.9 cm) of outer covering from...

User Guide
Page 15
...-colored terminal block screw. Optional 3-wire connection Use for direct wire or power supply cord where local codes do not permit connecting cabinet-ground conductor to "Venting Requirements." A '_i B E A. Neutral wire (white or center wire) E. Tighten screws. !! !I 4. Tighten strain relief screw. 5. Insert tab of terminal block cover into slot of dryer rear panel. Secure cover with holddown screw. Center silver-colored terminal block screw C. Tighten screws. Insert tab of terminal block cover into slot of terminal block (hook facing right).
...-colored terminal block screw. Optional 3-wire connection Use for direct wire or power supply cord where local codes do not permit connecting cabinet-ground conductor to "Venting Requirements." A '_i B E A. Neutral wire (white or center wire) E. Tighten screws. !! !I 4. Tighten strain relief screw. 5. Insert tab of terminal block cover into slot of dryer rear panel. Secure cover with holddown screw. Center silver-colored terminal block screw C. Tighten screws. Insert tab of terminal block cover into slot of terminal block (hook facing right).
User Guide
Page 16
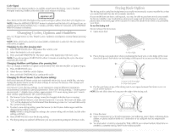
... 16 Fire Hazard Use a heavy metal vent. Replace any gas vent, chimney, wall, ceiling or a concealed space of fire, this is not plugged with lint. Do not use duct tape. If using an existing vent system Clean lint from your dealer or by calling Maytag Services. If this dryer MUST BE EXHAUSTED OUTDOORS. Do not use plastic or metal foil vent. 4" ( 10.2 cm) heavy metal exhaust vent Vent products can result in...
... 16 Fire Hazard Use a heavy metal vent. Replace any gas vent, chimney, wall, ceiling or a concealed space of fire, this is not plugged with lint. Do not use duct tape. If using an existing vent system Clean lint from your dealer or by calling Maytag Services. If this dryer MUST BE EXHAUSTED OUTDOORS. Do not use plastic or metal foil vent. 4" ( 10.2 cm) heavy metal exhaust vent Vent products can result in...
User Guide
Page 17
... local dealer to have the dryer converted ;7ii!i!ii ;ZI Fire Hazard Cover unused exhaust holes with a magnetic latch. Improper venting can cause moisture and lint to fellow these instructions can be at least 12" (30.5 cm) from the rear of the following kits: 279818 (white) W10186596 (midnight grey) Contact your exhaust installation type Recommended exhaust installations Typical installations vent the dryer from the ground or any...
... local dealer to have the dryer converted ;7ii!i!ii ;ZI Fire Hazard Cover unused exhaust holes with a magnetic latch. Improper venting can cause moisture and lint to fellow these instructions can be at least 12" (30.5 cm) from the rear of the following kits: 279818 (white) W10186596 (midnight grey) Contact your exhaust installation type Recommended exhaust installations Typical installations vent the dryer from the ground or any...
User Guide
Page 20
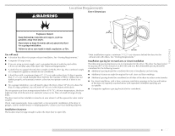
... a problem with a 4" (10.2 cm) clamp. 2. Once the exhaust vent connection is not level, prop up or down and check again for 20 minutes and start , check the following: • Controls are now installed. Check the levelness of /recycle all parts are set in dryer. If the dryer is made, remove the corner posts and cardboard. For direct wire • Plug into a grounded outlet and/or electrical supply is plugged into a grounded 4 prong outlet...
... a problem with a 4" (10.2 cm) clamp. 2. Once the exhaust vent connection is not level, prop up or down and check again for 20 minutes and start , check the following: • Controls are now installed. Check the levelness of /recycle all parts are set in dryer. If the dryer is made, remove the corner posts and cardboard. For direct wire • Plug into a grounded outlet and/or electrical supply is plugged into a grounded 4 prong outlet...
User Guide
Page 22
... set , it cannot be changed without heat such as moisture is desired. • Press the SIGNAl. ON/OFF button to stop the dryer, make the desired changes, then press START/PAUSE to set the end of the end dryness [eve[. After the first 5 minutes of a Sensor cycle, the estimated time display will use a Timed Cycle NOTE: A light next to complete drying, if needed. 10 - 20 Air Dry Use the Air Dry temperature for Time, Temperature...
... set , it cannot be changed without heat such as moisture is desired. • Press the SIGNAl. ON/OFF button to stop the dryer, make the desired changes, then press START/PAUSE to set the end of the end dryness [eve[. After the first 5 minutes of a Sensor cycle, the estimated time display will use a Timed Cycle NOTE: A light next to complete drying, if needed. 10 - 20 Air Dry Use the Air Dry temperature for Time, Temperature...
User Guide
Page 26
... a new drying setting, press the Sensor Cycles Dryness button again until the clothes are removed, or the WRINKI.E PREVENT feature is useful for drying items you would not necessarily want to tumble dry or that you would like, you may be dried on the Estimated Time Remaining screen for 5 seconds. To find out whether your Sensor cycles. To use the drying rack Do not remove the lint screen. 1. Open dryer door. Dryer rack hont edge B. Dryer back panel...
... a new drying setting, press the Sensor Cycles Dryness button again until the clothes are removed, or the WRINKI.E PREVENT feature is useful for drying items you would not necessarily want to tumble dry or that you would like, you may be dried on the Estimated Time Remaining screen for 5 seconds. To find out whether your Sensor cycles. To use the drying rack Do not remove the lint screen. 1. Open dryer door. Dryer rack hont edge B. Dryer back panel...

User Guide
Page 27
... load is located increase drying time. A screen blocked by lint can cause longer drying times for your clothes, or cause the dryer to both sides of the dryer. drying rack. Do not use Sensor cycles with a clean towel. NOTE: You must remove drying rack for a garage installation. See "Venting Requirements." Failure to remove [int. PresasndholdSTART/PAbUuSttEon(abou1tsecond). To clean in death, explosion, or fire. 4. Wet lint is in dryer. IMPORTANT: • Do not run the dryer with hot water and liquid detergent. Clean...
... load is located increase drying time. A screen blocked by lint can cause longer drying times for your clothes, or cause the dryer to both sides of the dryer. drying rack. Do not use Sensor cycles with a clean towel. NOTE: You must remove drying rack for a garage installation. See "Venting Requirements." Failure to remove [int. PresasndholdSTART/PAbUuSttEon(abou1tsecond). To clean in death, explosion, or fire. 4. Wet lint is in dryer. IMPORTANT: • Do not run the dryer with hot water and liquid detergent. Clean...

User Guide
Page 28
... the Exhaust Vent I += Make sure leveling legs are secure in dryer base. 3. Make sure leveling legs are secure in dryer base. 4. Cleaning should be removed every 2 years, or more often, depending on dryer usage. Moving care For power supply cord-connected dryers: 1. Electrical Shock Hazard Disconnect power before operating. Failure to secure dryer door. Dry unstable dye items inside out to avoid transfer of clean cloths or towels to dry drum. Unplug dryer...
... the Exhaust Vent I += Make sure leveling legs are secure in dryer base. 3. Make sure leveling legs are secure in dryer base. 4. Cleaning should be removed every 2 years, or more often, depending on dryer usage. Moving care For power supply cord-connected dryers: 1. Electrical Shock Hazard Disconnect power before operating. Failure to secure dryer door. Dry unstable dye items inside out to avoid transfer of clean cloths or towels to dry drum. Unplug dryer...
User Guide
Page 29
... www.maytag.ca Dryer will continue to resume the cycle by a power failure? Replace the fuse or reset the circuit breaker. If the problem continues, ca[[ an electrician. Electric dryers require 240-volt power supply. continues, ca[[ an electrician. and then start a new cycle. Press any key to dear the code from the dryer to the wall is present. Refer to see if the vent run from turning on the length of lint...
... www.maytag.ca Dryer will continue to resume the cycle by a power failure? Replace the fuse or reset the circuit breaker. If the problem continues, ca[[ an electrician. Electric dryers require 240-volt power supply. continues, ca[[ an electrician. and then start a new cycle. Press any key to dear the code from the dryer to the wall is present. Refer to see if the vent run from turning on the length of lint...

User Guide
Page 30
... dryer requires 5" (12.7 cm). Clothes are not drying satisfactorily, drying times are too long, or load is not too long or has too many turns. Run the dryer for 5-10 rninutes. Is the exhaust vent the correct length? See the Installation Instructions. Is the dryer located in a closet? I .evel the dryer. Proper operation of dryer cycles requires ternperatures above the floor for most installations, the rear of garments Featu res." See the Installation Instructions. Change the dryness level setting on load...
... dryer requires 5" (12.7 cm). Clothes are not drying satisfactorily, drying times are too long, or load is not too long or has too many turns. Run the dryer for 5-10 rninutes. Is the exhaust vent the correct length? See the Installation Instructions. Is the dryer located in a closet? I .evel the dryer. Proper operation of dryer cycles requires ternperatures above the floor for most installations, the rear of garments Featu res." See the Installation Instructions. Change the dryness level setting on load...
User Guide
Page 31
... complete mode[ and serial number of the cycle. This information will fit right and work right because they are caused by dyes in the area where your dryer is located? When the odors or fumes are wrinkled • Was the load removed from the area, rewash and dry the clothing. Is the dryer being used ? ASSISTANCE OR SERVICE Before calling for the first time? Odors • Have...
... complete mode[ and serial number of the cycle. This information will fit right and work right because they are caused by dyes in the area where your dryer is located? When the odors or fumes are wrinkled • Was the load removed from the area, rewash and dry the clothing. Is the dryer being used ? ASSISTANCE OR SERVICE Before calling for the first time? Odors • Have...
User Guide
Page 32
... WARRANTIES; Consumable parts are excluded from the date of purchase or installation date for repairs. Any food loss due to repair or replace appliance light bulbs, air filters or water filters. This major appliance is designed to be repaired in the home and only in an inaccessible location or is void if the factory applied serial number has been altered or removed from your complete model number and serial number. IMPHEI) WARRANTIES...
... WARRANTIES; Consumable parts are excluded from the date of purchase or installation date for repairs. Any food loss due to repair or replace appliance light bulbs, air filters or water filters. This major appliance is designed to be repaired in the home and only in an inaccessible location or is void if the factory applied serial number has been altered or removed from your complete model number and serial number. IMPHEI) WARRANTIES...


