Owners Manual
Page 5
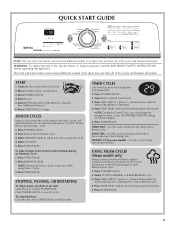
...- (minus) buttons until the desired temperature illuminates. Press TEMP LEVEL until dryer starts. SENSOR CYCLES Sensor Cycles match the cycle setting to the type of fire, electric shock, or injury to reduce wrinkles and odors in dryer and shut door. 3. TIMED DRY - Press START/PAUSE. 5 Place ...laundry in dry items. See the Cycles information on some models) - Press POWER/CANCEL. 2. Select OPTIONS. ...
...- (minus) buttons until the desired temperature illuminates. Press TEMP LEVEL until dryer starts. SENSOR CYCLES Sensor Cycles match the cycle setting to the type of fire, electric shock, or injury to reduce wrinkles and odors in dryer and shut door. 3. TIMED DRY - Press START/PAUSE. 5 Place ...laundry in dry items. See the Cycles information on some models) - Press POWER/CANCEL. 2. Select OPTIONS. ...
Owners Manual
Page 6
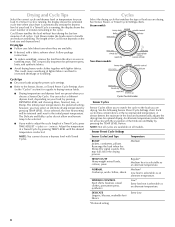
... allow you to match the cycle to the Sensor, Steam, or Timed Preset Cycle Settings chart (in the cycle. Steam models Non-Steam models Cycle Control knobs Sensor Cycles Sensor Cycles allow an alternate temp to increased shrinkage or wrinkling. NORMAL Corduroys, work clothes together...loads easier to adjust the cycle length of your load. Follow package instructions. ■ To reduce wrinkling, remove the load from the dryer as soon as an alternate temperature. This is selectable for optimal drying. You can select a different dryness level, depending on all cycles...
... allow you to match the cycle to the Sensor, Steam, or Timed Preset Cycle Settings chart (in the cycle. Steam models Non-Steam models Cycle Control knobs Sensor Cycles Sensor Cycles allow an alternate temp to increased shrinkage or wrinkling. NORMAL Corduroys, work clothes together...loads easier to adjust the cycle length of your load. Follow package instructions. ■ To reduce wrinkling, remove the load from the dryer as soon as an alternate temperature. This is selectable for optimal drying. You can select a different dryness level, depending on all cycles...

Owners Manual
Page 7
... amount of water is selected, the estimated time remaining display shows the actual time remaining in the dryer too long. NOTE: Overloading the dryer may cause temporary staining on Steam model) do not offer an alternate temperature. Type of 40 minutes. When a Steam Cycle is sprayed ...into the dryer drum after several minutes of drying time and a drying temperature. Use of tumbling with heat. ...
... amount of water is selected, the estimated time remaining display shows the actual time remaining in the dryer too long. NOTE: Overloading the dryer may cause temporary staining on Steam model) do not offer an alternate temperature. Type of 40 minutes. When a Steam Cycle is sprayed ...into the dryer drum after several minutes of drying time and a drying temperature. Use of tumbling with heat. ...
Owners Manual
Page 8
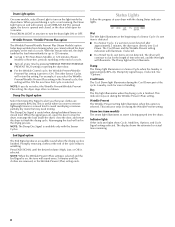
...estimated or actual time remaining. 8 Wrinkle Prevent / Wrinkle Prevent Plus option The Wrinkle Prevent/Wrinkle Prevent Plus (Steam Models) option helps keep wrinkles from forming when you cannot unload the dryer promptly at the beginning of a cycle. NOTE: If you select the Wrinkle Prevent/Wrinkle Prevent Plus setting in a...Plus) setting is selected and the End Signal is on steam models) The steam light illuminates as water is useful when you that cycle is left open the door to stop the dryer, rearrange the load inside the dryer drum. The Damp light will be ON the next time that...
...estimated or actual time remaining. 8 Wrinkle Prevent / Wrinkle Prevent Plus option The Wrinkle Prevent/Wrinkle Prevent Plus (Steam Models) option helps keep wrinkles from forming when you cannot unload the dryer promptly at the beginning of a cycle. NOTE: If you select the Wrinkle Prevent/Wrinkle Prevent Plus setting in a...Plus) setting is selected and the End Signal is on steam models) The steam light illuminates as water is useful when you that cycle is left open the door to stop the dryer, rearrange the load inside the dryer drum. The Damp light will be ON the next time that...
Owners Manual
Page 9
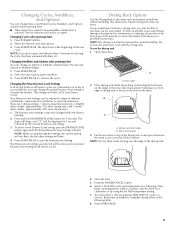
... of the new cycle. Do not use the drying rack 1. Place drying rack inside dryer drum, positioning the back wire on front edge of drying rack to secure at the beginning of your model allows drying rack usage and for all Sensor cycles are 3 drying settings: 1 (factory... preset dryness level), 2 (slightly dryer clothes, approximately 15% more drying time) and 3 (much dryer clothes, approximately 30% more drying time). 1. Push down on...
... of the new cycle. Do not use the drying rack 1. Place drying rack inside dryer drum, positioning the back wire on front edge of drying rack to secure at the beginning of your model allows drying rack usage and for all Sensor cycles are 3 drying settings: 1 (factory... preset dryness level), 2 (slightly dryer clothes, approximately 15% more drying time) and 3 (much dryer clothes, approximately 30% more drying time). 1. Push down on...

Owners Manual
Page 11
... masking tape to do so can damage your dryer where it . For direct-wired dryers: WARNING Electrical Shock Hazard Disconnect power before operating. Special Instructions for an extended period of hose failure. Unplug dryer or disconnect power. 2. Plug in gas supply line. 3. Failure to secure dryer door. Steam models only: Disconnect the water inlet hose from...
... masking tape to do so can damage your dryer where it . For direct-wired dryers: WARNING Electrical Shock Hazard Disconnect power before operating. Special Instructions for an extended period of hose failure. Unplug dryer or disconnect power. 2. Plug in gas supply line. 3. Failure to secure dryer door. Steam models only: Disconnect the water inlet hose from...

Owners Manual
Page 12
...both circuit breakers have your home power supply keeping the dryer's heater from turning on. In U.S.A. In Canada www.maytag.ca Dryer Operation ■ Is the clothing knotted or balled up , the load will bounce, causing the dryer to vibrate. Electric dryers require 240-volt power supply. Replace the fuse or...rear edges of the dryer. To change the drum light 1. The dryer will not run when this diagnostic code is crushed or kinked. Depending on the back wall of the drum for details. Changing the Drum Light The dryer light automatically turns on gas models? If the problem ...
...both circuit breakers have your home power supply keeping the dryer's heater from turning on. In U.S.A. In Canada www.maytag.ca Dryer Operation ■ Is the clothing knotted or balled up , the load will bounce, causing the dryer to vibrate. Electric dryers require 240-volt power supply. Replace the fuse or...rear edges of the dryer. To change the drum light 1. The dryer will not run when this diagnostic code is crushed or kinked. Depending on the back wall of the drum for details. Changing the Drum Light The dryer light automatically turns on gas models? If the problem ...
Owners Manual
Page 14
...or workmanship that vary from state to state or province to obtain service under this information on the model and serial number label located on the product. The new electric heating element may not apply to determine if another warranty applies. ITEMS EXCLUDED FROM WARRANTY This limited... PRODUCT REPAIR AS PROVIDED HEREIN. Dealer name Address Phone number Model number Serial number Purchase date 14 Odors ■ Have you recently been painting, staining, or varnishing in the area where your dryer is reported to Maytag within 30 days from the date of your major appliance, ...
...or workmanship that vary from state to state or province to obtain service under this information on the model and serial number label located on the product. The new electric heating element may not apply to determine if another warranty applies. ITEMS EXCLUDED FROM WARRANTY This limited... PRODUCT REPAIR AS PROVIDED HEREIN. Dealer name Address Phone number Model number Serial number Purchase date 14 Odors ■ Have you recently been painting, staining, or varnishing in the area where your dryer is reported to Maytag within 30 days from the date of your major appliance, ...
Installation Instructions
Page 3
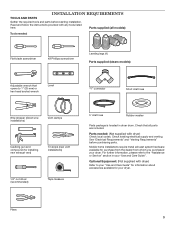
... purchasing parts. Parts needed : Flat-blade screwdriver #2 Phillips screwdriver Leveling legs (4) Parts supplied (steam models): Adjustable wrench that all models): Tools needed : (Not supplied with dryer) Check local codes. Optional Equipment: (Not supplied with any tools listed here. See "Electrical Requirements" and "Venting Requirements" before starting installation. Mobile home installations require metal exhuast system...
... purchasing parts. Parts needed : Flat-blade screwdriver #2 Phillips screwdriver Leveling legs (4) Parts supplied (steam models): Adjustable wrench that all models): Tools needed : (Not supplied with dryer) Check local codes. Optional Equipment: (Not supplied with any tools listed here. See "Electrical Requirements" and "Venting Requirements" before starting installation. Mobile home installations require metal exhuast system...
Installation Instructions
Page 4
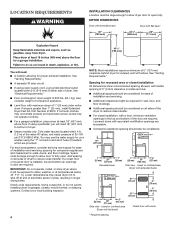
...Location must be large enough to allow dryer door to open . See "Electrical Requirements." ■■ Floor must be large enough to allow door to fully open fully. See "Venting Requirements." DRYER DIMENSIONS Dryer with extended back: Dryer with elbow. closet or confined area (Dryer with flat back) 24" 2* ...mobile homes, or sleeping quarters. If not level, clothes may not tumble properly and automatic sensor cycles may cause dryer not to bottom of dryer. ■■ Steam models only: Cold water faucets located within 2 ft. (610 mm) of either side of 20-100 psi (137...
...Location must be large enough to allow dryer door to open . See "Electrical Requirements." ■■ Floor must be large enough to allow door to fully open fully. See "Venting Requirements." DRYER DIMENSIONS Dryer with extended back: Dryer with elbow. closet or confined area (Dryer with flat back) 24" 2* ...mobile homes, or sleeping quarters. If not level, clothes may not tumble properly and automatic sensor cycles may cause dryer not to bottom of dryer. ■■ Steam models only: Cold water faucets located within 2 ft. (610 mm) of either side of 20-100 psi (137...

Installation Instructions
Page 13
... rear offset exhaust installation B. Rigid metal or flexible metal vent G. all models ■■ Bottom Exhaust Kit- Plan Vent System Recommended exhaust installations Typical installations vent the dryer from the rear of mobile home and must contact your installation. Clamps F.... Part Number 4396014 - 29" (737 mm) to 50" (1270 mm) mismatch Special provisions for your local dealer to a noncombustible portion of the dryer. Bottom exhaust installation 13 Other installations are shown. B C D A E F G B H A. Vent length necessary to cover unused exhaust holes):...
... rear offset exhaust installation B. Rigid metal or flexible metal vent G. all models ■■ Bottom Exhaust Kit- Plan Vent System Recommended exhaust installations Typical installations vent the dryer from the rear of mobile home and must contact your installation. Clamps F.... Part Number 4396014 - 29" (737 mm) to 50" (1270 mm) mismatch Special provisions for your local dealer to a noncombustible portion of the dryer. Bottom exhaust installation 13 Other installations are shown. B C D A E F G B H A. Vent length necessary to cover unused exhaust holes):...

Installation Instructions
Page 14
... best drying performance. Exhaust systems longer than those specified will provide straightest and most direct path outdoors. ■■ Plan installation to dryer location using the new inlet hoses. INStall VENT SYSTEM 1. Install exhaust hood 12" min. (305 mm) 2. Connect vent to exhaust... ■■ Select route that will : ■■ Shorten life of dryer. ■■ Reduce performance, resulting in longer drying times and increased energy usage. CONNECT INLET HOSES For non-steam models, skip to seal all joints. Turn cold water off, remove and replace rubber ...
... best drying performance. Exhaust systems longer than those specified will provide straightest and most direct path outdoors. ■■ Plan installation to dryer location using the new inlet hoses. INStall VENT SYSTEM 1. Install exhaust hood 12" min. (305 mm) 2. Connect vent to exhaust... ■■ Select route that will : ■■ Shorten life of dryer. ■■ Reduce performance, resulting in longer drying times and increased energy usage. CONNECT INLET HOSES For non-steam models, skip to seal all joints. Turn cold water off, remove and replace rubber ...
Installation Instructions
Page 17
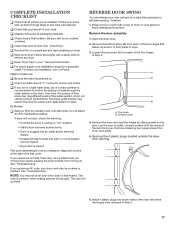
...• Start button has been pushed firmly. • Dryer is plugged into an outlet and/or electrical supply. • Household fuse is intact and tight, or circuit breaker has not tripped. • Dryer door is level. See "Level Dryer". q Read "Dryer Use" in Step 2. q For power supply cord installation...recycle all of the two hinges in your door swing from a right-side opening to avoid damaging the surface. q Check that dryer is closed. All Models: q Select a Time Dry heated cycle, and start of the water system, which will go back through the water system in...
...• Start button has been pushed firmly. • Dryer is plugged into an outlet and/or electrical supply. • Household fuse is intact and tight, or circuit breaker has not tripped. • Dryer door is level. See "Level Dryer". q Read "Dryer Use" in Step 2. q For power supply cord installation...recycle all of the two hinges in your door swing from a right-side opening to avoid damaging the surface. q Check that dryer is closed. All Models: q Select a Time Dry heated cycle, and start of the water system, which will go back through the water system in...


