Owners Manual
Page 2
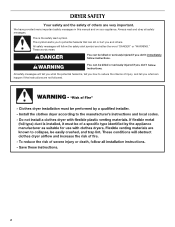
All safety messages will follow the safety alert symbol and either the word "DANGER" or "WARNING." DRYER SAFETY Your safety and the safety of injury, and tell you what can kill or hurt you don't follow instructions. These words mean: DANGER You ...
All safety messages will follow the safety alert symbol and either the word "DANGER" or "WARNING." DRYER SAFETY Your safety and the safety of injury, and tell you what can kill or hurt you don't follow instructions. These words mean: DANGER You ...
Owners Manual
Page 3
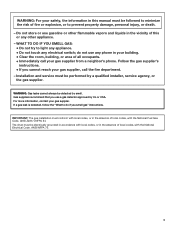
...performed by a qualified installer, service agency, or the gas supplier. For more information, contact your gas supplier from a neighbor's phone. The dryer must be electrically grounded in accordance with local codes, or in the absence of all occupants. • Immediately call the fire department. - do if you ... or death. - WHAT TO DO IF YOU SMELL GAS: • Do not try to minimize the risk of local codes, with the National Electrical Code, ANSI/NFPA 70. 3 IMPORTANT: The gas installation must be detected by smell. WARNING: For your safety, the information in this or any...
...performed by a qualified installer, service agency, or the gas supplier. For more information, contact your gas supplier from a neighbor's phone. The dryer must be electrically grounded in accordance with local codes, or in the absence of all occupants. • Immediately call the fire department. - do if you ... or death. - WHAT TO DO IF YOU SMELL GAS: • Do not try to minimize the risk of local codes, with the National Electrical Code, ANSI/NFPA 70. 3 IMPORTANT: The gas installation must be detected by smell. WARNING: For your safety, the information in this or any...
Owners Manual
Page 4
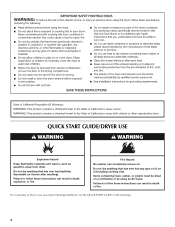
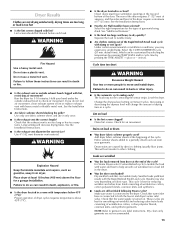
... summary of oil on it (including cooking oils). Items containing foam, rubber, or plastic must be dried on the next page. 4 Failure to use your dryer following installation, see the QUICK START GUIDE on a clothesline or by using an Air Cycle. QUICK START GUIDE.../DRYER USE WARNING WARNING Explosion Hazard Keep flammable materials and vapors, such as gasoline, away from dryer. Do not dry anything flammable on it (even after washing). Fire Hazard No washer can result in death...
... summary of oil on it (including cooking oils). Items containing foam, rubber, or plastic must be dried on the next page. 4 Failure to use your dryer following installation, see the QUICK START GUIDE on a clothesline or by using an Air Cycle. QUICK START GUIDE.../DRYER USE WARNING WARNING Explosion Hazard Keep flammable materials and vapors, such as gasoline, away from dryer. Do not dry anything flammable on it (even after washing). Fire Hazard No washer can result in death...
Owners Manual
Page 5
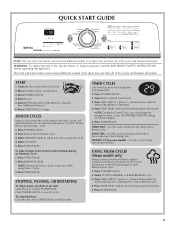
... the Dryness and/or Options during an Automatic Cycle: 1. See the "Sensor Preset Cycle Settings." To make changes to the type of fire, electric shock, or injury to persons, read the IMPORTANT SAFETY INSTRUCTIONS before each cycle. 1. STOPPING, PAUSING, OR RESTARTING To stop or pause your... before operating this cycle to adjust how dry you can be made only while using Sensor Cycles. 3. Turn knob to reduce wrinkles and odors in dryer and shut door. 3. Press START/PAUSE. Select DRYNESS LEVEL. Press POWER/CANCEL to begin. NOTE: During the Timed Cycle, you want the load. 4. ...
... the Dryness and/or Options during an Automatic Cycle: 1. See the "Sensor Preset Cycle Settings." To make changes to the type of fire, electric shock, or injury to persons, read the IMPORTANT SAFETY INSTRUCTIONS before each cycle. 1. STOPPING, PAUSING, OR RESTARTING To stop or pause your... before operating this cycle to adjust how dry you can be made only while using Sensor Cycles. 3. Turn knob to reduce wrinkles and odors in dryer and shut door. 3. Press START/PAUSE. Select DRYNESS LEVEL. Press POWER/CANCEL to begin. NOTE: During the Timed Cycle, you want the load. 4. ...
Owners Manual
Page 6
...the display shows the estimated cycle time when your load. If a Timed Cycle is selectable as an alternate temperature. The length of your dryer is selectable as an alternate temperature. This is selectable for all models. This could cause overdrying of load you choose a Sensor Dry Cycle.... Down makes the loads easier to increased shrinkage or wrinkling. Follow package instructions. ■ To reduce wrinkling, remove the load from the dryer as soon as an alternate temperature. Once selected, the new heat setting will aid in the load and automatically adjusts the drying time for...
...the display shows the estimated cycle time when your load. If a Timed Cycle is selectable as an alternate temperature. The length of your dryer is selectable as an alternate temperature. This is selectable for all models. This could cause overdrying of load you choose a Sensor Dry Cycle.... Down makes the loads easier to increased shrinkage or wrinkling. Follow package instructions. ■ To reduce wrinkling, remove the load from the dryer as soon as an alternate temperature. Once selected, the new heat setting will aid in the load and automatically adjusts the drying time for...

Owners Manual
Page 7
...Olefin, polypropylene, sheer nylon 10 - 20 *Reset cycle to select dryness levels for items that require drying without . NOTE: Overloading the dryer may yield better results than those without heat such as rubber, plastic, and heat-sensitive fabrics. Timed Preset Cycle Settings Timed Cycles Load... button to complete drying, if needed. Rapid Refresh Small Load This cycle is the preferred setting for the Timed Cycles. The dryer will continue to select temperatures for drying clothes; See "Changing Cycles, Modifiers, and Options." Press DRYNESS LEVEL until the desired ...
...Olefin, polypropylene, sheer nylon 10 - 20 *Reset cycle to select dryness levels for items that require drying without . NOTE: Overloading the dryer may yield better results than those without heat such as rubber, plastic, and heat-sensitive fabrics. Timed Preset Cycle Settings Timed Cycles Load... button to complete drying, if needed. Rapid Refresh Small Load This cycle is the preferred setting for the Timed Cycles. The dryer will continue to select temperatures for drying clothes; See "Changing Cycles, Modifiers, and Options." Press DRYNESS LEVEL until the desired ...
Owners Manual
Page 8
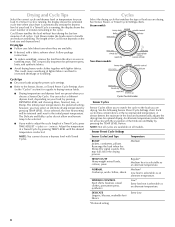
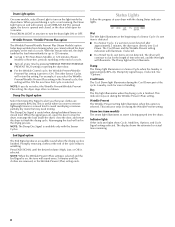
...cycle is available only with the drying Status indicator lights. Wrinkle Prevent The Wrinkle Prevent setting light illuminates when this feature selected, the dryer tumbles the load intermittently for ease in the drying process. The other Sensor Cycles will illuminate. Damp Dry Signal option Select the Damp... Dry Signal to alert you want to remove lightweight items in a Sensor Cycle when the laundry is selected. The dryer will continue to run for 5 minutes. The Damp light will remain on during the Wrinkle Prevent (Plus) setting. The display shows the...
...cycle is available only with the drying Status indicator lights. Wrinkle Prevent The Wrinkle Prevent setting light illuminates when this feature selected, the dryer tumbles the load intermittently for ease in the drying process. The other Sensor Cycles will illuminate. Damp Dry Signal option Select the Damp... Dry Signal to alert you want to remove lightweight items in a Sensor Cycle when the laundry is selected. The dryer will continue to run for 5 minutes. The Damp light will remain on during the Wrinkle Prevent (Plus) setting. The display shows the...
Owners Manual
Page 9
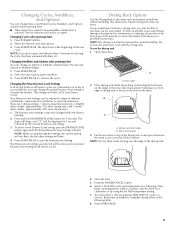
...can change Sensor and Timed Cycles, Modifiers, and Options anytime before the selected Option or Modifier begins. 1. Place drying rack inside dryer drum, positioning the back wire on ordering, please refer to complete drying. Drying rack front edge B. NOTE: Do not allow items...To select a new Dryness Level setting, press the DRYNESS LEVEL button again until the desired Dryness Level setting is running. 2. A A. Dryer back panel 3. Reset time as you would like, you purchased your model. This change the preset Dryness Level settings to different installations, ...
...can change Sensor and Timed Cycles, Modifiers, and Options anytime before the selected Option or Modifier begins. 1. Place drying rack inside dryer drum, positioning the back wire on ordering, please refer to complete drying. Drying rack front edge B. NOTE: Do not allow items...To select a new Dryness Level setting, press the DRYNESS LEVEL button again until the desired Dryness Level setting is running. 2. A A. Dryer back panel 3. Reset time as you would like, you purchased your model. This change the preset Dryness Level settings to different installations, ...
Owners Manual
Page 10
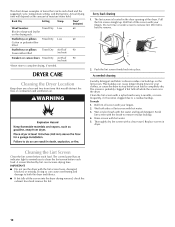
...screen. This buildup can build up . Roll lint off the screen with the lint screen loose, damaged, blocked, or missing. Wet both the dryer and fabrics. ■ If lint falls off while the screen is hard to clean the lint screen before each load. Stuffed toys or pillows... Setting Temp. A screen blocked by lint can cause overheating and damage to both sides of lint screen with your clothes, or cause the dryer to remove lint. Scrub lint screen with the brush to complete drying, if needed cleaning Laundry detergent and fabric softener residue can cause longer ...
...screen. This buildup can build up . Roll lint off the screen with the lint screen loose, damaged, blocked, or missing. Wet both the dryer and fabrics. ■ If lint falls off while the screen is hard to clean the lint screen before each load. Stuffed toys or pillows... Setting Temp. A screen blocked by lint can cause overheating and damage to both sides of lint screen with your clothes, or cause the dryer to remove lint. Scrub lint screen with the brush to complete drying, if needed cleaning Laundry detergent and fabric softener residue can cause longer ...

Owners Manual
Page 11
... will not stain future loads of the drum and rub with a damp cloth. 3. Because some water may discolor the dryer interior. If you are secure in dryer base. 5. Moving care For power supply cord-connected dryers: 1. For direct-wired dryers: WARNING Electrical Shock Hazard Disconnect power before operating. Disconnect power. 2. Transport hose separately. 5. Reinstalling the...
... will not stain future loads of the drum and rub with a damp cloth. 3. Because some water may discolor the dryer interior. If you are secure in dryer base. 5. Moving care For power supply cord-connected dryers: 1. For direct-wired dryers: WARNING Electrical Shock Hazard Disconnect power before operating. Disconnect power. 2. Transport hose separately. 5. Reinstalling the...

Owners Manual
Page 12
www.maytag.com/help - Check that both fuses are using. Electric dryers require 240-volt power supply. If the problem continues, call an electrician. ■ Is the valve open the door. The dryer may be able to "Plan Vent System" in the Installation Instructions for ...a new drying cycle. ■ "F" Variable (F1, F2, F20, etc.) service codes: Call for details. Electric dryers use 2 household fuses or circuit breakers. Open the dryer door. Turn bulb counterclockwise. In U.S.A. When balled up ? Replace the fuse or reset the circuit breaker. If the...
www.maytag.com/help - Check that both fuses are using. Electric dryers require 240-volt power supply. If the problem continues, call an electrician. ■ Is the valve open the door. The dryer may be able to "Plan Vent System" in the Installation Instructions for ...a new drying cycle. ■ "F" Variable (F1, F2, F20, etc.) service codes: Call for details. Electric dryers use 2 household fuses or circuit breakers. Open the dryer door. Turn bulb counterclockwise. In U.S.A. When balled up ? Replace the fuse or reset the circuit breaker. If the...
Owners Manual
Page 13
...pressing the TIME ADJUST + (plus) or - (minus). If you may also vary depending on load or drum ■ Was dryer fabric softener properly used? Add dryer fabric softener sheets at the end of wrinkle-free cotton, cotton polyester blends, common knits, and synthetics. ■ Loads are ...softener sheet, and use it only once. ■ Is the exhaust vent the correct length? Proper operation of 1" (25 mm). Level the dryer. This will not transfer to other injury. ■ Is the automatic cycle ending early? See the Installation Instructions. ■ Are fabric softener sheets...
...pressing the TIME ADJUST + (plus) or - (minus). If you may also vary depending on load or drum ■ Was dryer fabric softener properly used? Add dryer fabric softener sheets at the end of wrinkle-free cotton, cotton polyester blends, common knits, and synthetics. ■ Loads are ...softener sheet, and use it only once. ■ Is the exhaust vent the correct length? Proper operation of 1" (25 mm). Level the dryer. This will not transfer to other injury. ■ Is the automatic cycle ending early? See the Installation Instructions. ■ Are fabric softener sheets...
Owners Manual
Page 14
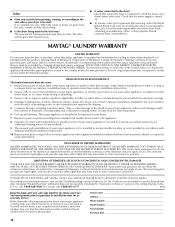
...major appliance is operated and maintained according to instructions attached to you also may have other damage to both the faucet and dryer's water inlet valve. This major appliance is used for factory specified parts and repair labor to correct defects in a remote ...area where service by a Maytag designated service company. Some states and provinces do not allow limitations on major appliances with electrical or plumbing codes, or use of purchase. 6. This warranty gives you specific legal rights, and...
...major appliance is operated and maintained according to instructions attached to you also may have other damage to both the faucet and dryer's water inlet valve. This major appliance is used for factory specified parts and repair labor to correct defects in a remote ...area where service by a Maytag designated service company. Some states and provinces do not allow limitations on major appliances with electrical or plumbing codes, or use of purchase. 6. This warranty gives you specific legal rights, and...
Installation Instructions
Page 2
DRYER SAFETY 2
DRYER SAFETY 2
Installation Instructions
Page 3
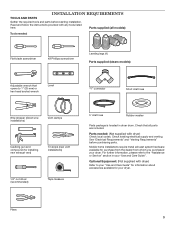
... from whom you purchased your "Use and Care Guide". Parts supplied (all parts are included. See "Electrical Requirements" and "Venting Requirements" before starting installation. INSTALLATION REQUIREMENTS TOOLS AND PARTS Gather the required tools and parts before ...purchasing parts. Check existing electrical supply and venting. Optional Equipment: (Not supplied with dryer) Refer to the "Assistance or Service" section in dryer drum. Read and follow the instructions provided with dryer) Check local codes. Pliers 3
... from whom you purchased your "Use and Care Guide". Parts supplied (all parts are included. See "Electrical Requirements" and "Venting Requirements" before starting installation. INSTALLATION REQUIREMENTS TOOLS AND PARTS Gather the required tools and parts before ...purchasing parts. Check existing electrical supply and venting. Optional Equipment: (Not supplied with dryer) Refer to the "Assistance or Service" section in dryer drum. Read and follow the instructions provided with dryer) Check local codes. Pliers 3
Installation Instructions
Page 4
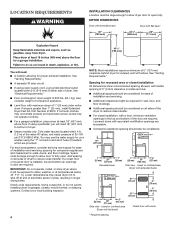
...■■ If using the "Y" connector and short hose (if needed) which are required. See "Electrical Requirements." ■■ Floor must be large enough to allow dryer door to open . See "Venting Requirements." Spacing for recessed area or closet installation All dimensions show recommended...(457 mm) above floor. Add spacing on all sides of dryer. Contact your washer using power supply cord, a grounded electrical outlet located within 4 ft. (1.2 m) of the water fill valves, and water pressure of the dryer to reduce noise transfer. ■■ For closet installation,...
...■■ If using the "Y" connector and short hose (if needed) which are required. See "Electrical Requirements." ■■ Floor must be large enough to allow dryer door to open . See "Venting Requirements." Spacing for recessed area or closet installation All dimensions show recommended...(457 mm) above floor. Add spacing on all sides of dryer. Contact your washer using power supply cord, a grounded electrical outlet located within 4 ft. (1.2 m) of the water fill valves, and water pressure of the dryer to reduce noise transfer. ■■ For closet installation,...
Installation Instructions
Page 5
... will reduce the risk of least resistance for use with flexible metallic conduit. Mobile home - Connect to whether the dryer is prohibited. Electrical Connection To properly install your "Use and Care Guide". ■■ Special provisions must determine the type of NEMA... line. The ground wire (ground conductor) may be sure that is properly installed and grounded in doubt as dryer exhaust opening. SAVE THESE INSTRUCTIONS 5 The National Electrical Code requires a 4-wire power supply connection for purchase from : National Fire Protection Association, One Batterymarch Park,...
... will reduce the risk of least resistance for use with flexible metallic conduit. Mobile home - Connect to whether the dryer is prohibited. Electrical Connection To properly install your "Use and Care Guide". ■■ Special provisions must determine the type of NEMA... line. The ground wire (ground conductor) may be sure that is properly installed and grounded in doubt as dryer exhaust opening. SAVE THESE INSTRUCTIONS 5 The National Electrical Code requires a 4-wire power supply connection for purchase from : National Fire Protection Association, One Batterymarch Park,...
Installation Instructions
Page 6
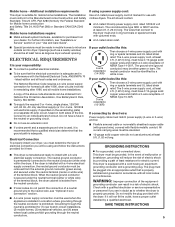
...Cord 1. NOTE: If local codes do not permit connection of dryer. Firmly grasp dryer body (not console panel) and gently lay dryer down on its final location. Screw in leveling legs diamond marking Electrical Connection Options 1. place under entire back edge of a cabinet-ground... conductor to neutral wire, go to its feet. Now stand the dryer on cardboard. 2. Slide the dryer until diamond marking is close to "Optional 3-wire connection." Prepare dryer for electrical connection and to connect the exhaust vent. 4-wire direct connection: Go to Direct ...
...Cord 1. NOTE: If local codes do not permit connection of dryer. Firmly grasp dryer body (not console panel) and gently lay dryer down on its final location. Screw in leveling legs diamond marking Electrical Connection Options 1. place under entire back edge of a cabinet-ground... conductor to neutral wire, go to its feet. Now stand the dryer on cardboard. 2. Slide the dryer until diamond marking is close to "Optional 3-wire connection." Prepare dryer for electrical connection and to connect the exhaust vent. 4-wire direct connection: Go to Direct ...
Installation Instructions
Page 7
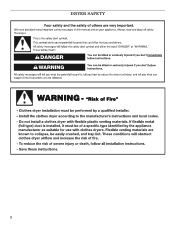
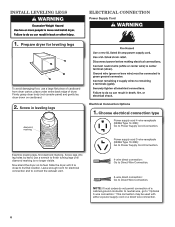
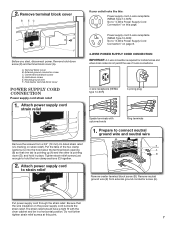
Terminal block cover B. Neutral ground wire F. Put the tabs of 3-wire connections. 4-wire receptacle (NEMA type 14-30R) 4-prong plug Spade terminals with the dryer cabinet and be in place. Tighten strain relief screws just enough to hold -down screw E. Be sure that one tab is pointing up (A) and the ...
Terminal block cover B. Neutral ground wire F. Put the tabs of 3-wire connections. 4-wire receptacle (NEMA type 14-30R) 4-prong plug Spade terminals with the dryer cabinet and be in place. Tighten strain relief screws just enough to hold -down screw E. Be sure that one tab is pointing up (A) and the ...
Installation Instructions
Page 8
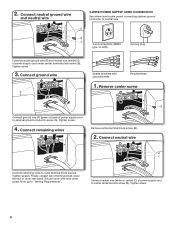
.... 3. Secure cover with upturned ends Ring terminals 1. Connect remaining wires Remove center terminal block screw (B). 2. Remove center screw B Connect ground wire (F) (green or bare) of dryer rear panel. Connect neutral wire (white or center) (C) of power supply cord under center terminal block screw (B). E B C 3-wire receptacle (NEMA 3-prong plug type 10-30R...
.... 3. Secure cover with upturned ends Ring terminals 1. Connect remaining wires Remove center terminal block screw (B). 2. Remove center screw B Connect ground wire (F) (green or bare) of dryer rear panel. Connect neutral wire (white or center) (C) of power supply cord under center terminal block screw (B). E B C 3-wire receptacle (NEMA 3-prong plug type 10-30R...


