

Use and Care Guide
Page 3
...symbol and either the word "DANGER" or "WARNING." Items contaminated with controls. ■ Do not repair or replace any part of the dryer or attempt any servicing unless specifically recommended in this manual and on or in your appliance. SAVE THESE INSTRUCTIONS 3 Always read and obey ...all instructions before or after each load. ■ Keep area around the exhaust opening and adjacent surrounding areas free from the accumulation of lint, dust, and dirt. ■ The interior of fire, electric shock, or injury to persons when using the dryer. ■ Do not place items ...
...symbol and either the word "DANGER" or "WARNING." Items contaminated with controls. ■ Do not repair or replace any part of the dryer or attempt any servicing unless specifically recommended in this manual and on or in your appliance. SAVE THESE INSTRUCTIONS 3 Always read and obey ...all instructions before or after each load. ■ Keep area around the exhaust opening and adjacent surrounding areas free from the accumulation of lint, dust, and dirt. ■ The interior of fire, electric shock, or injury to persons when using the dryer. ■ Do not place items ...

Use and Care Guide
Page 4
... that opens to 1" (2.5 cm) or hex-head socket wrench (for adjusting dryer feet) ■ Wire stripper (direct wire installations) ■ Level ■ Caulking gun and compound (for this dryer. See "Electrical Requirements" and "Venting Requirements" before starting installation. The cord should contain: &#...) pedestal at least 4 ft (1.22 m) long. The wires that connect to the dryer must end in several colors. To do so, you purchased your washer and dryer? Check existing electrical supply and venting. Pedestal Height Color Part Number 10" (25.4 cm) White MHP1000SQ0 ...
... that opens to 1" (2.5 cm) or hex-head socket wrench (for adjusting dryer feet) ■ Wire stripper (direct wire installations) ■ Level ■ Caulking gun and compound (for this dryer. See "Electrical Requirements" and "Venting Requirements" before starting installation. The cord should contain: &#...) pedestal at least 4 ft (1.22 m) long. The wires that connect to the dryer must end in several colors. To do so, you purchased your washer and dryer? Check existing electrical supply and venting. Pedestal Height Color Part Number 10" (25.4 cm) White MHP1000SQ0 ...

Use and Care Guide
Page 5
...following spacing dimensions are acceptable. ■ Companion appliance spacing should also be considered on the sides and rear. Dryer only 0" (0 cm) 38" min. (96.52 cm) *Required spacing 1"* (2.5 cm) 27" (68.6 cm) 1"* (2.5 cm) 5 If slope is not level. ■ For a garage ...exhaust installation. If using a power supply cord, a grounded electrical outlet located within 2 ft (61 cm) of either side of 1" (2.5 cm) under entire dryer. See "Electrical Requirements." ■ A sturdy floor to the bottom of the dryer in death, explosion, or fire. You will need ■...
...following spacing dimensions are acceptable. ■ Companion appliance spacing should also be considered on the sides and rear. Dryer only 0" (0 cm) 38" min. (96.52 cm) *Required spacing 1"* (2.5 cm) 27" (68.6 cm) 1"* (2.5 cm) 5 If slope is not level. ■ For a garage ...exhaust installation. If using a power supply cord, a grounded electrical outlet located within 2 ft (61 cm) of either side of 1" (2.5 cm) under entire dryer. See "Electrical Requirements." ■ A sturdy floor to the bottom of the dryer in death, explosion, or fire. You will need ■...

Use and Care Guide
Page 7
... installations require: ■ Metal exhaust system hardware, which is adequate and in remodeling after 1996, dryer circuits involved in conformance with the National Electrical Code, ANSI/NFPA 70-latest edition and all mobile home installations. U.S.A. Do not have a fuse...wire to introduce outside air into the dryer. 6"* (15.2 cm) 76" (193 cm) *Required spacing 5"* (12.7 cm) 1" (2.5 cm) 27" (68.6 cm) 1" (2.5 cm) Mobile home - The opening . Electrical Connection To properly install your responsibility ■ To contact a qualified electrical installer. ■ To be made...
... installations require: ■ Metal exhaust system hardware, which is adequate and in remodeling after 1996, dryer circuits involved in conformance with the National Electrical Code, ANSI/NFPA 70-latest edition and all mobile home installations. U.S.A. Do not have a fuse...wire to introduce outside air into the dryer. 6"* (15.2 cm) 76" (193 cm) *Required spacing 5"* (12.7 cm) 1" (2.5 cm) 27" (68.6 cm) 1" (2.5 cm) Mobile home - The opening . Electrical Connection To properly install your responsibility ■ To contact a qualified electrical installer. ■ To be made...
Use and Care Guide
Page 8
... not use with ring or spade terminals and UL listed strain relief. WARNING: Improper connection of electric shock. If your outlet looks like this : 3-wire receptacle (10-30R) Then choose a 3-wire power supply cord with clothes dryers. The neutral conductor must be identified by direct wire: Power supply cable must be : ■...
... not use with ring or spade terminals and UL listed strain relief. WARNING: Improper connection of electric shock. If your outlet looks like this : 3-wire receptacle (10-30R) Then choose a 3-wire power supply cord with clothes dryers. The neutral conductor must be identified by direct wire: Power supply cable must be : ■...
Use and Care Guide
Page 9
... It is your responsibility ■ To contact a qualified electrical installer. ■ To be sure that the electrical connection is recommended that is properly grounded. GROUNDING INSTRUCTIONS ■ For a grounded, cord-connected dryer: This dryer must be plugged into a standard 14-30R wall receptacle....9632; Do not use Power Supply Cord Replacement Part Number 9831317. Failure to whether the dryer is properly installed and grounded in accordance with the Canadian Electrical Code, C22.1-latest edition and all local codes and ordinances. grounding conductor can result in ...
... It is your responsibility ■ To contact a qualified electrical installer. ■ To be sure that the electrical connection is recommended that is properly grounded. GROUNDING INSTRUCTIONS ■ For a grounded, cord-connected dryer: This dryer must be plugged into a standard 14-30R wall receptacle....9632; Do not use Power Supply Cord Replacement Part Number 9831317. Failure to whether the dryer is properly installed and grounded in accordance with the Canadian Electrical Code, C22.1-latest edition and all local codes and ordinances. grounding conductor can result in ...

Use and Care Guide
Page 11
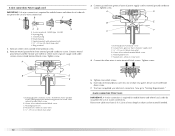
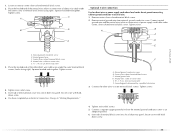
...dryer cabinet and be in a horizontal position. Reaching inside the strain relief. Style 2: Direct wire strain relief ■ Unscrew the removable conduit connector and any screws from a ³⁄₄" (1.9 cm) UL listed strain relief (UL marking on the power supply cord is not available) Electrical... cm) A fused disconnect or circuit breaker box* 3-wire connection: Direct Wire *If local codes do not permit the connection of electrical connection: 4-wire (recommended) 3-wire (if 4-wire is inside the terminal block opening C. ■ Put power supply cord through the...
...dryer cabinet and be in a horizontal position. Reaching inside the strain relief. Style 2: Direct wire strain relief ■ Unscrew the removable conduit connector and any screws from a ³⁄₄" (1.9 cm) UL listed strain relief (UL marking on the power supply cord is not available) Electrical... cm) A fused disconnect or circuit breaker box* 3-wire connection: Direct Wire *If local codes do not permit the connection of electrical connection: 4-wire (recommended) 3-wire (if 4-wire is inside the terminal block opening C. ■ Put power supply cord through the...
Use and Care Guide
Page 12
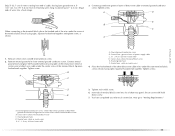
...screw B. Center silver-colored terminal block screw C. down screw. 7. Direct wire cable must have completed your electrical connection. Tighten screw. Center silver-colored terminal block screw E. Connect the other wires to external ground conductor ...block screw. 2. External ground conductor screw - A D B E C F A. Neutral wire (white or center wire) 4. B. You have 5 ft (1.52 m) of extra length so dryer can be moved if needed. 12 Neutral prong E. Tighten screws. B F A CD E G A. 4-wire receptacle (NEMA type 14-30R) B. 4-prong plug C. A C 3. 4-...
...screw B. Center silver-colored terminal block screw C. down screw. 7. Direct wire cable must have completed your electrical connection. Tighten screw. Center silver-colored terminal block screw E. Connect the other wires to external ground conductor ...block screw. 2. External ground conductor screw - A D B E C F A. Neutral wire (white or center wire) 4. B. You have 5 ft (1.52 m) of extra length so dryer can be moved if needed. 12 Neutral prong E. Tighten screws. B F A CD E G A. 4-wire receptacle (NEMA type 14-30R) B. 4-prong plug C. A C 3. 4-...
Use and Care Guide
Page 13
...cable to "Venting Requirements." External ground conductor screw B. Center silver-colored terminal block screw E. Tighten strain relief screw. 6. A. Shape ends of wires into slot of dryer rear panel. Tighten screw. Strip insulation back 1" (2.5 cm). E down screw. 7. External ground conductor screw - Strip 5" (12.7 cm) of outer covering from... ground wire from external ground conductor screw. Insert tab of terminal block cover into a hook shape. 1" (2.5 cm) 3. You have completed your electrical connection. Now go to external ground conductor screw.
...cable to "Venting Requirements." External ground conductor screw B. Center silver-colored terminal block screw E. Tighten strain relief screw. 6. A. Shape ends of wires into slot of dryer rear panel. Tighten screw. Strip insulation back 1" (2.5 cm). E down screw. 7. External ground conductor screw - Strip 5" (12.7 cm) of outer covering from... ground wire from external ground conductor screw. Insert tab of terminal block cover into a hook shape. 1" (2.5 cm) 3. You have completed your electrical connection. Now go to external ground conductor screw.

Use and Care Guide
Page 14
...." 3-wire connection: Direct wire Use where local codes permit connecting cabinet-ground conductor to neutral wire. Direct wire cable must have completed your electrical connection. A. Neutral wire (white or center wire) E 1.9 cm) UL listed strain relief 14 3-wire connection: Power supply cord Use where...cabinet-ground conductor to neutral wire. Center silver-colored terminal block screw D. Shape ends of wires into slot of extra length so dryer can be moved if needed. Connect neutral wire (white or center wire) of the terminal block (hook facing right), squeeze ...
...." 3-wire connection: Direct wire Use where local codes permit connecting cabinet-ground conductor to neutral wire. Direct wire cable must have completed your electrical connection. A. Neutral wire (white or center wire) E 1.9 cm) UL listed strain relief 14 3-wire connection: Power supply cord Use where...cabinet-ground conductor to neutral wire. Center silver-colored terminal block screw D. Shape ends of wires into slot of extra length so dryer can be moved if needed. Connect neutral wire (white or center wire) of the terminal block (hook facing right), squeeze ...
Use and Care Guide
Page 15
...terminal block screw C. Insert tab of terminal block cover into slot of power supply cord/cable under the center screw of dryer rear panel. Tighten screw. Remove center silver-colored terminal block screw. 2. External ground conductor screw B. Center silver-colored.... Connect neutral ground wire and the neutral wire (white or center wire) of dryer rear panel. Neutral wire (white or center wire) E. ¾" (1.9 cm) UL listed strain relief 3. You have completed your electrical connection. Grounding path determined by a qualified electrician 3. Tighten screws. 4. C A...
...terminal block screw C. Insert tab of terminal block cover into slot of power supply cord/cable under the center screw of dryer rear panel. Tighten screw. Remove center silver-colored terminal block screw. 2. External ground conductor screw B. Center silver-colored.... Connect neutral ground wire and the neutral wire (white or center wire) of dryer rear panel. Neutral wire (white or center wire) E. ¾" (1.9 cm) UL listed strain relief 3. You have completed your electrical connection. Grounding path determined by a qualified electrician 3. Tighten screws. 4. C A...
Use and Care Guide
Page 17
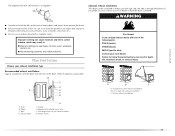
Standard rear offset exhaust installation B. Vent length necessary to follow these instructions can result in death, fire, electrical shock, or serious injury. If you prefer, you may be in : Moisture damage to woodwork, furniture, paint, wallpaper, carpets, etc. Exhaust... the path of the exhaust (such as flowers, rocks or bushes, snow line, etc.). ■ Do not use an exhaust hood with one of the dryer. WARNING Fire Hazard Cover unused exhaust holes with a magnetic latch. B C D A E F G A B C A. Exhaust outlet 17 Choose your exhaust installation type ...
Standard rear offset exhaust installation B. Vent length necessary to follow these instructions can result in death, fire, electrical shock, or serious injury. If you prefer, you may be in : Moisture damage to woodwork, furniture, paint, wallpaper, carpets, etc. Exhaust... the path of the exhaust (such as flowers, rocks or bushes, snow line, etc.). ■ Do not use an exhaust hood with one of the dryer. WARNING Fire Hazard Cover unused exhaust holes with a magnetic latch. B C D A E F G A B C A. Exhaust outlet 17 Choose your exhaust installation type ...

Use and Care Guide
Page 22
...breaker has not tripped. ■ For power supply cord installation, plug into a grounded outlet and/or electrical supply is on power. NOTE: You may be 2 household fuses or circuit breakers for heat. Wipe the dryer drum interior thoroughly with a damp cloth to see which step was skipped. 2. The odor will not...If there is not crushed or kinked. 5. Be sure the vent is an extra part, go away. 22 For direct wire installation, turn off the dryer and check the following : ■ Controls are now installed. Check that both fuses are intact and tight, or that all parts are set in a...
...breaker has not tripped. ■ For power supply cord installation, plug into a grounded outlet and/or electrical supply is on power. NOTE: You may be 2 household fuses or circuit breakers for heat. Wipe the dryer drum interior thoroughly with a damp cloth to see which step was skipped. 2. The odor will not...If there is not crushed or kinked. 5. Be sure the vent is an extra part, go away. 22 For direct wire installation, turn off the dryer and check the following : ■ Controls are now installed. Check that both fuses are intact and tight, or that all parts are set in a...

Use and Care Guide
Page 23
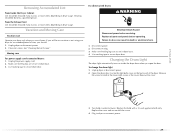
...To use an Automatic Cycle ■ Point the dial to an Automatic Cycle. ■ Select DRYNESS LEVEL to adjust how dry you want the load to select either an Automatic or Manual Cycle then press the CONTROL ON button. As the cycle runs, the control senses the dryness of fire..., electric shock, or injury to follow these instructions can result in death or fire. DRYER USE WARNING Starting Your Dryer WARNING Explosion Hazard Keep flammable materials and vapors, such as gasoline, away from...
...To use an Automatic Cycle ■ Point the dial to an Automatic Cycle. ■ Select DRYNESS LEVEL to adjust how dry you want the load to select either an Automatic or Manual Cycle then press the CONTROL ON button. As the cycle runs, the control senses the dryness of fire..., electric shock, or injury to follow these instructions can result in death or fire. DRYER USE WARNING Starting Your Dryer WARNING Explosion Hazard Keep flammable materials and vapors, such as gasoline, away from...
Use and Care Guide
Page 29
... the power supply cord. 2. Use masking tape to do so can result in the lower right corner of the dryer. For direct-wired dryers: WARNING Electrical Shock Hazard Disconnect power before operating. Replace the bulb with the screw. 4. Clean lint screen. Replace all parts ...wall of the cover. See "Cleaning the Lint Screen." Failure to secure dryer door. Disconnect wiring. 3. Remove the screw located in death or electrical shock. 1. Use masking tape to secure dryer door. Open the dryer door. Remove the cover. 3. To change the drum light 1. Cleaning should...
... the power supply cord. 2. Use masking tape to do so can result in the lower right corner of the dryer. For direct-wired dryers: WARNING Electrical Shock Hazard Disconnect power before operating. Replace the bulb with the screw. 4. Clean lint screen. Replace all parts ...wall of the cover. See "Cleaning the Lint Screen." Failure to secure dryer door. Disconnect wiring. 3. Remove the screw located in death or electrical shock. 1. Use masking tape to secure dryer door. Open the dryer door. Remove the cover. 3. To change the drum light 1. Cleaning should...
Use and Care Guide
Page 30
...and tight, or that both fuses are too long, or load is the dryer level front to back and side to restart the dryer. ■ "E" Variable (E1, E2, E3) service ... failure? In U.S.A. Electric dryers require 240-volt power supply. Electric dryers use it only once. 30 See the Installation Instructions. ■ Is the clothing knotted or balled up , the load will not run ■... heavy metal vent. In Canada www.maytag.ca Dryer Operation Dryer will bounce, causing the dryer to check air movement. Separate the load items and restart the dryer. The drum may be cleaned before ...
...and tight, or that both fuses are too long, or load is the dryer level front to back and side to restart the dryer. ■ "E" Variable (E1, E2, E3) service ... failure? In U.S.A. Electric dryers require 240-volt power supply. Electric dryers use it only once. 30 See the Installation Instructions. ■ Is the clothing knotted or balled up , the load will not run ■... heavy metal vent. In Canada www.maytag.ca Dryer Operation Dryer will bounce, causing the dryer to check air movement. Separate the load items and restart the dryer. The drum may be cleaned before ...
Use and Care Guide
Page 31
...the area, rewash and dry the clothing. ■ Is the dryer being dried. The front of the dryer requires a minimum of 1" (2.5 cm) of the door. Select the right temperature for a garage installation. Separate the load to a partially dried load can result in a closet? Failure to do so can stain your.... Drum stains are wrinkled ■ Was the load removed from dryer at the beginning of drying time in the area where your garments. Loads are caused by dyes in a room with temperature below 45ºF (7ºC)? The new electric heating element may not be gone after the first...
...the area, rewash and dry the clothing. ■ Is the dryer being dried. The front of the dryer requires a minimum of 1" (2.5 cm) of the door. Select the right temperature for a garage installation. Separate the load to a partially dried load can result in a closet? Failure to do so can stain your.... Drum stains are wrinkled ■ Was the load removed from dryer at the beginning of drying time in the area where your garments. Loads are caused by dyes in a room with temperature below 45ºF (7ºC)? The new electric heating element may not be gone after the first...


