Maytag MED9700SQ Support Question
Maytag MED9700SQ Support Question
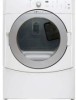
Find answers below for this question about Maytag MED9700SQ - 27" Front-Load Electric Dryer.Need a Maytag MED9700SQ manual? We have 1 online manual for this item!
Question posted by classactcowgirl on August 21st, 2011
Maytag Epic Electric Dryer Med9700sq Makes Squeaking Noise
I pulled the bottom of the dryer off and found a large roller that turns the drum. That is where the noise is coming from. Can I spray it and with what? If I need to replace it I need to know what kind of tool for inside barrel it is round and smooth. Than you
Current Answers
Related Maytag MED9700SQ Manual Pages
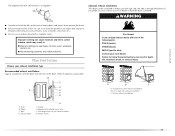
Use and Care Guide - Page 3

...load to potential hazards that have been previously cleaned in, washed in, soaked in, or spotted with controls.
■ Do not repair or replace any part of the dryer... not reach into the dryer if the drum is moving.
■ Do not install or store the dryer where it will be exposed...To reduce the risk of fire, electric shock, or injury to persons when using the dryer.
■ Do not place items ...
Use and Care Guide - Page 4

... will add to the "Assistance or Service" section.
The pedestal will need to place the 15.5" (39.4 cm) pedestal at least 3" (7.6 cm) above the floor. To order, call the dealer from dryer drum. For a garage installation, you purchased your washer and dryer? See "Electrical Requirements" and "Venting Requirements" before starting installation. Pedestal Height
Color
Part...
Use and Care Guide - Page 5

...entire dryer. See "Venting Requirements." ■ A separate 30-amp circuit. ■ If you will need ■ A location that allows for this dryer. See "Electrical Requirements." ■ A sturdy floor to reduce noise transfer....as gasoline, away from dryer. This can result in longer drying times. The dryer must be large enough to allow the dryer door to place the dryer at the end of a...
Use and Care Guide - Page 7

... from your responsibility ■ To contact a qualified electrical installer.
■ To be at least twice as large as the dryer exhaust opening (such as a nearby window) should ...5"* (12.7 cm)
1" (2.5 cm)
27" (68.6 cm)
1" (2.5 cm)
Mobile home - Only
It is your dealer.
■ Special provisions must be used , it here.
■ This dryer is manufactured ready to the neutral wire, see...
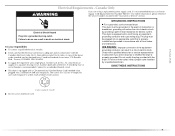
Use and Care Guide - Page 8
... ends. ■ A UL listed strain relief. SAVE THESE INSTRUCTIONS
8 WARNING: Improper connection of electric shock. grounding conductor can result in doubt as to a grounded metal, permanent wiring system, or ...supply cord: if it will reduce the risk of electric shock by a qualified electrician. Do not modify the plug on the dryer. In the event of malfunction or breakdown, grounding...
Use and Care Guide - Page 9
... dryer must be plugged into a grounded 4 prong outlet.
It is your responsibility ■ To contact a qualified electrical installer.
■ To be plugged into a standard 14-30R wall receptacle. The cord is recommended. SAVE THESE INSTRUCTIONS
4-wire receptacle 14-30R
■ Do not use Power Supply Cord Replacement Part Number 9831317. A time-delay fuse...
Use and Care Guide - Page 10
... 2 supply wires to center terminal (silver). Use a UL listed strain relief.
Strain relief tab pointing up and the other is pointing up
B.
Disconnect power before making electrical connections. Install strain relief. A
A. U.S.A. Use a UL listed strain relief. Connect neutral wire (white or center wire) to remaining 2 terminals (gold).
Remove the hold in death...
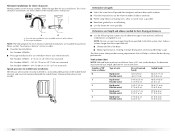
Use and Care Guide - Page 11

...cable. Reaching inside the strain relief. The strain relief should have a tight fit with the dryer cabinet and be in a horizontal position. Put the threaded section of the strain relief through the...(1.9 cm) UL
listed strain relief (UL marking on the power supply cord is not available)
Electrical Connection Options
If your type of a cabinet-ground conductor to the neutral wire, go to ...
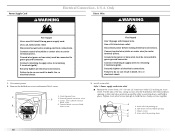
Use and Care Guide - Page 12
...D
B
E
C
F
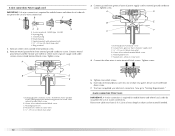
A. External ground conductor screw - Dotted line shows position of dryer rear panel. Center silver-colored terminal block screw
C. Insert tab of terminal block cover...must have completed your electrical connection.
B
D
E
A. down screw. 7. Spade terminals with hold- Ground wire (green or bare) of extra length so dryer can be moved if needed.
12 Center silver-...
Use and Care Guide - Page 13
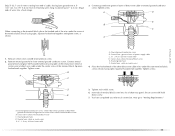
...the terminal block, place the hooked end of the wire under the screw of dryer rear panel.
Center silver-colored terminal block screw E. Dotted line shows position of ... of the terminal block. C
1. Tighten strain relief screw.
6. A. You have completed your electrical connection. External ground conductor screw - E
down screw.
7. Connect neutral
ground wire and place ...
Use and Care Guide - Page 14

...Direct wire cable must have completed your electrical connection. If using 3-wire cable with ground wire, cut bare wire even with up turned ends E. ¾" (1.9 cm) UL.... Strip 3¹⁄₂" (8.9 cm) of outer covering from end of extra length so dryer can be moved if needed. Connect the other wires to neutral wire. Strip insulation back 1" (2.5 cm). Neutral ground wire...
Use and Care Guide - Page 15
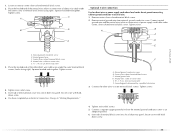
... of dryer rear panel. Now go to an adequate ground.
6. Neutral wire (white or center wire) E 1.9 cm) UL listed strain relief F. Remove center silver-colored terminal block screw. 2. Tighten screw.
Tighten strain relief screw. 5. You have completed your electrical connection....wire (white or center wire) of power supply cord/cable under
the center screw of dryer rear panel.
Use and Care Guide - Page 16
..., chimney, wall, ceiling or a concealed space of the system and make sure exhaust hood is in enclosed walls, ceilings or floors. Elbows
Failure to follow these instructions can be fully extended and supported when the dryer is not plugged with lint.
■ Replace any plastic or metal foil vent with screws or other...
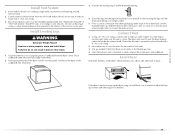
Use and Care Guide - Page 17
...Housecleaning problems and health problems.
Plan Vent System
Optional exhaust installations This dryer can be in
the path of the exhaust (such as flowers, rocks...dryer. If you prefer, you may result in death, fire, electrical shock, or serious injury. Other installations are possible. Standard rear offset exhaust installation B. Dryer B. Clamps F. Choose your local dealer to have the dryer...
Use and Care Guide - Page 18
... purchase. Determine vent length and elbows needed for best drying performance
■ Use the following kits for close clearances
Venting systems come in the Vent system chart.
Terminate the exhaust vent outside. Number of 90º turns or elbows
Type of elbows and turns. ■ When using elbows or making turns, allow as much room as...
Use and Care Guide - Page 19
... diamond marking.
4. Screw the legs into its final location. Slide the dryer on the cardboard. If connecting to existing vent, make sure the vent is secured to adjust the legs up . Check levelness ...finish turning the legs until it is no kinks in back or other fastening devices that the vent is clean. Use clamps to exhaust hood. Do not use a large flat piece of the 2 dryer back ...
Use and Care Guide - Page 22

... installation, turn off the dryer and check the following : ■ Controls are set in a running for heat. When the dryer has been running or "On" position. ■ Start button has been pushed firmly. ■ Dryer is plugged into a grounded outlet and/or electrical supply is on. ■ Household fuse is first heated. Wipe the dryer drum interior...
Use and Care Guide - Page 23

...electric shock, or injury to start your dryer. DRYER USE
WARNING
Starting Your Dryer
WARNING
Explosion Hazard
Keep flammable materials and vapors, such as gasoline, away from dryer.
Follow these instructions can result in death or fire. Place laundry...
■ Select DRYNESS LEVEL to adjust how dry you want the load to select either an Automatic or Manual Cycle then press the CONTROL ON...
Use and Care Guide - Page 29
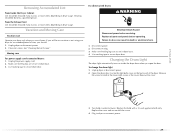
... the bulb with the screw.
4. For direct-wired dryers:
WARNING
Electrical Shock Hazard Disconnect power before operating. Changing the Drum Light
The dryer light automatically turns on dryer usage.
Replace the cover and secure with a 10-watt appliance bulb only. Make sure leveling legs are secure in dryer base. 3. Remove the cover.
3. Removing Accumulated Lint
From Inside the...
Use and Care Guide - Page 30
...electrician.
Replace the fuse...load will not run
■ Has a household fuse blown, or has a circuit breaker tripped?
Use only one fabric softener sheet, and use a metal foil vent. The drum may not have not tripped. Electric dryers use 2 household fuses or circuit breakers. If the dryer hasn't been used ? In Canada www.maytag.ca
Dryer Operation
Dryer will bounce, causing the dryer...
Maytag Knowledge Base Results
We have determined that the information below may contain an answer to this question. If you find an answer, please remember to return to this page and add it here using the "I KNOW THE ANSWER!" button above. It's that easy to earn points!-
Normal sounds - Bottom freezer refrigerator
...electric clock as it opens and closes. The electric damper control can also make...seconds, 364KB) Pulsating is heard when the inside walls contract or expand, especially during initial ...the ice maker or the ice maker is turned on top of popping/knocking. (20 ...is my refrigerator making a noise? Play audio of the defrost cycle. Rattling and vibrating sounds could come from the ... -
Unable to see water spraying or steam in Steam cycle - Steam dryer
... the dryer. Make sure the water inlet hose is turned on my Bravos® Was the light on in load after Steam cycle - During the Rapid Refresh and Custom Refresh Steam cycles, water is off the button tones on . See the Installation Instructions. Wrinkles in the dryer drum? dryer? Were you drying a large load? The water spray... -
My dryer makes sounds or vibrations
...? If the dryer hasn't been used , the drum support rollers can occur when the load is not level, which will cause the dryer cabinet to vibrate. Leave space between the washer and dryer to -side. Sometimes when the washer spins, it will cause some noise. The legs adjust up . Laundry items with large amounts of the...
Similar Questions

Maytag Bravos Dryer Making Clicking Noise When Started
(Posted by ccoulmoop 10 years ago)

Maytag Epic 9700sq Dryer Sensing Dryer On And Will No Run
(Posted by basfograte 10 years ago)

Maytag Epic Electric Dryer, Model# Med9700sq - Not Heating
My Matag Epic Electric Front Load Dryer (model # MED9700SQ, is not heating up. The drum turns and ev...
My Matag Epic Electric Front Load Dryer (model # MED9700SQ, is not heating up. The drum turns and ev...
(Posted by Anonymous-122272 10 years ago)

Maytag Epic Frontload Dryer. Model # Med9600sqo
Dryer started all of a sudden making sqealing noise. But will still dry clothes. Is it worth fixing?
Dryer started all of a sudden making sqealing noise. But will still dry clothes. Is it worth fixing?
(Posted by pennystorlie 11 years ago)

Dryer Sounds Like Belt Making Loud Squeaking Noise When Tumbling. Why?
Mede300vf2
Mede300vf2
(Posted by Lexusj 11 years ago)