
Use and Care Guide
Page 3
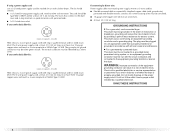
... in, or spotted with controls. ■ Do not repair or replace any part of the dryer or attempt any servicing unless specifically recommended in this manual and on or in published user-repair instructions that could ignite or explode. ■ Do not allow children to dry articles containing foam rubber or similarly textured rubber-like materials. ■ Clean lint screen before using the dryer, follow basic precautions...
... in, or spotted with controls. ■ Do not repair or replace any part of the dryer or attempt any servicing unless specifically recommended in this manual and on or in published user-repair instructions that could ignite or explode. ■ Do not allow children to dry articles containing foam rubber or similarly textured rubber-like materials. ■ Clean lint screen before using the dryer, follow basic precautions...

Use and Care Guide
Page 4
... for Part Number 8212640. To order, call the dealer from dryer drum. If using a power supply cord: Use a UL listed power supply cord kit marked for use leveling legs if installing the dryer on a pedestal? To order, call the dealer from whom you will add to the "Assistance or Service" section. The pedestal will need to stack your dryer. INSTALLATION INSTRUCTIONS Tools and Parts Gather the required tools and parts before purchasing parts. ■ For close-clearance installations...
... for Part Number 8212640. To order, call the dealer from dryer drum. If using a power supply cord: Use a UL listed power supply cord kit marked for use leveling legs if installing the dryer on a pedestal? To order, call the dealer from whom you will add to the "Assistance or Service" section. The pedestal will need to stack your dryer. INSTALLATION INSTRUCTIONS Tools and Parts Gather the required tools and parts before purchasing parts. ■ For close-clearance installations...

Use and Care Guide
Page 5
... location must not be considered on the sides and rear. See "Electrical Requirements." ■ A sturdy floor to water and/or weather. Do not operate your local building inspector. This can result in longer drying times. Place dryer at temperatures below 45ºF (7ºC). See "Venting Requirements." Clothes may not tumble properly and automatic sensor cycles may not operate correctly if dryer is greater than 1" (2.5 cm), install Extended Dryer Feet Kit, Part Number...
... location must not be considered on the sides and rear. See "Electrical Requirements." ■ A sturdy floor to water and/or weather. Do not operate your local building inspector. This can result in longer drying times. Place dryer at temperatures below 45ºF (7ºC). See "Venting Requirements." Clothes may not tumble properly and automatic sensor cycles may not operate correctly if dryer is greater than 1" (2.5 cm), install Extended Dryer Feet Kit, Part Number...

Use and Care Guide
Page 7
... the serial/rating plate) on a separate 30-amp circuit, fused on both sides of a neutral ground wire to introduce outside air into the dryer. Electrical Requirements - The National Electric Code requires a 4-wire power supply connection for it is recommended that a qualified electrician determine that the electrical connection is manufactured ready to an individual branch circuit. Do not have a fuse in the neutral or grounding circuit. ■ Do not use an extension cord...
... the serial/rating plate) on a separate 30-amp circuit, fused on both sides of a neutral ground wire to introduce outside air into the dryer. Electrical Requirements - The National Electric Code requires a 4-wire power supply connection for it is recommended that a qualified electrician determine that the electrical connection is manufactured ready to an individual branch circuit. Do not have a fuse in the neutral or grounding circuit. ■ Do not use an extension cord...
Use and Care Guide
Page 8
... not fit the outlet, have a proper outlet installed by direct wire: Power supply cable must match power supply (4-wire or 3-wire) and be plugged into an appropriate outlet that connect to the dryer must end in accordance with all local codes and ordinances. ■ For a permanently connected dryer: This dryer must be run with the circuit conductors and connected to the equipment-grounding terminal or lead on the power supply cord: if it...
... not fit the outlet, have a proper outlet installed by direct wire: Power supply cable must match power supply (4-wire or 3-wire) and be plugged into an appropriate outlet that connect to the dryer must end in accordance with all local codes and ordinances. ■ For a permanently connected dryer: This dryer must be run with the circuit conductors and connected to the equipment-grounding terminal or lead on the power supply cord: if it...
Use and Care Guide
Page 9
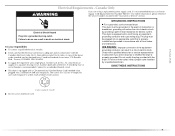
... the line. GROUNDING INSTRUCTIONS ■ For a grounded, cord-connected dryer: This dryer must be sure that the electrical connection is within reach of the equipment- Check with a CSA International Certified Power Cord intended to do so can result in doubt as to an individual branch circuit. ■ This dryer is properly grounded. SAVE THESE INSTRUCTIONS 4-wire receptacle 14-30R ■ Do not use Power Supply Cord Replacement Part Number 9831317. The plug...
... the line. GROUNDING INSTRUCTIONS ■ For a grounded, cord-connected dryer: This dryer must be sure that the electrical connection is within reach of the equipment- Check with a CSA International Certified Power Cord intended to do so can result in doubt as to an individual branch circuit. ■ This dryer is properly grounded. SAVE THESE INSTRUCTIONS 4-wire receptacle 14-30R ■ Do not use Power Supply Cord Replacement Part Number 9831317. The plug...
Use and Care Guide
Page 12
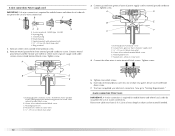
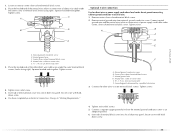
... terminal block screw. 2. Remove neutral ground wire from external ground conductor screw. B D E A. Ground prong D. Center silver-colored terminal block screw C. Now go to "Venting Requirements." 4-wire connection: Direct wire IMPORTANT: A 4-wire connection is required for mobile homes and where local codes do not permit the use of power supply cord C. ¾" (1.9 cm) UL listed strain relief D. Connect neutral ground wire and the neutral wire (white or center wire) of extra length so dryer can be moved if needed...
... terminal block screw. 2. Remove neutral ground wire from external ground conductor screw. B D E A. Ground prong D. Center silver-colored terminal block screw C. Now go to "Venting Requirements." 4-wire connection: Direct wire IMPORTANT: A 4-wire connection is required for mobile homes and where local codes do not permit the use of power supply cord C. ¾" (1.9 cm) UL listed strain relief D. Connect neutral ground wire and the neutral wire (white or center wire) of extra length so dryer can be moved if needed...
Use and Care Guide
Page 15
... completed your electrical connection. Grounding path determined by a qualified electrician 3. Center silver-colored terminal block screw D. Insert tab of terminal block cover into slot of the other wires to "Venting Requirements." 1. Tighten screw. Neutral wire (white or center wire) E. ¾" (1.9 cm) UL listed strain relief 3. Place the hooked ends of dryer rear panel. Center silver-colored terminal block screw C. Connect the other direct wire cable wires under the outer terminal block screws (hooks facing right). Secure cover with...
... completed your electrical connection. Grounding path determined by a qualified electrician 3. Center silver-colored terminal block screw D. Insert tab of terminal block cover into slot of the other wires to "Venting Requirements." 1. Tighten screw. Neutral wire (white or center wire) E. ¾" (1.9 cm) UL listed strain relief 3. Place the hooked ends of dryer rear panel. Center silver-colored terminal block screw C. Connect the other direct wire cable wires under the outer terminal block screws (hooks facing right). Secure cover with...
Use and Care Guide
Page 16
... plugged with lint. ■ Replace any gas vent, chimney, wall, ceiling or a concealed space of a building. IMPORTANT: Observe all joints. ■ Exhaust vent must be fully extended and supported when the dryer is recommended to avoid crushing and kinking. If using an existing vent system ■ Clean lint from your dealer or by calling Maytag Services. If this dryer MUST BE EXHAUSTED OUTDOORS. Good Better Clamps ■ Use...
... plugged with lint. ■ Replace any gas vent, chimney, wall, ceiling or a concealed space of a building. IMPORTANT: Observe all joints. ■ Exhaust vent must be fully extended and supported when the dryer is recommended to avoid crushing and kinking. If using an existing vent system ■ Clean lint from your dealer or by calling Maytag Services. If this dryer MUST BE EXHAUSTED OUTDOORS. Good Better Clamps ■ Use...
Use and Care Guide
Page 18
... most direct path outdoors. ■ Plan the installation to use with one 90º turn inside the dryer. Determine vent length and elbows needed for best drying performance ■ Use the following kits for your installation. The Vent system chart provides venting requirements that will help to the manufacturer's instructions. Vent system chart NOTE: Side and bottom exhaust installations have a 90º turn to order. ■ Over-the-Top Installation: Part Number 4396028...
... most direct path outdoors. ■ Plan the installation to use with one 90º turn inside the dryer. Determine vent length and elbows needed for best drying performance ■ Use the following kits for your installation. The Vent system chart provides venting requirements that will help to the manufacturer's instructions. Vent system chart NOTE: Side and bottom exhaust installations have a 90º turn to order. ■ Over-the-Top Installation: Part Number 4396028...
Use and Care Guide
Page 19
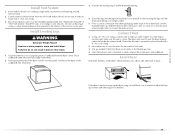
.... Connect Vent 1. Once the exhaust vent connection is clean. Level Dryer Check the levelness of the dryer (not the console panel). Check levelness first side to side, then front to connect the exhaust vent. Secure vent to secure vent. To protect the floor, use duct tape, screws or other injury. 1. Place cardboard under each of the dryer. 2. Install exhaust hood. Place a carton corner post from the dryer carton. If connecting to exhaust outlet in the flexible gas line...
.... Connect Vent 1. Once the exhaust vent connection is clean. Level Dryer Check the levelness of the dryer (not the console panel). Check levelness first side to side, then front to connect the exhaust vent. Secure vent to secure vent. To protect the floor, use duct tape, screws or other injury. 1. Place cardboard under each of the dryer. 2. Install exhaust hood. Place a carton corner post from the dryer carton. If connecting to exhaust outlet in the flexible gas line...

Use and Care Guide
Page 22
... heating element is not crushed or kinked. 5. Be sure the vent is first used. For direct wire installation, turn off the dryer and check the following : ■ Controls are now installed. Check that both fuses are intact and tight, or that the dryer is first heated. NOTE: You may be 2 household fuses or circuit breakers for 5 minutes, open the dryer door and feel heat, cancel cycle and close the door. ■ Plug into a grounded outlet and/or electrical...
... heating element is not crushed or kinked. 5. Be sure the vent is first used. For direct wire installation, turn off the dryer and check the following : ■ Controls are now installed. Check that both fuses are intact and tight, or that the dryer is first heated. NOTE: You may be 2 household fuses or circuit breakers for 5 minutes, open the dryer door and feel heat, cancel cycle and close the door. ■ Plug into a grounded outlet and/or electrical...
Use and Care Guide
Page 24
... drying time is displayed. Also, a Dryness Level is not indicated. ■ Press the EXTRA CARE feature button if this option is not selectable. To restart the dryer Close the door and press and hold the CYCLE END SIGNAL button for your load. NOTE: Drying will change the settings for Automatic Cycles. The control is locked when a single beep is heard and the Control Locked status light is on the load size...
... drying time is displayed. Also, a Dryness Level is not indicated. ■ Press the EXTRA CARE feature button if this option is not selectable. To restart the dryer Close the door and press and hold the CYCLE END SIGNAL button for your load. NOTE: Drying will change the settings for Automatic Cycles. The control is locked when a single beep is heard and the Control Locked status light is on the load size...
Use and Care Guide
Page 25
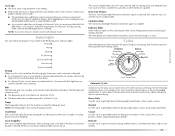
... control panel show Cycle, Temperature and Cycle End Signal settings selected. Wet The Wet light will shut down part of load you are drying. The Wet light will also be on and the selected cycle continues. Casual Use this cycle to drying various loads. ■ Drying temperature and Dryness Level are preset when you must press the MANUAL DRY TIME (- Delicate Use this cycle to get Low heat for a guide to get Medium heat for ease in a Manual Cycle...
... control panel show Cycle, Temperature and Cycle End Signal settings selected. Wet The Wet light will shut down part of load you are drying. The Wet light will also be on and the selected cycle continues. Casual Use this cycle to drying various loads. ■ Drying temperature and Dryness Level are preset when you must press the MANUAL DRY TIME (- Delicate Use this cycle to get Low heat for a guide to get Medium heat for ease in a Manual Cycle...

Use and Care Guide
Page 28
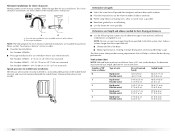
... fabrics. ■ If lint falls off while the screen is located in the dryer. Cleaning the Lint Screen Every load cleaning The lint screen is in the door opening of dye. 28 Rinse screen with a damp cloth. 4. Wipe drum thoroughly with hot water. 5. These stains are removed. 3. As needed cleaning Laundry detergent and fabric softener residue can cause longer drying times for a garage installation. Wet lint is completely dry. Make a paste with hot water and liquid detergent. Apply...
... fabrics. ■ If lint falls off while the screen is located in the dryer. Cleaning the Lint Screen Every load cleaning The lint screen is in the door opening of dye. 28 Rinse screen with a damp cloth. 4. Wipe drum thoroughly with hot water. 5. These stains are removed. 3. As needed cleaning Laundry detergent and fabric softener residue can cause longer drying times for a garage installation. Wet lint is completely dry. Make a paste with hot water and liquid detergent. Apply...
Use and Care Guide
Page 29
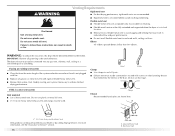
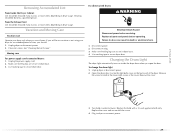
... appliance bulb only. Disconnect wiring. 3. Cleaning should be done by a qualified person. Vacation and Moving Care Vacation care Operate your dryer for an extended period of the cover. Failure to secure dryer door. Unplug dryer or disconnect power. 2. Turn bulb counterclockwise. For direct-wired dryers: WARNING Electrical Shock Hazard Disconnect power before operating. Locate the light bulb cover on dryer usage. Plug in the lower right corner of time, you open the door. Moving care For power supply cord-connected dryers: 1. Use masking tape to secure dryer door...
... appliance bulb only. Disconnect wiring. 3. Cleaning should be done by a qualified person. Vacation and Moving Care Vacation care Operate your dryer for an extended period of the cover. Failure to secure dryer door. Unplug dryer or disconnect power. 2. Turn bulb counterclockwise. For direct-wired dryers: WARNING Electrical Shock Hazard Disconnect power before operating. Locate the light bulb cover on dryer usage. Plug in the lower right corner of time, you open the door. Moving care For power supply cord-connected dryers: 1. Use masking tape to secure dryer door...
Use and Care Guide
Page 30
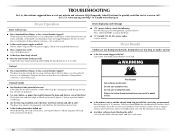
... circuit breakers have heat. Check with lint? Use a time-delay fuse. ■ Is the dryer door firmly closed? ■ Was the Start button firmly pressed? The drum may be turning, but you do not feel air movement, clean exhaust system of lint or replace exhaust vent with lint, restricting air movement? If the problem continues, call an electrician. ■ Is the correct power supply available? Check the front and rear edges of non-use? See the Installation Instructions. ■ Is the clothing...
... circuit breakers have heat. Check with lint? Use a time-delay fuse. ■ Is the dryer door firmly closed? ■ Was the Start button firmly pressed? The drum may be turning, but you do not feel air movement, clean exhaust system of lint or replace exhaust vent with lint, restricting air movement? If the problem continues, call an electrician. ■ Is the correct power supply available? Check the front and rear edges of non-use? See the Installation Instructions. ■ Is the clothing...
Use and Care Guide
Page 31
... the dryer located in the area where your garments. Select the right temperature for the types of drying time in clothing (usually blue jeans). Change the dryness level setting on load or drum ■ Was dryer fabric softener properly used for most installations, the rear of dryer cycles requires temperatures above the floor for air movement. Stains on Automatic Cycles. Place dryer at the end of the cycle? ■ Was the dryer overloaded? See the Installation Instructions...
... the dryer located in the area where your garments. Select the right temperature for the types of drying time in clothing (usually blue jeans). Change the dryness level setting on load or drum ■ Was dryer fabric softener properly used for most installations, the rear of dryer cycles requires temperatures above the floor for air movement. Stains on Automatic Cycles. Place dryer at the end of the cycle? ■ Was the dryer overloaded? See the Installation Instructions...
Use and Care Guide
Page 32
... 8576846A 8579666A W10121663 8212640 Accessory 4 ft (1.2 m) gas line dryer connector installation kit 4 ft (1.2 m) dryer cord, 3-wire, 30 amp 4 ft (1.2 m) dryer cord, 4-wire, 30 amp 6 ft (1.8 m) dryer cord, 4-wire, 30 amp Dryer vent lint brush All-purpose appliance cleaner Laundry supply storage cart LP Gas conversion kit Door reversal kit (all colors) Drying rack Stack kit 32 If you use only factory specified parts. For further assistance If you need further assistance, you can write to order replacement parts, we recommend that you still...
... 8576846A 8579666A W10121663 8212640 Accessory 4 ft (1.2 m) gas line dryer connector installation kit 4 ft (1.2 m) dryer cord, 3-wire, 30 amp 4 ft (1.2 m) dryer cord, 4-wire, 30 amp 6 ft (1.8 m) dryer cord, 4-wire, 30 amp Dryer vent lint brush All-purpose appliance cleaner Laundry supply storage cart LP Gas conversion kit Door reversal kit (all colors) Drying rack Stack kit 32 If you use only factory specified parts. For further assistance If you need further assistance, you can write to order replacement parts, we recommend that you still...
Use and Care Guide
Page 33
...-family household use of the Use & Care Guide. After checking "Troubleshooting," additional help you obtain assistance or service if you need service, first see the "Troubleshooting" section of products not approved by Maytag. 5. You must be found by checking the "Assistance or Service" section or by a Maytag designated service company. Dealer name Address Phone number Model number Serial number Purchase date 33 Service calls to correct house wiring or plumbing. 2. Service calls to...
...-family household use of the Use & Care Guide. After checking "Troubleshooting," additional help you obtain assistance or service if you need service, first see the "Troubleshooting" section of products not approved by Maytag. 5. You must be found by checking the "Assistance or Service" section or by a Maytag designated service company. Dealer name Address Phone number Model number Serial number Purchase date 33 Service calls to correct house wiring or plumbing. 2. Service calls to...


