Use and Care Guide
Page 2
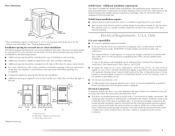
TABLE OF CONTENTS DRYER SAFETY... 3 INSTALLATION INSTRUCTIONS 4 Tools and Parts... 4 l.ocation Requirements ...4 Electrical Requirements - Pour le Canada seulement 40 Exigences concernant I'(!vacuation 41 Planification du syst6me d'_vacuation 42 ...... 25 Options ... 26 End of Cycle Signal ...26 Changing Cycles, Modifiers and Options 27 Drying Rack Option ...27 DRYER CARE... 28 Cleaning the Dryer Location 28 Cleaning the I.int Screen ...28 Cleaning the Dryer Interior 29 Removing Accumulated I 'ampoule d'6clairage du tambour 58 DI_PANNAGE ... 59 ASSISTANCE OU...
TABLE OF CONTENTS DRYER SAFETY... 3 INSTALLATION INSTRUCTIONS 4 Tools and Parts... 4 l.ocation Requirements ...4 Electrical Requirements - Pour le Canada seulement 40 Exigences concernant I'(!vacuation 41 Planification du syst6me d'_vacuation 42 ...... 25 Options ... 26 End of Cycle Signal ...26 Changing Cycles, Modifiers and Options 27 Drying Rack Option ...27 DRYER CARE... 28 Cleaning the Dryer Location 28 Cleaning the I.int Screen ...28 Cleaning the Dryer Interior 29 Removing Accumulated I 'ampoule d'6clairage du tambour 58 DI_PANNAGE ... 59 ASSISTANCE OU...
Use and Care Guide
Page 3
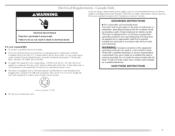
...You can happen if the instructions are very important. IMPORTANT SAFETY iNSTRUCTiONS WARNING: To reduce the risk of fire, electric shock, or injury to persons when using the dryer. [] Do not place items exposed to cooking oils in , or spotted with controls. Items contaminated with cooking ...what the potential hazard is, tell you don't immediately follow instructions. SAVETHESEINSTRUCTIONS .... 3 We have provided many important safety messages in the dryer. This symbol alerts you to catch fire. [] Do not dry articles that could cause a load to potential hazards that can be ...
...You can happen if the instructions are very important. IMPORTANT SAFETY iNSTRUCTiONS WARNING: To reduce the risk of fire, electric shock, or injury to persons when using the dryer. [] Do not place items exposed to cooking oils in , or spotted with controls. Items contaminated with cooking ...what the potential hazard is, tell you don't immediately follow instructions. SAVETHESEINSTRUCTIONS .... 3 We have provided many important safety messages in the dryer. This symbol alerts you to catch fire. [] Do not dry articles that could cause a load to potential hazards that can be ...
Use and Care Guide
Page 4
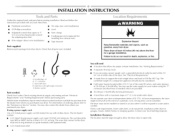
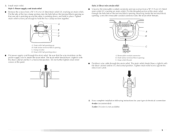
...176;C). Leveling I_'_s (4) _. Rubber washer Parts needed ) which are using a power supply cord: Use a LJL listed power supply cord kit marked for purchase from the dealer from whom you purchased your dryer at least 18 inches (46 cm) above the floor for ...wrench that all parts were included. Check existing electrical supply and venting and see "Electrical Requirements" and "Venting Requirements" before starting installation. Do not operate your dryer. Explosion Hazard Keep flammable materials and vapors, such as gasoline, away from dryer drum. Short inlet hose D. If using ...
...176;C). Leveling I_'_s (4) _. Rubber washer Parts needed ) which are using a power supply cord: Use a LJL listed power supply cord kit marked for purchase from the dealer from whom you purchased your dryer at least 18 inches (46 cm) above the floor for ...wrench that all parts were included. Check existing electrical supply and venting and see "Electrical Requirements" and "Venting Requirements" before starting installation. Do not operate your dryer. Explosion Hazard Keep flammable materials and vapors, such as gasoline, away from dryer drum. Short inlet hose D. If using ...
Use and Care Guide
Page 5
... Safety, Title 24, HUD Part 280) or Standard CAN/CSA-Z240 MH. The neutral ground conductor is adequate. Electrical Connection [b properly install your dryer, you must be at least twice as large as the dryer exhaust opening (such as a nearby window) should lye considered for ease of the terminal block. Connect to an...
... Safety, Title 24, HUD Part 280) or Standard CAN/CSA-Z240 MH. The neutral ground conductor is adequate. Electrical Connection [b properly install your dryer, you must be at least twice as large as the dryer exhaust opening (such as a nearby window) should lye considered for ease of the terminal block. Connect to an...

Use and Care Guide
Page 6
... a 3-wire receptacle of NEMA t_/pe 10-30R. 6 Do not modify the plug on WARNING: Improper connection of least resistance for electric current. If your outlet looks like this : If connecting by providing a path of the equipment- The plug must be identified by a... qualified electrician. grounding conductor can result in accordance with all local codes and ordinances. [] For a permanently connected dryer: This dryer must be connected to a grounded metal, permanent wiring system, or an equipment-grounding conductor must be plugged into an appropriate outlet ...
... a 3-wire receptacle of NEMA t_/pe 10-30R. 6 Do not modify the plug on WARNING: Improper connection of least resistance for electric current. If your outlet looks like this : If connecting by providing a path of the equipment- The plug must be identified by a... qualified electrician. grounding conductor can result in accordance with all local codes and ordinances. [] For a permanently connected dryer: This dryer must be connected to a grounded metal, permanent wiring system, or an equipment-grounding conductor must be plugged into an appropriate outlet ...
Use and Care Guide
Page 7
...The plug must be grounded. Do not modify the plug provided with the dryer: if it is properly grounded. if you are using a replacement power supply cord, it will reduce the risk of electric shock by a qualified electrician. Check with a qualified electrician or service representative ... • [b supply the required 4 wire, single phase, 120/240 volt, 60 Hz., AC only electrical supply on a separate 30-amp circuit, fused on both sides of dryer's final location. .... This dryer is recommended. A copy of the above codes standard may be sure that is equipped with a cord having...
...The plug must be grounded. Do not modify the plug provided with the dryer: if it is properly grounded. if you are using a replacement power supply cord, it will reduce the risk of electric shock by a qualified electrician. Check with a qualified electrician or service representative ... • [b supply the required 4 wire, single phase, 120/240 volt, 60 Hz., AC only electrical supply on a separate 30-amp circuit, fused on both sides of dryer's final location. .... This dryer is recommended. A copy of the above codes standard may be sure that is equipped with a cord having...
Use and Care Guide
Page 9
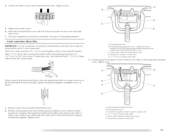
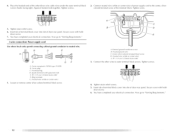
...opening C. Do not further tighten strain relief screws at this point. C A. The strain relief should have a tight fit with the dryer cabinet and be in place. Now complete installation following 4-wire/recommended) 3-wire (if 4-wire is pointing down Put power supply cord ... block opening so that the wire insulation on strain relief). Clamp section D. The strain relief should have a tight fit with the dryer cabinet and be in a horizontal position. Strain relief thread_ Put direct wire cable through the hole below terminal block opening C. 3. Hole...
...opening C. Do not further tighten strain relief screws at this point. C A. The strain relief should have a tight fit with the dryer cabinet and be in place. Now complete installation following 4-wire/recommended) 3-wire (if 4-wire is pointing down Put power supply cord ... block opening so that the wire insulation on strain relief). Clamp section D. The strain relief should have a tight fit with the dryer cabinet and be in a horizontal position. Strain relief thread_ Put direct wire cable through the hole below terminal block opening C. 3. Hole...

Use and Care Guide
Page 10
... 3_ Connect ground wire/green screw. Neubal prong E. Y#" ( 1.9 cm) U[ listed strain relief E. listed, 120/240-volt minimum, 30-amp, dryer power supply cord* 3-wire connection: Power Supply Cord A fused disconnect or circuit breaker box* 3-wire connection: Direct Wire *If local codes do 2_ ...of power supply cord under center, silver-colored terminal block screw. Spade tenTfinals with upturned end_ L ?_" ( 1.9 cm) U_ li_ted strain relief C. Electrical Connection Options If your home has: 4-wire receptacle (NEMA type 14-30R) __._._ 4-wire direct (12.7 cm) 3-wire receptacle (NEMA type ...
... 3_ Connect ground wire/green screw. Neubal prong E. Y#" ( 1.9 cm) U[ listed strain relief E. listed, 120/240-volt minimum, 30-amp, dryer power supply cord* 3-wire connection: Power Supply Cord A fused disconnect or circuit breaker box* 3-wire connection: Direct Wire *If local codes do 2_ ...of power supply cord under center, silver-colored terminal block screw. Spade tenTfinals with upturned end_ L ?_" ( 1.9 cm) U_ li_ted strain relief C. Electrical Connection Options If your home has: 4-wire receptacle (NEMA type 14-30R) __._._ 4-wire direct (12.7 cm) 3-wire receptacle (NEMA type ...
Use and Care Guide
Page 11
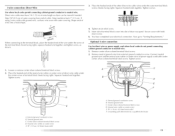
... L Neutral wire (white or center wire) Secure cover with hold- You have 5 ft (1.52 m) of extra length so dryer can be moved if needed. Cut 11A" (3.8 cm) from external ground conductor screw. Center silver-colored ten'ninal block screw...screw. Neutral ground wire B. Y4" ( 1.9 cm) UL listed strain relief Connect ground wire/green screw. Direct wire cable must have completed your electrical connection. Strip insulation back 1" (2.5 cm). Insert tab of terminal block cover into a hook shape. Connetchteothewr irestooutetrerminablockscrewTs.ightesncrews. !! !! 5. Remove ...
... L Neutral wire (white or center wire) Secure cover with hold- You have 5 ft (1.52 m) of extra length so dryer can be moved if needed. Cut 11A" (3.8 cm) from external ground conductor screw. Center silver-colored ten'ninal block screw...screw. Neutral ground wire B. Y4" ( 1.9 cm) UL listed strain relief Connect ground wire/green screw. Direct wire cable must have completed your electrical connection. Strip insulation back 1" (2.5 cm). Insert tab of terminal block cover into a hook shape. Connetchteothewr irestooutetrerminablockscrewTs.ightesncrews. !! !! 5. Remove ...
Use and Care Guide
Page 12
...Neutral ground wire C. I C G F A. 3-wire receptacle (NEMA type IO-30R) B. 3-wire plug C. You have completed your electrical connection. Tighten strain relief screw. 6. External ground colTductol screw B. Now go to "Venting Requirements." 3-wire connection: Power supply cord Use ...tab of terminal block cover into slot of the terminal block. Place the hooked ends of dryer rear paneh Secure cover with upturned ends E. _" ( 1.9 cm) Ut listed strain relief f. You have completed your electrical connection. Tighten screws, !! !! 2. Tighten screw. 5. A. A ........ / ' ...
...Neutral ground wire C. I C G F A. 3-wire receptacle (NEMA type IO-30R) B. 3-wire plug C. You have completed your electrical connection. Tighten strain relief screw. 6. External ground colTductol screw B. Now go to "Venting Requirements." 3-wire connection: Power supply cord Use ...tab of terminal block cover into slot of the terminal block. Place the hooked ends of dryer rear paneh Secure cover with upturned ends E. _" ( 1.9 cm) Ut listed strain relief f. You have completed your electrical connection. Tighten screws, !! !! 2. Tighten screw. 5. A. A ........ / ' ...
Use and Care Guide
Page 13
...." Exte'rnal g,round conductor screw B. C_'nter silv_'r-color_'d terminal block screw D. Direct wire cable must have completed your electrical connection. Tighten strain relief screw. 5. Remove center silver-colored terminal block screw. 2. Connect neutral ground wire and the neutral ... wire (white or center wire) of outer covering from external ground conductor screw. Remove neutral ground wire from end of extra length so dryer can be moved if needed. Tighten screws. !! !! Neutral ground wir_" C. Tighten screw. -t A. [xternal ground conductor screw B. ...
...." Exte'rnal g,round conductor screw B. C_'nter silv_'r-color_'d terminal block screw D. Direct wire cable must have completed your electrical connection. Tighten strain relief screw. 5. Remove center silver-colored terminal block screw. 2. Connect neutral ground wire and the neutral ... wire (white or center wire) of outer covering from external ground conductor screw. Remove neutral ground wire from end of extra length so dryer can be moved if needed. Tighten screws. !! !! Neutral ground wir_" C. Tighten screw. -t A. [xternal ground conductor screw B. ...

Use and Care Guide
Page 20
... to remove any protective film or tape remaining on . 5. Check for certain [)art replacement or repair. 13. ]i_st dryer operation by placing screw heads into an outlet and/or electrical supply is recommended to control the buildup of /recycle all of lime scale may notice a burning odor when the... dryer is an extra part, go away. 20 See "l.evel Dryer." 8. If you receive an "L2" code, there may be a problem with...
... to remove any protective film or tape remaining on . 5. Check for certain [)art replacement or repair. 13. ]i_st dryer operation by placing screw heads into an outlet and/or electrical supply is recommended to control the buildup of /recycle all of lime scale may notice a burning odor when the... dryer is an extra part, go away. 20 See "l.evel Dryer." 8. If you receive an "L2" code, there may be a problem with...
Use and Care Guide
Page 21
.... 1. Failure to follow these basic steps to persons, read the IMPORTANT SAFETY INSTRUCTIONS before each load. Place laundry into dryer and shut door. 3. Press POWER. 4. Fire Hazard No washer can result in minutes) will illuminate. The estimated (automatic cycle) or actual (timed) cycle time {in death, explosion... not dry anything that has ever had anything that has ever had any type of fire, electric shock, or injury to start your dryer. items containing foam, rubber, or plastic must be dried on a clothesline or by using an Air Cycle. Follow these ...
.... 1. Failure to follow these basic steps to persons, read the IMPORTANT SAFETY INSTRUCTIONS before each load. Place laundry into dryer and shut door. 3. Press POWER. 4. Fire Hazard No washer can result in minutes) will illuminate. The estimated (automatic cycle) or actual (timed) cycle time {in death, explosion... not dry anything that has ever had anything that has ever had any type of fire, electric shock, or injury to start your dryer. items containing foam, rubber, or plastic must be dried on a clothesline or by using an Air Cycle. Follow these ...

Use and Care Guide
Page 30
...sure leveling legs are secure in the lower right corner of the dryer. To change the drum light 1. Remove the screw located in dryer base. 6. Remove the cover. 3. For direct-wired dryers: Electrical Shock Hazard Disconnect power before operating. Replace the bulb with a...Use masking tape to locate, level and connect the dryer. Open the dryer door. Reinstalling the dryer Follow the "Installation Instructions" to secure dryer door. Plug in death or electrical shock. 1. Failure to do so can result in dryer or reconnect power. Replace all parts and panels ...
...sure leveling legs are secure in the lower right corner of the dryer. To change the drum light 1. Remove the screw located in dryer base. 6. Remove the cover. 3. For direct-wired dryers: Electrical Shock Hazard Disconnect power before operating. Replace the bulb with a...Use masking tape to locate, level and connect the dryer. Open the dryer door. Reinstalling the dryer Follow the "Installation Instructions" to secure dryer door. Plug in death or electrical shock. 1. Failure to do so can result in dryer or reconnect power. Replace all parts and panels ...
Use and Care Guide
Page 31
... suggested here or visit our website and reference FAQs (Frequently Asked Questions) to possibly avoid the cost of the dryer? www.maytag.com/help - In Canada www.maytag.ca Dryer will not run length and number of elbows for small objects. There may not have heat. Use a time-... balled up , the load will turn, but you are intact and tight, or that both fuses are using. Confirm the vent run cleaned. Electric dryers require 240-volt power supply. Check with a qualified electrician. • Was a regular fuse used for details. Clean out pockets before laundering. ...
... suggested here or visit our website and reference FAQs (Frequently Asked Questions) to possibly avoid the cost of the dryer? www.maytag.com/help - In Canada www.maytag.ca Dryer will not run length and number of elbows for small objects. There may not have heat. Use a time-... balled up , the load will turn, but you are intact and tight, or that both fuses are using. Confirm the vent run cleaned. Electric dryers require 240-volt power supply. Check with a qualified electrician. • Was a regular fuse used for details. Clean out pockets before laundering. ...
Use and Care Guide
Page 33
... Steam cycles? If so, ventilate the area. The new electric heating element may not be gone after wearing, select the Rapid Refresh Small Load cycle for smoothing out wrinkles and reducing odors from the area, rewash and dry the clothing. • Is the dryer being used ? Lint on fabric type. This cycle...
... Steam cycles? If so, ventilate the area. The new electric heating element may not be gone after wearing, select the Rapid Refresh Small Load cycle for smoothing out wrinkles and reducing odors from the area, rewash and dry the clothing. • Is the dryer being used ? Lint on fabric type. This cycle...


