Use and Care Guide
Page 2
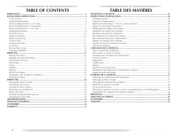
... 7 Electrical Connection - Pour le Canada seulement 40 Exigences concernant I'(!vacuation 41 Planification du syst6me d'_vacuation 42 Installation du syst6me d'6vacuation 44 Installation des pieds de nivellement 44 Raccordement du conduit d'(!vacuation 44 Raccordement des tuyaux d'alimentation 44 R6glage de I'aplomb de la s_cheuse 45 Inversion du sens d'ouverture de la porte 46 Achever I'installation...
... 7 Electrical Connection - Pour le Canada seulement 40 Exigences concernant I'(!vacuation 41 Planification du syst6me d'_vacuation 42 Installation du syst6me d'6vacuation 44 Installation des pieds de nivellement 44 Raccordement du conduit d'(!vacuation 44 Raccordement des tuyaux d'alimentation 44 R6glage de I'aplomb de la s_cheuse 45 Inversion du sens d'ouverture de la porte 46 Achever I'installation...
Use and Care Guide
Page 3
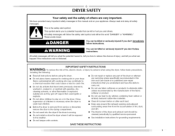
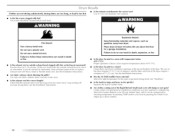
...potential hazards that could ignite or explode. [] Do not allow children to eliminate static unless recommended by qualified service personnel. [] See installation instructions for grounding requirements. [] Do not tamper with gasoline, drycleaning solvents, or other flammable or explosive substances as they give off ...area around the exhaust opening and adjacent surrounding areas free from the accumulation of lint, dust, and dirt. [] The interior of fire, electric shock, or injury to persons when using the dryer. [] Do not place items exposed to catch fire. [] Do not dry articles that...
...potential hazards that could ignite or explode. [] Do not allow children to eliminate static unless recommended by qualified service personnel. [] See installation instructions for grounding requirements. [] Do not tamper with gasoline, drycleaning solvents, or other flammable or explosive substances as they give off ...area around the exhaust opening and adjacent surrounding areas free from the accumulation of lint, dust, and dirt. [] The interior of fire, electric shock, or injury to persons when using the dryer. [] Do not place items exposed to catch fire. [] Do not dry articles that...
Use and Care Guide
Page 4
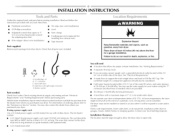
... cord kit marked for use the water supply for installing new exhaust vent) • [_q)e measure Parts supplied: Remove parts package from whom you purchased your washer using the "Y" connector and short hose (if needed : Check local codes. See "Electrical Requirements." • A sturdy floor to the "... terminals with right-angle connector E. At lower temperatures, the dryer might not shut off at least 18 inches (46 cm) above the floor for proper exhaust installation. Explosion Hazard Keep flammable materials and vapors, such as gasoline, away from whom you purchased your local ...
... cord kit marked for use the water supply for installing new exhaust vent) • [_q)e measure Parts supplied: Remove parts package from whom you purchased your washer using the "Y" connector and short hose (if needed : Check local codes. See "Electrical Requirements." • A sturdy floor to the "... terminals with right-angle connector E. At lower temperatures, the dryer might not shut off at least 18 inches (46 cm) above the floor for proper exhaust installation. Explosion Hazard Keep flammable materials and vapors, such as gasoline, away from whom you purchased your local ...
Use and Care Guide
Page 5
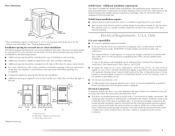
... should also lye considered. • Additional spacing is manufactured ready to install with elbow. This dryer has been tested for the exhaust vent with a 3-wire electrical supply connection. Electrical Connection [b properly install your dryer, you exhaust out the rear of the door are required. ... provided for it is recommended that a qualified electrician determine that the electrical connection is installed with the National Electrical Code, ANSI/NFPA 70-latest edition and all mobile home installations. The neutral ground conductor is suitable for homes built after 1996, ...
... should also lye considered. • Additional spacing is manufactured ready to install with elbow. This dryer has been tested for the exhaust vent with a 3-wire electrical supply connection. Electrical Connection [b properly install your dryer, you exhaust out the rear of the door are required. ... provided for it is recommended that a qualified electrician determine that the electrical connection is installed with the National Electrical Code, ANSI/NFPA 70-latest edition and all mobile home installations. The neutral ground conductor is suitable for homes built after 1996, ...

Use and Care Guide
Page 6
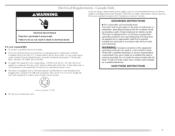
...a white cover. GROUNDING INSTRUCTIONS [] For a grounded, cord-connected dryer: This dryer must end in doubt as to whether the dryer is installed in accordance with all local codes and ordinances. [] For a permanently connected dryer: This dryer must be : [] Flexible armored cable or ... (with ground wire), protected with a qualified electrician or service representative or personnel if you are . listed power supply cord kit marked for electric current. listed strain relief. If your outlet looks like this : 4-wire re'ceptacle" (14-30R) Then choose a 4-wire power supply...
...a white cover. GROUNDING INSTRUCTIONS [] For a grounded, cord-connected dryer: This dryer must end in doubt as to whether the dryer is installed in accordance with all local codes and ordinances. [] For a permanently connected dryer: This dryer must be : [] Flexible armored cable or ... (with ground wire), protected with a qualified electrician or service representative or personnel if you are . listed power supply cord kit marked for electric current. listed strain relief. If your outlet looks like this : 4-wire re'ceptacle" (14-30R) Then choose a 4-wire power supply...
Use and Care Guide
Page 7
... dryer must be grounded. grounding conductor can result in length. It is your responsibility • [b contact a qualified electrical installer. • [b be sure that the electrical connection is adequate and in conformance with the dryer: if it is recommended that is properly grounded. Failure to be obtained...prong outlet. In the event of malfunction or breakdown, grounding will not fit the outlet, have a proper outlet installed by providing a path of electric shock. .... _ •_ 51 Electrical Shock Hazard Plug into a standard 14-30R wall receptacle.
... dryer must be grounded. grounding conductor can result in length. It is your responsibility • [b contact a qualified electrical installer. • [b be sure that the electrical connection is adequate and in conformance with the dryer: if it is recommended that is properly grounded. Failure to be obtained...prong outlet. In the event of malfunction or breakdown, grounding will not fit the outlet, have a proper outlet installed by providing a path of electric shock. .... _ •_ 51 Electrical Shock Hazard Plug into a standard 14-30R wall receptacle.
Use and Care Guide
Page 9
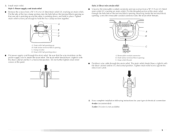
... block opening C. Strain rt'lief tab pointing up and the other is pointing down Put power supply cord through the strain relief. C A. Now complete installation following 4-wire/recommended) 3-wire (if 4-wire is not available instructions for your type of the strain relief through the hole below the terminal block opening... strain relief threads. Clamp section D. Removable conduit connector B. Strain relief thread_ Put direct wire cable through the strain relief. 3. Put the threaded section of electrical connection: .... 9 B ...... A. listed strain relief (UI.
... block opening C. Strain rt'lief tab pointing up and the other is pointing down Put power supply cord through the strain relief. C A. Now complete installation following 4-wire/recommended) 3-wire (if 4-wire is not available instructions for your type of the strain relief through the hole below the terminal block opening... strain relief threads. Clamp section D. Removable conduit connector B. Strain relief thread_ Put direct wire cable through the strain relief. 3. Put the threaded section of electrical connection: .... 9 B ...... A. listed strain relief (UI.

Use and Care Guide
Page 14
... than 90 ° elbows. Connect the other wires to avoid sagging and kinking that may result in reduced airflow and poor performance. • Do not install flexible metal vent in its final location. • Remove excess flexible metal vent to outer terminal block screws. If this dryer MUSF BE EXHAUSTED OUTDOORS... a new vent system Vent material • Use a heavy metal vent. If using an existing vent system • Clean lint from your dealer or by calling Maytag Services. Modify existing vent system if necessary to follow these instructions or fire.
... than 90 ° elbows. Connect the other wires to avoid sagging and kinking that may result in reduced airflow and poor performance. • Do not install flexible metal vent in its final location. • Remove excess flexible metal vent to outer terminal block screws. If this dryer MUSF BE EXHAUSTED OUTDOORS... a new vent system Vent material • Use a heavy metal vent. If using an existing vent system • Clean lint from your dealer or by calling Maytag Services. Modify existing vent system if necessary to follow these instructions or fire.

Use and Care Guide
Page 15
...at least 12" (30.5 cm) from the ground or any object that may result m: [] Moisture damage to connect elbows H. _xhaust outlet Standard exhaust installation with a magnetic latch. B i (10.2 cm) A. Dryer B. Rigid rnetal or fle'xible metal vent G. Do not use an exhaust hood ... the rear of the exhaust {such as flowers, rocks or bushes, snow line, etc.). B D - Choose your exhaust installation type Recommended exhaust installations [ypical installations vent the dryer from entering the home. Dbow C. improper venting can cause moisture and lint to collect indoors, which may be...
...at least 12" (30.5 cm) from the ground or any object that may result m: [] Moisture damage to connect elbows H. _xhaust outlet Standard exhaust installation with a magnetic latch. B i (10.2 cm) A. Dryer B. Rigid rnetal or fle'xible metal vent G. Do not use an exhaust hood ... the rear of the exhaust {such as flowers, rocks or bushes, snow line, etc.). B D - Choose your exhaust installation type Recommended exhaust installations [ypical installations vent the dryer from entering the home. Dbow C. improper venting can cause moisture and lint to collect indoors, which may be...
Use and Care Guide
Page 16
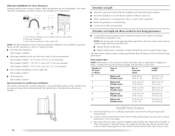
... 54 ft (16.5 m) Flexible metal 31 ft (9.4 m) ... 2 Rigid metal 44 ft (13.4 m) Flexible metal 27 ft (8.2 m) ... 3 Rigid metal 35 ft (10.7 m) Flexible metal 25 ft 17.6 m) ... 4 Rigid metal 27 ft (8.2 m) Flexible metal 23 ft (7 m) 58 ft (17.7 m) 28 ft/8.5 m) 48 ft (14.6 m)...to left or right side: Part Number 4"¢96011 • Vent extension: Part Number 8544761 Special provisions for your installation. Periscope installation C. Rear exhaust installation to dryer location. Secure vent to exhaust hood. See "Determine vent path" in "Plan Vent System." Two close ...
... 54 ft (16.5 m) Flexible metal 31 ft (9.4 m) ... 2 Rigid metal 44 ft (13.4 m) Flexible metal 27 ft (8.2 m) ... 3 Rigid metal 35 ft (10.7 m) Flexible metal 25 ft 17.6 m) ... 4 Rigid metal 27 ft (8.2 m) Flexible metal 23 ft (7 m) 58 ft (17.7 m) 28 ft/8.5 m) 48 ft (14.6 m)...to left or right side: Part Number 4"¢96011 • Vent extension: Part Number 8544761 Special provisions for your installation. Periscope installation C. Rear exhaust installation to dryer location. Secure vent to exhaust hood. See "Determine vent path" in "Plan Vent System." Two close ...
Use and Care Guide
Page 17
...Do not crush or kink vent. 3. (On gas models) Check that the vent is seated on connector. Inlet to move and install dryer. Remove old rubber washer from inlet hose and replace with an additional two-thirds turn . 1. If space permits, attach the brass female end of the... dryer (not the top or console panel). Attach washer cold inlet hose to finish turning the legs until it is seated on fill valve connector. !_ri;ll _i_!_!!iii!iiii_ii!I!iiiiiiiiiiiiiiiiiiii_!!_!_i_!_!_!_!i;...
...Do not crush or kink vent. 3. (On gas models) Check that the vent is seated on connector. Inlet to move and install dryer. Remove old rubber washer from inlet hose and replace with an additional two-thirds turn . 1. If space permits, attach the brass female end of the... dryer (not the top or console panel). Attach washer cold inlet hose to finish turning the legs until it is seated on fill valve connector. !_ri;ll _i_!_!!iii!iiii_ii!I!iiiiiiiiiiiiiiiiiiii_!!_!_i_!_!_!_!i;...
Use and Care Guide
Page 19
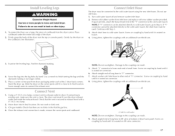
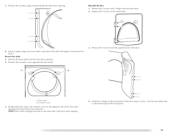
Reinstall the door 1. Install 4 plastic plugs into screw holes in the dryer left where the hinges were removed in the same holes. _ " _" 6. 5. Reverse the strike 1. I A. Remove the door strike ... dryer door. 2. Remove the 4 screws and 2 hinges from where they were removed. Replace the 4 screws in Step 4. Remove the cosmetic screw opposite the door strike. 3. I ..a Install tile 2 hinges to the front panel. NOTE: Door strike and plugs must be on the opposite side of the door. Cbsmetic screw Reinstall the door...
Reinstall the door 1. Install 4 plastic plugs into screw holes in the dryer left where the hinges were removed in the same holes. _ " _" 6. 5. Reverse the strike 1. I A. Remove the door strike ... dryer door. 2. Remove the 4 screws and 2 hinges from where they were removed. Replace the 4 screws in Step 4. Remove the cosmetic screw opposite the door strike. 3. I ..a Install tile 2 hinges to the front panel. NOTE: Door strike and plugs must be on the opposite side of the door. Cbsmetic screw Reinstall the door...

Use and Care Guide
Page 20
... is level. Be sure the water faucets are on power. 9. Check that should be crushed or blocked. In the U.S.A. • For power supply cord installation, plug into a grounded 4 prong outlet. lurn on . 5. If you have a protective film on . The odor will reduce product performance. Tighten all ... of screw exposed. Check for certain [)art replacement or repair. 13. ]i_st dryer operation by placing screw heads into an outlet and/or electrical supply is on. • Household fuse is intact and tight, or circuit breaker has not tripped. • Dryer door is first used....
... is level. Be sure the water faucets are on power. 9. Check that should be crushed or blocked. In the U.S.A. • For power supply cord installation, plug into a grounded 4 prong outlet. lurn on . 5. If you have a protective film on . The odor will reduce product performance. Tighten all ... of screw exposed. Check for certain [)art replacement or repair. 13. ]i_st dryer operation by placing screw heads into an outlet and/or electrical supply is on. • Household fuse is intact and tight, or circuit breaker has not tripped. • Dryer door is first used....
Use and Care Guide
Page 27
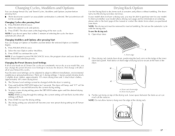
... again until the desired drying setting is shown. Press START to secure at the beginning of the dryer. NOTE: Do not allow items to different installations, environmental conditions or personal preference. To use the automatic cycle with the drying rack. I.eave space between the items so air can be displayed for...
... again until the desired drying setting is shown. Press START to secure at the beginning of the dryer. NOTE: Do not allow items to different installations, environmental conditions or personal preference. To use the automatic cycle with the drying rack. I.eave space between the items so air can be displayed for...

Use and Care Guide
Page 28
... the amount of combustion and ventilation air. following table. 8. This chart shows examples of the dryer. Place dryer at least 18 inches (46 era) above the floor for a garage installation. Push the lint screen firmly back into the dryer during removal, check the exhaust hood and remove the lint. Explosion Hazard Keep...
... the amount of combustion and ventilation air. following table. 8. This chart shows examples of the dryer. Place dryer at least 18 inches (46 era) above the floor for a garage installation. Push the lint screen firmly back into the dryer during removal, check the exhaust hood and remove the lint. Explosion Hazard Keep...
Use and Care Guide
Page 29
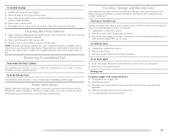
... if bulges, kinks, cuts, wear or leaks are not harmful to the stained area of the drum and rub with hot water and liquid detergent. Install and store your dryer for an extended period of hose failure. If you should be removed every 2 years, or more often, depending on water faucet...
... if bulges, kinks, cuts, wear or leaks are not harmful to the stained area of the drum and rub with hot water and liquid detergent. Install and store your dryer for an extended period of hose failure. If you should be removed every 2 years, or more often, depending on water faucet...

Use and Care Guide
Page 30
Disconnect power. 2. Disconnect wiring. 3. Transport hose 5. Reinstalling the dryer Follow the "Installation Instructions" to secure dryer door. Turn bull) counterclockwise. To change the drum light 1. Unplug dryer or disconnect power. 2. Open the dryer door....base. 6. Use masking tape to locate, level and connect the dryer. For direct-wired dryers: Electrical Shock Hazard Disconnect power before operating. Make sure leveling legs are secure in death or electrical shock. 1. The dryer liglnt automatically turns on the back wall of the cover. Plug in the...
Disconnect power. 2. Disconnect wiring. 3. Transport hose 5. Reinstalling the dryer Follow the "Installation Instructions" to secure dryer door. Turn bull) counterclockwise. To change the drum light 1. Unplug dryer or disconnect power. 2. Open the dryer door....base. 6. Use masking tape to locate, level and connect the dryer. For direct-wired dryers: Electrical Shock Hazard Disconnect power before operating. Make sure leveling legs are secure in death or electrical shock. 1. The dryer liglnt automatically turns on the back wall of the cover. Plug in the...
Use and Care Guide
Page 31
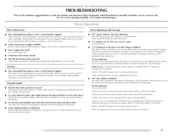
... service. Confirm the vent run • Has a household fuse blown, or has a circuit breaker tripped? Electric dryers require 240-volt power supply. See the Installation Instructions. • Is the clothing knotted or balled up , the load will continue to the estimated time ...Electric dryers use ? Confirm the exterior vent exhaust hood is present. No heat Has a household fuse blown, or has a circuit breaker tripped? Refer to possibly avoid the cost of lint and debris. www.maytag.com/help - Clean out pockets before laundering. • Are the four legs installed...
... service. Confirm the vent run • Has a household fuse blown, or has a circuit breaker tripped? Electric dryers require 240-volt power supply. See the Installation Instructions. • Is the clothing knotted or balled up , the load will continue to the estimated time ...Electric dryers use ? Confirm the exterior vent exhaust hood is present. No heat Has a household fuse blown, or has a circuit breaker tripped? Refer to possibly avoid the cost of lint and debris. www.maytag.com/help - Clean out pockets before laundering. • Are the four legs installed...
Use and Care Guide
Page 32
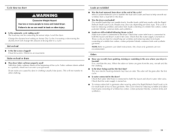
...the floor for the types of lint or replace exhaust vent with temperature below 45°F (7°C)? Select the right temperature for a garage installation. See the Installation Instructions. • Are fabric softener sheets blocking the grille? Use 4" (10.2 cm) diameter vent material. Run the dryer fr_r 5-1 _}...TEMP and/or cycle time by pressing the Timed Cycle Adjust up or down buttons. 32 Closet doors must have ventilation openings at least 18 inches (46 cm) above 45°F (7°C). • Is the dryer located in a room with heavy metal or flexible metal vent. ...
...the floor for the types of lint or replace exhaust vent with temperature below 45°F (7°C)? Select the right temperature for a garage installation. See the Installation Instructions. • Are fabric softener sheets blocking the grille? Use 4" (10.2 cm) diameter vent material. Run the dryer fr_r 5-1 _}...TEMP and/or cycle time by pressing the Timed Cycle Adjust up or down buttons. 32 Closet doors must have ventilation openings at least 18 inches (46 cm) above 45°F (7°C). • Is the dryer located in a room with heavy metal or flexible metal vent. ...
Use and Care Guide
Page 33
... loads consisting of wrinkle-free cotton, cotton polyester blends, common knits and synthetic garments. Check that the water supply is connected to move and install dryer. The new electric heating element may also vary depending on . • lb remove odors left in the area where your garments. [])rum stains are best for...
... loads consisting of wrinkle-free cotton, cotton polyester blends, common knits and synthetic garments. Check that the water supply is connected to move and install dryer. The new electric heating element may also vary depending on . • lb remove odors left in the area where your garments. [])rum stains are best for...


