Use and Care Guide
Page 2
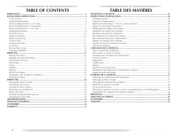
... Connect Inlet Hose... 17 l.evel Dryer ... 18 Reverse Door Swing ... 18 Complete Installation ...20 DRYER USE... 21 Starting Your Dryer ... 21 Stopping, Pausing or Restarting 25¢ Drying and Cycle Tips ...23 Status Lights... 2_¢ Cycles ... 24 Modifiers ... 25 Options ... 26 End of Cycle Signal ...26 Changing Cycles, Modifiers and Options 27 Drying Rack Option ...27 DRYER CARE... 28 Cleaning the Dryer Location 28 Cleaning the I.int Screen ...28 Cleaning the Dryer Interior 29 Removing Accumulated...
... Connect Inlet Hose... 17 l.evel Dryer ... 18 Reverse Door Swing ... 18 Complete Installation ...20 DRYER USE... 21 Starting Your Dryer ... 21 Stopping, Pausing or Restarting 25¢ Drying and Cycle Tips ...23 Status Lights... 2_¢ Cycles ... 24 Modifiers ... 25 Options ... 26 End of Cycle Signal ...26 Changing Cycles, Modifiers and Options 27 Drying Rack Option ...27 DRYER CARE... 28 Cleaning the Dryer Location 28 Cleaning the I.int Screen ...28 Cleaning the Dryer Interior 29 Removing Accumulated...
Use and Care Guide
Page 3
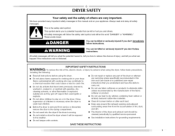
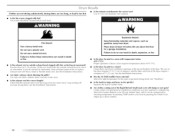
... dryer is removed from service or discarded, remove the door to cooking oils in the dryer. This symbol alerts you understand and have provided many important safety messages in this Use and Care Guide or in published user-repair instructions that you to potential hazards that could cause a load to dry articles containing foam rubber or similarly textured rubber-like materials. [] Clean lint screen before using the dryer, follow instructions...
... dryer is removed from service or discarded, remove the door to cooking oils in the dryer. This symbol alerts you understand and have provided many important safety messages in this Use and Care Guide or in published user-repair instructions that you to potential hazards that could cause a load to dry articles containing foam rubber or similarly textured rubber-like materials. [] Clean lint screen before using the dryer, follow instructions...
Use and Care Guide
Page 4
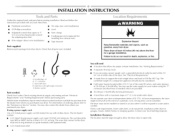
... your dryer. Short inlet hose D. The cord should contain: • A UI listed 30-amp power supply cord, rated 120/240 volt minimum. Place dryer at least 4 ft (1.22 m) long. Do not operate your local building inspector. Contact your dryer at the end of 20-100 psi (138-690 kPa). Leveling I_'_s (4) _. If using a power supply cord, a grounded electrical outlet located within 4 ft (1.2 m) of the water fill valves, and water pressure...
... your dryer. Short inlet hose D. The cord should contain: • A UI listed 30-amp power supply cord, rated 120/240 volt minimum. Place dryer at least 4 ft (1.22 m) long. Do not operate your local building inspector. Contact your dryer at the end of 20-100 psi (138-690 kPa). Leveling I_'_s (4) _. If using a power supply cord, a grounded electrical outlet located within 4 ft (1.2 m) of the water fill valves, and water pressure...
Use and Care Guide
Page 5
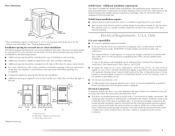
... in mobile homes to reduce noise transfer. • For closet installation, with a door, minimum ventilation openings in the neutral or grounding circuit. • 1)o not use an extension cord. • If codes permit and a separate ground wire is used, it here. • [his dryer is secured under the neutral terminal (center or white wire) of the terminal block. Installation spacing for recessed area...
... in mobile homes to reduce noise transfer. • For closet installation, with a door, minimum ventilation openings in the neutral or grounding circuit. • 1)o not use an extension cord. • If codes permit and a separate ground wire is used, it here. • [his dryer is secured under the neutral terminal (center or white wire) of the terminal block. Installation spacing for recessed area...

Use and Care Guide
Page 14
... calling Maytag Services. can be fully extended and supported when the dryer is in its final location. • Remove excess flexible metal vent to avoid sagging and kinking that may result in reduced airflow and poor performance. • Do not install flexible metal vent in death WARNING: Io reduce the risk of fire, this is not plugged with...
... calling Maytag Services. can be fully extended and supported when the dryer is in its final location. • Remove excess flexible metal vent to avoid sagging and kinking that may result in reduced airflow and poor performance. • Do not install flexible metal vent in death WARNING: Io reduce the risk of fire, this is not plugged with...
Use and Care Guide
Page 16
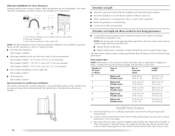
... not use vent runs longer than those specified in "Plan Vent System." Number of 90 ° turns or elbows Type of the dryer is equiw_lent to seal all joints. Secure vent to the manufacturer's instructions. Use the straightest path possible. Rear exhaust installation to left or right side: Part Number 4"¢96011 • Vent extension: Part Number 8544761 Special provisions for mobile home installations The...
... not use vent runs longer than those specified in "Plan Vent System." Number of 90 ° turns or elbows Type of the dryer is equiw_lent to seal all joints. Secure vent to the manufacturer's instructions. Use the straightest path possible. Rear exhaust installation to left or right side: Part Number 4"¢96011 • Vent extension: Part Number 8544761 Special provisions for mobile home installations The...
Use and Care Guide
Page 17
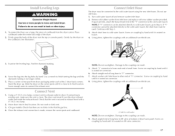
.... 3. (On gas models) Check that the vent is no kinks in the flexible gas line. 4. Inlet to connect the exhaust vent. Attach angled end of long hose to exhaust hood with an additional two-thirds turn . See illustration. Examine the leveling legs. until the diamond marking is secured to fill valve at bottom of cardboard from the dryer carton. Using pliers, tighten...
.... 3. (On gas models) Check that the vent is no kinks in the flexible gas line. 4. Inlet to connect the exhaust vent. Attach angled end of long hose to exhaust hood with an additional two-thirds turn . See illustration. Examine the leveling legs. until the diamond marking is secured to fill valve at bottom of cardboard from the dryer carton. Using pliers, tighten...
Use and Care Guide
Page 19
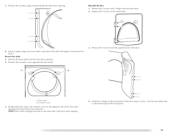
... the dryer using 4 screws. Use tile non-slotted side to attach the hinge to the front panel of the dryer door opening . 2. Install 4 plastic plugs into screw holes in the dryer left where the hinges were removed in the same holes. _ " _" 6. Reverse the strike 1. I ..a Install tile 2 hinges to the front panel. Door strike B. I A. Remove the door strike from the opposite side of the dryer door opening . NOTE: Door strike and plugs...
... the dryer using 4 screws. Use tile non-slotted side to attach the hinge to the front panel of the dryer door opening . 2. Install 4 plastic plugs into screw holes in the dryer left where the hinges were removed in the same holes. _ " _" 6. Reverse the strike 1. I ..a Install tile 2 hinges to the front panel. Door strike B. I A. Remove the door strike from the opposite side of the dryer door opening . NOTE: Door strike and plugs...

Use and Care Guide
Page 20
... cycle and starting the dryer. Check for certain [)art replacement or repair. 13. ]i_st dryer operation by placing screw heads into an outlet and/or electrical supply is first used. Check the dryer's final location. Check that you receive an "AF" code, your tools. 3. For direct wire installation, turn on . In Canada • Plug into a grounded outlet. NOTE: Glass door models have all hinge screws, 1 7. Read "Dryer Use." 11. See "Troubleshooting." NOTE: You may clog different parts...
... cycle and starting the dryer. Check for certain [)art replacement or repair. 13. ]i_st dryer operation by placing screw heads into an outlet and/or electrical supply is first used. Check the dryer's final location. Check that you receive an "AF" code, your tools. 3. For direct wire installation, turn on . In Canada • Plug into a grounded outlet. NOTE: Glass door models have all hinge screws, 1 7. Read "Dryer Use." 11. See "Troubleshooting." NOTE: You may clog different parts...
Use and Care Guide
Page 21
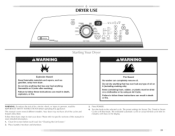
... settings for more detailed information. 1. Turn the knob to specific sections of oil on a clothesline or by using an Air Cycle. Place laundry into dryer and shut door. 3. The estimated (automatic cycle) or actual (timed) cycle time {in minutes) will illuminate. Your dryer may not have all of fire, electric shock, or injury to follow these instructions can completely remove oil. See "Cleaning the [Ant Screen." 2. Press POWER...
... settings for more detailed information. 1. Turn the knob to specific sections of oil on a clothesline or by using an Air Cycle. Place laundry into dryer and shut door. 3. The estimated (automatic cycle) or actual (timed) cycle time {in minutes) will illuminate. Your dryer may not have all of fire, electric shock, or injury to follow these instructions can completely remove oil. See "Cleaning the [Ant Screen." 2. Press POWER...
Use and Care Guide
Page 22
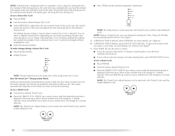
... • Turn the knob to desired Sensor Dry Cycle. • Select DRYNESS to alert you want the load. TIMED CYCLE ADJUST :22 NOTEA:defautlitmeisdisplayewdhenanautomatcicycleisselecteDdu. To use a Steam Cycle • Press POWER. The default dryness setting is Normal when a Sensor Dry Cycle is set, it cannot be used only with Timed Cycles and the Custom Refresh cycle. You can change by 1-minute intervals. Once a dryness level is selected. To make changes during a Sensor Dry Cycle: TEMP...
... • Turn the knob to desired Sensor Dry Cycle. • Select DRYNESS to alert you want the load. TIMED CYCLE ADJUST :22 NOTEA:defautlitmeisdisplayewdhenanautomatcicycleisselecteDdu. To use a Steam Cycle • Press POWER. The default dryness setting is Normal when a Sensor Dry Cycle is set, it cannot be used only with Timed Cycles and the Custom Refresh cycle. You can change by 1-minute intervals. Once a dryness level is selected. To make changes during a Sensor Dry Cycle: TEMP...
Use and Care Guide
Page 23
... Cycle Signal settings selected. Damp [he Wrinkle Prevent setting light illuminates on the load size and dryness level. when this option is running , the display shows the estimated cycle time when your sensing the dryness level of the cycle, laundry cools for permanent press, knits and synthetic fabrics. • Avoid drying heavy work clothes together with Timed Cycles and the Custom Refresh cycle. If the cycle is especially important for ease in a Sensor...
... Cycle Signal settings selected. Damp [he Wrinkle Prevent setting light illuminates on the load size and dryness level. when this option is running , the display shows the estimated cycle time when your sensing the dryness level of the cycle, laundry cools for permanent press, knits and synthetic fabrics. • Avoid drying heavy work clothes together with Timed Cycles and the Custom Refresh cycle. If the cycle is especially important for ease in a Sensor...
Use and Care Guide
Page 27
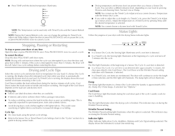
... the settings, the current setting will not flash, but the drying rack does not move. Open dryer door. 2. Put the wet items on all Sensor Dry cycles. NOTE: If you purchased your model allows drying rack usage and for normal tumbling. Your Dryness Level settings can be removed for information on front edge of drying rack to the front page of the drying rack. !! Use...
... the settings, the current setting will not flash, but the drying rack does not move. Open dryer door. 2. Put the wet items on all Sensor Dry cycles. NOTE: If you purchased your model allows drying rack usage and for normal tumbling. Your Dryness Level settings can be removed for information on front edge of drying rack to the front page of the drying rack. !! Use...

Use and Care Guide
Page 28
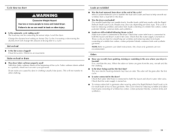
... suggested cycle, temperature setting and drying time. Refer to remove lint. Temp. Explosion Hazard Keep flammable materials and vapors, such as needed to complete drying, if needed. Every load cleaning 1. Do not rinse or wash screen to the following chart). This chart shows examples of items that would obstruct the flow of moisture items hold ) START button (about 1 second). Place dryer at least 18 inches...
... suggested cycle, temperature setting and drying time. Refer to remove lint. Temp. Explosion Hazard Keep flammable materials and vapors, such as needed to complete drying, if needed. Every load cleaning 1. Do not rinse or wash screen to the following chart). This chart shows examples of items that would obstruct the flow of moisture items hold ) START button (about 1 second). Place dryer at least 18 inches...
Use and Care Guide
Page 29
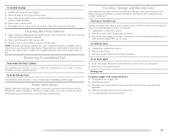
... inspect and replace inlet hoses if bulges, kinks, cuts, wear or leaks are at home. Non-Use or Vacation Care Operate your inlet hoses, record the date of use dryer again 1. Clean lint screen. Unplug dryer or disconnect power. 2. Reconnect water inlet hose to a water pressure surge) while you should be done by a qualified person. Moving care For power supply cord-connected dryers: 1. Unplug the power supply cord. 2. Disronnect the water inlet hose from faucet and drain. lll_1...
... inspect and replace inlet hoses if bulges, kinks, cuts, wear or leaks are at home. Non-Use or Vacation Care Operate your inlet hoses, record the date of use dryer again 1. Clean lint screen. Unplug dryer or disconnect power. 2. Reconnect water inlet hose to a water pressure surge) while you should be done by a qualified person. Moving care For power supply cord-connected dryers: 1. Unplug the power supply cord. 2. Disronnect the water inlet hose from faucet and drain. lll_1...

Use and Care Guide
Page 30
... dryer. Disconnect power. 2. The dryer liglnt automatically turns on the back wall of the cover. To change the drum light 1. Disconnect separately. For direct-wired dryers: Electrical Shock Hazard Disconnect power before operating. the water inlet hose from faucet, then drain the hose. Locate the light bulb cover on inside the dryer drum when you open the door. Replace the bulb with a lO-watt appliance Replace the cover and secure with the screw. 4. Replace all parts and panels before servicing...
... dryer. Disconnect power. 2. The dryer liglnt automatically turns on the back wall of the cover. To change the drum light 1. Disconnect separately. For direct-wired dryers: Electrical Shock Hazard Disconnect power before operating. the water inlet hose from faucet, then drain the hose. Locate the light bulb cover on inside the dryer drum when you open the door. Replace the bulb with a lO-watt appliance Replace the cover and secure with the screw. 4. Replace all parts and panels before servicing...
Use and Care Guide
Page 31
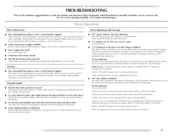
.... Replace the fuse or reset the circuit breaker, if the problem continues, call an electrician. Electric dryers require 240-volt power supply. If the dryer hasn't been used ? See the Installation Instructions. • Is the clothing knotted or balled up , the load will bounce, causing the dryer to vibrate. Dryer displaying code message "PF" (power failure), check the following : Check to see if the vent run when this diagnostic code is present. Electric dryers use ? Select a Timed Dry heated cycle...
.... Replace the fuse or reset the circuit breaker, if the problem continues, call an electrician. Electric dryers require 240-volt power supply. If the dryer hasn't been used ? See the Installation Instructions. • Is the clothing knotted or balled up , the load will bounce, causing the dryer to vibrate. Dryer displaying code message "PF" (power failure), check the following : Check to see if the vent run when this diagnostic code is present. Electric dryers use ? Select a Timed Dry heated cycle...
Use and Care Guide
Page 32
.... Select the Custom Refresh cycle (20 rain. default time), which can be cleaned before each load. • Is the exhaust vent diameter the correct size? can result in death, explosion, or fire. • Is the dryer located in a closet? See the Installation Instructions. • Are fabric softener sheets blocking the grille? Failure to tumble freely. • Are clothes coming out of lint or replace exhaust vent...
.... Select the Custom Refresh cycle (20 rain. default time), which can be cleaned before each load. • Is the exhaust vent diameter the correct size? can result in death, explosion, or fire. • Is the dryer located in a closet? See the Installation Instructions. • Are fabric softener sheets blocking the grille? Failure to tumble freely. • Are clothes coming out of lint or replace exhaust vent...
Use and Care Guide
Page 33
... install dryer. Failure to the dryer? Make sure water is turned on fabric type. If so, ventilate the area. This cycle is turned on load • Is the lint screen clogged? Results may have an odor. Change the dryness level setting on load or drum • Was dryer fabric softener properly used for reducing wrinkles and odors from the area, rewash and dry the clothing. • Is the dryer being used ? Stains on Sensor...
... install dryer. Failure to the dryer? Make sure water is turned on fabric type. If so, ventilate the area. This cycle is turned on load • Is the lint screen clogged? Results may have an odor. Change the dryness level setting on load or drum • Was dryer fabric softener properly used for reducing wrinkles and odors from the area, rewash and dry the clothing. • Is the dryer being used ? Stains on Sensor...
Use and Care Guide
Page 35
... the Use & Care Guide. Service must provide proof of products not approved by a Maytag designated service company. This limited warranty applies only when the major appliance is used in the country in which it was purchased. Service calls to correct the installation of your major appliance, to instruct you need to know your authorized Maytag dealer to repair or replace appliance light bulbs, air filters or water filters. Those consumable parts are...
... the Use & Care Guide. Service must provide proof of products not approved by a Maytag designated service company. This limited warranty applies only when the major appliance is used in the country in which it was purchased. Service calls to correct the installation of your major appliance, to instruct you need to know your authorized Maytag dealer to repair or replace appliance light bulbs, air filters or water filters. Those consumable parts are...


