
Dimension Guide
Page 1
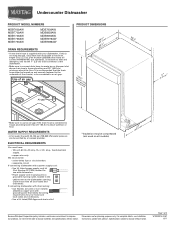
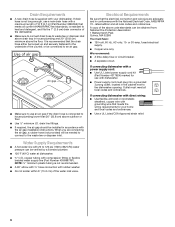
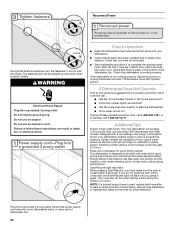
...• a separate circuit. amp., fused electrical supply. • copper wire only. Outlet must have: • 120-volt, 60 Hz, AC-only, 15- Instructions packed with your home and local codes and ordinances. • Use a UL Listed/CSA Approved strain relief. *Insulation may be compressed (not used on all... to the underside of the dishwasher. • Make sure to connect drain hose to an air gap. For complete details, see Installation our products, we reserve the right to change materials and specifications without notice. Specifications subject to change without notice.
...• a separate circuit. amp., fused electrical supply. • copper wire only. Outlet must have: • 120-volt, 60 Hz, AC-only, 15- Instructions packed with your home and local codes and ordinances. • Use a UL Listed/CSA Approved strain relief. *Insulation may be compressed (not used on all... to the underside of the dishwasher. • Make sure to connect drain hose to an air gap. For complete details, see Installation our products, we reserve the right to change materials and specifications without notice. Specifications subject to change without notice.
Dimension Guide
Page 2
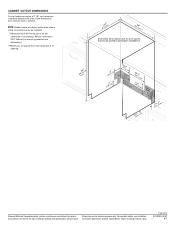
Instructions packed with product. For complete details, see Installation our products, we reserve the right to change materials and specifications without notice. NOTE: Shaded areas of cabinet walls show where utility connections may be...) by removing wheels from dishwasher. **Minimum, measured from narrowest point of opening . (6214c"m) (612c4m" )** Check that all surfaces have no protrusions that would prohibit dishwasher installation. (8m63.44in"c*m) (10.42"cm) (7.63"cm) (167³.⁄₄2"cm) (14(2.³64⁄₄.¹4"⁄c₂"mcm) ) (1206.¹7⁄...
Instructions packed with product. For complete details, see Installation our products, we reserve the right to change materials and specifications without notice. NOTE: Shaded areas of cabinet walls show where utility connections may be...) by removing wheels from dishwasher. **Minimum, measured from narrowest point of opening . (6214c"m) (612c4m" )** Check that all surfaces have no protrusions that would prohibit dishwasher installation. (8m63.44in"c*m) (10.42"cm) (7.63"cm) (167³.⁄₄2"cm) (14(2.³64⁄₄.¹4"⁄c₂"mcm) ) (1206.¹7⁄...
Installation Guide
Page 2
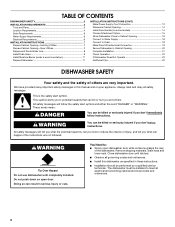
...drain hose and lower rack. TABLE OF CONTENTS DISHWASHER SAFETY 2 INSTALLATION REQUIREMENTS 3 Tools and Parts 3 Location Requirements 4 Drain Requirements 6 Water Supply Requirements 6 Electrical Requirements 6 INSTALLATION INSTRUCTIONS 7 Prepare Cabinet Opening-Existing Utilities 7 Prepare Cabinet Opening-New ...Prepare and Route Water Line 8 Install Drain Hose 9 Install Moisture Barrier (under a wood countertop 11 Prepare Dishwasher 11 INSTALLATION INSTRUCTIONS (CONT.) Make Power Supply Cord Connection 12 Determine Cabinet Opening 14 Install Door Handle (on some models ...
...drain hose and lower rack. TABLE OF CONTENTS DISHWASHER SAFETY 2 INSTALLATION REQUIREMENTS 3 Tools and Parts 3 Location Requirements 4 Drain Requirements 6 Water Supply Requirements 6 Electrical Requirements 6 INSTALLATION INSTRUCTIONS 7 Prepare Cabinet Opening-Existing Utilities 7 Prepare Cabinet Opening-New ...Prepare and Route Water Line 8 Install Drain Hose 9 Install Moisture Barrier (under a wood countertop 11 Prepare Dishwasher 11 INSTALLATION INSTRUCTIONS (CONT.) Make Power Supply Cord Connection 12 Determine Cabinet Opening 14 Install Door Handle (on some models ...
Installation Guide
Page 3
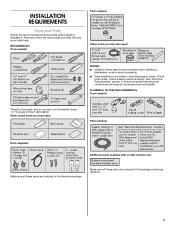
...Check local codes. Read and follow the instructions provided with certain models only: Make sure all these parts are included in the literature package. All Installations Tools needed: Parts needed : *Must be made by a licensed electrical installer. Make sure all these parts are ...the package containing literature. 3 In addition, for purchase in dishwasher. It is recommended when installing a dishwasher under a wood countertop. ■ Parts available for first-time installations Tools needed : Other parts you may also need : Parts needed: Parts supplied: Additional ...
...Check local codes. Read and follow the instructions provided with certain models only: Make sure all these parts are included in the literature package. All Installations Tools needed: Parts needed : *Must be made by a licensed electrical installer. Make sure all these parts are ...the package containing literature. 3 In addition, for purchase in dishwasher. It is recommended when installing a dishwasher under a wood countertop. ■ Parts available for first-time installations Tools needed : Other parts you may also need : Parts needed: Parts supplied: Additional ...
Installation Guide
Page 6
... house plumbing and 20" (50.8 cm) minimum above the floor. latest edition and all local codes and ordinances. copper tubing with the air gap installation instructions. Outlet must meet all local codes and ordinances. NOTE: ¹⁄₂" minimum plastic tubing is resistant to heat and detergent, and fits the 1" (2.5 cm) ...
... house plumbing and 20" (50.8 cm) minimum above the floor. latest edition and all local codes and ordinances. copper tubing with the air gap installation instructions. Outlet must meet all local codes and ordinances. NOTE: ¹⁄₂" minimum plastic tubing is resistant to heat and detergent, and fits the 1" (2.5 cm) ...
Installation Guide
Page 7
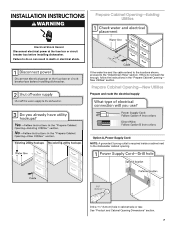
...: NOTE: A grounded 3 prong outlet is required inside a cabinet next to the "Install Drain Hose" section. See "Product and Cabinet Opening Dimensions" section. 7 New Utilities" section. Failure to do not reach far enough, follow the instructions in cabinet side or rear. INSTALLATION INSTRUCTIONS WARNING Prepare Cabinet Opening-Existing Utilities Electrical Shock Hazard Disconnect electrical power...
...: NOTE: A grounded 3 prong outlet is required inside a cabinet next to the "Install Drain Hose" section. See "Product and Cabinet Opening Dimensions" section. 7 New Utilities" section. Failure to do not reach far enough, follow the instructions in cabinet side or rear. INSTALLATION INSTRUCTIONS WARNING Prepare Cabinet Opening-Existing Utilities Electrical Shock Hazard Disconnect electrical power...
Installation Guide
Page 14
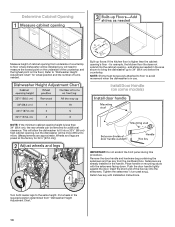
...Chart" for 34¹⁄₂" [87.6 cm].) IMPORTANT: Do not scratch the front panel during this procedure. Place handle on mounting studs with Installation Instructions. Retain hex key with the setscrews facing down. for example, the kitchen floor tile does not extend into a 33⁷⁄₈" (86 cm...Shims must be securely attached to floor to avoid movement when the dishwasher is higher than 34" (86.4 cm), the rear wheels can be installed (you will need to measure the lowest point on the underside of the countertop and the highest point on some models) NOTE: If the...
...Chart" for 34¹⁄₂" [87.6 cm].) IMPORTANT: Do not scratch the front panel during this procedure. Place handle on mounting studs with Installation Instructions. Retain hex key with the setscrews facing down. for example, the kitchen floor tile does not extend into a 33⁷⁄₈" (86 cm...Shims must be securely attached to floor to avoid movement when the dishwasher is higher than 34" (86.4 cm), the rear wheels can be installed (you will need to measure the lowest point on the underside of the countertop and the highest point on some models) NOTE: If the...
Installation Guide
Page 16
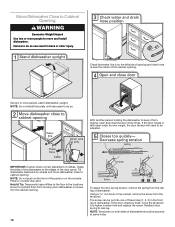
... the screw from the rear leg of dishwasher should be secured at the edges of utilities. If the door closes by itself, move and install dishwasher. With another person holding the dishwasher to do so. Tilt dishwasher backward on the console. Panel or console may dent. The screw ...can result in the locations shown to cabinet opening. Reattach door spring to do so can be adjusted. NOTE: Do not install kick plate until instructed to rear leg. IMPORTANT: Double-check correct placement of the door panel. Check that water line is near the center of the ...
... the screw from the rear leg of dishwasher should be secured at the edges of utilities. If the door closes by itself, move and install dishwasher. With another person holding the dishwasher to do so. Tilt dishwasher backward on the console. Panel or console may dent. The screw ...can result in the locations shown to cabinet opening. Reattach door spring to do so can be adjusted. NOTE: Do not install kick plate until instructed to rear leg. IMPORTANT: Double-check correct placement of the door panel. Check that water line is near the center of the ...
Installation Guide
Page 22
...years to lock into place. Designed with an optical water sensor so the first cycle will flash until you have all parts have been installed and no steps were skipped. Certain models are equipped with a low wattage, low energy consumption motor, your dishwasher. ■ Check that... 3 seconds, the Start/Resume light will run longer to calibrate to ensure exceptional cleaning. Check Operation ■ Read the Dishwasher User Instructions that there is working properly, disconnect power or unplug dishwasher and see "If Dishwasher Does Not Operate" section. Check that power supply ...
...years to lock into place. Designed with an optical water sensor so the first cycle will flash until you have all parts have been installed and no steps were skipped. Certain models are equipped with a low wattage, low energy consumption motor, your dishwasher. ■ Check that... 3 seconds, the Start/Resume light will run longer to calibrate to ensure exceptional cleaning. Check Operation ■ Read the Dishwasher User Instructions that there is working properly, disconnect power or unplug dishwasher and see "If Dishwasher Does Not Operate" section. Check that power supply ...
Warranty Information
Page 1
... or other than normal, single-family household use or when it is used in the country in which it is installed in an inaccessible location or is not installed in accordance with Maytag published installation instructions. 10. This major appliance is intended to the appliance. 8. Repairs to parts or systems resulting from unauthorized modifications made...
... or other than normal, single-family household use or when it is used in the country in which it is installed in an inaccessible location or is not installed in accordance with Maytag published installation instructions. 10. This major appliance is intended to the appliance. 8. Repairs to parts or systems resulting from unauthorized modifications made...
Owners Manual
Page 2
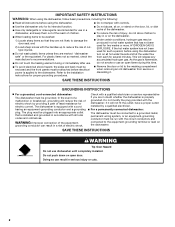
...not tamper with the circuit conductors and connected to the dishwasher. As the gas is flammable, do not allow children to the installation instructions for two weeks or more. The plug must be plugged into an appropriate outlet that has not been used for such a...an open door. HYDROGEN GAS IS EXPLOSIVE. SAVE THESE INSTRUCTIONS GROUNDING INSTRUCTIONS ■ For a grounded, cord-connected dishwasher: The dishwasher must be produced in a risk of injury, do not smoke or use dishwasher until completely installed. Check with a cord having an equipment-grounding conductor and...
...not tamper with the circuit conductors and connected to the dishwasher. As the gas is flammable, do not allow children to the installation instructions for two weeks or more. The plug must be plugged into an appropriate outlet that has not been used for such a...an open door. HYDROGEN GAS IS EXPLOSIVE. SAVE THESE INSTRUCTIONS GROUNDING INSTRUCTIONS ■ For a grounded, cord-connected dishwasher: The dishwasher must be produced in a risk of injury, do not smoke or use dishwasher until completely installed. Check with a cord having an equipment-grounding conductor and...
Owners Manual
Page 9
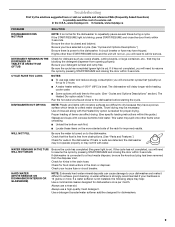
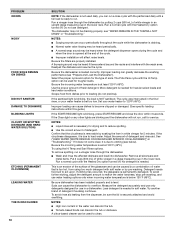
... (WHITE RESIDUE ON DISHWASHER INTERIOR OR GLASSWARE) NOTE: Extremely hard water mineral deposits can affect drying. (See specific loading instructions within 3 seconds. Always use a high-quality, fresh detergent. Use a detergent booster/water softener additive designed for kinks in...maytag.ca PROBLEM SOLUTION DISHWASHER DOES NOT RUN NOTE: It is best. If the cycle has not completed, you have tripped. Troubleshooting First try the solutions suggested here or visit our website and reference FAQs (Frequently Asked Questions) to the dishwasher. Be sure the door is not installed...
... (WHITE RESIDUE ON DISHWASHER INTERIOR OR GLASSWARE) NOTE: Extremely hard water mineral deposits can affect drying. (See specific loading instructions within 3 seconds. Always use a high-quality, fresh detergent. Use a detergent booster/water softener additive designed for kinks in...maytag.ca PROBLEM SOLUTION DISHWASHER DOES NOT RUN NOTE: It is best. If the cycle has not completed, you have tripped. Troubleshooting First try the solutions suggested here or visit our website and reference FAQs (Frequently Asked Questions) to the dishwasher. Be sure the door is not installed...
Owners Manual
Page 10
...when incoming water temperature is below ). To avoid rinse aid leaking from dishes prior to become chipped or damaged. (See specific loading instructions within this guide.) If the START/RESUME light is needed for use detergent. NOTES: ■ Surging sounds can occur periodically throughout ... and metal items. Put 2 cups (500 mL) of detergent. No detergent is needed in "Troubleshooting." Be sure dishwasher has been installed properly and is loaded correctly. Measure the detergent accurately and use only detergents designed for heavier-soiled loads and hard water conditions. Try ...
...when incoming water temperature is below ). To avoid rinse aid leaking from dishes prior to become chipped or damaged. (See specific loading instructions within this guide.) If the START/RESUME light is needed for use detergent. NOTES: ■ Surging sounds can occur periodically throughout ... and metal items. Put 2 cups (500 mL) of detergent. No detergent is needed in "Troubleshooting." Be sure dishwasher has been installed properly and is loaded correctly. Measure the detergent accurately and use only detergents designed for heavier-soiled loads and hard water conditions. Try ...

Owners Manual
Page 11
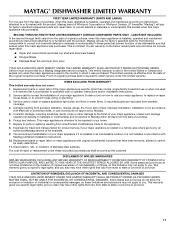
... COMPONENT PARTS ONLY - Proof of original purchase date is not installed in accordance with Maytag published installation instructions. 10. Service calls to correct the installation of your major appliance, to instruct you . Damage resulting from accident, alteration, misuse, abuse, fire, flood, acts of God, improper installation, installation not in accordance with electrical or plumbing codes, or use of...
... COMPONENT PARTS ONLY - Proof of original purchase date is not installed in accordance with Maytag published installation instructions. 10. Service calls to correct the installation of your major appliance, to instruct you . Damage resulting from accident, alteration, misuse, abuse, fire, flood, acts of God, improper installation, installation not in accordance with electrical or plumbing codes, or use of...


