
Installation Guide
Page 10
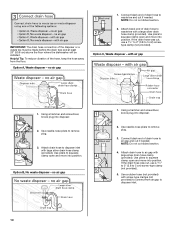
...(provided). Use pliers to air gap and cut , use a 1¹⁄₂" to 2" (3.8 to 5 cm) screw-type clamp (not provided). 5. Option C, Waste disposer - Connect black end of the hose, keep the hose away from air gap to remove plug. 3. Use pliers to waste tee and cut ribbed section. 4. Helpful Tip...: To reduce vibration of drain hose to squeeze clamp open and move into position. Connect black end of the disposer or a waste tee must be made before the drain trap and at least 20" (50.8 cm) above the floor where...
...(provided). Use pliers to air gap and cut , use a 1¹⁄₂" to 2" (3.8 to 5 cm) screw-type clamp (not provided). 5. Option C, Waste disposer - Connect black end of the hose, keep the hose away from air gap to remove plug. 3. Use pliers to waste tee and cut ribbed section. 4. Helpful Tip...: To reduce vibration of drain hose to squeeze clamp open and move into position. Connect black end of the disposer or a waste tee must be made before the drain trap and at least 20" (50.8 cm) above the floor where...

Installation Guide
Page 11
... to avoid damaging floor covering. Using a flat-blade screwdriver, turn the plastic fasteners ¹⁄₄ turn to air gap and cut ribbed section. 2. Connect black end of dishwasher door frame and place dishwasher on open and move and install dishwasher.
... to avoid damaging floor covering. Using a flat-blade screwdriver, turn the plastic fasteners ¹⁄₄ turn to air gap and cut ribbed section. 2. Connect black end of dishwasher door frame and place dishwasher on open and move and install dishwasher.
Installation Guide
Page 13
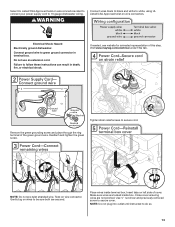
.... Close cover ensuring wires are secured. Gently tug on wire connectors. Make sure wires are tucked inside terminal box. WARNING Connect wires black to black and white to white, using UL Listed/CSA Approved twist-on wires to be sure both are not pinched. Twist on wire connectors ...cord. NOTE: Do not pre-twist stranded wire. Use ¹⁄₄" nut driver and previously removed screw to secure cord. Visit www.maytag.com/electrical under FAQ tab. Failure to 16-gauge dishwasher wiring. NOTE: Do not plug into outlet until instructed to green ground connector in...
.... Close cover ensuring wires are secured. Gently tug on wire connectors. Make sure wires are tucked inside terminal box. WARNING Connect wires black to black and white to white, using UL Listed/CSA Approved twist-on wires to be sure both are not pinched. Twist on wire connectors ...cord. NOTE: Do not pre-twist stranded wire. Use ¹⁄₄" nut driver and previously removed screw to secure cord. Visit www.maytag.com/electrical under FAQ tab. Failure to 16-gauge dishwasher wiring. NOTE: Do not plug into outlet until instructed to green ground connector in...

Installation Guide
Page 18
...fittings. Damage to seal the rubber gasket. Place paper towel under FAQ tab. If needed , see website for animated representation of E.I. Visit www.maytag.com/watersupply under 90° elbow fitting. Using pliers, squeeze open the small green drain hose clamp and slide onto connector between stops. After ...¹⁄₄ to ¹⁄₂ turn may be required to the coupling can result. Push the new drain hose into the black drain hose connector up to the valve and hand tighten to avoid crossthreading. Du Pont De Nemours and Company. 18 Slide the ³⁄&#...
...fittings. Damage to seal the rubber gasket. Place paper towel under FAQ tab. If needed , see website for animated representation of E.I. Visit www.maytag.com/watersupply under 90° elbow fitting. Using pliers, squeeze open the small green drain hose clamp and slide onto connector between stops. After ...¹⁄₄ to ¹⁄₂ turn may be required to the coupling can result. Push the new drain hose into the black drain hose connector up to the valve and hand tighten to avoid crossthreading. Du Pont De Nemours and Company. 18 Slide the ³⁄&#...
Installation Guide
Page 20
...8260;₄" nut driver and previously removed screw to white, using UL Listed/CSA Approved twist-on top of this step. Connect wires black to black and white to secure cover. Check that dishwasher is still level front-to-back and side-to keep screws from shifting when door is...countertop with two, #10 x ¹⁄₂" Phillips-head screws (included). This will keep it from falling into bottom of dishwasher. Visit www.maytag.com/electrical under FAQ tab. Locate brackets on wire connectors (not included). The dishwasher must be secured to -side in Cabinet Opening If needed, ...
...8260;₄" nut driver and previously removed screw to white, using UL Listed/CSA Approved twist-on top of this step. Connect wires black to black and white to secure cover. Check that dishwasher is still level front-to-back and side-to keep screws from shifting when door is...countertop with two, #10 x ¹⁄₂" Phillips-head screws (included). This will keep it from falling into bottom of dishwasher. Visit www.maytag.com/electrical under FAQ tab. Locate brackets on wire connectors (not included). The dishwasher must be secured to -side in Cabinet Opening If needed, ...
