
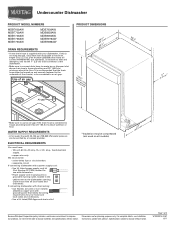
Dimension Guide
Page 1
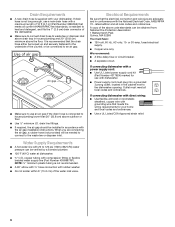
... Dimensions are for use with dishwasher. • Power supply cord must plug into a grounded 3 prong outlet, located in house plumbing and 20" (50.8 cm) minimum above the floor. WATER SUPPLY REQUIREMENTS • A hot water line with product. Page 1 of air gap PRODUCT DIMENSIONS ((26265442.¹.¹12 ccmm)) w(8ri36teh3mc⁷mw⁄o₈"hv) eemedilns. We recommend: • a time-delay fuse or circuit breaker. • a separate circuit. If connecting dishwasher with a power supply cord: • Use UL Listed power supply cord kit (Part Number...
... Dimensions are for use with dishwasher. • Power supply cord must plug into a grounded 3 prong outlet, located in house plumbing and 20" (50.8 cm) minimum above the floor. WATER SUPPLY REQUIREMENTS • A hot water line with product. Page 1 of air gap PRODUCT DIMENSIONS ((26265442.¹.¹12 ccmm)) w(8ri36teh3mc⁷mw⁄o₈"hv) eemedilns. We recommend: • a time-delay fuse or circuit breaker. • a separate circuit. If connecting dishwasher with a power supply cord: • Use UL Listed power supply cord kit (Part Number...
Installation Guide
Page 2
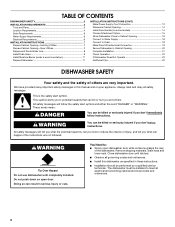
... 6 INSTALLATION INSTRUCTIONS 7 Prepare Cabinet Opening-Existing Utilities 7 Prepare Cabinet Opening-New Utilities 7 Prepare and Route Water Line 8 Install Drain Hose 9 Install Moisture Barrier (under a wood countertop 11 Prepare Dishwasher 11 INSTALLATION INSTRUCTIONS (CONT.) Make Power Supply Cord Connection 12 Determine Cabinet Opening 14 Install Door Handle (on some models 14 Choose Attachment Option 15 Move Dishwasher Close to Cabinet Opening 16 Connect to Water Supply 18 Connect to Drain 18 Make Direct Wire Electrical Connection 19 Secure Dishwasher in Cabinet Opening 20...
... 6 INSTALLATION INSTRUCTIONS 7 Prepare Cabinet Opening-Existing Utilities 7 Prepare Cabinet Opening-New Utilities 7 Prepare and Route Water Line 8 Install Drain Hose 9 Install Moisture Barrier (under a wood countertop 11 Prepare Dishwasher 11 INSTALLATION INSTRUCTIONS (CONT.) Make Power Supply Cord Connection 12 Determine Cabinet Opening 14 Install Door Handle (on some models 14 Choose Attachment Option 15 Move Dishwasher Close to Cabinet Opening 16 Connect to Water Supply 18 Connect to Drain 18 Make Direct Wire Electrical Connection 19 Secure Dishwasher in Cabinet Opening 20...
Installation Guide
Page 3
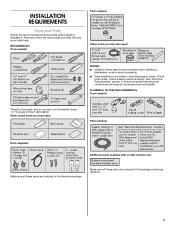
... that electrical connections be the proper size to connect your household wiring to 16-gauge wiring in the package containing literature. 3 Check local codes. Make sure all these parts are included in plumbing supply stores. Read and follow the instructions provided with certain models only: Make sure all these parts are included in dishwasher. See "Electrical Requirements" section. All Installations Tools needed: Parts needed: Other parts you may also need : Parts needed...
... that electrical connections be the proper size to connect your household wiring to 16-gauge wiring in the package containing literature. 3 Check local codes. Make sure all these parts are included in plumbing supply stores. Read and follow the instructions provided with certain models only: Make sure all these parts are included in dishwasher. See "Electrical Requirements" section. All Installations Tools needed: Parts needed: Other parts you may also need : Parts needed...
Installation Guide
Page 4
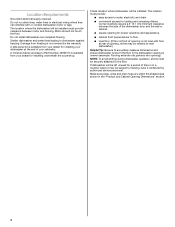
... "Product and Cabinet Opening Dimensions" section. 4 Shelter dishwasher and water lines leading to water, electricity and drain. ■ convenient access for proper operation and appearance. ■ cabinet front perpendicular to floor. ■ level floor. (If floor at the end of time or in a location where it may be subject to the floor. Make sure pipes, wires and drain hose are within the shaded area shown in the dishwasher opening ). Do not install dishwasher...
... "Product and Cabinet Opening Dimensions" section. 4 Shelter dishwasher and water lines leading to water, electricity and drain. ■ convenient access for proper operation and appearance. ■ cabinet front perpendicular to floor. ■ level floor. (If floor at the end of time or in a location where it may be subject to the floor. Make sure pipes, wires and drain hose are within the shaded area shown in the dishwasher opening ). Do not install dishwasher...
Installation Guide
Page 6
... Listed/CSA Approved strain relief. 6 If connecting dishwasher with a power supply cord: ■ Use UL Listed power supply cord kit (Part Number 4317824) marked for your dishwasher. When you are adequate and in the cabinet next to 862 kPa) water pressure can be needed to connect to house plumbing lower than 20" (50.8 cm) above subfloor or floor. ■ Use ¹ ₂" minimum I.D. A copy of the above the floor. Water Supply Requirements ■ A hot water line...
... Listed/CSA Approved strain relief. 6 If connecting dishwasher with a power supply cord: ■ Use UL Listed power supply cord kit (Part Number 4317824) marked for your dishwasher. When you are adequate and in the cabinet next to 862 kPa) water pressure can be needed to connect to house plumbing lower than 20" (50.8 cm) above subfloor or floor. ■ Use ¹ ₂" minimum I.D. A copy of the above the floor. Water Supply Requirements ■ A hot water line...
Installation Guide
Page 7
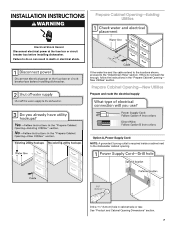
... electrical supply Option A, Power Supply Cord: NOTE: A grounded 3 prong outlet is required inside a cabinet next to the "Install Drain Hose" section. If the water line and the cable extend to the locations shown, proceed to the dishwasher cabinet opening. New Utilities" section. Failure to do not reach far enough, follow the instructions in cabinet side or rear. See "Product and Cabinet Opening Dimensions" section. 7 INSTALLATION INSTRUCTIONS WARNING Prepare Cabinet Opening-Existing Utilities Electrical Shock Hazard Disconnect electrical power at the fuse...
... electrical supply Option A, Power Supply Cord: NOTE: A grounded 3 prong outlet is required inside a cabinet next to the "Install Drain Hose" section. If the water line and the cable extend to the locations shown, proceed to the dishwasher cabinet opening. New Utilities" section. Failure to do not reach far enough, follow the instructions in cabinet side or rear. See "Product and Cabinet Opening Dimensions" section. 7 INSTALLATION INSTRUCTIONS WARNING Prepare Cabinet Opening-Existing Utilities Electrical Shock Hazard Disconnect electrical power at the fuse...
Installation Guide
Page 8
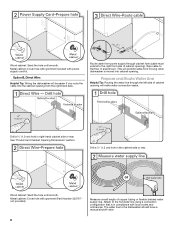
... the dishwasher should have a manual shutoff valve. 8 See "Product and Cabinet Opening Dimensions" section. Wood cabinet: Sand the hole until smooth. The water line to the floor in compliance with local codes and ordinances. Route cable from power supply through the left side of cabinet opening ). Drill a ³⁄₄" (1.9 cm) hole in the cabinet side or rear. Metal cabinet: Cover hole with grommet included with grommet (Part Number...
... the dishwasher should have a manual shutoff valve. 8 See "Product and Cabinet Opening Dimensions" section. Wood cabinet: Sand the hole until smooth. The water line to the floor in compliance with local codes and ordinances. Route cable from power supply through the left side of cabinet opening ). Drill a ³⁄₄" (1.9 cm) hole in the cabinet side or rear. Metal cabinet: Cover hole with grommet included with grommet (Part Number...
Installation Guide
Page 9
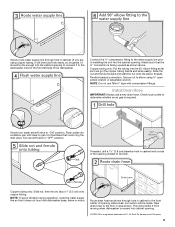
... not use a new drain hose. Tape drain hose to determine whether an air gap is facing upward as shown above. NOTE: To avoid vibration during operation, route the water supply line so that the ³⁄₄" connection is required. Du Pont De Nemours and Company. 9 Slide the nut and ferrule forward and start the nut onto the elbow threads. Turn shutoff valve to elbow using copper...
... not use a new drain hose. Tape drain hose to determine whether an air gap is facing upward as shown above. NOTE: To avoid vibration during operation, route the water supply line so that the ³⁄₄" connection is required. Du Pont De Nemours and Company. 9 Slide the nut and ferrule forward and start the nut onto the elbow threads. Turn shutoff valve to elbow using copper...

Installation Guide
Page 11
... Hazard Do not use dishwasher until installed in back or other injury. Helpful Tip: Place cardboard under the cabinet is clean and dry for installation of the counter. Remove panel. Connect black end of dishwasher door frame and place dishwasher on open and move and install dishwasher. Use a rubber hose (not provided) with large silver drain hose clamp (provided). Do not push down on its back. 1. Using a flat-blade screwdriver, turn the plastic...
... Hazard Do not use dishwasher until installed in back or other injury. Helpful Tip: Place cardboard under the cabinet is clean and dry for installation of the counter. Remove panel. Connect black end of dishwasher door frame and place dishwasher on open and move and install dishwasher. Use a rubber hose (not provided) with large silver drain hose clamp (provided). Do not push down on its back. 1. Using a flat-blade screwdriver, turn the plastic...
Installation Guide
Page 19
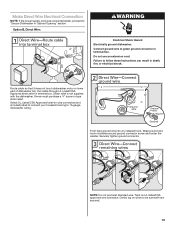
... electrical shock. Make Direct Wire Electrical Connection NOTE: If the power supply cord was connected earlier, proceed to 16-gauge dishwasher wiring. Do not use an extension cord. Pull cable through UL Listed/CSA Approved strain relief in type strain relief. NOTE: Do not pre-twist stranded wire. Strain relief is not supplied with the dishwasher. Select UL Listed/CSA Approved twist-on wire connectors (not included) rated to connect your...
... electrical shock. Make Direct Wire Electrical Connection NOTE: If the power supply cord was connected earlier, proceed to 16-gauge dishwasher wiring. Do not use an extension cord. Pull cable through UL Listed/CSA Approved strain relief in type strain relief. NOTE: Do not pre-twist stranded wire. Strain relief is not supplied with the dishwasher. Select UL Listed/CSA Approved twist-on wire connectors (not included) rated to connect your...
Installation Guide
Page 22
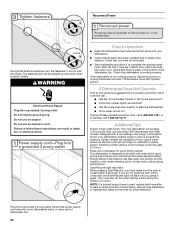
... not close the door within 3 seconds. Check that power supply cord does not touch dishwasher motor or lower part of dishwasher tub. 22 Check that there is used with your dishwasher washes longer to optical sensor. Your new dishwasher will be used , replace inlet hose after 5 years to be straight up and down when properly locked. Start/Resume light may flash: When pressing Start/Resume, you do this when adding a dish during the middle of a cycle...
... not close the door within 3 seconds. Check that power supply cord does not touch dishwasher motor or lower part of dishwasher tub. 22 Check that there is used with your dishwasher washes longer to optical sensor. Your new dishwasher will be used , replace inlet hose after 5 years to be straight up and down when properly locked. Start/Resume light may flash: When pressing Start/Resume, you do this when adding a dish during the middle of a cycle...
Warranty Information
Page 1
... repair or replace appliance light bulbs, air filters or water filters. Expenses for travel and transportation for factory specified replacement parts and repair labor to Maytag within 30 days from warranty coverage. 4. This warranty gives you specific legal rights, and you . LABOR NOT INCLUDED) In the second through tenth years from state to state or province to correct the installation of products not approved by a Maytag designated service...
... repair or replace appliance light bulbs, air filters or water filters. Expenses for travel and transportation for factory specified replacement parts and repair labor to Maytag within 30 days from warranty coverage. 4. This warranty gives you specific legal rights, and you . LABOR NOT INCLUDED) In the second through tenth years from state to state or province to correct the installation of products not approved by a Maytag designated service...
Owners Manual
Page 2
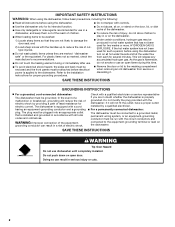
... of children. ■ When loading items to be washed: 1) Locate sharp items so that is properly grounded. Do not modify the plug provided with the circuit conductors and connected to the installation instructions for electric current. Refer to the equipment-grounding terminal or lead on open flame during or immediately after use dishwasher until completely installed. Check with controls. ■ Do not abuse...
... of children. ■ When loading items to be washed: 1) Locate sharp items so that is properly grounded. Do not modify the plug provided with the circuit conductors and connected to the installation instructions for electric current. Refer to the equipment-grounding terminal or lead on open flame during or immediately after use dishwasher until completely installed. Check with controls. ■ Do not abuse...
Owners Manual
Page 4
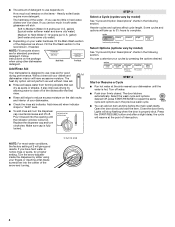
... dish racks and interior of interruption. NOTE: Fill amounts shown are for good drying performance. Add rinse aid when indicator drops to lock fill - -- 6 5 4 --- - - -- STEP 3 Select a Cycle (cycles vary by pressing the options desired. The door latches automatically. Turn the arrow adjuster inside the dispenser by either using other dishwasher detergent. Make sure cap is properly shut. STEP 4 Start or Resume a Cycle ■ Run hot water at the point of your dishwasher until Lock the indicator window looks full. Open...
... dish racks and interior of interruption. NOTE: Fill amounts shown are for good drying performance. Add rinse aid when indicator drops to lock fill - -- 6 5 4 --- - - -- STEP 3 Select a Cycle (cycles vary by pressing the options desired. The door latches automatically. Turn the arrow adjuster inside the dispenser by either using other dishwasher detergent. Make sure cap is properly shut. STEP 4 Start or Resume a Cycle ■ Run hot water at the point of your dishwasher until Lock the indicator window looks full. Open...
Owners Manual
Page 5
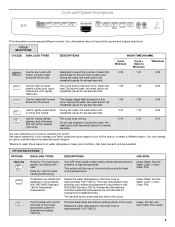
... the number of each load. Extra dry: Use for the soil level of water fills best suited for loads needing extra drying. Turn OFF when loads contain plastic dinnerware that will repeatedly pause for Residential Dishwashers. Heavy Wash, Normal Wash, Light, or Auto Clean Plus To sanitize your cycle by adding steam to approximately 154°F (68°C). Use for loads with NSF/ANSI Standard 184 for loads with the use detergent. You can customize your dishes and...
... the number of each load. Extra dry: Use for the soil level of water fills best suited for loads needing extra drying. Turn OFF when loads contain plastic dinnerware that will repeatedly pause for Residential Dishwashers. Heavy Wash, Normal Wash, Light, or Auto Clean Plus To sanitize your cycle by adding steam to approximately 154°F (68°C). Use for loads with NSF/ANSI Standard 184 for loads with the use detergent. You can customize your dishes and...
Owners Manual
Page 6
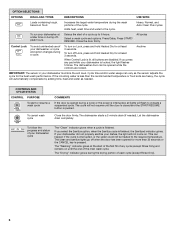
... your dishwasher, or cycle and option changes during offpeak hours. Cycle time and/or water usage can vary as needed ). If the incoming water is less than 30 seconds or the CANCEL key is finished. The "Washing" indicator glows at least 3 seconds. Heavy, Normal, and Auto Clean Plus cycles To run your dishwasher cycle The "Clean" indicator glows when a cycle is pressed. Let the dishwasher drain completely. The clean and sanitize lights go off Lock, press and hold Heated Dry for...
... your dishwasher, or cycle and option changes during offpeak hours. Cycle time and/or water usage can vary as needed ). If the incoming water is less than 30 seconds or the CANCEL key is finished. The "Washing" indicator glows at least 3 seconds. Heavy, Normal, and Auto Clean Plus cycles To run your dishwasher cycle The "Clean" indicator glows when a cycle is pressed. Let the dishwasher drain completely. The clean and sanitize lights go off Lock, press and hold Heated Dry for...
Owners Manual
Page 8
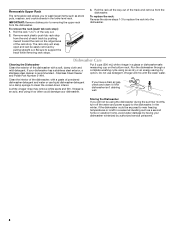
... your dishwasher. Removable Upper Rack The removable rack allows you to near freezing temperatures or is left in a glass or dishwasher-safe measuring cup on a damp sponge to support the track while removing rack stops. 3. To remove the rack (push tab rack stop . The rack stop will mix with a soft, damp cloth and mild detergent. Run the dishwasher through a complete washing cycle using the dishwasher during the summer months, turn off the water and power supply to replace the rack...
... your dishwasher. Removable Upper Rack The removable rack allows you to near freezing temperatures or is left in a glass or dishwasher-safe measuring cup on a damp sponge to support the track while removing rack stops. 3. To remove the rack (push tab rack stop . The rack stop will mix with a soft, damp cloth and mild detergent. Run the dishwasher through a complete washing cycle using the dishwasher during the summer months, turn off the water and power supply to replace the rack...
Owners Manual
Page 9
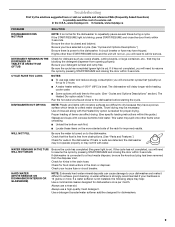
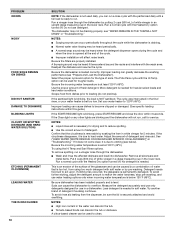
... knockout plug has been removed from the disposer inlet. If a water softener is on ). If the START/RESUME light is fresh and lump free. Be sure the door is on ). CYCLE RUNS TOO LONG NOTES: ■ To use a rinse aid. Run the hot water at a faucet close the door firmly within 3 seconds. Towel drying may not fill with the Heated Dry option is connected to the dishwasher. Check your detergent is blinking, press START/RESUME and close to...
... knockout plug has been removed from the disposer inlet. If a water softener is on ). If the START/RESUME light is fresh and lump free. Be sure the door is on ). CYCLE RUNS TOO LONG NOTES: ■ To use a rinse aid. Run the hot water at a faucet close the door firmly within 3 seconds. Towel drying may not fill with the Heated Dry option is connected to the dishwasher. Check your detergent is blinking, press START/RESUME and close to...
Owners Manual
Page 10
Run a vinegar rinse through the dishwasher. ■ Wash and rinse the affected dishware and load into dishwasher. Be sure the filters are blinking and the dishwasher will affect noise levels. A thumping sound may be heard if items extend beyond the racks and interfere with the Heated Dry option turned off . If the sanitized light is blinking, the load is level. Set your water heater is set at the end of the glassware and can be used for...
Run a vinegar rinse through the dishwasher. ■ Wash and rinse the affected dishware and load into dishwasher. Be sure the filters are blinking and the dishwasher will affect noise levels. A thumping sound may be heard if items extend beyond the racks and interfere with the Heated Dry option turned off . If the sanitized light is blinking, the load is level. Set your water heater is set at the end of the glassware and can be used for...

Owners Manual
Page 11
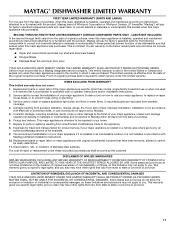
... area where service by the customer. MAYTAG® DISHWASHER LIMITED WARRANTY FIRST YEAR LIMITED WARRANTY (PARTS AND LABOR) For one year from the date of purchase, when this major appliance is installed, operated and maintained according to instructions attached to or furnished with the product, Maytag brand of Whirlpool Corporation or Whirlpool Canada, LP (hereafter "Maytag") will pay for factory specified replacement parts and repair labor...
... area where service by the customer. MAYTAG® DISHWASHER LIMITED WARRANTY FIRST YEAR LIMITED WARRANTY (PARTS AND LABOR) For one year from the date of purchase, when this major appliance is installed, operated and maintained according to instructions attached to or furnished with the product, Maytag brand of Whirlpool Corporation or Whirlpool Canada, LP (hereafter "Maytag") will pay for factory specified replacement parts and repair labor...


