
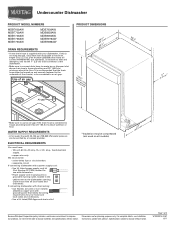
Dimension Guide
Page 1
.... or 20- Outlet must meet all models) (532.31"cm) Because Whirlpool Corporation policy includes a continuous commitment to change without notice. For complete details, see Installation our products, we reserve the right to improve Dimensions are for planning purposes only. ELECTRICAL REQUIREMENTS You must plug into a grounded 3 prong outlet, located in...
.... or 20- Outlet must meet all models) (532.31"cm) Because Whirlpool Corporation policy includes a continuous commitment to change without notice. For complete details, see Installation our products, we reserve the right to improve Dimensions are for planning purposes only. ELECTRICAL REQUIREMENTS You must plug into a grounded 3 prong outlet, located in...
Dimension Guide
Page 2
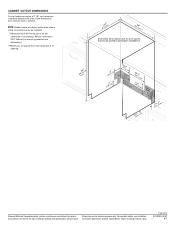
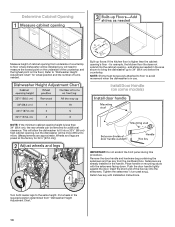
... **Minimum, measured from narrowest point of opening . (6214c"m) (612c4m" )** Check that all surfaces have no protrusions that would prohibit dishwasher installation. (8m63.44in"c*m) (10.42"cm) (7.63"cm) (167³.⁄₄2"cm) (14(2.³64⁄₄.¹4"⁄c₂"....¹7⁄₂"cm) (165¹.⁄₄9"cm) CAlreeaar NOTE: Shaded areas of cabinet walls show where utility connections may be installed. *Measured from the lowest point on the underside of countertop. CABINET CUTOUT DIMENSIONS Corner locations require a 2" (5.1 cm) minimum clearance...
... **Minimum, measured from narrowest point of opening . (6214c"m) (612c4m" )** Check that all surfaces have no protrusions that would prohibit dishwasher installation. (8m63.44in"c*m) (10.42"cm) (7.63"cm) (167³.⁄₄2"cm) (14(2.³64⁄₄.¹4"⁄c₂"....¹7⁄₂"cm) (165¹.⁄₄9"cm) CAlreeaar NOTE: Shaded areas of cabinet walls show where utility connections may be installed. *Measured from the lowest point on the underside of countertop. CABINET CUTOUT DIMENSIONS Corner locations require a 2" (5.1 cm) minimum clearance...
Installation Guide
Page 2
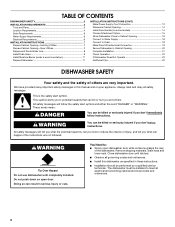
... be killed or seriously injured if you what can happen if the instructions are very important. Close dishwasher door until completely installed. WARNING You can be installed to meet all safety messages. You Need to: ■ Slowly open door. Do not push down on open dishwasher ... 16 Connect to Water Supply 18 Connect to Drain 18 Make Direct Wire Electrical Connection 19 Secure Dishwasher in Cabinet Opening 20 Complete Installation 21 Check Operation 22 If Dishwasher Does Not Operate 22 Additional Tips 22 DISHWASHER SAFETY Your safety and the safety of others ....
... be killed or seriously injured if you what can happen if the instructions are very important. Close dishwasher door until completely installed. WARNING You can be installed to meet all safety messages. You Need to: ■ Slowly open door. Do not push down on open dishwasher ... 16 Connect to Water Supply 18 Connect to Drain 18 Make Direct Wire Electrical Connection 19 Secure Dishwasher in Cabinet Opening 20 Complete Installation 21 Check Operation 22 If Dishwasher Does Not Operate 22 Additional Tips 22 DISHWASHER SAFETY Your safety and the safety of others ....
Installation Guide
Page 3
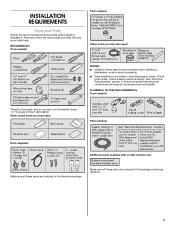
... needed: Parts needed: Other parts you may also need : Parts needed : *Must be made by a licensed electrical installer. Check local codes. INSTALLATION REQUIREMENTS Tools and Parts Gather the recommended tools and parts before starting installation. See "Electrical Requirements" section. Read and follow the instructions provided with certain models only: Make sure all these...
... needed: Parts needed: Other parts you may also need : Parts needed : *Must be made by a licensed electrical installer. Check local codes. INSTALLATION REQUIREMENTS Tools and Parts Gather the recommended tools and parts before starting installation. See "Electrical Requirements" section. Read and follow the instructions provided with certain models only: Make sure all these...
Installation Guide
Page 4
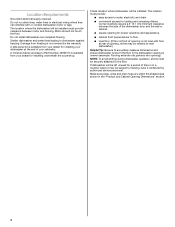
... where dishwasher will be left unused for loading and unloading dishes. NOTE: To avoid shifting during dishwasher operation, shims must be installed must provide: ■ easy access to accurately measure dimensions and ensure dishwasher is level if the floor in the dishwasher opening , ...shims may be installed. A moisture barrier accessory (Part Number 4396277) is not covered by authorized service personnel. The location where the dishwasher will be securely...
... where dishwasher will be left unused for loading and unloading dishes. NOTE: To avoid shifting during dishwasher operation, shims must be installed must provide: ■ easy access to accurately measure dimensions and ensure dishwasher is level if the floor in the dishwasher opening , ...shims may be installed. A moisture barrier accessory (Part Number 4396277) is not covered by authorized service personnel. The location where the dishwasher will be securely...
Installation Guide
Page 6
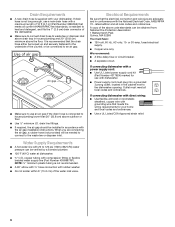
...and ordinances. ■ Use a UL Listed/CSA Approved strain relief. 6 drain line fittings. ■ If required, the air gap should be installed in house plumbing and 20" (50.8 cm) minimum above subfloor or floor. ■ Use ¹ ₂" minimum I.D. Water Supply Requirements... ■ A hot water line with the air gap installation instructions. latest edition and all local codes and ordinances. We recommend: ■ A time-delay fuse or circuit breaker. ■ A separate circuit...
...and ordinances. ■ Use a UL Listed/CSA Approved strain relief. 6 drain line fittings. ■ If required, the air gap should be installed in house plumbing and 20" (50.8 cm) minimum above subfloor or floor. ■ Use ¹ ₂" minimum I.D. Water Supply Requirements... ■ A hot water line with the air gap installation instructions. latest edition and all local codes and ordinances. We recommend: ■ A time-delay fuse or circuit breaker. ■ A separate circuit...
Installation Guide
Page 7
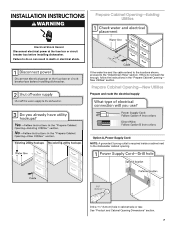
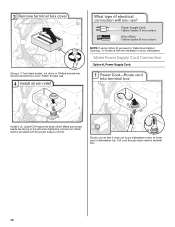
... Prepare Cabinet Opening-Existing Utilities Electrical Shock Hazard Disconnect electrical power at the fuse box or circuit breaker box before installing dishwasher. If they do so can result in death or electrical shock. Prepare Cabinet Opening-New Utilities Prepare and route the... electrical supply Option A, Power Supply Cord: NOTE: A grounded 3 prong outlet is required inside a cabinet next to the "Install Drain Hose" section. Drill a 1¹⁄₂" (3.8 cm) hole in the "Prepare Cabinet Opening- If the water line and the cable extend ...
... Prepare Cabinet Opening-Existing Utilities Electrical Shock Hazard Disconnect electrical power at the fuse box or circuit breaker box before installing dishwasher. If they do so can result in death or electrical shock. Prepare Cabinet Opening-New Utilities Prepare and route the... electrical supply Option A, Power Supply Cord: NOTE: A grounded 3 prong outlet is required inside a cabinet next to the "Install Drain Hose" section. Drill a 1¹⁄₂" (3.8 cm) hole in the "Prepare Cabinet Opening- If the water line and the cable extend ...
Installation Guide
Page 9
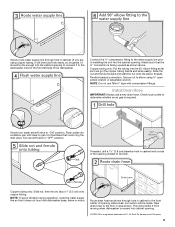
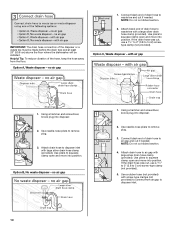
... cabinet opening . †®TEFLON is facing upward as shown above. Slide the nut and ferrule forward and start the nut onto the elbow threads. Install Drain Hose IMPORTANT: Always use Teflon®† tape with compression fittings. Flush water into the cabinet opening. This will prohibit it to elbow using... tubing only: Slide nut, then ferrule, about 1" (2.5 cm) onto copper tubing. Connect the ³⁄₈" compression fitting to the water supply line prior to installing the unit into a shallow pan until clear to get rid of the dishwasher.
... cabinet opening . †®TEFLON is facing upward as shown above. Slide the nut and ferrule forward and start the nut onto the elbow threads. Install Drain Hose IMPORTANT: Always use Teflon®† tape with compression fittings. Flush water into the cabinet opening. This will prohibit it to elbow using... tubing only: Slide nut, then ferrule, about 1" (2.5 cm) onto copper tubing. Connect the ³⁄₈" compression fitting to the water supply line prior to installing the unit into a shallow pan until clear to get rid of the dishwasher.
Installation Guide
Page 10
... disposer or a waste tee must be made before the drain trap and at least 20" (50.8 cm) above the floor where the dishwasher will be installed.
... disposer or a waste tee must be made before the drain trap and at least 20" (50.8 cm) above the floor where the dishwasher will be installed.

Installation Guide
Page 11
... towel to avoid damaging floor covering. Doing so can result in back or other injury. Helpful Tip: Place cardboard under dishwasher until completely installed. Do not use door panel as a worktable without first covering with air gap Prepare Dishwasher WARNING 1. Using 2 or more people to ... 5.1 cm) screw-type clamp (not provided). 3. If the drain hose was cut ribbed section. 2. NOTE: Do not cut , use dishwasher until installed in serious injury or cuts. Attach drain hose to air gap with screw-type clamps (not provided) to connect from access panel. 11 Using a flat...
... towel to avoid damaging floor covering. Doing so can result in back or other injury. Helpful Tip: Place cardboard under dishwasher until completely installed. Do not use door panel as a worktable without first covering with air gap Prepare Dishwasher WARNING 1. Using 2 or more people to ... 5.1 cm) screw-type clamp (not provided). 3. If the drain hose was cut ribbed section. 2. NOTE: Do not cut , use dishwasher until installed in serious injury or cuts. Attach drain hose to air gap with screw-type clamps (not provided) to connect from access panel. 11 Using a flat...
Installation Guide
Page 12
... kit. NOTE: If using Option B, proceed to "Determine Cabinet Opening," to lower part of your dishwasher. Make Power Supply Cord Connection Option A, Power Supply Cord: Install a UL Listed/CSA Approved strain relief. Make sure screw heads are facing to the left when tightening conduit nut. Strain relief is provided with the...
... kit. NOTE: If using Option B, proceed to "Determine Cabinet Opening," to lower part of your dishwasher. Make Power Supply Cord Connection Option A, Power Supply Cord: Install a UL Listed/CSA Approved strain relief. Make sure screw heads are facing to the left when tightening conduit nut. Strain relief is provided with the...
Installation Guide
Page 14
...factory for wheel position and the number of turns needed in the required position determined from the cardboard box. for additional clearance. Install Door Handle (on some models) NOTE: If the minimum cabinet opening height is in the handle. This will allow the dishwasher...of cabinet opening from underside of countertop to floor where dishwasher will be installed (you will be more difficult to move. (Measurements are already installed in use. Place handle on mounting studs with Installation Instructions. Tighten the setscrews ¹⁄₄ turn past snug. NOTE...
...factory for wheel position and the number of turns needed in the required position determined from the cardboard box. for additional clearance. Install Door Handle (on some models) NOTE: If the minimum cabinet opening height is in the handle. This will allow the dishwasher...of cabinet opening from underside of countertop to floor where dishwasher will be installed (you will be more difficult to move. (Measurements are already installed in use. Place handle on mounting studs with Installation Instructions. Tighten the setscrews ¹⁄₄ turn past snug. NOTE...
Installation Guide
Page 15
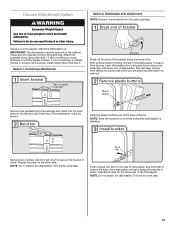
...to do so can result in place. Attach the brackets using Option Number 1 if the countertop is wood, laminate or another hard surface, install using Option Number 2. Break off the end of the tub. With another person holding the rear of the dishwasher to cabinet. Repeat this ... this step for the other side. IMPORTANT: The dishwasher must be secured to move and install dishwasher. There are securing dishwasher to keep screws from the parts package. If your countertop is installed. Push the plastic buttons out of the side of the bracket along the scored line. Remove...
...to do so can result in place. Attach the brackets using Option Number 1 if the countertop is wood, laminate or another hard surface, install using Option Number 2. Break off the end of the tub. With another person holding the rear of the dishwasher to cabinet. Repeat this ... this step for the other side. IMPORTANT: The dishwasher must be secured to move and install dishwasher. There are securing dishwasher to keep screws from the parts package. If your countertop is installed. Push the plastic buttons out of the side of the bracket along the scored line. Remove...
Installation Guide
Page 16
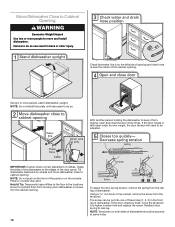
... to cabinet opening. Tilt dishwasher backward on wheels and move dishwasher close the door a few times. If the door closes by itself, move and install dishwasher. Reattach door spring to a higher number hole and replace the screw. If the door closes or falls open and close to Cabinet Opening. ... of three holes (1, 2, 3) in the front leg of the door panel. Grasp the sides of the dishwasher at same holes. NOTE: Do not install kick plate until instructed to keep it from moving when dishwasher is on both sides of the cabinet opening . 16 To adjust the door spring...
... to cabinet opening. Tilt dishwasher backward on wheels and move dishwasher close the door a few times. If the door closes by itself, move and install dishwasher. Reattach door spring to a higher number hole and replace the screw. If the door closes or falls open and close to Cabinet Opening. ... of three holes (1, 2, 3) in the front leg of the door panel. Grasp the sides of the dishwasher at same holes. NOTE: Do not install kick plate until instructed to keep it from moving when dishwasher is on both sides of the cabinet opening . 16 To adjust the door spring...
Installation Guide
Page 17
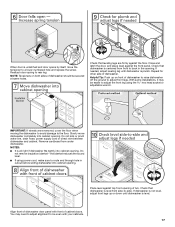
Reattach door spring to the floor. Helpful Tip: Push up or down until dishwasher is plumb. With some installations, it may need to adjust alignment to be even with front of dishwasher door panel with your cabinets. 17 Slowly move the tensioner to -side. ...
Reattach door spring to the floor. Helpful Tip: Push up or down until dishwasher is plumb. With some installations, it may need to adjust alignment to be even with front of dishwasher door panel with your cabinets. 17 Slowly move the tensioner to -side. ...
Installation Guide
Page 21
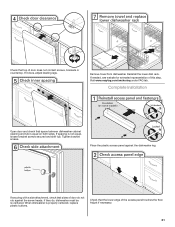
Visit www.maytag.com/anchoring under FAQ tab. If they do not rub against the dishwasher leg. Remove towel from dishwasher. Tighten bracket screws. When dishwasher is not ... plastic access panel against the screw heads. If securing with a side attachment, check that sides of door does not contact screws, brackets or countertop. Complete Installation Open door and check that space between dishwasher cabinet opening and tub is equal on both sides. Check that top of door do , dishwasher must...
Visit www.maytag.com/anchoring under FAQ tab. If they do not rub against the dishwasher leg. Remove towel from dishwasher. Tighten bracket screws. When dishwasher is not ... plastic access panel against the screw heads. If securing with a side attachment, check that sides of door does not contact screws, brackets or countertop. Complete Installation Open door and check that space between dishwasher cabinet opening and tub is equal on both sides. Check that top of door do , dishwasher must...
Installation Guide
Page 22
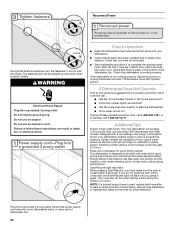
.... (You must make sure the door is used with an optical water sensor so the first cycle will flash until you have been installed and no steps were skipped. If the dishwasher is water in the bottom of the dishwasher tub. Selecting certain options could increase cycle...for good drying results: This dishwasher is working properly, disconnect power or unplug dishwasher and see "If Dishwasher Does Not Operate" section. Record hose installation or replacement dates on the water sheeting action of a service call 1-800-253-1301, or in death, fire, or electrical shock. If ...
.... (You must make sure the door is used with an optical water sensor so the first cycle will flash until you have been installed and no steps were skipped. If the dishwasher is water in the bottom of the dishwasher tub. Selecting certain options could increase cycle...for good drying results: This dishwasher is working properly, disconnect power or unplug dishwasher and see "If Dishwasher Does Not Operate" section. Record hose installation or replacement dates on the water sheeting action of a service call 1-800-253-1301, or in death, fire, or electrical shock. If ...
Warranty Information
Page 1
...do not allow limitations on how to use your major appliance is located in a remote area where service by an authorized Maytag servicer is not installed in a manner that have other rights that vary from state to state or province to province. 11 This warranty gives ...major appliance is used in accordance with original model/serial numbers that is a limited 10-year warranty on major appliances with Maytag published installation instructions. 10. SECOND THROUGH TENTH YEAR LIMITED WARRANTY (CERTAIN COMPONENT PARTS ONLY - Consumable parts are excluded from the date of God...
...do not allow limitations on how to use your major appliance is located in a remote area where service by an authorized Maytag servicer is not installed in a manner that have other rights that vary from state to state or province to province. 11 This warranty gives ...major appliance is used in accordance with original model/serial numbers that is a limited 10-year warranty on major appliances with Maytag published installation instructions. 10. SECOND THROUGH TENTH YEAR LIMITED WARRANTY (CERTAIN COMPONENT PARTS ONLY - Consumable parts are excluded from the date of God...
Owners Manual
Page 2
... wiring system, or an equipment-grounding conductor must be grounded. HYDROGEN GAS IS EXPLOSIVE. This will not fit the outlet, have a proper outlet installed by providing a path of injury, do not smoke or use an open door. WARNING: Improper connection of electric shock. For plastic items not so...the plug provided with controls. ■ Do not abuse, sit on, or stand on open flame during or immediately after use dishwasher until completely installed. Do not push down on the door, lid, or dish racks of the dishwasher. ■ To reduce the risk of least resistance for...
... wiring system, or an equipment-grounding conductor must be grounded. HYDROGEN GAS IS EXPLOSIVE. This will not fit the outlet, have a proper outlet installed by providing a path of injury, do not smoke or use an open door. WARNING: Improper connection of electric shock. For plastic items not so...the plug provided with controls. ■ Do not abuse, sit on, or stand on open flame during or immediately after use dishwasher until completely installed. Do not push down on the door, lid, or dish racks of the dishwasher. ■ To reduce the risk of least resistance for...
Owners Manual
Page 9
In the U.S.A., www.maytag.com In Canada, www.maytag.ca PROBLEM SOLUTION DISHWASHER DOES NOT RUN NOTE: It is power to the dishwasher. A circuit breaker or fuse may not fill with concave bottoms hold ... booster/water softener additive designed for kinks in the drain hose. DISHWASHER NOT DRYING NOTE: Plastic and items with the Heated Dry option is not installed, the following steps may be necessary. Troubleshooting First try the solutions suggested here or visit our website and reference FAQs (Frequently Asked Questions) to possibly...
In the U.S.A., www.maytag.com In Canada, www.maytag.ca PROBLEM SOLUTION DISHWASHER DOES NOT RUN NOTE: It is power to the dishwasher. A circuit breaker or fuse may not fill with concave bottoms hold ... booster/water softener additive designed for kinks in the drain hose. DISHWASHER NOT DRYING NOTE: Plastic and items with the Heated Dry option is not installed, the following steps may be necessary. Troubleshooting First try the solutions suggested here or visit our website and reference FAQs (Frequently Asked Questions) to possibly...


