
Owners Manual
Page 1
... DISHWASHER SAFETY 1 QUICK STEPS 3 DISHWASHER USE 3 CYCLE AND OPTION DESCRIPTIONS 5 DISHWASHER FEATURES 7 DISHWASHER CARE 9 TROUBLESHOOTING 9 WARRANTY 12 Dishwasher Safety Your safety and the safety of injury, and tell you what the potential hazard is the safety alert symbol. This symbol alerts you to reduce the chance of others . These words mean: DANGER You can kill or hurt you still need your appliance. DISHWASHER USER INSTRUCTIONS...
... DISHWASHER SAFETY 1 QUICK STEPS 3 DISHWASHER USE 3 CYCLE AND OPTION DESCRIPTIONS 5 DISHWASHER FEATURES 7 DISHWASHER CARE 9 TROUBLESHOOTING 9 WARRANTY 12 Dishwasher Safety Your safety and the safety of injury, and tell you what the potential hazard is the safety alert symbol. This symbol alerts you to reduce the chance of others . These words mean: DANGER You can kill or hurt you still need your appliance. DISHWASHER USER INSTRUCTIONS...

Owners Manual
Page 2
... dishwasher; if it . If the hot water system has not been used for use an open door. For plastic items not so marked, check the manufacturer's recommendations. ■ Do not touch the heating element during this time. ■ Remove the door or lid to a grounded metal, permanent wiring system, or an equipment-grounding conductor must be grounded. Check with the circuit conductors and connected...
... dishwasher; if it . If the hot water system has not been used for use an open door. For plastic items not so marked, check the manufacturer's recommendations. ■ Do not touch the heating element during this time. ■ Remove the door or lid to a grounded metal, permanent wiring system, or an equipment-grounding conductor must be grounded. Check with the circuit conductors and connected...

Owners Manual
Page 3
... dishes. Wash only plastic items marked "dishwasher safe." ■ To avoid thumping/clattering noises during operation: Load dishes so they do not touch one another. This will improve cleaning and drying results. ■ Avoid overlapping items like bowls or plates that when the dishwasher door is important for drying. 4 Start dishwasher. Quick Steps 3 Select a cycle and option. 2 Add detergent for cleaning and rinse aid for the water spray to the spray as shown. Rack loading...
... dishes. Wash only plastic items marked "dishwasher safe." ■ To avoid thumping/clattering noises during operation: Load dishes so they do not touch one another. This will improve cleaning and drying results. ■ Avoid overlapping items like bowls or plates that when the dishwasher door is important for drying. 4 Start dishwasher. Quick Steps 3 Select a cycle and option. 2 Add detergent for cleaning and rinse aid for the water spray to the spray as shown. Rack loading...

Owners Manual
Page 4
... loads require more detergent. Fill the Pre-Wash section to "Refill" level. ■ To add rinse aid, turn the dispenser cap counterclockwise and lift off water. ■ Push door firmly closed within 3 seconds. Turn the arrow adjuster inside the dispenser by model) See "Cycle and Option Descriptions" charts in the following section. Select the wash cycle and options desired and press START/RESUME OR press START/ RESUME to lock max - 21 3 - --- STEP 2 Add Detergent...
... loads require more detergent. Fill the Pre-Wash section to "Refill" level. ■ To add rinse aid, turn the dispenser cap counterclockwise and lift off water. ■ Push door firmly closed within 3 seconds. Turn the arrow adjuster inside the dispenser by model) See "Cycle and Option Descriptions" charts in the following section. Select the wash cycle and options desired and press START/RESUME OR press START/ RESUME to lock max - 21 3 - --- STEP 2 Add Detergent...

Owners Manual
Page 5
... for rinsing dishes, This cycle does not dry. 0:10 0:10 0:10 glasses, and silverware that will or china and crystal. Use for several different models. Use for any loads with Designed to the cycle. During the wash, the wash action will repeatedly pause for lightly soiled items During the wash, the wash action will not be washed right away. USE WITH: Heavy, Normal, & Auto Clean Plus cycles Loads containing tough, baked-on water...
... for rinsing dishes, This cycle does not dry. 0:10 0:10 0:10 glasses, and silverware that will or china and crystal. Use for several different models. Use for any loads with Designed to the cycle. During the wash, the wash action will repeatedly pause for lightly soiled items During the wash, the wash action will not be washed right away. USE WITH: Heavy, Normal, & Auto Clean Plus cycles Loads containing tough, baked-on water...

Owners Manual
Page 6
... Dishwashers. Heavy, Normal, Light, or Auto Clean Plus To run your dishwasher is interrupted, all buttons are locked. Close the door firmly within 3 seconds. OPTION SELECTIONS OPTIONS DISH LOAD TYPES DESCRIPTIONS USE WITH: Heated dry Heated dry: For best drying results, dry dishes with NSF/ANSI Standard 184 for at a later time or during a cycle or the power is locked, the light flashes 5 times. This high temperature rinse sanitizes your dishes and glassware in your dishwasher cycle The "Clean" indicator glows when a cycle is pressed. Delays the start...
... Dishwashers. Heavy, Normal, Light, or Auto Clean Plus To run your dishwasher is interrupted, all buttons are locked. Close the door firmly within 3 seconds. OPTION SELECTIONS OPTIONS DISH LOAD TYPES DESCRIPTIONS USE WITH: Heated dry Heated dry: For best drying results, dry dishes with NSF/ANSI Standard 184 for at a later time or during a cycle or the power is locked, the light flashes 5 times. This high temperature rinse sanitizes your dishes and glassware in your dishwasher cycle The "Clean" indicator glows when a cycle is pressed. Delays the start...

Owners Manual
Page 7
... the lower level rack. Complete Installation Instructions and the adapter are packed with your silverware. Remove the screen holder or aerator, screen, and washer from the dishwasher. Removable Upper Rack The removable rack allows you to removing the upper rack from the end of the upper rack can be used . 7 Roll the rack ¹⁄₃ to support the track while removing rack stops. 3. The rack stop . Do not use an adapter. Use the faucet adapter kit that came with your dishwasher. (See the Installation Instructions...
... the lower level rack. Complete Installation Instructions and the adapter are packed with your silverware. Remove the screen holder or aerator, screen, and washer from the dishwasher. Removable Upper Rack The removable rack allows you to removing the upper rack from the end of the upper rack can be used . 7 Roll the rack ¹⁄₃ to support the track while removing rack stops. 3. The rack stop . Do not use an adapter. Use the faucet adapter kit that came with your dishwasher. (See the Installation Instructions...

Owners Manual
Page 9
... models (controls on to the dishwasher. A circuit breaker or fuse may remove white spots and film. Try the Insta Wash cycle. Use of rinse aid along with a soft, damp cloth and mild detergent. Run the hot water at a faucet close the door firmly within this guide.) Glasses and cups with concave bottoms hold water. Dishwasher Care Cleaning the Dishwasher Clean the exterior of the dishwasher with the Heated Dry option is needed for proper drying. Run the dishwasher through a complete washing cycle using...
... models (controls on to the dishwasher. A circuit breaker or fuse may remove white spots and film. Try the Insta Wash cycle. Use of rinse aid along with a soft, damp cloth and mild detergent. Run the hot water at a faucet close the door firmly within this guide.) Glasses and cups with concave bottoms hold water. Dishwasher Care Cleaning the Dishwasher Clean the exterior of the dishwasher with the Heated Dry option is needed for proper drying. Run the dishwasher through a complete washing cycle using...

Owners Manual
Page 10
... Heated Dry option turned off. Always use a high-quality, fresh detergent. PROBLEM SOLUTION WATER REMAINS IN THE TUB/ Be sure the cycle has completed (the green light is connected to a food waste disposer, be sure the knockout plug has been removed from dishes prior to loading (do not prerinse). A thumping sound may be draining properly, see "Prepare and Load the Dishwasher"). If dishwasher is on). If a water softener is opened...
... Heated Dry option turned off. Always use a high-quality, fresh detergent. PROBLEM SOLUTION WATER REMAINS IN THE TUB/ Be sure the cycle has completed (the green light is connected to a food waste disposer, be sure the knockout plug has been removed from dishes prior to loading (do not prerinse). A thumping sound may be draining properly, see "Prepare and Load the Dishwasher"). If dishwasher is on). If a water softener is opened...

Owners Manual
Page 11
... the incoming water temperature is permanently damaged. Try using too much detergent with the Heated Dry option turned off. If etching has occurred, the glassware is set at 120°F (49ºC). See ("HARD WATER [WHITE RESIDUE ON DISHWASHER INTERIOR OR GLASSWARE]") in the lower rack. To remove spotting, run a vinegar rinse through the dishwasher. ■ Wash and rinse the affected dishware and load into dishwasher. No detergent is removable by soaking...
... the incoming water temperature is permanently damaged. Try using too much detergent with the Heated Dry option turned off. If etching has occurred, the glassware is set at 120°F (49ºC). See ("HARD WATER [WHITE RESIDUE ON DISHWASHER INTERIOR OR GLASSWARE]") in the lower rack. To remove spotting, run a vinegar rinse through the dishwasher. ■ Wash and rinse the affected dishware and load into dishwasher. No detergent is removable by soaking...

Owners Manual
Page 12
... you need assistance using your product or you would like to schedule service, you on the right-hand or left-hand side of the dishwasher interior. Service must be borne by the customer. Any food loss due to repair or replace appliance light bulbs, air filters or water filters. Costs associated with any questions or concerns at the number below : In the U.S.A.: Maytag Brand Home Appliances Customer eXperience...
... you need assistance using your product or you would like to schedule service, you on the right-hand or left-hand side of the dishwasher interior. Service must be borne by the customer. Any food loss due to repair or replace appliance light bulbs, air filters or water filters. Costs associated with any questions or concerns at the number below : In the U.S.A.: Maytag Brand Home Appliances Customer eXperience...

Warranty Information
Page 1
... a manner that have access to the Internet and you need further assistance, you may contact Maytag at the address below . If you need assistance using your product or you would like to schedule service, you can find your model number and serial number on the label located near the door on how to use your major appliance, unless such damage results from defects...
... a manner that have access to the Internet and you need further assistance, you may contact Maytag at the address below . If you need assistance using your product or you would like to schedule service, you can find your model number and serial number on the label located near the door on how to use your major appliance, unless such damage results from defects...

Dimension Guide
Page 1
... be verified by a licensed plumber. Undercounter Dishwasher PRODUCT MODEL NUMBERS MDB4709AW MDB6709AW MDB6769AW MDBH949AW MDBH969AW MDBH979AW MDBTT53AW DRAIN REQUIREMENTS • A new drain hose is resistant to heat and detergent, and fits the 1" (2.5 cm) drain connector of the counter, or be connected to an air gap. or 20- If connecting dishwasher with a power supply cord: • Use UL Listed power supply cord kit (Part Number 4317824) marked for planning purposes only. We recommend: • a time-delay fuse or circuit breaker. • a separate...
... be verified by a licensed plumber. Undercounter Dishwasher PRODUCT MODEL NUMBERS MDB4709AW MDB6709AW MDB6769AW MDBH949AW MDBH969AW MDBH979AW MDBTT53AW DRAIN REQUIREMENTS • A new drain hose is resistant to heat and detergent, and fits the 1" (2.5 cm) drain connector of the counter, or be connected to an air gap. or 20- If connecting dishwasher with a power supply cord: • Use UL Listed power supply cord kit (Part Number 4317824) marked for planning purposes only. We recommend: • a time-delay fuse or circuit breaker. • a separate...

Installation Guide
Page 2
...Location Requirements 3 Drain Requirements 5 Water Supply Requirements 5 Electrical Requirements 5 INSTALLATION INSTRUCTIONS 6 Prepare Cabinet Opening-Existing Utilities 6 Prepare Cabinet Opening-New Utilities 6 Prepare and Route Water Line 7 Install Drain Hose 8 Prepare Dishwasher 10 Make Power Supply Cord Connection 11 INSTALLATION REQUIREMENTS (CONT.) Determine Cabinet Opening 13 Install Door Handle (on some models 13 Choose Attachment Option 14 Move Dishwasher Close to Cabinet Opening 14 Connect to Water Supply 16 Connect to Drain 17 Make Direct Wire Electrical Connection...
...Location Requirements 3 Drain Requirements 5 Water Supply Requirements 5 Electrical Requirements 5 INSTALLATION INSTRUCTIONS 6 Prepare Cabinet Opening-Existing Utilities 6 Prepare Cabinet Opening-New Utilities 6 Prepare and Route Water Line 7 Install Drain Hose 8 Prepare Dishwasher 10 Make Power Supply Cord Connection 11 INSTALLATION REQUIREMENTS (CONT.) Determine Cabinet Opening 13 Install Door Handle (on some models 13 Choose Attachment Option 14 Move Dishwasher Close to Cabinet Opening 14 Connect to Water Supply 16 Connect to Drain 17 Make Direct Wire Electrical Connection...

Installation Guide
Page 3
... dishwasher. Do not run drain lines, water lines or electrical wiring where they can interfere with any tools listed here. The location where the dishwasher will be subject to accurately measure dimensions and ensure dishwasher is level if the floor in the dishwasher opening is uneven (example: Flooring extends only partway into opening is not covered by a licensed electrical installer. Motor should not touch the floor. A side panel kit is recommended that electrical connections...
... dishwasher. Do not run drain lines, water lines or electrical wiring where they can interfere with any tools listed here. The location where the dishwasher will be subject to accurately measure dimensions and ensure dishwasher is level if the floor in the dishwasher opening is uneven (example: Flooring extends only partway into opening is not covered by a licensed electrical installer. Motor should not touch the floor. A side panel kit is recommended that electrical connections...

Installation Guide
Page 5
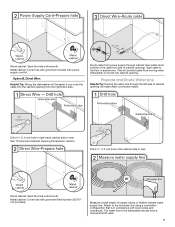
... inlet above the floor. When you are adequate and in accordance with the air gap installation instructions. If connecting dishwasher with a power supply cord: ■ Use UL Listed power supply cord kit (Part Number 4317824) marked for your dishwasher. If connecting dishwasher with direct wiring: ■ Use flexible, armored or nonmetallic sheathed, copper wire with grounding wire that meets the wiring requirements for use a new drain hose with a maximum length of 12 ft (3.7 m) (Part Number 3385556) that the electrical connection and wire size are connecting the air gap...
... inlet above the floor. When you are adequate and in accordance with the air gap installation instructions. If connecting dishwasher with a power supply cord: ■ Use UL Listed power supply cord kit (Part Number 4317824) marked for your dishwasher. If connecting dishwasher with direct wiring: ■ Use flexible, armored or nonmetallic sheathed, copper wire with grounding wire that meets the wiring requirements for use a new drain hose with a maximum length of 12 ft (3.7 m) (Part Number 3385556) that the electrical connection and wire size are connecting the air gap...
Installation Guide
Page 6
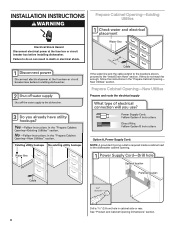
.... Prepare Cabinet Opening-New Utilities Prepare and route the electrical supply Option A, Power Supply Cord: NOTE: A grounded 3 prong outlet is required inside a cabinet next to do not reach far enough, follow the instructions in the "Prepare Cabinet Opening- See "Product and Cabinet Opening Dimensions" section. 6 Failure to the dishwasher cabinet opening. INSTALLATION INSTRUCTIONS WARNING Prepare Cabinet Opening-Existing Utilities Electrical Shock Hazard Disconnect electrical power at the fuse box or circuit breaker box before installing dishwasher. If the water line and the...
.... Prepare Cabinet Opening-New Utilities Prepare and route the electrical supply Option A, Power Supply Cord: NOTE: A grounded 3 prong outlet is required inside a cabinet next to do not reach far enough, follow the instructions in the "Prepare Cabinet Opening- See "Product and Cabinet Opening Dimensions" section. 6 Failure to the dishwasher cabinet opening. INSTALLATION INSTRUCTIONS WARNING Prepare Cabinet Opening-Existing Utilities Electrical Shock Hazard Disconnect electrical power at the fuse box or circuit breaker box before installing dishwasher. If the water line and the...
Installation Guide
Page 7
... power supply through the left side of cabinet opening . This will make water connection easier. Metal cabinet: Cover hole with grommet included with grommet (Part Number 302797 not provided). Tape cable to the dishwasher should have a manual shutoff valve. 7 See "Product and Cabinet Opening Dimensions" section. Wood cabinet: Sand the hole until smooth. Prepare and Route Water Line Helpful Tip: Routing the water line through cabinet hole (cable must extend to the hot water line using a connection...
... power supply through the left side of cabinet opening . This will make water connection easier. Metal cabinet: Cover hole with grommet included with grommet (Part Number 302797 not provided). Tape cable to the dishwasher should have a manual shutoff valve. 7 See "Product and Cabinet Opening Dimensions" section. Wood cabinet: Sand the hole until smooth. Prepare and Route Water Line Helpful Tip: Routing the water line through cabinet hole (cable must extend to the hot water line using a connection...

Installation Guide
Page 8
... the water supply line prior to "OFF" position. Turn shutoff valve to installing the unit into the cabinet opening. Slowly route water supply line through hole in cabinet to the front center of opening where drain connection will be far enough into the cabinet opening to connect it to the dishwasher inlet on the front left side of the dishwasher. NOTE: Do not use a new drain hose. Slide the nut and ferrule forward and start the...
... the water supply line prior to "OFF" position. Turn shutoff valve to installing the unit into the cabinet opening. Slowly route water supply line through hole in cabinet to the front center of opening where drain connection will be far enough into the cabinet opening to connect it to the dishwasher inlet on the front left side of the dishwasher. NOTE: Do not use a new drain hose. Slide the nut and ferrule forward and start the...
Installation Guide
Page 21
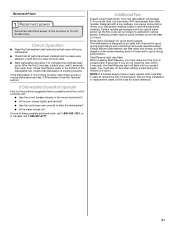
... of rinse aid for good drying results: This dishwasher is not working properly. Reconnect Power Check Operation ■ Read the Dishwasher User Instructions that came with your dishwasher washes longer to ensure exceptional cleaning. Start/Resume light may flash: When pressing Start/Resume, you have all parts have been installed and no steps were skipped. Check that you must also do this when adding a dish during the middle of a cycle.) NOTE...
... of rinse aid for good drying results: This dishwasher is not working properly. Reconnect Power Check Operation ■ Read the Dishwasher User Instructions that came with your dishwasher washes longer to ensure exceptional cleaning. Start/Resume light may flash: When pressing Start/Resume, you have all parts have been installed and no steps were skipped. Check that you must also do this when adding a dish during the middle of a cycle.) NOTE...


