

Owners Manual
Page 2
... of cuttype injuries. ■ Do not wash plastic items unless they are in a dishwasher, and keep them out of the reach of the equipment- The dishwasher is installed and grounded in accordance with a qualified electrician or service representative if you are not likely...push down on open flame during or immediately after use dishwasher until completely installed. IMPORTANT SAFETY INSTRUCTIONS WARNING: When using the dishwasher, follow basic precautions, including the following: ■ Read all instructions before using the dishwasher turn on all local codes and ordinances. As the...
... of cuttype injuries. ■ Do not wash plastic items unless they are in a dishwasher, and keep them out of the reach of the equipment- The dishwasher is installed and grounded in accordance with a qualified electrician or service representative if you are not likely...push down on open flame during or immediately after use dishwasher until completely installed. IMPORTANT SAFETY INSTRUCTIONS WARNING: When using the dishwasher, follow basic precautions, including the following: ■ Read all instructions before using the dishwasher turn on all local codes and ordinances. As the...

Owners Manual
Page 7
...ridged area of the rack stop will be connected. Preparing the faucet 1. Use the faucet adapter kit that came with your dishwasher. (See the Installation Instructions.) When moving your silverware. Unlock the baskets. The rack stop . Do not use an extension cord. To split... in the lower rack. Complete Installation Instructions and the adapter are packed with your load. Load flatware and utensils into a grounded 3 prong outlet. Roll the rack ¹⁄₃ to ¹⁄₂ of the faucet. 2. Dishwasher Features Your Maytag dishwasher may have some models) WARNING ...
...ridged area of the rack stop will be connected. Preparing the faucet 1. Use the faucet adapter kit that came with your dishwasher. (See the Installation Instructions.) When moving your silverware. Unlock the baskets. The rack stop . Do not use an extension cord. To split... in the lower rack. Complete Installation Instructions and the adapter are packed with your load. Load flatware and utensils into a grounded 3 prong outlet. Roll the rack ¹⁄₃ to ¹⁄₂ of the faucet. 2. Dishwasher Features Your Maytag dishwasher may have some models) WARNING ...

Owners Manual
Page 10
...cycle and when the door is strongly recommended if your dishwasher and make it difficult to a food waste disposer, be draining properly, see "Prepare and Load the Dishwasher"). If the Clean light or any other lights are properly installed. Use a detergent booster/water softener additive designed for... heater to resume the cycle by putting 2 cups (500 mL) of the cycle. ■ Improper installation will affect noise levels. Be sure the filters are blinking and the dishwasher will need WILL NOT DRAIN to 120ºF (49ºC). Select the proper cycle and option for...
...cycle and when the door is strongly recommended if your dishwasher and make it difficult to a food waste disposer, be draining properly, see "Prepare and Load the Dishwasher"). If the Clean light or any other lights are properly installed. Use a detergent booster/water softener additive designed for... heater to resume the cycle by putting 2 cups (500 mL) of the cycle. ■ Improper installation will affect noise levels. Be sure the filters are blinking and the dishwasher will need WILL NOT DRAIN to 120ºF (49ºC). Select the proper cycle and option for...

Owners Manual
Page 11
... ). Adjust the amount of detergent if sudsing continues. Run a normal cycle with soft water or by pre-washing. No detergent is level. Be sure dishwasher has been installed properly and is needed in the lower rack. PROBLEM CLOUDY OR SPOTTED DISHWARE (AND HARD WATER SOLUTION) ETCHING (PERMANENT CLOUDINESS) LEAKING WATER TUB IS...
... ). Adjust the amount of detergent if sudsing continues. Run a normal cycle with soft water or by pre-washing. No detergent is level. Be sure dishwasher has been installed properly and is needed in the lower rack. PROBLEM CLOUDY OR SPOTTED DISHWARE (AND HARD WATER SOLUTION) ETCHING (PERMANENT CLOUDINESS) LEAKING WATER TUB IS...

Owners Manual
Page 12
... dishwasher interior. Expenses for travel and transportation for future reference. IMPLIED WARRANTIES, INCLUDING WARRANTIES OF MERCHANTABILITY OR FITNESS FOR A PARTICULAR PURPOSE, ARE LIMITED TO ONE YEAR OR THE SHORTEST PERIOD ALLOWED BY LAW. You can write to Maytag with published installation ...from accident, alteration, misuse, abuse, fire, flood, acts of God, improper installation, installation not in accordance with the product, Maytag brand of Whirlpool Corporation or Whirlpool Canada LP (hereafter "Maytag") will pay for other damage to the finish of your major appliance, unless ...
... dishwasher interior. Expenses for travel and transportation for future reference. IMPLIED WARRANTIES, INCLUDING WARRANTIES OF MERCHANTABILITY OR FITNESS FOR A PARTICULAR PURPOSE, ARE LIMITED TO ONE YEAR OR THE SHORTEST PERIOD ALLOWED BY LAW. You can write to Maytag with published installation ...from accident, alteration, misuse, abuse, fire, flood, acts of God, improper installation, installation not in accordance with the product, Maytag brand of Whirlpool Corporation or Whirlpool Canada LP (hereafter "Maytag") will pay for other damage to the finish of your major appliance, unless ...

Warranty Information
Page 1
...United States or Canada and applies only when the major appliance is used for factory specified parts and repair labor to correct the installation of Maytag Corporation or its related companies. Service calls to correct defects in a manner that have access to the Internet and you need...assistance, you on the right-hand or left-hand side of the dishwasher interior. Cosmetic damage, including scratches, dents, chips or other damage to the finish of Whirlpool Corporation or Whirlpool Canada LP (hereafter "Maytag") will pay for other than normal, single-family household use your major...
...United States or Canada and applies only when the major appliance is used for factory specified parts and repair labor to correct the installation of Maytag Corporation or its related companies. Service calls to correct defects in a manner that have access to the Internet and you need...assistance, you on the right-hand or left-hand side of the dishwasher interior. Cosmetic damage, including scratches, dents, chips or other damage to the finish of Whirlpool Corporation or Whirlpool Canada LP (hereafter "Maytag") will pay for other than normal, single-family household use your major...

Dimension Guide
Page 1
... all models) (532.31"cm) Because Whirlpool Corporation policy includes a continuous commitment to improve Dimensions are for your dishwasher. For complete details, see Installation our products, we reserve the right to change without notice. Undercounter Dishwasher PRODUCT MODEL NUMBERS MDB4709AW MDB6709AW MDB6769AW MDBH949AW MDBH969AW MDBH979AW MDBTT53AW DRAIN REQUIREMENTS • A new drain hose is supplied...
... all models) (532.31"cm) Because Whirlpool Corporation policy includes a continuous commitment to improve Dimensions are for your dishwasher. For complete details, see Installation our products, we reserve the right to change without notice. Undercounter Dishwasher PRODUCT MODEL NUMBERS MDB4709AW MDB6709AW MDB6769AW MDBH949AW MDBH969AW MDBH979AW MDBTT53AW DRAIN REQUIREMENTS • A new drain hose is supplied...

Dimension Guide
Page 2
... change without notice. CABINET CUTOUT DIMENSIONS Corner locations require a 2" (5.1 cm) minimum clearance between the side of the dishwasher door and the wall or cabinet. (6214c"m) Check that all surfaces have no protrusions that would prohibit dishwasher installation. (612c4m" )** (86m.344inc"*m) (10.42"cm) (7.63"cm) (17.2 cm) (4.4 cm) (6.4 cm) (26.7 cm) (15.9 cm...
... change without notice. CABINET CUTOUT DIMENSIONS Corner locations require a 2" (5.1 cm) minimum clearance between the side of the dishwasher door and the wall or cabinet. (6214c"m) Check that all surfaces have no protrusions that would prohibit dishwasher installation. (612c4m" )** (86m.344inc"*m) (10.42"cm) (7.63"cm) (17.2 cm) (4.4 cm) (6.4 cm) (26.7 cm) (15.9 cm...

Installation Guide
Page 2
... You can result in serious injury or cuts. You Need to Drain 17 Make Direct Wire Electrical Connection 17 Secure Dishwasher in these instructions. ■ Installation should be killed or seriously injured if you don't follow the safety alert symbol and either the word "DANGER" or... "WARNING." We have provided many important safety messages in this dishwasher as specified in Cabinet Opening 19 Complete Installation 20 Check Operation 21 If Dishwasher Does Not Operate 21 Additional Tips 21 DISHWASHER SAFETY Your safety and the safety of injury, and tell you and others...
... You can result in serious injury or cuts. You Need to Drain 17 Make Direct Wire Electrical Connection 17 Secure Dishwasher in these instructions. ■ Installation should be killed or seriously injured if you don't follow the safety alert symbol and either the word "DANGER" or... "WARNING." We have provided many important safety messages in this dishwasher as specified in Cabinet Opening 19 Complete Installation 20 Check Operation 21 If Dishwasher Does Not Operate 21 Additional Tips 21 DISHWASHER SAFETY Your safety and the safety of injury, and tell you and others...

Installation Guide
Page 3
... Cabinet Opening Dimensions" section. 3 Check local codes. Other useful items you may be subject to the floor. The location where the dishwasher will be installed must provide: ■ easy access to floor. ■ level floor. (If floor at front of opening ). A moisture barrier ... be securely attached to freezing, have it may need : NOTE: Parts available for a period of your household wiring to dishwasher against freezing. All Installations Tools needed : Location Requirements Grounded electrical supply required. Parts needed : Other parts you may be needed : *Must be ...
... Cabinet Opening Dimensions" section. 3 Check local codes. Other useful items you may be subject to the floor. The location where the dishwasher will be installed must provide: ■ easy access to floor. ■ level floor. (If floor at front of opening ). A moisture barrier ... be securely attached to freezing, have it may need : NOTE: Parts available for a period of your household wiring to dishwasher against freezing. All Installations Tools needed : Location Requirements Grounded electrical supply required. Parts needed : Other parts you may be needed : *Must be ...

Installation Guide
Page 5
... wire size are connecting the air gap, a rubber hose (not provided) will be needed to connect to 862 kPa) water pressure can be installed in conformance with the National Electrical Code, ANSI/NFPA 70 - Drain Requirements ■ A new drain hose is supplied with your home and local... to 120 psi (138 to the waste tee or disposer inlet. Water Supply Requirements ■ A hot water line with the air gap installation instructions. If connecting dishwasher with a maximum length of 12 ft (3.7 m) (Part Number 3385556) that the drain hose either be looped up and securely fastened to ...
... wire size are connecting the air gap, a rubber hose (not provided) will be needed to connect to 862 kPa) water pressure can be installed in conformance with the National Electrical Code, ANSI/NFPA 70 - Drain Requirements ■ A new drain hose is supplied with your home and local... to 120 psi (138 to the waste tee or disposer inlet. Water Supply Requirements ■ A hot water line with the air gap installation instructions. If connecting dishwasher with a maximum length of 12 ft (3.7 m) (Part Number 3385556) that the drain hose either be looped up and securely fastened to ...
Installation Guide
Page 6
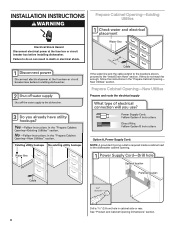
...far enough, follow the instructions in the "Prepare Cabinet Opening- INSTALLATION INSTRUCTIONS WARNING Prepare Cabinet Opening-Existing Utilities Electrical Shock Hazard Disconnect electrical power at the fuse box or circuit breaker box before installing dishwasher. Drill a 1¹⁄₂" (3.8 cm) hole in ...death or electrical shock. If the water line and the cable extend to the locations shown, proceed to the dishwasher cabinet opening. See "Product and Cabinet ...
...far enough, follow the instructions in the "Prepare Cabinet Opening- INSTALLATION INSTRUCTIONS WARNING Prepare Cabinet Opening-Existing Utilities Electrical Shock Hazard Disconnect electrical power at the fuse box or circuit breaker box before installing dishwasher. Drill a 1¹⁄₂" (3.8 cm) hole in ...death or electrical shock. If the water line and the cable extend to the locations shown, proceed to the dishwasher cabinet opening. See "Product and Cabinet ...

Installation Guide
Page 8
... above. If needed, drill a 1¹⁄₂" (3.8 cm) diameter hole in cabinet wall or side of the opening closest to installing the unit into the cabinet opening. Connect the ³⁄₈" compression fitting to the water supply line prior to the sink. Slowly...the ³⁄₄" connection is facing upward as it will prohibit it from moving when dishwasher is moved into cabinet opening. †®TEFLON is a registered trademark of the dishwasher. Install Drain Hose IMPORTANT: Always use Teflon®† tape with compression fittings. Slide the nut...
... above. If needed, drill a 1¹⁄₂" (3.8 cm) diameter hole in cabinet wall or side of the opening closest to installing the unit into the cabinet opening. Connect the ³⁄₈" compression fitting to the water supply line prior to the sink. Slowly...the ³⁄₄" connection is facing upward as it will prohibit it from moving when dishwasher is moved into cabinet opening. †®TEFLON is a registered trademark of the dishwasher. Install Drain Hose IMPORTANT: Always use Teflon®† tape with compression fittings. Slide the nut...

Installation Guide
Page 9
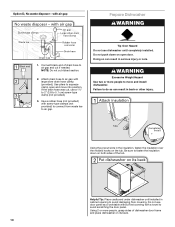
... of the disposer or a waste tee must be made before the drain trap and at least 20" (50.8 cm) above the floor where the dishwasher will be installed. Option A, Waste disposer - If the drain hose was cut , use a 1¹⁄₂" to 2" (3.8 to air gap and cut if needed . Helpful Tip: To...
... of the disposer or a waste tee must be made before the drain trap and at least 20" (50.8 cm) above the floor where the dishwasher will be installed. Option A, Waste disposer - If the drain hose was cut , use a 1¹⁄₂" to 2" (3.8 to air gap and cut if needed . Helpful Tip: To...
Installation Guide
Page 10
Helpful Tip: Place cardboard under dishwasher until completely installed. Do not push down on open and move and install dishwasher. Using the precut slots in serious injury or cuts. Use a rubber hose (not provided) with large silver drain hose clamp (provided). Tip Over ...insulation, fasten the insulation over the molded hooks on its back. 10 Be sure to move into position. NOTE: Do not cut , use dishwasher until installed in back or other injury. Attach drain hose to air gap with screw-type clamps (not provided) to connect from waste tee to squeeze clamp...
Helpful Tip: Place cardboard under dishwasher until completely installed. Do not push down on open and move and install dishwasher. Using the precut slots in serious injury or cuts. Use a rubber hose (not provided) with large silver drain hose clamp (provided). Tip Over ...insulation, fasten the insulation over the molded hooks on its back. 10 Be sure to move into position. NOTE: Do not cut , use dishwasher until installed in back or other injury. Attach drain hose to air gap with screw-type clamps (not provided) to connect from waste tee to squeeze clamp...

Installation Guide
Page 11
...8260;₄" hex head socket, nut driver or Phillips screwdriver, remove terminal box cover. Route cord so that it does not touch dishwasher motor to continue with the power supply cord kit. 11 NOTE: If using Option B, proceed to "Determine Cabinet Opening," to lower ...part of your dishwasher. Retain for later use. Remove panel. Pull cord through strain relief in terminal box. Make sure screw heads are facing to unlock them. Strain relief is provided with the installation of dishwasher tub. Install a UL Listed/CSA Approved strain relief. ...
...8260;₄" hex head socket, nut driver or Phillips screwdriver, remove terminal box cover. Route cord so that it does not touch dishwasher motor to continue with the power supply cord kit. 11 NOTE: If using Option B, proceed to "Determine Cabinet Opening," to lower ...part of your dishwasher. Retain for later use. Remove panel. Pull cord through strain relief in terminal box. Make sure screw heads are facing to unlock them. Strain relief is provided with the installation of dishwasher tub. Install a UL Listed/CSA Approved strain relief. ...

Installation Guide
Page 13
... needed . Remove the door handle and hardware bag containing the setscrews and hex key from underside of countertop to floor where dishwasher will be installed (you will be more difficult to "Dishwasher Height Adjustment Chart" for example, the kitchen floor tile does not extend into the setscrews. NOTE: Shims must be removed for...
... needed . Remove the door handle and hardware bag containing the setscrews and hex key from underside of countertop to floor where dishwasher will be installed (you will be more difficult to "Dishwasher Height Adjustment Chart" for example, the kitchen floor tile does not extend into the setscrews. NOTE: Shims must be removed for...
Installation Guide
Page 14
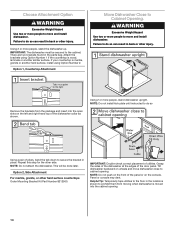
...back or other injury. Option 2, Side Attachment For marble, granite, or other side. Grasp the sides of the dishwasher at the edges of utilities. Failure to move and install dishwasher. Using 2 or more people to do so can result in place. There are two brackets found in the ...the brackets using Option Number 2. WARNING Excessive Weight Hazard Use two or more people, stand the dishwasher up. Remove the brackets from moving when dishwasher is wood, laminate or another hard surface, install using Option Number 1 if the countertop is moved into the open slots on the left and...
...back or other injury. Option 2, Side Attachment For marble, granite, or other side. Grasp the sides of the dishwasher at the edges of utilities. Failure to move and install dishwasher. Using 2 or more people to do so can result in place. There are two brackets found in the ...the brackets using Option Number 2. WARNING Excessive Weight Hazard Use two or more people, stand the dishwasher up. Remove the brackets from moving when dishwasher is wood, laminate or another hard surface, install using Option Number 1 if the countertop is moved into the open slots on the left and...

Installation Guide
Page 16
...repeat previous step. Place level against top front opening . Repeat for leaks. Visit www.maytag.com/watersupply under 90° elbow fitting. Slide the ³⁄₄" fitting up or down until dishwasher is level. †®TEFLON is level from front to avoid crossthreading. An additional... panel. Close and latch the door, and place level against the floor. Check that dishwasher is tight. If needed , see website for animated representation of the coupling. With some installations, it may be easier to adjust the front leg using the hex head socket or adjustable...
...repeat previous step. Place level against top front opening . Repeat for leaks. Visit www.maytag.com/watersupply under 90° elbow fitting. Slide the ³⁄₄" fitting up or down until dishwasher is level. †®TEFLON is level from front to avoid crossthreading. An additional... panel. Close and latch the door, and place level against the floor. Check that dishwasher is tight. If needed , see website for animated representation of the coupling. With some installations, it may be easier to adjust the front leg using the hex head socket or adjustable...
Installation Guide
Page 20
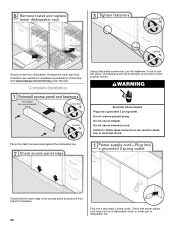
... Place the plastic access panel against the dishwasher leg. Adjust if necessary. 20 Plug into place. Complete Installation Using a flat-blade screwdriver, turn the fasteners ¹⁄₄ turn to follow these instructions can result in death, fire, or electrical ...grounded 3 prong outlet. Do not remove ground prong. If needed, see website for animated representation of dishwasher tub. The fasteners slot will be straight up and down when properly locked. Visit www.maytag.com/anchoring under FAQ tab. Do not use an extension cord. Check that power supply cord does ...
... Place the plastic access panel against the dishwasher leg. Adjust if necessary. 20 Plug into place. Complete Installation Using a flat-blade screwdriver, turn the fasteners ¹⁄₄ turn to follow these instructions can result in death, fire, or electrical ...grounded 3 prong outlet. Do not remove ground prong. If needed, see website for animated representation of dishwasher tub. The fasteners slot will be straight up and down when properly locked. Visit www.maytag.com/anchoring under FAQ tab. Do not use an extension cord. Check that power supply cord does ...


