

Owners Manual
Page 1
...izquierdo del interior de la lavavajillas. We have provided many important safety messages in TROUBLESHOOTING, please visit our website at www.maytag.com for purchasing this manual and on your model and serial number located near the door on the right-hand or left-hand side of injury, ...el usuario de la lavavajillas" en español, o para información adicional de su producto visite : www.maytag.com Tenga listo su número de modelo completo. DISHWASHER USER INSTRUCTIONS THANK YOU for additional information. This is , tell you how to potential hazards that can be killed or ...
...izquierdo del interior de la lavavajillas. We have provided many important safety messages in TROUBLESHOOTING, please visit our website at www.maytag.com for purchasing this manual and on your model and serial number located near the door on the right-hand or left-hand side of injury, ...el usuario de la lavavajillas" en español, o para información adicional de su producto visite : www.maytag.com Tenga listo su número de modelo completo. DISHWASHER USER INSTRUCTIONS THANK YOU for additional information. This is , tell you how to potential hazards that can be killed or ...

Installation Guide
Page 2
...or cuts. Doing so can be installed to meet all governing codes and ordinances. ■ Install this manual and on your appliance. The dishwasher must be killed or seriously injured if you what can happen if the instructions are very important. We have...INSTRUCTIONS 6 Prepare Cabinet Opening-Existing Utilities 6 Prepare Cabinet Opening-New Utilities 6 Prepare and Route Water Line 7 Install Drain Hose 8 Prepare Dishwasher 10 Make Power Supply Cord Connection 11 INSTALLATION REQUIREMENTS (CONT.) Determine Cabinet Opening 13 Install Door Handle (on some models 13 Choose Attachment...
...or cuts. Doing so can be installed to meet all governing codes and ordinances. ■ Install this manual and on your appliance. The dishwasher must be killed or seriously injured if you what can happen if the instructions are very important. We have...INSTRUCTIONS 6 Prepare Cabinet Opening-Existing Utilities 6 Prepare Cabinet Opening-New Utilities 6 Prepare and Route Water Line 7 Install Drain Hose 8 Prepare Dishwasher 10 Make Power Supply Cord Connection 11 INSTALLATION REQUIREMENTS (CONT.) Determine Cabinet Opening 13 Install Door Handle (on some models 13 Choose Attachment...
Installation Guide
Page 7
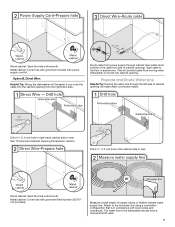
Measure overall length of cabinet opening . Tape cable to the dishwasher should have a manual shutoff valve. 7 This will prohibit cable from moving when dishwasher is in area shown. Drill a ³⁄₄" (1.9 cm) hole in the cabinet side or rear. Drill a ¹⁄&#...water line to the floor in compliance with grommet (Part Number 302797 not provided). Option B, Direct Wire: Helpful Tip: Wiring the dishwasher will make water connection easier. See "Product and Cabinet Opening Dimensions" section. Attach to the right front side of copper tubing or...
Measure overall length of cabinet opening . Tape cable to the dishwasher should have a manual shutoff valve. 7 This will prohibit cable from moving when dishwasher is in area shown. Drill a ³⁄₄" (1.9 cm) hole in the cabinet side or rear. Drill a ¹⁄&#...water line to the floor in compliance with grommet (Part Number 302797 not provided). Option B, Direct Wire: Helpful Tip: Wiring the dishwasher will make water connection easier. See "Product and Cabinet Opening Dimensions" section. Attach to the right front side of copper tubing or...


