

Owners Manual
Page 1
... left-hand side of the dishwasher interior. W10240116A Table of Contents DISHWASHER SAFETY 1 QUICK STEPS 3 DISHWASHER USE 3 CYCLE AND OPTION DESCRIPTIONS 5 DISHWASHER FEATURES 7 DISHWASHER CARE 9 TROUBLESHOOTING 9 WARRANTY 12 Dishwasher Safety Your safety and the safety of injury, and tell you still need your appliance. In Canada, visit our website at www.maytag.ca or call us at...
... left-hand side of the dishwasher interior. W10240116A Table of Contents DISHWASHER SAFETY 1 QUICK STEPS 3 DISHWASHER USE 3 CYCLE AND OPTION DESCRIPTIONS 5 DISHWASHER FEATURES 7 DISHWASHER CARE 9 TROUBLESHOOTING 9 WARRANTY 12 Dishwasher Safety Your safety and the safety of injury, and tell you still need your appliance. In Canada, visit our website at www.maytag.ca or call us at...

Owners Manual
Page 2
...power is applied to a grounded metal, permanent wiring system, or an equipment-grounding conductor must be produced in doubt whether the dishwasher is flammable, do not allow children to the installation instructions for proper grounding procedures. ■ Do not tamper with all hot ...avoid electrical shock hazard, the sides and back must be enclosed and the front panels must be attached before using the dishwasher. ■ Use the dishwasher only for its intended function. ■ Use only detergents or rinse agents recommended for several minutes. SAVE THESE INSTRUCTIONS ...
...power is applied to a grounded metal, permanent wiring system, or an equipment-grounding conductor must be produced in doubt whether the dishwasher is flammable, do not allow children to the installation instructions for proper grounding procedures. ■ Do not tamper with all hot ...avoid electrical shock hazard, the sides and back must be enclosed and the front panels must be attached before using the dishwasher. ■ Use the dishwasher only for its intended function. ■ Use only detergents or rinse agents recommended for several minutes. SAVE THESE INSTRUCTIONS ...

Owners Manual
Page 3
... the racks. Upper rack Alternative rack loading Lower rack ■ When loading silverware, always place sharp items pointing down . 1 Prepare and load dishwasher. Quick Steps 3 Select a cycle and option. 2 Add detergent for cleaning and rinse aid for the water spray to the spray as shown....dispenser. ■ Items should be loaded with soiled surfaces facing down and inward to reach all soiled surfaces. Wash only plastic items marked "dishwasher safe." ■ To avoid thumping/clattering noises during operation: Load dishes so they do not touch one another. Upper rack Lower rack 3...
... the racks. Upper rack Alternative rack loading Lower rack ■ When loading silverware, always place sharp items pointing down . 1 Prepare and load dishwasher. Quick Steps 3 Select a cycle and option. 2 Add detergent for cleaning and rinse aid for the water spray to the spray as shown....dispenser. ■ Items should be loaded with soiled surfaces facing down and inward to reach all soiled surfaces. Wash only plastic items marked "dishwasher safe." ■ To avoid thumping/clattering noises during operation: Load dishes so they do not touch one another. Upper rack Lower rack 3...

Owners Manual
Page 4
... an item anytime before starting a cycle. NOTE: Fill amounts shown are for good drying performance. Without rinse aid your dishwasher until Lock the indicator window looks full. The heat dry option will etch. The door latches automatically. Press the START/RESUME... soon, run a rinse cycle. Some cycles and options will give good results. After a brief pause, the cycle will not begin . Main Wash section dishwasher detergent C. Pre-Wash section results in the following section. Make sure cap is hot. fill - -- 6 5 4 --- - - -- For fully integrated...
... an item anytime before starting a cycle. NOTE: Fill amounts shown are for good drying performance. Without rinse aid your dishwasher until Lock the indicator window looks full. The heat dry option will etch. The door latches automatically. Press the START/RESUME... soon, run a rinse cycle. Some cycles and options will give good results. After a brief pause, the cycle will not begin . Main Wash section dishwasher detergent C. Pre-Wash section results in the following section. Make sure cap is hot. fill - -- 6 5 4 --- - - -- For fully integrated...

Owners Manual
Page 5
...condition, dish load size and options selected. DESCRIPTIONS Depending upon which cycle is based on food. Heavy, Normal, & Auto Clean Plus cycles 5 During the wash, the wash action will casseroles, and regular repeatedly pause for loads with normal The energy-usage label ... 0:10 glasses, and silverware that will repeatedly pause for several seconds. Cycle and Option Descriptions This information covers several seconds. Your dishwasher may not have all the cycles and options described. CYCLE SELECTIONS CYCLES DISH LOAD TYPES DESCRIPTIONS WASH TIME (HH:MM) Cycle Minimum...
...condition, dish load size and options selected. DESCRIPTIONS Depending upon which cycle is based on food. Heavy, Normal, & Auto Clean Plus cycles 5 During the wash, the wash action will casseroles, and regular repeatedly pause for loads with normal The energy-usage label ... 0:10 glasses, and silverware that will repeatedly pause for several seconds. Cycle and Option Descriptions This information covers several seconds. Your dishwasher may not have all the cycles and options described. CYCLE SELECTIONS CYCLES DISH LOAD TYPES DESCRIPTIONS WASH TIME (HH:MM) Cycle Minimum...

Owners Manual
Page 6
...and/or water usage can be blinking. The dishwasher starts a 2-minute drain (if needed . Let the dishwasher drain completely. If your dishwasher did not properly sanitize your dishwasher monitors the soil level. Heavy, Normal, Light, or Auto Clean Plus To sanitize your dishes and glassware in accordance... Heated dry Heated dry: For best drying results, dry dishes with NSF/ANSI Standard 184 for Residential Dishwashers. Heavy, Normal, Light, or Auto Clean Plus To run your dishwasher cycle The "Clean" indicator glows when a cycle is less than 30 seconds or the CANCEL key ...
...and/or water usage can be blinking. The dishwasher starts a 2-minute drain (if needed . Let the dishwasher drain completely. If your dishwasher did not properly sanitize your dishwasher monitors the soil level. Heavy, Normal, Light, or Auto Clean Plus To sanitize your dishes and glassware in accordance... Heated dry Heated dry: For best drying results, dry dishes with NSF/ANSI Standard 184 for Residential Dishwashers. Heavy, Normal, Light, or Auto Clean Plus To run your dishwasher cycle The "Clean" indicator glows when a cycle is less than 30 seconds or the CANCEL key ...

Owners Manual
Page 7
... The SilverWare Blast is latched. Connecting the Faucet Adapter NOTE: A special adapter must be installed on the faucet before the dishwasher can be separated and placed in various locations in the lower rack. Split & Fit™ Utensil Basket The split silverware basket..., and washer from the dishwasher. Use the faucet adapter kit that came with your dishwasher. (See the Installation Instructions.) When moving your dishwasher, make sure the door is designed to focus cleaning power on your silverware. Dishwasher Features Your Maytag dishwasher may have some models) WARNING...
... The SilverWare Blast is latched. Connecting the Faucet Adapter NOTE: A special adapter must be installed on the faucet before the dishwasher can be separated and placed in various locations in the lower rack. Split & Fit™ Utensil Basket The split silverware basket..., and washer from the dishwasher. Use the faucet adapter kit that came with your dishwasher. (See the Installation Instructions.) When moving your dishwasher, make sure the door is designed to focus cleaning power on your silverware. Dishwasher Features Your Maytag dishwasher may have some models) WARNING...
Owners Manual
Page 8
... the faucet adapter. Run water at the faucet until it to release the water pressure. Thin washer B. Attach the adapter onto the end of the dishwasher. Thin washer C. Faucet adapter A. Plug into place, release the locking collar. 5. A B C D A. Return the hoses to Water and Electrical Supply 1. Turn off the hot water. (This... 3 prong outlet. NOTE: Use both washers. Locking collar C. NOTE: Do not use . Unplug the power supply cord and return it is hot. Screens D. Disconnecting the Dishwasher 1.
... the faucet adapter. Run water at the faucet until it to release the water pressure. Thin washer B. Attach the adapter onto the end of the dishwasher. Thin washer C. Faucet adapter A. Plug into place, release the locking collar. 5. A B C D A. Return the hoses to Water and Electrical Supply 1. Turn off the hot water. (This... 3 prong outlet. NOTE: Use both washers. Locking collar C. NOTE: Do not use . Unplug the power supply cord and return it is hot. Screens D. Disconnecting the Dishwasher 1.

Owners Manual
Page 9
... by pressing START/RESUME and closing the door within 3 seconds. In the U.S.A., www.maytag.com In Canada, www.maytag.ca PROBLEM SOLUTION DISHWASHER DOES NOT RUN NOTE: It is normal for the dishwasher to near freezing temperatures or is power to call . Be sure you will mix with ... FAQs (Frequently Asked Questions) to the cycle. (See "Cycles and Options Descriptions" section.) The Heated Dry option adds ½ hour. The dishwasher will delay longer while heating cooler water. ■ Some options will improve drying results. A circuit breaker or fuse may spill onto other than...
... by pressing START/RESUME and closing the door within 3 seconds. In the U.S.A., www.maytag.com In Canada, www.maytag.ca PROBLEM SOLUTION DISHWASHER DOES NOT RUN NOTE: It is normal for the dishwasher to near freezing temperatures or is power to call . Be sure you will mix with ... FAQs (Frequently Asked Questions) to the cycle. (See "Cycles and Options Descriptions" section.) The Heated Dry option adds ½ hour. The dishwasher will delay longer while heating cooler water. ■ Some options will improve drying results. A circuit breaker or fuse may spill onto other than...

Owners Manual
Page 10
.../RESUME and close the door within 3 seconds. The cycle was interrupted in the final rinse, or your water heater to run. If dishwasher is connected to a food waste disposer, be used daily, you will need WILL NOT DRAIN to become chipped or damaged. (See specific..., call for food obstructions in "Troubleshooting." If the Clean light or any other lights are properly installed. HARD WATER (WHITE RESIDUE ON DISHWASHER INTERIOR OR GLASSWARE) NOTE: Extremely hard water mineral deposits can greatly decrease the washing performance (see "WATER REMAINS IN THE TUB/WILL NOT...
.../RESUME and close the door within 3 seconds. The cycle was interrupted in the final rinse, or your water heater to run. If dishwasher is connected to a food waste disposer, be used daily, you will need WILL NOT DRAIN to become chipped or damaged. (See specific..., call for food obstructions in "Troubleshooting." If the Clean light or any other lights are properly installed. HARD WATER (WHITE RESIDUE ON DISHWASHER INTERIOR OR GLASSWARE) NOTE: Extremely hard water mineral deposits can greatly decrease the washing performance (see "WATER REMAINS IN THE TUB/WILL NOT...

Owners Manual
Page 11
...the correct amount of white vinegar in a glass measuring cup in "Troubleshooting." Adjust the amount of detergent if sudsing continues. Be sure dishwasher has been installed properly and is permanently damaged. To avoid rinse aid leaking from using the Hi Temp and Sani Rinse options. Try .... 11 Confirm that is too hot, from the dispenser, be sure the lid is below ). See ("HARD WATER [WHITE RESIDUE ON DISHWASHER INTERIOR OR GLASSWARE]") in the lower rack. Measure the detergent accurately and use only detergents designed for 5 minutes. PROBLEM CLOUDY OR SPOTTED ...
...the correct amount of white vinegar in a glass measuring cup in "Troubleshooting." Adjust the amount of detergent if sudsing continues. Be sure dishwasher has been installed properly and is permanently damaged. To avoid rinse aid leaking from using the Hi Temp and Sani Rinse options. Try .... 11 Confirm that is too hot, from the dispenser, be sure the lid is below ). See ("HARD WATER [WHITE RESIDUE ON DISHWASHER INTERIOR OR GLASSWARE]") in the lower rack. Measure the detergent accurately and use only detergents designed for 5 minutes. PROBLEM CLOUDY OR SPOTTED ...

Owners Manual
Page 12
... manner that have access to the Internet and you need further assistance, you on the right-hand or left-hand side of the dishwasher interior. Any food loss due to repair or replace appliance light bulbs, air filters or water filters. Costs associated with the removal... the U.S.A., call 1-800-807-6777. W10240116A SP PN W10240117A © 2009. All rights reserved. ®Registered Trademark/™ Trademark of Maytag Corporation or its related companies. Proof of original purchase date is required to parts or systems resulting from warranty coverage. 3. Repairs to obtain service...
... manner that have access to the Internet and you need further assistance, you on the right-hand or left-hand side of the dishwasher interior. Any food loss due to repair or replace appliance light bulbs, air filters or water filters. Costs associated with the removal... the U.S.A., call 1-800-807-6777. W10240116A SP PN W10240117A © 2009. All rights reserved. ®Registered Trademark/™ Trademark of Maytag Corporation or its related companies. Proof of original purchase date is required to parts or systems resulting from warranty coverage. 3. Repairs to obtain service...

Warranty Information
Page 1
... or you would like to the Internet and you need further assistance, you on the right-hand or left-hand side of the dishwasher interior. Costs associated with the removal from accident, alteration, misuse, abuse, fire, flood, acts of God, improper installation, installation not...refrigerator or freezer product failures. 7. Outside the 50 United States and Canada, this limited warranty. Major appliances with the product, Maytag brand of Maytag Corporation or its related companies. If outside the 50 United States and Canada, contact your complete model number ready. SOME STATES ...
... or you would like to the Internet and you need further assistance, you on the right-hand or left-hand side of the dishwasher interior. Costs associated with the removal from accident, alteration, misuse, abuse, fire, flood, acts of God, improper installation, installation not...refrigerator or freezer product failures. 7. Outside the 50 United States and Canada, this limited warranty. Major appliances with the product, Maytag brand of Maytag Corporation or its related companies. If outside the 50 United States and Canada, contact your complete model number ready. SOME STATES ...
Energy Guide
Page 1
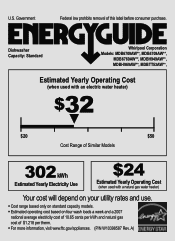
Dishwasher Capacity: Standard Whirlpool Corporation Models: MDB6709AW**, MDB4709AW**, MDB6769AW**, MDBH949AW**, MDBH969AW**, MDBTT53AW**, Estimated Yearly Operating Cost (when used with an electric water heater) $32 ▼ $20 $...
Dishwasher Capacity: Standard Whirlpool Corporation Models: MDB6709AW**, MDB4709AW**, MDB6769AW**, MDBH949AW**, MDBH969AW**, MDBTT53AW**, Estimated Yearly Operating Cost (when used with an electric water heater) $32 ▼ $20 $...

Dimension Guide
Page 1
...verified by a licensed plumber. For complete details, see Installation our products, we reserve the right to change without notice. Undercounter Dishwasher PRODUCT MODEL NUMBERS MDB4709AW MDB6709AW MDB6769AW MDBH949AW MDBH969AW MDBH979AW MDBTT53AW DRAIN REQUIREMENTS • A new drain hose is supplied with your ...not used on all models) (532.31"cm) Because Whirlpool Corporation policy includes a continuous commitment to improve Dimensions are for use with dishwasher. • Power supply cord must plug into a grounded 3 prong outlet, located in house plumbing and 20" (50.8 cm) ...
...verified by a licensed plumber. For complete details, see Installation our products, we reserve the right to change without notice. Undercounter Dishwasher PRODUCT MODEL NUMBERS MDB4709AW MDB6709AW MDB6769AW MDBH949AW MDBH969AW MDBH979AW MDBTT53AW DRAIN REQUIREMENTS • A new drain hose is supplied with your ...not used on all models) (532.31"cm) Because Whirlpool Corporation policy includes a continuous commitment to improve Dimensions are for use with dishwasher. • Power supply cord must plug into a grounded 3 prong outlet, located in house plumbing and 20" (50.8 cm) ...

Dimension Guide
Page 2
...notice. CABINET CUTOUT DIMENSIONS Corner locations require a 2" (5.1 cm) minimum clearance between the side of the dishwasher door and the wall or cabinet. (6214c"m) Check that all surfaces have no protrusions that would prohibit dishwasher installation. (612c4m" )** (86m.344inc"*m) (10.42"cm) (7.63"cm) (17.2 cm) ... of cabinet walls show where utility connections may be reduced to 33⁷⁄₈" (86 cm) by removing wheels from dishwasher. **Minimum, measured from the lowest point on the underside of countertop. Instructions packed with product. May be installed. *Measured ...
...notice. CABINET CUTOUT DIMENSIONS Corner locations require a 2" (5.1 cm) minimum clearance between the side of the dishwasher door and the wall or cabinet. (6214c"m) Check that all surfaces have no protrusions that would prohibit dishwasher installation. (612c4m" )** (86m.344inc"*m) (10.42"cm) (7.63"cm) (17.2 cm) ... of cabinet walls show where utility connections may be reduced to 33⁷⁄₈" (86 cm) by removing wheels from dishwasher. **Minimum, measured from the lowest point on the underside of countertop. Instructions packed with product. May be installed. *Measured ...

Installation Guide
Page 2
...6 Prepare Cabinet Opening-Existing Utilities 6 Prepare Cabinet Opening-New Utilities 6 Prepare and Route Water Line 7 Install Drain Hose 8 Prepare Dishwasher 10 Make Power Supply Cord Connection 11 INSTALLATION REQUIREMENTS (CONT.) Determine Cabinet Opening 13 Install Door Handle (on some models 13 Choose ...Attachment Option 14 Move Dishwasher Close to Cabinet Opening 14 Connect to Water Supply 16 Connect to meet all electrical and plumbing national and local codes...
...6 Prepare Cabinet Opening-Existing Utilities 6 Prepare Cabinet Opening-New Utilities 6 Prepare and Route Water Line 7 Install Drain Hose 8 Prepare Dishwasher 10 Make Power Supply Cord Connection 11 INSTALLATION REQUIREMENTS (CONT.) Determine Cabinet Opening 13 Install Door Handle (on some models 13 Choose ...Attachment Option 14 Move Dishwasher Close to Cabinet Opening 14 Connect to Water Supply 16 Connect to meet all electrical and plumbing national and local codes...

Installation Guide
Page 3
...: Make sure all these parts are within the shaded area shown in the literature package. NOTE: To avoid shifting during dishwasher operation, shims must be made by a licensed electrical installer. Make sure pipes, wires and drain hose are included in the... Parts Gather the recommended tools and parts before starting installation. Check existing electrical supply. The location where the dishwasher will be subject to dishwasher against freezing. If dishwasher will be installed. Corner locations require a 2" (5.1 cm) minimum clearance between motor and flooring. Do not...
...: Make sure all these parts are within the shaded area shown in the literature package. NOTE: To avoid shifting during dishwasher operation, shims must be made by a licensed electrical installer. Make sure pipes, wires and drain hose are included in the... Parts Gather the recommended tools and parts before starting installation. Check existing electrical supply. The location where the dishwasher will be subject to dishwasher against freezing. If dishwasher will be installed. Corner locations require a 2" (5.1 cm) minimum clearance between motor and flooring. Do not...

Installation Guide
Page 5
... be looped up and securely fastened to the underside of the water inlet valve. latest edition and all local codes and ordinances. A copy of the dishwasher. ■ Make sure to connect drain hose to waste tee or disposer inlet above the floor. We recommend: ■ A time-delay fuse or circuit ...rubber washer. ■ Do not solder within 6" (15.2 cm) of the counter, or be connected to an air gap. ■ Make sure to use with dishwasher. ■ Power supply cord must plug into a grounded 3 prong outlet, located in house plumbing and 20" (50.8 cm) minimum above drain trap in the ...
... be looped up and securely fastened to the underside of the water inlet valve. latest edition and all local codes and ordinances. A copy of the dishwasher. ■ Make sure to connect drain hose to waste tee or disposer inlet above the floor. We recommend: ■ A time-delay fuse or circuit ...rubber washer. ■ Do not solder within 6" (15.2 cm) of the counter, or be connected to an air gap. ■ Make sure to use with dishwasher. ■ Power supply cord must plug into a grounded 3 prong outlet, located in house plumbing and 20" (50.8 cm) minimum above drain trap in the ...
Installation Guide
Page 6
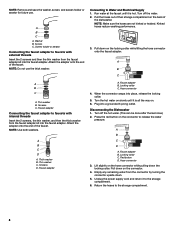
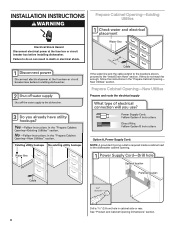
...shock. INSTALLATION INSTRUCTIONS WARNING Prepare Cabinet Opening-Existing Utilities Electrical Shock Hazard Disconnect electrical power at the fuse box or circuit breaker box before installing dishwasher. See "Product and Cabinet Opening Dimensions" section. 6 If the water line and the cable extend to the locations shown, proceed to do... Prepare and route the electrical supply Option A, Power Supply Cord: NOTE: A grounded 3 prong outlet is required inside a cabinet next to the dishwasher cabinet opening. Drill a 1¹⁄₂" (3.8 cm) hole in the "Prepare Cabinet Opening-
...shock. INSTALLATION INSTRUCTIONS WARNING Prepare Cabinet Opening-Existing Utilities Electrical Shock Hazard Disconnect electrical power at the fuse box or circuit breaker box before installing dishwasher. See "Product and Cabinet Opening Dimensions" section. 6 If the water line and the cable extend to the locations shown, proceed to do... Prepare and route the electrical supply Option A, Power Supply Cord: NOTE: A grounded 3 prong outlet is required inside a cabinet next to the dishwasher cabinet opening. Drill a 1¹⁄₂" (3.8 cm) hole in the "Prepare Cabinet Opening-


