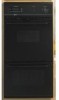

Owners Manual
Page 2
...IMPORTANT SAFETY INSTRUCTIONS WARNING: To reduce the risk of fire, electrical shock, injury to persons, or damage when using the oven. ■ User Servicing - Build-up of California to cause...around any part of our website at www.maytag.com for a good seal. Moist or damp potholders on Grease Fires - Always place oven racks in the manual. Refer to rub... heating elements or interior surfaces of oven doors. Flammable materials should be worn while using the oven, follow basic precautions, including the following: ■ Proper Installation - Do not use dry chemical ...
...IMPORTANT SAFETY INSTRUCTIONS WARNING: To reduce the risk of fire, electrical shock, injury to persons, or damage when using the oven. ■ User Servicing - Build-up of California to cause...around any part of our website at www.maytag.com for a good seal. Moist or damp potholders on Grease Fires - Always place oven racks in the manual. Refer to rub... heating elements or interior surfaces of oven doors. Flammable materials should be worn while using the oven, follow basic precautions, including the following: ■ Proper Installation - Do not use dry chemical ...

Owners Manual
Page 8
...home service is contrary to Maytag within 30 days from the date of your major appliance, unless such damage results from defects in materials or workmanship and is not installed in accordance with the ... information for factory specified parts and repair labor to instruct you on the oven frame behind the broiler door. Any food loss due to determine if another warranty applies. ...or cannot be provided by an authorized Maytag servicer is operated and maintained according to instructions attached to or furnished with electrical or plumbing codes, or use your correspondence.
...home service is contrary to Maytag within 30 days from the date of your major appliance, unless such damage results from defects in materials or workmanship and is not installed in accordance with the ... information for factory specified parts and repair labor to instruct you on the oven frame behind the broiler door. Any food loss due to determine if another warranty applies. ...or cannot be provided by an authorized Maytag servicer is operated and maintained according to instructions attached to or furnished with electrical or plumbing codes, or use your correspondence.

Installation Instructions
Page 1
... or seriously injured if you and others are not followed. INSTALLATION INSTRUCTIONS 24" (61.0 CM) ELECTRIC SINGLE AND DOUBLE BUILT-IN OVEN Table of Contents BUILT-IN OVEN SAFETY 1 INSTALLATION REQUIREMENTS 2 Tools and Parts 2 Location Requirements 2 Electrical Requirements 3 INSTALLATION INSTRUCTIONS 4 Prepare Built-In Oven 4 Oven Door 4 Make Electrical Connection 5 Install Oven 7 Complete Installation 8 BUILT-IN OVEN SAFETY Your safety and the safety of injury, and tell...
... or seriously injured if you and others are not followed. INSTALLATION INSTRUCTIONS 24" (61.0 CM) ELECTRIC SINGLE AND DOUBLE BUILT-IN OVEN Table of Contents BUILT-IN OVEN SAFETY 1 INSTALLATION REQUIREMENTS 2 Tools and Parts 2 Location Requirements 2 Electrical Requirements 3 INSTALLATION INSTRUCTIONS 4 Prepare Built-In Oven 4 Oven Door 4 Make Electrical Connection 5 Install Oven 7 Complete Installation 8 BUILT-IN OVEN SAFETY Your safety and the safety of injury, and tell...

Installation Instructions
Page 2
... oven (4), double oven (6) Check local codes. Product Dimensions - See "Electrical Requirements" section. ■ Electrical supply junction box should be located in Cabinet A B F D E C A. 24" (61 cm) min. See "Electrical Requirements." Location Requirements IMPORTANT: Observe all governing codes and ordinances. ■ Cabinet opening dimensions that all electrical connections be used. Read and follow the instructions provided with oven. ■ Recessed installation area...
... oven (4), double oven (6) Check local codes. Product Dimensions - See "Electrical Requirements" section. ■ Electrical supply junction box should be located in Cabinet A B F D E C A. 24" (61 cm) min. See "Electrical Requirements." Location Requirements IMPORTANT: Observe all governing codes and ordinances. ■ Cabinet opening dimensions that all electrical connections be used. Read and follow the instructions provided with oven. ■ Recessed installation area...

Installation Instructions
Page 3
...(3.8 cm) top of the above code standards can be connected to the proper electrical voltage and frequency as specified on the model/serial number rating plate. Double or Single Oven A B E C D A. 24"(61 cm) min. A copy of cutout to floor D. 22³⁄₈..., permanent wiring system. bottom of electrical connection you are not sure the oven is properly grounded. Check with local codes. Double Oven A B E D C A. 22¹⁄₄" (56.5 cm) max. Double Oven Double Oven Installed in accordance with a qualified electrical installer if you will be connected to...
...(3.8 cm) top of the above code standards can be connected to the proper electrical voltage and frequency as specified on the model/serial number rating plate. Double or Single Oven A B E C D A. 24"(61 cm) min. A copy of cutout to floor D. 22³⁄₈..., permanent wiring system. bottom of electrical connection you are not sure the oven is properly grounded. Check with local codes. Double Oven A B E D C A. 22¹⁄₄" (56.5 cm) max. Double Oven Double Oven Installed in accordance with a qualified electrical installer if you will be connected to...

Installation Instructions
Page 4
... the door by pulling it forward. A A Single Oven A. Model/serial number plate Double Oven A. Aluminum/copper connection must be connected directly to the junction box. ■ Do not cut the conduit. INSTALLATION INSTRUCTIONS Prepare Built-In Oven 1. Excessive Weight Hazard Use two or more people to...listed for the oven. Move oven and cardboard close to move and install oven. Locate existing wiring to do so can result in back or other parts from inside the oven. 6. The length of conduit provided is recommended. ■ Connect directly to 6 inches). IMPORTANT: ...
... the door by pulling it forward. A A Single Oven A. Model/serial number plate Double Oven A. Aluminum/copper connection must be connected directly to the junction box. ■ Do not cut the conduit. INSTALLATION INSTRUCTIONS Prepare Built-In Oven 1. Excessive Weight Hazard Use two or more people to...listed for the oven. Move oven and cardboard close to move and install oven. Locate existing wiring to do so can result in back or other parts from inside the oven. 6. The length of conduit provided is recommended. ■ Connect directly to 6 inches). IMPORTANT: ...

Installation Instructions
Page 5
... conduit from Home A Power Supply A. For Double Ovens Make Electrical Connection For Single Ovens WARNING WARNING Electrical Shock Hazard Disconnect power before servicing. Use 12 gauge solid copper wire. Electrically ground oven. See "Electrical Connection Options Chart" to follow these instructions can result in death, fire, or electrical shock. Failure to complete installation for your home has: Go to the...
... conduit from Home A Power Supply A. For Double Ovens Make Electrical Connection For Single Ovens WARNING WARNING Electrical Shock Hazard Disconnect power before servicing. Use 12 gauge solid copper wire. Electrically ground oven. See "Electrical Connection Options Chart" to follow these instructions can result in death, fire, or electrical shock. Failure to complete installation for your home has: Go to the...

Installation Instructions
Page 6
... 2 white wires (D) and the green (or bare) ground wire (of the oven cable) using a UL listed wire connector. 5. where local codes do not allow grounding through neutral, New Branch circuit installations (1996 NEC), mobile homes and recreational vehicles, new construction and in the U.S. ...Red wires H. Junction box F. Untwist white wire from green (or bare) ground wire coming from oven G. Install junction box cover. 3-Wire Cable from home power supply B. Cable from Home Power Supply - Connect the 2 white wires (F) together using ...
... 2 white wires (D) and the green (or bare) ground wire (of the oven cable) using a UL listed wire connector. 5. where local codes do not allow grounding through neutral, New Branch circuit installations (1996 NEC), mobile homes and recreational vehicles, new construction and in the U.S. ...Red wires H. Junction box F. Untwist white wire from green (or bare) ground wire coming from oven G. Install junction box cover. 3-Wire Cable from home power supply B. Cable from Home Power Supply - Connect the 2 white wires (F) together using ...

Installation Instructions
Page 7
... pilot holes before driving screws. A Use the oven opening as you purchased your oven. 7 Push oven completely into cabinet and center oven into cabinet. Decorative trim B. Grasp sides of the door and align slots in decorative trim. Repeat for double oven) provided. If display panel does not light, ... or more people, lift oven partially into cabinet cutout. Insert the screws through holes in door with the hinge arms. 6. Close door. 9. A. Slightly pull the door open as an area to move and install oven. Using 2 or more people to grip. Install Oven 3. Gently push the door...
... pilot holes before driving screws. A Use the oven opening as you purchased your oven. 7 Push oven completely into cabinet and center oven into cabinet. Decorative trim B. Grasp sides of the door and align slots in decorative trim. Repeat for double oven) provided. If display panel does not light, ... or more people, lift oven partially into cabinet cutout. Insert the screws through holes in door with the hinge arms. 6. Close door. 9. A. Slightly pull the door open as an area to move and install oven. Using 2 or more people to grip. Install Oven 3. Gently push the door...

Installation Instructions
Page 8
... "Assistance or Service" section of Maytag Corporation or its related companies. 7/08 Printed in the Use and Care Guide. 4. Check Operation of /recycle all parts are now installed. If you purchased your tools. 3. Check that the oven door(s) is an extra part, go... steps to see which step was skipped. 2. The time should flash in the display. ■ Electrical supply is intact and tight; Turn on the oven(s) Broil function. Complete Installation 1. Dispose of Oven(s) 1. See the User Instructions for heat. W10203506A © 2008 All rights reserved. ®Registered...
... "Assistance or Service" section of Maytag Corporation or its related companies. 7/08 Printed in the Use and Care Guide. 4. Check Operation of /recycle all parts are now installed. If you purchased your tools. 3. Check that the oven door(s) is an extra part, go... steps to see which step was skipped. 2. The time should flash in the display. ■ Electrical supply is intact and tight; Turn on the oven(s) Broil function. Complete Installation 1. Dispose of Oven(s) 1. See the User Instructions for heat. W10203506A © 2008 All rights reserved. ®Registered...
Dimension Guide
Page 1
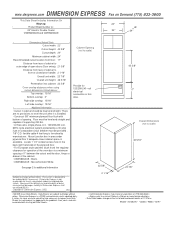
... This Data Sheet Includes Information On Maytag • Product Model Number (s): • 24" Electric Double Ovens: CWE5800ACB and CWE5800ACE 24" 22" 24" • Dimensions (Actual Size) • Cutout width: 22" Cutout height: 45 3/8" Cutout depth: 24" Minimum cabinet width: 24" Recommended cutout location from floor :...level and straight. flexible cable 4 feet long is not responsible for operation of the oven door is available. This system is updated daily, it is installed. • Construct 5/8" minimum plywood floor flush with reusing old Data Sheets. 2 1/...
... This Data Sheet Includes Information On Maytag • Product Model Number (s): • 24" Electric Double Ovens: CWE5800ACB and CWE5800ACE 24" 22" 24" • Dimensions (Actual Size) • Cutout width: 22" Cutout height: 45 3/8" Cutout depth: 24" Minimum cabinet width: 24" Recommended cutout location from floor :...level and straight. flexible cable 4 feet long is not responsible for operation of the oven door is available. This system is updated daily, it is installed. • Construct 5/8" minimum plywood floor flush with reusing old Data Sheets. 2 1/...

Warranty Information
Page 1
... If you need assistance using your major appliance if it is installed in a remote area where service by a Maytag designated service company. Outside the 50 United States and Canada, this... the number below : Maytag Brand Home Appliances Customer eXperience Center 553 Benson Road Benton Harbor, MI 49022-2692 Please include a daytime phone number in accordance with electrical or plumbing codes, or... For additional product information, visit www.maytag.com. DISCLAIMER OF IMPLIED WARRANTIES; Proof of your major appliance, to instruct you on the oven frame behind the broiler door. The ...
... If you need assistance using your major appliance if it is installed in a remote area where service by a Maytag designated service company. Outside the 50 United States and Canada, this... the number below : Maytag Brand Home Appliances Customer eXperience Center 553 Benson Road Benton Harbor, MI 49022-2692 Please include a daytime phone number in accordance with electrical or plumbing codes, or... For additional product information, visit www.maytag.com. DISCLAIMER OF IMPLIED WARRANTIES; Proof of your major appliance, to instruct you on the oven frame behind the broiler door. The ...

